Interlift ILK - It works! - Palfinger
Interlift ILK - It works! - Palfinger
Interlift ILK - It works! - Palfinger

Create successful ePaper yourself
Turn your PDF publications into a flip-book with our unique Google optimized e-Paper software.
6 Electrical Installation <strong>ILK</strong> PLUS INSTALLATION MANUAL<br />
Inspect and test all electrical connections, wiring and the different functions to make sure<br />
that the electrical installation is complete.<br />
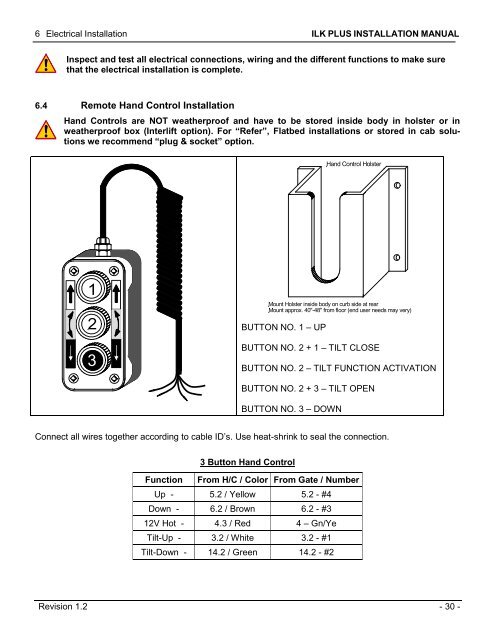
6.4 Remote Hand Control Installation<br />
Hand Controls are NOT weatherproof and have to be stored inside body in holster or in<br />
weatherproof box (<strong>Interlift</strong> option). For “Refer”, Flatbed installations or stored in cab solutions<br />
we recommend “plug & socket” option.<br />
1<br />
2<br />
3<br />
Hand Control Holster<br />
Mount Holster inside body on curb side at rear<br />
Mount approx. 40"-48" from floor (end user needs may very)<br />
BUTTON NO. 1 – UP<br />
BUTTON NO. 2 + 1 – TILT CLOSE<br />
BUTTON NO. 2 – TILT FUNCTION ACTIVATION<br />
BUTTON NO. 2 + 3 – TILT OPEN<br />
BUTTON NO. 3 – DOWN<br />
Connect all wires together according to cable ID‟s. Use heat-shrink to seal the connection.<br />
3 Button Hand Control<br />
Function From H/C / Color From Gate / Number<br />
Up - 5.2 / Yellow 5.2 - #4<br />
Down - 6.2 / Brown 6.2 - #3<br />
12V Hot - 4.3 / Red 4 – Gn/Ye<br />
Tilt-Up - 3.2 / White 3.2 - #1<br />
Tilt-Down - 14.2 / Green 14.2 - #2<br />
Revision 1.2 - 30 -