Interlift ILK - It works! - Palfinger
Interlift ILK - It works! - Palfinger
Interlift ILK - It works! - Palfinger

Create successful ePaper yourself
Turn your PDF publications into a flip-book with our unique Google optimized e-Paper software.
6 Electrical Installation <strong>ILK</strong> PLUS INSTALLATION MANUAL<br />
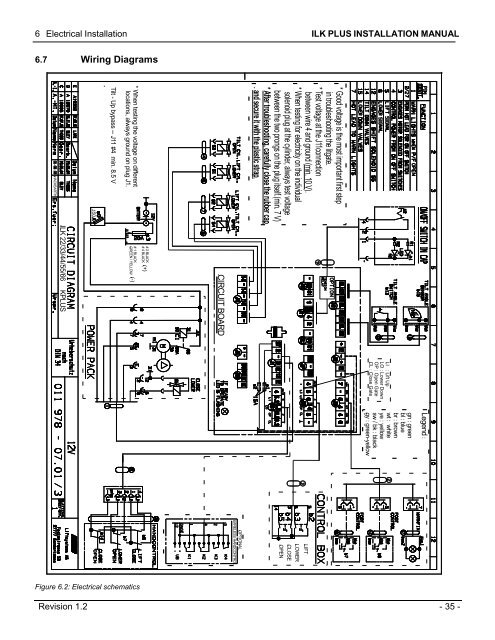
6.7 Wiring Diagrams<br />
HACKBARTH<br />
<strong>ILK</strong> 22/33/44/55/66 KPLUS<br />
Figure 6.2: Electrical schematics<br />
150<br />
Tilt - Up bypass -- J11 #4 min. 8.5 V<br />
* When testing the voltage on different<br />
locations, always ground on plug J1.<br />
# 1 BLACK<br />
GREEN / YELLOW<br />
(-)<br />
# 2 BLACK<br />
# 4 BLACK<br />
(+)<br />
CIRCUIT BOARD<br />
WIRELESS HANDCONTROL<br />
OPTIONAL<br />
Revision 1.2 - 35 -<br />
* After troubleshooting, carefully close the rubber cap<br />
and secure it with the plastic strap.<br />
* Good voltage is the most important first step<br />
in troubleshooting the litgate.<br />
* Test voltage at the J11connection<br />
between wire 4 and ground (min. 10 V).<br />
* When testing for electricity on the individual<br />
solenoid plug at the cylinder, always test voltage<br />
between the two prongs on the plug itself.(min. 7 V)<br />
LOWER<br />
CLOSE<br />
OPEN<br />
LIFT<br />
gn : green<br />
bl : blue<br />
br : brown<br />
wt : white<br />
ye : yellow<br />
sw / bk : black<br />
gy : green-yellow<br />
LI : Lift Up<br />
LO : Lower Down<br />
OP : Open Gate<br />
CL : Close Gate<br />
Legend :