3 Your First Session: Quickstart - SiliconCOACH
3 Your First Session: Quickstart - SiliconCOACH
3 Your First Session: Quickstart - SiliconCOACH

You also want an ePaper? Increase the reach of your titles
YUMPU automatically turns print PDFs into web optimized ePapers that Google loves.
18 TimeWarp 4 User Manual<br />
3 <strong>Your</strong> <strong>First</strong> <strong>Session</strong>: <strong>Quickstart</strong><br />
This section is all about getting going in the software as quickly as possible.<br />
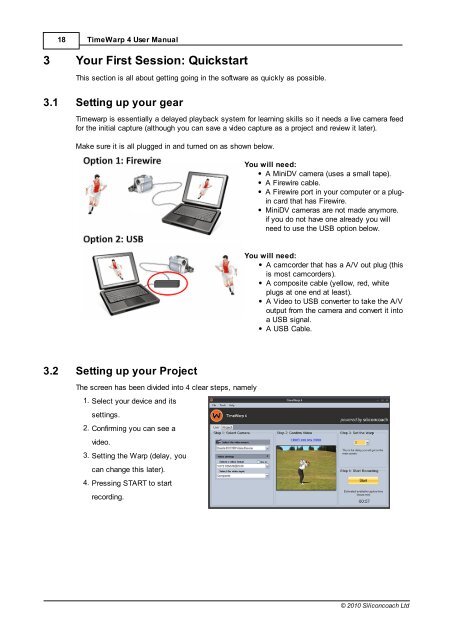
3.1 Setting up your gear<br />
Timewarp is essentially a delayed playback system for learning skills so it needs a live camera feed<br />
for the initial capture (although you can save a video capture as a project and review it later).<br />
Make sure it is all plugged in and turned on as shown below.<br />
3.2 Setting up your Project<br />
The screen has been divided into 4 clear steps, namely<br />
1. Select your device and its<br />
settings.<br />
2. Confirming you can see a<br />
video.<br />
3. Setting the Warp (delay, you<br />
can change this later).<br />
4. Pressing START to start<br />
recording.<br />
You will need:<br />
A MiniDV camera (uses a small tape).<br />
A Firewire cable.<br />
A Firewire port in your computer or a plugin<br />
card that has Firewire.<br />
MiniDV cameras are not made anymore.<br />
if you do not have one already you will<br />
need to use the USB option below.<br />
You will need:<br />
A camcorder that has a A/V out plug (this<br />
is most camcorders).<br />
A composite cable (yellow, red, white<br />
plugs at one end at least).<br />
A Video to USB converter to take the A/V<br />
output from the camera and convert it into<br />
a USB signal.<br />
A USB Cable.<br />
© 2010 Siliconcoach Ltd