3 Your First Session: Quickstart - SiliconCOACH
3 Your First Session: Quickstart - SiliconCOACH
3 Your First Session: Quickstart - SiliconCOACH

You also want an ePaper? Increase the reach of your titles
YUMPU automatically turns print PDFs into web optimized ePapers that Google loves.
30 TimeWarp 4 User Manual<br />
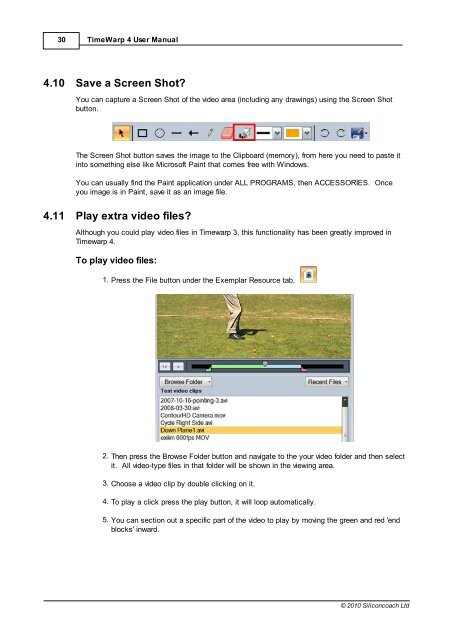
4.10 Save a Screen Shot?<br />
You can capture a Screen Shot of the video area (including any drawings) using the Screen Shot<br />
button.<br />
The Screen Shot button saves the image to the Clipboard (memory), from here you need to paste it<br />
into something else like Microsoft Paint that comes free with Windows.<br />
You can usually find the Paint application under ALL PROGRAMS, then ACCESSORIES. Once<br />
you image is in Paint, save it as an image file.<br />
4.11 Play extra video files?<br />
Although you could play video files in Timewarp 3, this functionality has been greatly improved in<br />
Timewarp 4.<br />
To play video files:<br />
1. Press the File button under the Exemplar Resource tab.<br />
2. Then press the Browse Folder button and navigate to the your video folder and then select<br />
it. All video-type files in that folder will be shown in the viewing area.<br />
3. Choose a video clip by double clicking on it.<br />
4. To play a click press the play button, it will loop automatically.<br />
5. You can section out a specific part of the video to play by moving the green and red 'end<br />
blocks' inward.<br />
© 2010 Siliconcoach Ltd