TT-3000E mini-C GMDSS User Manual - Polaris-as.dk
TT-3000E mini-C GMDSS User Manual - Polaris-as.dk
TT-3000E mini-C GMDSS User Manual - Polaris-as.dk

Create successful ePaper yourself
Turn your PDF publications into a flip-book with our unique Google optimized e-Paper software.
SAILOR®<br />
by Thrane & Thrane<br />
<strong>TT</strong>-<strong>3000E</strong> <strong>mini</strong>-C <strong>GMDSS</strong><br />
<strong>User</strong> <strong>Manual</strong><br />
Copyright © Thrane & Thrane A/S<br />
ALL RIGHTS RESERVED<br />
2007, Thrane & Thrane A/S<br />
Information in this document is subject to change<br />
without notice and does not represent a commitment<br />
on the part of Thrane & Thrane A/S.<br />
Document number: <strong>TT</strong> 98-122464 Revision: C<br />
Rele<strong>as</strong>e Date: December 5, 2007
This page is intentionally left blank
SAFETY SUMMARY<br />
The following general safety precautions must be observed<br />
during all ph<strong>as</strong>es of operation, service and repair of this<br />
equipment. Failure to comply with these precautions or with<br />
specific warnings elsewhere in this manual violates safety<br />
standards of design, manufacture and intended use of the<br />
equipment<br />
Thrane & Thrane A/S <strong>as</strong>sume no liability for the customer’s<br />
failure to comply with these requirements.<br />
MICROWAVE RADIATION HAZARDS<br />
During transmission this unit radiates microwaves from the<br />
antenna. This radiation may be hazardous to humans if they<br />
are exposed to it directly at short distances from the antenna.<br />
During transmission, make sure that nobody is closer than the<br />
recommended <strong>mini</strong>mum safety distance of 1 ft. (0.3 meter).<br />
KEEP AWAY FROM LIVE CIRCUITS<br />
Operating personnel must not remove equipment covers. Only<br />
qualified maintenance personnel must make component<br />
replacement and internal adjustment. Under certain<br />
conditions, dangerous voltages may exist even with the power<br />
cable removed. To avoid injuries, always disconnect power<br />
and discharge circuits before touching them.<br />
SAFETY AT SEA<br />
Use the e<strong>as</strong>yTrack transceiver in connection with a display<br />
device (e.g. a personal computer with E<strong>as</strong>yMail or a Message<br />
Terminal) to incre<strong>as</strong>e safety at sea. Without a display terminal<br />
you will be unable to display meteorological, navigational and<br />
SAR messages, distress alert relays <strong>as</strong> well <strong>as</strong> commercial<br />
messages.
<strong>TT</strong>-<strong>3000E</strong> <strong>mini</strong>-C <strong>GMDSS</strong> <strong>User</strong> <strong>Manual</strong><br />
This page is intentionally left blank<br />
4
<strong>TT</strong>-<strong>3000E</strong> <strong>mini</strong>-C <strong>GMDSS</strong> <strong>User</strong> <strong>Manual</strong><br />
LIST OF CONTENTS:<br />
1 SCOPE AND PURPOSE.........................................11<br />
1.1 Related Documents ......................................... 11<br />
1.2 Abbreviations and terms ................................. 12<br />
2 SYSTEM DESCRIPTION .......................................15<br />
3 INTRODUCTION TO INMARSAT-C .........................17<br />
3.1 System overview.............................................. 17<br />
3.2 Services ........................................................... 20<br />
3.2.1 Messages ...................................................... 20<br />
3.2.2 Broadc<strong>as</strong>ts .................................................... 21<br />
3.2.3 Position reporting ........................................ 21<br />
3.2.4 Polling .......................................................... 23<br />
3.3 Safety and distress capabilities....................... 24<br />
4 THE DISTRESS ALERT INSTALLATION.....................30<br />
4.1 Sending distress .............................................. 30<br />
4.2 Other buzzer indications ................................ 31<br />
5 MESSAGE TERMINAL OPERATION.........................33<br />
5.1 B<strong>as</strong>ic Concepts ................................................ 33<br />
5.1.1 Special Keys on the Keyboard ...................... 34<br />
5.2 First Time with Capsat .................................... 37<br />
5.2.1 Power On ...................................................... 38<br />
5.2.2 Commissioning............................................. 39<br />
5.2.3 Sending a Test Message................................ 39<br />
5.3 Capsat Text Editor ........................................... 42<br />
5.3.1 The Editor Window ....................................... 42<br />
5.3.2 Creating a Message....................................... 43<br />
5.3.3 Typing in Text .............................................. 44<br />
5.3.4 Moving the Insertion Point (Cursor) ............. 44<br />
5.3.5 Saving Your Work ........................................ 45<br />
5.3.6 Opening an Existing Message ....................... 46<br />
5.3.7 Revising a Message....................................... 46<br />
5.3.8 Typing over Text .......................................... 47<br />
5.3.9 Selecting a Block of Text .............................. 47<br />
5
<strong>TT</strong>-<strong>3000E</strong> <strong>mini</strong>-C <strong>GMDSS</strong> <strong>User</strong> <strong>Manual</strong><br />
5.3.10 Moving Text........................................... 48<br />
5.3.11 Copying Text ......................................... 48<br />
5.3.12 Deleting Selected Text........................... 49<br />
5.3.13 Finding and Replacing Text ................... 49<br />
5.3.14 Finding Text .......................................... 49<br />
5.3.15 Replacing Text....................................... 49<br />
5.3.16 Printing.................................................. 50<br />
5.3.17 Customising the Editor.......................... 50<br />
5.4 Capsat Address Book ...................................... 51<br />
5.4.1 Address Book Window ................................. 52<br />
5.4.2 Address Book Facilities ................................ 54<br />
5.4.3 Inserting a New Destination......................... 55<br />
5.4.4 Accessing the Different Networks................ 57<br />
5.5 Capsat ............................................................. 58<br />
5.5.1 Transmission ............................................... 58<br />
5.5.2 Destinations................................................. 58<br />
5.5.3 Presentation ................................................. 58<br />
5.5.4 The Transmit Window.................................. 60<br />
5.5.5 Transmitting a Message ............................... 61<br />
5.5.6 Transmitting an Email.................................. 62<br />
5.5.7 Selecting a File for Transmission................. 64<br />
5.5.8 Scheduling a File for later Transmission ..... 64<br />
5.5.9 Printing a Message on Transmission............ 65<br />
5.5.10 P<strong>as</strong>sword Protection .............................. 65<br />
5.5.11 Aborting a transmission ........................ 65<br />
5.5.12 Transmit Log ......................................... 66<br />
5.5.13 The Transmit Log Facilities ................... 69<br />
5.5.14 Sending a Message Again....................... 69<br />
5.5.15 Reception............................................... 70<br />
5.5.16 Message Routing.................................... 71<br />
5.5.17 Receive Log............................................ 72<br />
5.5.18 The Receive Log Facilities ..................... 73<br />
5.5.19 Requesting Mail ..................................... 73<br />
5.5.20 Enhanced Group Call (EGC).................... 74<br />
5.5.21 The EGC Window ................................... 77<br />
5.5.22 EGC Log ................................................. 78<br />
6
<strong>TT</strong>-<strong>3000E</strong> <strong>mini</strong>-C <strong>GMDSS</strong> <strong>User</strong> <strong>Manual</strong><br />
5.5.23 ENID - EGC Network ID........................... 79<br />
5.5.24 Distress .................................................. 80<br />
5.5.25 Sending a detailed Distress Message. .... 81<br />
5.5.26 Position & GPS........................................ 82<br />
5.5.27 Setting the Position................................ 84<br />
5.5.28 Position Reporting ................................. 84<br />
5.5.29 Setting up Position Reports ................... 85<br />
5.5.30 Checking the Reporting Functions......... 89<br />
5.5.31 Ocean Region Management .................... 90<br />
5.5.32 Scan........................................................ 90<br />
5.5.33 Login ...................................................... 90<br />
5.5.34 Logout.................................................... 91<br />
5.5.35 Miscellaneous......................................... 91<br />
5.5.36 NMEA-out ............................................... 91<br />
5.5.37 Link Test ................................................ 93<br />
5.5.38 Polling .................................................... 94<br />
5.5.39 DNID - The Data Network ID .................. 95<br />
5.5.40 NCS Channels......................................... 96<br />
5.5.41 Transceiver Status Information ............. 97<br />
5.5.42 GPS Status Information .......................... 97<br />
5.5.43 P<strong>as</strong>sword................................................ 97<br />
5.5.44 Test Mode .............................................. 99<br />
5.5.45 Terminal Mode ....................................... 99<br />
5.5.46 Message Log ......................................... 100<br />
5.5.47 Inspecting Old Message Logs ............... 101<br />
5.5.48 About... ................................................ 102<br />
5.5.49 Internet Mail......................................... 102<br />
5.6 Directory ....................................................... 105<br />
5.6.1 The Directory Window................................ 105<br />
5.6.2 The Directory Facilities .............................. 106<br />
5.7 System........................................................... 109<br />
5.7.1 Moving Windows ........................................ 109<br />
5.7.2 Changing Colours....................................... 111<br />
5.7.3 Setting Display Options.............................. 113<br />
5.7.4 Configuring the Serial Port......................... 115<br />
5.7.5 Using Com2 ................................................ 116<br />
7
<strong>TT</strong>-<strong>3000E</strong> <strong>mini</strong>-C <strong>GMDSS</strong> <strong>User</strong> <strong>Manual</strong><br />
5.7.6 Configuring the Printer.............................. 117<br />
5.7.7 Setting the System Clock ........................... 118<br />
5.7.8 Formatting a Floppy Disk........................... 119<br />
5.7.9 Configuring the Macro Key’s...................... 119<br />
5.7.10 Record a Macro .................................... 121<br />
5.7.11 Deleting a Macro.................................. 122<br />
6 TROUBLE SHOOTING .......................................124<br />
7 GE<strong>TT</strong>ING FURTHER INFORMATION .....................125<br />
8 TRANSMISSION ERROR CODES...........................126<br />
LIST OF FIGURES:<br />
Figure 1. <strong>TT</strong>-<strong>3000E</strong> Mini-C <strong>GMDSS</strong> System overview ..........16<br />
Figure 2 Registration at NCS...............................................18<br />
Figure 3 Data transmission using LES ................................19<br />
Figure 4 Inmarsat-C position reporting ..............................22<br />
Figure 5 B<strong>as</strong>ic Concept .......................................................33<br />
Figure 6 The Editor Window ...............................................42<br />
Figure 7 Opening an Existing Message ...............................46<br />
Figure 8 Selecting a Block of Text.......................................47<br />
Figure 9 Customising the Editor.........................................51<br />
Figure 10 Address Book Window ........................................52<br />
Figure 11 The Transmit Window ........................................60<br />
Figure 12 Transmitting a Message......................................62<br />
Figure 13 Transmit Email Window......................................63<br />
Figure 14 Transmit Log ......................................................66<br />
Figure 15 Resubmit Message ..............................................70<br />
Figure 16Message Routing..................................................71<br />
Figure 17 Receive Log.........................................................72<br />
Figure 18 Requesting Mail ..................................................74<br />
Figure 19 The EGC Window ................................................77<br />
Figure 20 Setting Distress Message Window.......................80<br />
Figure 21 Setting the Position ............................................84<br />
8
<strong>TT</strong>-<strong>3000E</strong> <strong>mini</strong>-C <strong>GMDSS</strong> <strong>User</strong> <strong>Manual</strong><br />
Figure 22 Data Reporting ................................................... 85<br />
Figure 23 Setting up Data Reporting.................................. 86<br />
Figure 24 Setting Ocean Area on Data Reporting ............... 87<br />
Figure 25 Changing Status on Data Reporting ................... 87<br />
Figure 26 Reporting Interval .............................................. 88<br />
Figure 27 Starting Data Reporting...................................... 88<br />
Figure 28 Data Reporting Program Details......................... 89<br />
Figure 29 P<strong>as</strong>word needed message................................... 98<br />
Figure 30 Test Mode........................................................... 99<br />
Figure 31 Old Message Logs............................................. 102<br />
Figure 32 InternetMail Configuration Menu..................... 103<br />
Figure 33 Directory Window ............................................ 105<br />
Figure 34 Moving Windows .............................................. 110<br />
Figure 35 Changing Colours............................................. 112<br />
Figure 36 Setting Display Options ................................... 113<br />
Figure 37 Configuring the Serial Port............................... 116<br />
Figure 38 Macro Configuration Menu............................... 120<br />
Figure 39 Start Recording Macro..................................... 122<br />
LIST OF TABLES:<br />
Table 1 Related documents................................................ 12<br />
Table 2 Abbreviations and terms....................................... 13<br />
Table 3 Message Priority .................................................... 61<br />
Table 4 Message Transmission Status................................ 68<br />
Table 5 Enhanced Group Call (EGC) ................................... 76<br />
Table 6 EGC priority........................................................... 79<br />
Table 7 GPS Status ............................................................. 83<br />
Table 8 Transmission Error Codes................................... 127<br />
9
<strong>TT</strong>-<strong>3000E</strong> <strong>mini</strong>-C <strong>GMDSS</strong> <strong>User</strong> <strong>Manual</strong><br />
This page is intentionally left blank<br />
10
<strong>TT</strong>-<strong>3000E</strong> <strong>mini</strong>-C <strong>GMDSS</strong> <strong>User</strong> <strong>Manual</strong><br />
1 SCOPE AND PURPOSE<br />
The purpose of this document is to describe the <strong>TT</strong><strong>3000E</strong><br />
Mini-c <strong>GMDSS</strong> system and how the system is operated. For<br />
description of installation and other <strong>as</strong>pects of the system<br />
read the documents listed in section 1.1 Related<br />
Documents. For access to these manuals ple<strong>as</strong>e contact the<br />
local distributor.<br />
1.1 RELATED DOCUMENTS<br />
Looking for Ple<strong>as</strong>e read<br />
Detailed description of the<br />
installation of the <strong>GMDSS</strong><br />
system.<br />
Detailed description of<br />
RS232 interface to the<br />
e<strong>as</strong>yTrack MES.<br />
Detailed description of the<br />
Land Earth Station PSDN<br />
interface<br />
Detailed description of the<br />
Land Earth Station Internet<br />
interface<br />
Something not described in<br />
any of the above listed<br />
documents<br />
[1] <strong>TT</strong>98-122414, <strong>TT</strong>-<strong>3000E</strong><br />
<strong>mini</strong>-C <strong>GMDSS</strong> System<br />
Installation <strong>Manual</strong><br />
[2] <strong>TT</strong> 98-116080, <strong>TT</strong>-3026<br />
Software Interface<br />
Reference <strong>Manual</strong><br />
[3] <strong>TT</strong> 99-103879, PSDN<br />
<strong>User</strong> Interface <strong>Manual</strong><br />
[4] <strong>TT</strong> 99-110036, Internet<br />
Gateway <strong>User</strong> <strong>Manual</strong><br />
[5] www.thrane.com tells<br />
how to contact the local<br />
Thrane & Thrane distributor<br />
for further <strong>as</strong>sistance.<br />
AP5042 Alarm Panel [6] <strong>TT</strong> 98-125064 AP5042<br />
Alarm Panel Installation and<br />
<strong>User</strong> <strong>Manual</strong><br />
AP5065 Alarm Panel [7] <strong>TT</strong> 98-125065 AP5065<br />
Alarm Panel Installation<br />
11
<strong>TT</strong>-<strong>3000E</strong> <strong>mini</strong>-C <strong>GMDSS</strong> <strong>User</strong> <strong>Manual</strong><br />
1.2 ABBREVIATIONS AND TERMS<br />
<strong>Manual</strong><br />
Table 1 Related documents<br />
AA Accounting Authority.<br />
Capsat Manager Thrane & Thrane fleet tracking<br />
program.<br />
DNID Data Network ID (for tracking purpose).<br />
EGC Enhanced Group Call.<br />
Geostationary Geostationary satellites are positioned<br />
36000 Km above the earth. At this<br />
height they rotate around the earth at<br />
the same speed <strong>as</strong> the earth rotates<br />
around its axis, so in effect remaining<br />
stationary above a point on the earth.<br />
GPS Global Positioning System.<br />
Inmarsat-C mobile The satellite communication modem.<br />
ISP Inmarsat Service Provider. Company<br />
offering the service. Most likely also a<br />
PSA and AA.<br />
ISN Inmarsat Serial Number.<br />
LES Land Earth Station.<br />
Login Registration of e<strong>as</strong>yTrack MES in the<br />
Inmarsat-C system.<br />
Mailbox Storage account on an LES that holds<br />
position reports transmitted from an<br />
e<strong>as</strong>yTrack MES.<br />
Member number Used to distinguish e<strong>as</strong>yTrack MES’s<br />
12
<strong>TT</strong>-<strong>3000E</strong> <strong>mini</strong>-C <strong>GMDSS</strong> <strong>User</strong> <strong>Manual</strong><br />
with same DNID from another.<br />
MES Mobile Earth Station – the name of the<br />
transceiver in Inmarsat-C.<br />
MRCC Maritime Rescue Coordination Centre<br />
NCS Network Coordination Station.<br />
Ocean region Coverage of one of four geostationary<br />
Inmarsat satellites.<br />
Omni-directional All directions simultaneously when in<br />
free space conditions.<br />
OS Operating System.<br />
Position report Compact information transmitted from<br />
e<strong>as</strong>yTrack that includes the GPS<br />
position.<br />
PSA Point of Service Activation. Company<br />
making the registration. Most likely<br />
also an ISP and AA.<br />
PSDN Public Switched Data Network such <strong>as</strong><br />
the X25 data network.<br />
PSTN Public Switched Telephone Network is<br />
the land b<strong>as</strong>ed telephone system or an<br />
analogue modem.<br />
SARF Service Activation Registration Form.<br />
Store and forward LES receives complete mails before<br />
forwarding it to the recipient.<br />
Telex TELeprinter EXchange is a<br />
standardized, internationally<br />
recognized, means of real time text<br />
communications.<br />
Table 2 Abbreviations and terms<br />
13
<strong>TT</strong>-<strong>3000E</strong> <strong>mini</strong>-C <strong>GMDSS</strong> <strong>User</strong> <strong>Manual</strong><br />
14
<strong>TT</strong>-<strong>3000E</strong> <strong>mini</strong>-C <strong>GMDSS</strong> <strong>User</strong> <strong>Manual</strong><br />
2 SYSTEM DESCRIPTION<br />
An overview of the complete <strong>GMDSS</strong> system is shown in<br />
Figure 1. The individual products are introduced in [1] <strong>TT</strong>-<br />
<strong>3000E</strong> Instalation <strong>Manual</strong>. This manual will describe how to<br />
operate the system using the <strong>TT</strong>-3606E Message Terminal<br />
and the AP5042 Alarm Panel.<br />
The following chapters give an introduction to the Inmarsat<br />
C system (3 Introduction to Inmarsat-C) and tell how to<br />
operate the alarm panel (4 The distress alert installation)<br />
and the CAPSAT message terminal software (5 Message<br />
Terminal Operation)<br />
15
<strong>TT</strong>-<strong>3000E</strong> <strong>mini</strong>-C <strong>GMDSS</strong> <strong>User</strong> <strong>Manual</strong><br />
Figure 1. <strong>TT</strong>-<strong>3000E</strong> Mini-C <strong>GMDSS</strong> System overview<br />
16
<strong>TT</strong>-<strong>3000E</strong> <strong>mini</strong>-C <strong>GMDSS</strong> <strong>User</strong> <strong>Manual</strong><br />
3 INTRODUCTION TO INMARSAT-C<br />
The Inmarsat-C is a communication system, which enables<br />
the user to send and receive data to and from mobile<br />
terminals. The Inmarsat-C system provides the possibility<br />
of reaching remote are<strong>as</strong> where other methods of<br />
communication are impossible.<br />
3.1 SYSTEM OVERVIEW<br />
The Inmarsat-C satellite network provides the link between<br />
the mobile and the destination office. It uses four<br />
geostationary satellites to cover the world. Satellite data<br />
link coverage is complete between 70º North and 70º South.<br />
Because the Polar regions cannot be seen from<br />
geostationary satellites these regions are not covered.<br />
The Inmarsat-C system contains 2 satellite stations types<br />
that are of interest for the operator of the e<strong>as</strong>yTrack MES:<br />
The NCS stations and the LES stations.<br />
The NCS stations handle the registration of the MES in the<br />
Inmarsat-C system. The Inmarsat-C system h<strong>as</strong> one NCS for<br />
every geostationary satellite and they have names that<br />
correspond to the ocean area they cover: Atlantic Ocean<br />
Region E<strong>as</strong>t (AORE), Atlantic Ocean Region West (AORW),<br />
Indian Ocean Region (IOR) and the Pacific Ocean Region<br />
(POR). Before using the Inmarsat-C system the e<strong>as</strong>yTrack<br />
MES must be registered in one of the four ocean regions<br />
through a Login on an NCS where the corresponding<br />
satellite is visible from the current location. Normally this<br />
login procedure will happen automatically when the<br />
equipment is turned on.<br />
17
<strong>TT</strong>-<strong>3000E</strong> <strong>mini</strong>-C <strong>GMDSS</strong> <strong>User</strong> <strong>Manual</strong><br />
Inmarsat Satellite<br />
Inmarsat Satellite<br />
Inmarsat Satellite<br />
Inmarsat Satellite<br />
Network<br />
Coordination Station<br />
Network (AORE NCS)<br />
Coordination Station<br />
Network (AORW NCS)<br />
Coordination Station<br />
Network (POR NCS)<br />
Coordination Station<br />
(IOR NCS)<br />
Figure 2 Registration at NCS<br />
18<br />
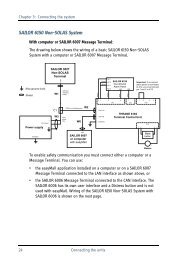
e<strong>as</strong>yTrack<br />
Inmarsat-C<br />
MES<br />
The LES handles the data transmission to and from the<br />
e<strong>as</strong>yTrack MES. When the e<strong>as</strong>yTrack MES is logged into an<br />
NCS, several LESs are available for data transmission. The<br />
number of LESs available may vary and depends entirely on<br />
the number of provider companies that wishes to offer<br />
Inmarsat-C services. Also some e<strong>as</strong>yTracks can be delivered<br />
with configurations that may limit the number of usable<br />
LESs but this will only be done under special agreement.
<strong>TT</strong>-<strong>3000E</strong> <strong>mini</strong>-C <strong>GMDSS</strong> <strong>User</strong> <strong>Manual</strong><br />
Destination<br />
office<br />
Internet<br />
Telex<br />
Network<br />
PSDN<br />
Network<br />
PSTN<br />
Network<br />
Land Earth<br />
Station (LES)<br />
19<br />
Inmarsat Satellite<br />
Figure 3 Data transmission using LES<br />
e<strong>as</strong>yTrack<br />
Inmarsat-C<br />
MES<br />
Mail PC<br />
When the e<strong>as</strong>yTrack MES is logged in at an NCS it maintains<br />
a list of currently available LESs. Most of the<br />
communication operations are done via a LES so in most<br />
c<strong>as</strong>es the operator must select an LES when initiating a<br />
transmission.
<strong>TT</strong>-<strong>3000E</strong> <strong>mini</strong>-C <strong>GMDSS</strong> <strong>User</strong> <strong>Manual</strong><br />
3.2 SERVICES<br />
The Inmarsat-C system offers a variety of services<br />
including:<br />
3.2.1 MESSAGES<br />
• Message transmission to and from a mobile<br />
unit.<br />
• Broadc<strong>as</strong>t data to groups of mobile<br />
terminals.<br />
• Position reporting from fleets of mobile<br />
units.<br />
• Polling system that enables the operator to<br />
request various data from the mobile units.<br />
• Distress alerting (<strong>TT</strong>-3026C and D only).<br />
This is probably the service that is used most often in<br />
‘average’ installations: It enables the user to send and<br />
receive text messages (like e-mail) on the terminal.<br />
Messaging is carried out via a LES where the user needs to<br />
have an account.<br />
As mentioned in 3.1 there are a number of network types<br />
that connect to the LES (PSTN, Telex, etc.) and generally it is<br />
possible to send and receive messages through each of<br />
these networks. Most LESs work the same way – particularly<br />
seen from the MES’ point of view – but still there are some<br />
differences in are<strong>as</strong> such <strong>as</strong>:<br />
• How to receive and send a message on the Land<br />
side.<br />
• Support for Internet access.<br />
20
<strong>TT</strong>-<strong>3000E</strong> <strong>mini</strong>-C <strong>GMDSS</strong> <strong>User</strong> <strong>Manual</strong><br />
• Additional services provided (such <strong>as</strong><br />
forwarding messages <strong>as</strong> SMS).<br />
• Special requirements for how destination<br />
addresses are written.<br />
Also most LESs offer a large number of configuration<br />
options where the MES owner can request and adjust<br />
special features: Adding header and footer lines, setting<br />
message size limits, enable automatic forwarding, etc.<br />
Therefore it is recommendable to seek specific information<br />
from the desired LES.<br />
3.2.2 BROADCASTS<br />
Broadc<strong>as</strong>t data is supported through a mechanism called<br />
EGCs. They are used for different types of services but the<br />
FleetNET EGC (Enhanced Group Call) service is the most<br />
interesting one for commercial purposes.<br />
FleetNET is typically used in situations where a sender h<strong>as</strong><br />
a need for frequent transmissions to a fleet of ships. There<br />
are also LESs that provide various newsletter services sent<br />
via FleetNET. The mobiles receiving the FleetNET EGC<br />
messages are identified by an ENID.<br />
Ple<strong>as</strong>e contact your preferred LES operator for enquiries of<br />
availability and pricing of these services.<br />
Refer to [2] for information on viewing the ENIDs in the<br />
transceiver.<br />
EGCs are also used for distributing maritime safety<br />
information; this will be covered in section 3.3.<br />
3.2.3 POSITION REPORTING<br />
While messages could in principle be used for frequent<br />
position tracking, there exists a more convenient protocol<br />
21
<strong>TT</strong>-<strong>3000E</strong> <strong>mini</strong>-C <strong>GMDSS</strong> <strong>User</strong> <strong>Manual</strong><br />
that is more suited for this service. Data reports have a<br />
very compact format that helps reducing the transmission<br />
time and price.<br />
One consequence of this compact format is that the<br />
addressing h<strong>as</strong> been simplified compared to messages. A<br />
report is sent to a DNID (Data Network IDentity) that is<br />
effectively a mailbox created on some LESs. So the MES<br />
sends its reports to this mailbox and other tracking<br />
systems can then access and empty the mailbox.<br />
Up to 255 mobiles can use the same DNID, and the specific<br />
mobile is identified by a ‘member number’ between 1 and<br />
255.<br />
Figure 4 Inmarsat-C position reporting<br />
Before the position reporting feature can be used the DNID<br />
must be created on the LES; once the DNID account is<br />
created the LES can ‘download’ the DNID information to the<br />
22
<strong>TT</strong>-<strong>3000E</strong> <strong>mini</strong>-C <strong>GMDSS</strong> <strong>User</strong> <strong>Manual</strong><br />
desired MESs and thereby enabling the MESs to send to the<br />
DNID.<br />
Accessing and reading the reports is normally possible in a<br />
number of ways: Automatic e-mail forwarding, PSTN<br />
terminal interface, etc. The LES operator can provide<br />
information about these options.<br />
The raw data reports are in a compressed format and need<br />
to be decoded to present meaningful information to the<br />
receiver. There are several ways of doing this:<br />
• The e<strong>as</strong>iest way is to have the LES doing the<br />
decoding – a service known <strong>as</strong> ‘textual<br />
conversion’ that is available on most LESs. By<br />
combining this service with automatic e-mail<br />
forwarding, the reports will be received <strong>as</strong><br />
simple, readable e-mails.<br />
• Another simple solution is to use an online<br />
tracking service such <strong>as</strong> LocPoint<br />
(http://www.locpoint.com/). The routing is set<br />
up to forward the position reports to the<br />
tracking service provider and then they will<br />
maintain and present the fleet tracking.<br />
• A third suggestion is to acquire a tracking<br />
system such <strong>as</strong> the Thrane & Thrane CapSat<br />
Manager system. It comes with vectorized map<br />
material with excellent zooming facilities. The<br />
detailed maps show mobile positions and trails<br />
with individual icons and timestamps.<br />
3.2.4 POLLING<br />
Polling is a way of sending a small note to the MES. Like<br />
messages a poll can in principle contain any information.<br />
However a poll is normally given a special structure<br />
23
<strong>TT</strong>-<strong>3000E</strong> <strong>mini</strong>-C <strong>GMDSS</strong> <strong>User</strong> <strong>Manual</strong><br />
containing commands that are understood and interpreted<br />
by the MES. And this is the most common purpose for<br />
sending a poll: Instructing the MES to do something.<br />
Some of the poll commands are defined by Inmarsat and<br />
are therefore available via standard services on the LES; this<br />
includes download and management of DNIDs and<br />
configuration of position reporting. Position reporting need<br />
not be configured via poll, though; once the DNID h<strong>as</strong> been<br />
downloaded, the reporting can also be set up at the MES<br />
using the message terminal (this will be covered in section<br />
5.5.26 Position & GPS).<br />
3.3 SAFETY AND DISTRESS CAPABILITIES<br />
The <strong>TT</strong>-<strong>3000E</strong> system is a SOLAS <strong>GMDSS</strong> installation that<br />
provides maritime distress capabilities. This section gives<br />
an overview of how the maritime safety system works and<br />
how this applies to this particular installation type. It is<br />
important to understand that this section is only meant <strong>as</strong><br />
an introduction and it cannot replace proper education in<br />
safety and rescue at sea.<br />
First, a few definitions:<br />
• IMO (the International Maritime Organization) is<br />
– <strong>as</strong> the name implies – an international<br />
organization that coordinates, regulates and<br />
standardizes maritime practice.<br />
• SOLAS (Safety Of Life At Sea) is a convention<br />
under IMO that specifically deals with safety and<br />
rescue issues.<br />
• <strong>GMDSS</strong> is the emergency system that is now<br />
implemented to ensure safety at sea. This<br />
system w<strong>as</strong> adopted and approved by SOLAS in<br />
1988 and is b<strong>as</strong>ed solely on automated radio<br />
24
<strong>TT</strong>-<strong>3000E</strong> <strong>mini</strong>-C <strong>GMDSS</strong> <strong>User</strong> <strong>Manual</strong><br />
communication (unlike previous systems that<br />
included manual subsystems like Morse<br />
telegraphy).<br />
The term ‘SOLAS <strong>GMDSS</strong>’ designates <strong>GMDSS</strong> equipment and<br />
installations that lives up to the SOLAS convention –<br />
typically installations on ships subject to SOLAS chapter IV.<br />
The main purpose of having safety communication<br />
equipment like the <strong>TT</strong>-<strong>3000E</strong> <strong>GMDSS</strong> system is to be able to<br />
send and receive important information such <strong>as</strong> this:<br />
• Receive: Information about nearby ships in<br />
distress (distress relays); weather forec<strong>as</strong>ts and<br />
meteorological warnings; navigational warnings.<br />
• Send: Distress alerts; responses when requested<br />
for <strong>as</strong>sistance.<br />
It is important to realize how important it is for the overall<br />
maritime safety that <strong>GMDSS</strong> communication equipment is<br />
capable of receiving <strong>as</strong> well <strong>as</strong> sending information and<br />
that received information is actually read and understood.<br />
Sometimes the misconception arises that being able to ‘call<br />
for help’ is the most important capability. But calling out<br />
will not be of much value if there is no one around that<br />
listens, responds and <strong>as</strong>sists.<br />
Receiving information<br />
As previously indicated the safety related information that<br />
can be received can generally be split into two categories:<br />
• Maritime Safety Information (commonly<br />
abbreviated to MSI) that is general information<br />
about maritime conditions that are relevant to<br />
safety (such <strong>as</strong> meteorological or navigational<br />
information and warnings). MSI will normally be<br />
sent though some means of broadc<strong>as</strong>t and in<br />
25
<strong>TT</strong>-<strong>3000E</strong> <strong>mini</strong>-C <strong>GMDSS</strong> <strong>User</strong> <strong>Manual</strong><br />
Inmarsat-C this service is b<strong>as</strong>ed on so-called<br />
SafetyNET EGCs that can be addressed to ships<br />
within a given area.<br />
• Urgency and safety information that is<br />
communicated to coordinate specific distress<br />
efforts. This type of information may be sent <strong>as</strong><br />
EGCs but are more often sent <strong>as</strong> Messages to the<br />
specific ships that are involved in the operation.<br />
SafetyNET EGC reception<br />
The SafetyNET reception function is supported by the <strong>TT</strong>-<br />
<strong>3000E</strong> <strong>GMDSS</strong> system. A large number of SafetyNET EGCs<br />
are sent every day via Inmarsat-C and to limit the<br />
communication an EGC receiver can be set up to receive the<br />
relevant ones and discard the irrelevant.<br />
There are two mechanisms to facilitate this filtering: Each<br />
EGC h<strong>as</strong> a ‘service code’ that tells about the subject<br />
(weather forec<strong>as</strong>t, ice report, pilot service, etc.) and each<br />
EGC is addressed to a certain geographical area. An EGC<br />
receiver will disregard messages that do not match the<br />
current position and the service code list chosen by the<br />
user; there are some exceptions, though, since some EGCs<br />
must be received regardless of the user’s preferences.<br />
Area addressing can be either one of the MET/NAVAREAs (of<br />
which there are 16 covering all oceans) or a specific<br />
location given by coordinates. In either c<strong>as</strong>e the EGC<br />
receiver will use the current position to determine<br />
automatically which messages to receive. Besides using the<br />
current position, the <strong>TT</strong>-<strong>3000E</strong> system can also receive<br />
EGCs for other positions and NAVAREAs to receive EGCs<br />
that relate to, e.g., the destination harbour.<br />
Also an EGC may be addressed to a ‘NAVTEX costal area’ if<br />
it contains information that is only relevant for a small<br />
26
<strong>TT</strong>-<strong>3000E</strong> <strong>mini</strong>-C <strong>GMDSS</strong> <strong>User</strong> <strong>Manual</strong><br />
costal section. The <strong>TT</strong>-<strong>3000E</strong> system can not determine<br />
automatically what the current costal area is, so if the user<br />
want to receive these EGCs the relevant area codes must be<br />
set explicitly (each costal area, along with the<br />
corresponding NAVTEX transmitter, is designated by a<br />
letter ‘A’ to ‘Z’). Further information can be found in the<br />
‘Admiralty List of Radio Signals’ published by the<br />
Hydrographer of the Navy in the UK.<br />
Each EGC h<strong>as</strong> a priority <strong>as</strong>signed: Routine, Safety, Urgent, or<br />
Distress. When an EGC with urgent or distress priority is<br />
received the receiver is required to indicate this clearly in<br />
order to notify the crew.<br />
Distress alerting<br />
A <strong>GMDSS</strong> installation that supports distress alert will have<br />
an alarm button that will initiate an alert when pressed for<br />
more than 5 seconds. The distress alert protocol is<br />
carefully designed so that it will get through regardless of<br />
the current state and activity of the Inmarsat-C transceiver<br />
(provided, of course, that the installation is working and<br />
active).<br />
Having said that, there are a number of configuration issues<br />
that should be considered. The user should select which<br />
LES that will receive the alert and the main advantage of<br />
doing this is that it determines beforehand how subsequent<br />
emergency communication should be routed. The alert<br />
itself will in any c<strong>as</strong>e be p<strong>as</strong>sed on to the authorities<br />
closest to the distress position. If no LES is chosen by the<br />
user the <strong>TT</strong>-<strong>3000E</strong> will select one automatically.<br />
The <strong>TT</strong>-<strong>3000E</strong> also h<strong>as</strong> an option of choosing a cause for<br />
the alert and the position that will reported with the alert;<br />
the latter will rarely be relevant since the <strong>TT</strong>-3026C<br />
transceiver h<strong>as</strong> a built-in GPS unit that will provide a<br />
position automatically.<br />
27
<strong>TT</strong>-<strong>3000E</strong> <strong>mini</strong>-C <strong>GMDSS</strong> <strong>User</strong> <strong>Manual</strong><br />
When an alert is activated it will be received at the LES<br />
where it is forwarded to the relevant national Maritime<br />
Rescue Coordination Centre (MRCC). The MRCC will then<br />
take the proper steps to initiate the rescue operation and<br />
one of the first thing that happens is normally that the<br />
MRCC sends a message to the alerting unit to gather more<br />
information about the situation. The alerting part should<br />
respond to such messages if at all possible. Subsequent<br />
steps from the MRCC may involve sending Distress EGCs to<br />
other ships in the area to request <strong>as</strong>sistance (typically <strong>as</strong><br />
Distress Relay or SAR Coordination request).<br />
Safety at sea is taken very seriously by the involved<br />
authorities and an incoming distress alert will always<br />
generate immediate activity at the MRCC. Therefore it<br />
should be emph<strong>as</strong>ized that false alarms must be avoided.<br />
The distress alert is only to be used when there is an<br />
immediate danger that threatens life or ship. If an alert is<br />
sent by accident the MRCC must be informed about the<br />
mistake immediately to have the rescue operation<br />
cancelled.<br />
The messages used in an emergency (or false alarm)<br />
situation will normally be ‘Distress Messages’ that b<strong>as</strong>ically<br />
work like normal Inmarsat-C messages with the following<br />
important exceptions:<br />
• A distress message must only be sent in an<br />
emergency situation – comparable to the use of<br />
VHF ‘MAYDAY’ calls.<br />
• The system ensures that ‘distress message’<br />
communication takes priority over other<br />
transmissions.<br />
• A distress message will always be sent directly<br />
to the relevant MRCC – no addressing is<br />
required.<br />
28
<strong>TT</strong>-<strong>3000E</strong> <strong>mini</strong>-C <strong>GMDSS</strong> <strong>User</strong> <strong>Manual</strong><br />
Other urgency or safety information (similar to VHF ‘PAN-<br />
PAN’ and ‘SECURITÉ’ calls) should be sent <strong>as</strong> ordinary<br />
messages and the primary recommendation is to use<br />
‘Special Access Code’ addressing. There is a list of standard<br />
codes for these purposes:<br />
• 32 : Medical advice.<br />
• 38 : Medical <strong>as</strong>sistance.<br />
• 39 : Maritime <strong>as</strong>sistance.<br />
• 41 : Meteorological reports.<br />
• 42 : Navigational hazards and warnings.<br />
• 43 : Ship position report<br />
Sending a message to one of these Special Access Codes on<br />
a LES will ensure that it is automatically forwarded to the<br />
relevant <strong>as</strong>sistance centre. However there is a catch: These<br />
addressing forms are not mandatory requirements for a LES<br />
so there may exist LESs that do not support them.<br />
Ple<strong>as</strong>e contact your preferred LES for more information on<br />
applicable Special Access Codes.<br />
29
<strong>TT</strong>-<strong>3000E</strong> <strong>mini</strong>-C <strong>GMDSS</strong> <strong>User</strong> <strong>Manual</strong><br />
4 THE DISTRESS ALERT INSTALLATION<br />
As explained in sections 3.3 the <strong>TT</strong>-<strong>3000E</strong> system is capable<br />
of sending maritime distress alerts using the AP5042 Alarm<br />
Panel [5]. For distress alerting this panel includes a distress<br />
button with a red light inside and a buzzer.<br />
4.1 SENDING DISTRESS<br />
In the normal operational state the alarm button light is off<br />
and the buzzer is silent.<br />
An alert is initiated simply by pressing the distress button<br />
for more than 5 seconds. During these 5 seconds the button<br />
light will fl<strong>as</strong>h and the buzzer will beep. After 5 seconds<br />
the red light goes steady on and the buzzer will be silent.<br />
The distress signal is now being sent.<br />
After a little while (typically around half a minute <strong>as</strong> a<br />
rough average) a confirmation is received by the transceiver<br />
and the red light will show this by being on with a short<br />
off-period every 15 seconds. If the alert is not delivered<br />
(e.g., due to bad satellite signal conditions) the button light<br />
will turn off.<br />
At any time it is possible to cancel a Distress Alert using<br />
“Abort transmission” from the Options menu. Be aware that<br />
a Distress Alert is usually sent within 10-30 seconds.<br />
To reset the button light to the normal off-state use the<br />
following procedure:<br />
1. Select “Clear distress indication” from the Distress<br />
menu on the <strong>TT</strong>-3606E Message Terminal.<br />
The system can be tried out in Distress Test mode where all<br />
indications work like in ‘normal’ operation but no alerts<br />
will be sent (the system will behave like the alert is<br />
30
<strong>TT</strong>-<strong>3000E</strong> <strong>mini</strong>-C <strong>GMDSS</strong> <strong>User</strong> <strong>Manual</strong><br />
acknowledged immediately). It is recommended to use<br />
Distress Test mode to become familiar with the sound and<br />
light indications.<br />
4.2 OTHER BUZZER INDICATIONS<br />
Apart from the alerting signal described above, the buzzer<br />
and lights on the alarm panel have two other purposes:<br />
1. Indicating incoming EGCs or messages with<br />
distress or urgency priority.<br />
2. Indicating printer or hardware problems that may<br />
cause the installation not to work.<br />
The EGC/message signal is a quick beeping sound - around<br />
one beep per second, and the “Distress MSG” light will fl<strong>as</strong>h<br />
at the same rate. This indication can be reset by the<br />
following procedure:<br />
1. Select “Clear distress indication” from the Distress<br />
menu on the <strong>TT</strong>-3606E Message Terminal.<br />
The hardware problem indication is three beeps repeated<br />
every 10 seconds. Below is a list of re<strong>as</strong>ons for the beeps.<br />
The specific re<strong>as</strong>on will be shown on the message terminal:<br />
• Hardware error in the distress button<br />
installation.<br />
• Position is not updated for an extended period.<br />
• No access to the satellite signal.<br />
The printer problem indication is two beeps repeated every<br />
10 seconds. Below is a list of re<strong>as</strong>ons for the beeps. The<br />
specific re<strong>as</strong>on will be shown on the message terminal:<br />
31
<strong>TT</strong>-<strong>3000E</strong> <strong>mini</strong>-C <strong>GMDSS</strong> <strong>User</strong> <strong>Manual</strong><br />
• Printer out of paper. See that the printer h<strong>as</strong><br />
paper and that it is properly placed in the<br />
feeder.<br />
• Printer off-line. Press the “Set” button on the<br />
printer.<br />
• Printer communication problem. Check that the<br />
printer is connected <strong>as</strong> described in [1] <strong>TT</strong>-<br />
<strong>3000E</strong> Installation <strong>Manual</strong>.<br />
• Paper low warning.<br />
The hardware problem indication cannot be reset in other<br />
ways than correcting the actual problem. For printer<br />
problems the audio indication can be muted using the mute<br />
button on the alarm panel. Note, the "MES Fault" LED is lit<br />
until the printer error is corrected.<br />
32
<strong>TT</strong>-<strong>3000E</strong> <strong>mini</strong>-C <strong>GMDSS</strong> <strong>User</strong> <strong>Manual</strong><br />
5 MESSAGE TERMINAL OPERATION<br />
5.1 BASIC CONCEPTS<br />
Menu Bar<br />
Text<br />
Field<br />
Status<br />
Line<br />
Status Field<br />
Hint Field<br />
Shadow<br />
33<br />
Title<br />
GPS mode<br />
A Window Title<br />
Figure 5 B<strong>as</strong>ic Concept<br />
INM-C Signal<br />
A Window Is an area of the screen delimited by a double<br />
line border. Several windows may be displayed on the<br />
screen at the same time overlapping each other. The<br />
window being on top will have a shadow. This indicates<br />
that the next keystroke on the keyboard will be directed to<br />
this window .<br />
Title Shows the name of the window.<br />
Menu Bar Holds the menus of a window. Not all windows<br />
have a menu.<br />
Clock
<strong>TT</strong>-<strong>3000E</strong> <strong>mini</strong>-C <strong>GMDSS</strong> <strong>User</strong> <strong>Manual</strong><br />
Text Field Is the part of the Capsat window, where you may<br />
type in text.<br />
Status Field Is a combined field showing the current ocean<br />
region and status information. When the transceiver is<br />
logged in and not performing a Scan, Login, Logout or a<br />
Link Test, the current ocean region is displayed.<br />
GPS Mode Indicates the mode of the GPS; Acquisition, 2-D<br />
or 3-D mode. See page 82 for further information.<br />
INM-C Signal Meter Indicates the signal strength 0-5 using<br />
square boxes. The scale is indicated by 5 small dots. 3<br />
boxes or more is needed to do reliable communication.<br />
Clock Shows the system local time.<br />
Hint Field May show miscellaneous status information or<br />
hints about which key to press. This will be '' for<br />
Spacebar and '' for the Enter key.<br />
Shadow Points out the window on top. When you type on<br />
the keyboard, the keystrokes will be given to that window.<br />
5.1.1 SPECIAL KEYS ON THE KEYBOARD<br />
To operate the Capsat Message Handling program you need<br />
to know which keys to press. In this chapter we will explain<br />
the functionality of the special keys on your keyboard.<br />
34
<strong>TT</strong>-<strong>3000E</strong> <strong>mini</strong>-C <strong>GMDSS</strong> <strong>User</strong> <strong>Manual</strong><br />
Esc Pressing Esc will always take you one step back.<br />
Previous Action Hitting Esc will...<br />
Just had a window Remove the window<br />
displayed<br />
Revising a value in a field Cancel revise and restore<br />
the original content<br />
Arrow Keys Moves the highlight or the insertion point.<br />
Both are known <strong>as</strong> the cursor.<br />
There are 4 arrow keys; Up, Down, Left and Right.<br />
35
<strong>TT</strong>-<strong>3000E</strong> <strong>mini</strong>-C <strong>GMDSS</strong> <strong>User</strong> <strong>Manual</strong><br />
Enter Is used to do the following operations:<br />
• Choosing the command currently highlighted.<br />
• Make a new line in the Text Field of the Editor.<br />
• To validate values, names, etc. that you have<br />
typed in.<br />
Alt The Alt key is usually used together with another<br />
key. You press down the Alt key continuously while you<br />
then press the second key once.<br />
You have... You want to... Press...<br />
Fl<strong>as</strong>hing cursor Get Highlight in Alt<br />
in Text Field the Menu Bar<br />
Highlight in the Fl<strong>as</strong>hing cursor Alt<br />
Menu Bar in the Text Field<br />
Fl<strong>as</strong>hing cursor Choose a<br />
Alt, T (Press Alt<br />
in Text Field command from first and keep<br />
the Menu Bar. I.e. holding it down<br />
Transmit. while hitting T.<br />
Rele<strong>as</strong>e Alt)<br />
36
<strong>TT</strong>-<strong>3000E</strong> <strong>mini</strong>-C <strong>GMDSS</strong> <strong>User</strong> <strong>Manual</strong><br />
Spacebar Is used to do the following operations:<br />
• Insert blank characters in the Text Field of the<br />
Editor.<br />
• Change the value of a field that cannot be<br />
changed otherwise. This applies to fields on<br />
the screen like:<br />
(•) ( )<br />
[X] [ ]<br />
Hitting Spacebar, when the highlight is positioned on such<br />
a field, will reverse the value, e.g. if you have '( )', you will<br />
get '(•)' and vice versa. When the Spacebar h<strong>as</strong> this<br />
functionality, the upper left corner of the current window<br />
(The Hint Field) will normally show ''.<br />
• Have additional information presented, when<br />
you are filling in a field. When the Spacebar<br />
h<strong>as</strong> this functionality, the upper left corner of<br />
the current window will normally show<br />
''.<br />
• Marking items in some lists. This can be used<br />
in Directory and in the Address Book.<br />
5.2 FIRST TIME WITH CAPSAT<br />
In this chapter it is first described what happens when your<br />
turn on your Capsat system for the first time. Then we will<br />
explain how to send your very first message.<br />
37
<strong>TT</strong>-<strong>3000E</strong> <strong>mini</strong>-C <strong>GMDSS</strong> <strong>User</strong> <strong>Manual</strong><br />
5.2.1 POWER ON<br />
Before doing the following steps, you should check that<br />
communication port 1 (Com 1) of your PC or Message<br />
Terminal is connected to the transceiver.<br />
Message Terminal Turn on the power to have the start-up<br />
screen presented.<br />
CAPSAT<br />
Version 3.40 05-12-01<br />
(C) Thrane & Thrane<br />
1. Wait for start-up screen to disappear within 5<br />
seconds and the Capsat window is shown. The<br />
upper left corner of the screen (Status Field)<br />
will show “Transceiver not connected”.<br />
2. Turn on the power of the transceiver and wait<br />
approximately 25 seconds until the power-on<br />
sequence h<strong>as</strong> been completed. The upper left<br />
corner of the screen will now show 'Logged<br />
out', if this is the very first power-on of the<br />
unit.<br />
3. Continue with the next chapter<br />
Commissioning.<br />
38
<strong>TT</strong>-<strong>3000E</strong> <strong>mini</strong>-C <strong>GMDSS</strong> <strong>User</strong> <strong>Manual</strong><br />
5.2.2 COMMISSIONING<br />
When your system is going to be used for the first time, the<br />
following steps must be done.<br />
Login Make a login by choosing Options, Login (Alt, O, L)<br />
and select the desired Ocean Region.<br />
West Atlantic E<strong>as</strong>t Atlantic Pacific Indian<br />
The Status Field will now indicate ''. Wait<br />
until the Status Field shows the desired Ocean Region.<br />
Link Test The first time a transceiver performs a login to the<br />
Inmarsat-C Network, the transceiver is commanded to carry<br />
out a Link Test, also known <strong>as</strong> Automatic Commissioning.<br />
This may take up to 15 minutes and is indicated by '' in the Status Field.<br />
During the Link Test the message:<br />
will be displayed.<br />
Automatic test mode: Normal communication disabled. Do not<br />
press any distress buttons unless you are in distress<br />
When the link test is completed, the 'Link Test Finished'<br />
message is displayed/printed along with the results of the<br />
test. Your system is now ready to use.<br />
5.2.3 SENDING A TEST MESSAGE<br />
A quick guide of how to send a message through the<br />
Inmarsat-C Network and back to yourself is presented in<br />
the following. This is known <strong>as</strong> a loop back test.<br />
1. Type in a short message in the Text Field.<br />
39
<strong>TT</strong>-<strong>3000E</strong> <strong>mini</strong>-C <strong>GMDSS</strong> <strong>User</strong> <strong>Manual</strong><br />
2. Choose Transmit (Alt, T) to open the Transmit<br />
window. The highlight will be positioned on<br />
the address field.<br />
3. Activate the Address Book by pressing<br />
Spacebar.<br />
4. Choose New to insert an entry in the empty<br />
Address Book. The highlight will be positioned<br />
on the Name field.<br />
5. Type in the name 'My mobile' and press Enter.<br />
The highlight moves to the Number field.<br />
6. Identify your Ocean Region by looking at the<br />
Status Field in the upper left corner of the<br />
Capsat window. Type in the 3 digit Ocean<br />
Region Id corresponding to this.<br />
580 - All Oceans<br />
581 - E<strong>as</strong>t<br />
Atlantic<br />
582 - Pacific<br />
583 - Indian<br />
584 - West<br />
Atlantic<br />
7. Complete the number by adding your mobile<br />
number to the Ocean Region already typed in.<br />
Your mobile number is displayed in the upper<br />
right corner of the Transmit window. Press<br />
Enter to validate the number. A valid number<br />
could be 581 492380049. The highlight moves<br />
to the Answer back field.<br />
40
<strong>TT</strong>-<strong>3000E</strong> <strong>mini</strong>-C <strong>GMDSS</strong> <strong>User</strong> <strong>Manual</strong><br />
8. Press Arrow-Down twice to move the highlight<br />
to '( ) Mobile'. Press Spacebar to get '(•) Mobile'.<br />
9. Pressing Enter moves the highlight to '< OK >'.<br />
10. Press Enter once on '< OK >' to validate the<br />
entry. The highlight will now be on New in the<br />
menu bar.<br />
11. Choose Select to copy the entry to the<br />
Transmit window. The highlight will now be<br />
positioned at the Land Station field.<br />
12. Press Spacebar to get a list of Land Stations.<br />
The Select field and the first Land Station will<br />
both be highlighted.<br />
13. Choose Select to copy the first Land Station to<br />
the Transmit window.<br />
14. Press Enter to move the highlight to the '<<br />
SEND >' field.<br />
15. Press Enter once on '< SEND >' to transmit the<br />
message. The Transmit window is now<br />
removed and you are back in the Text Field.<br />
16. After approx. 5 minutes you will receive the<br />
message. Your message is transferred to the<br />
Message Terminal and will be printed. It can<br />
be opened by selecting from the menu: Logs,<br />
Receive Log (Alt, L, R), highlight the new<br />
message and press V.<br />
41
<strong>TT</strong>-<strong>3000E</strong> <strong>mini</strong>-C <strong>GMDSS</strong> <strong>User</strong> <strong>Manual</strong><br />
5.3 CAPSAT TEXT EDITOR<br />
The integrated text editor makes it very simple to create<br />
messages for later transmission. It is designed to be used<br />
<strong>as</strong> a tool for editing small messages and not for managing<br />
large documents.<br />
5.3.1 THE EDITOR WINDOW<br />
The following illustration shows the important parts of the<br />
editor window, followed by a brief description of each part.<br />
Menu bar<br />
Insertion point (The Cursor)<br />
Filename Character count Insert mode: Overwriting/Inserting<br />
Input mode: Telex/ASCII<br />
Figure 6 The Editor Window<br />
42<br />
Margin<br />
Menu bar Contains menus. Open the menus and choose the<br />
appropriate command.<br />
Insertion Point. Shows where text will be inserted when you<br />
type. Are also called the cursor.
<strong>TT</strong>-<strong>3000E</strong> <strong>mini</strong>-C <strong>GMDSS</strong> <strong>User</strong> <strong>Manual</strong><br />
Input Mode Shows which input mode you currently are<br />
using. The field will either be Telex or ASCII. In Telex the<br />
editor will only allow you to insert characters that are<br />
represented in the Baudot alphabet.<br />
Filename Shows the name of the file on disk holding the<br />
present text. When starting out on a new message this field<br />
will be empty until you have saved your message for the<br />
first time.<br />
Character count Indicates the number of characters in your<br />
message at any time. Ple<strong>as</strong>e note that a new line is only<br />
counted <strong>as</strong> one character. When saving the message, a new<br />
line will be saved <strong>as</strong> two characters, CR LF (Carriage Return<br />
Line Feed).<br />
Insert mode Shows whether you will be inserting or<br />
overwriting characters when you type. The mode is toggled<br />
by pressing Ins on the numeric keypad. Make sure that Num<br />
Lock is off.<br />
Margin Shows the position of the right margin of your<br />
message. The default setting is at 69, which is the<br />
maximum line length that can be transmitted through the<br />
Telex Network.<br />
5.3.2 CREATING A MESSAGE<br />
1. Choose File (Alt, F) and New Telex or New<br />
ASCII.<br />
If you are going to send the message to a telex<br />
destination, you should select New Telex to prevent<br />
you from using characters that cannot be transmitted<br />
through the Telex network. In all other c<strong>as</strong>es it will be<br />
most convenient to use the ASCII mode.<br />
43
<strong>TT</strong>-<strong>3000E</strong> <strong>mini</strong>-C <strong>GMDSS</strong> <strong>User</strong> <strong>Manual</strong><br />
5.3.3 TYPING IN TEXT<br />
As the position point (the cursor) is already positioned at<br />
the start of the message, you just type in your message <strong>as</strong><br />
if you were using a typewriter. If you want to create some<br />
blank lines before typing, press the Enter key to insert<br />
blank lines.<br />
As you type the insertion point advances to the right. When<br />
the insertion point gets to the right margin a new line is<br />
automatically inserted and the word that you were typing<br />
will be moved to the next line. This is called word-wrap.<br />
5.3.4 MOVING THE INSERTION POINT (CURSOR)<br />
If you are using the numeric keypad, make sure that NUM<br />
LOCK is off.<br />
To move Press this key<br />
Up one line UP ARROW<br />
Down one line DOWN ARROW<br />
One character to the left LEFT ARROW<br />
One character to the right RIGHT ARROW<br />
One word to the left CTRL+LEFT ARROW<br />
One word to the right CTRL+RIGHT ARROW<br />
Beginning of the line HOME<br />
End of the line END<br />
Top of the window CTRL+HOME<br />
Bottom of the window END<br />
Beginning of the message CTRL+PAGE UP<br />
End of the message CTRL+PAGE DOWN<br />
Up one window PAGE UP<br />
Down one window PAGE DOWN<br />
Note. The cursor can only be moved to positions holding a<br />
character or a space. The blank portions of the window do<br />
not hold spaces unless you have typed them.<br />
44
<strong>TT</strong>-<strong>3000E</strong> <strong>mini</strong>-C <strong>GMDSS</strong> <strong>User</strong> <strong>Manual</strong><br />
5.3.5 SAVING YOUR WORK<br />
1. Choose File, Save (Alt, F, S).<br />
2. Type in the name of the file. The name may<br />
consist of 1 to 8 characters. The Editor will<br />
append .TXT to the name. This is called an<br />
extension.<br />
3. Press Enter to actually save the file.<br />
Before saving the message, the Editor checks if there<br />
already is file of that name on the disk. If that is the c<strong>as</strong>e,<br />
you are given the opportunity to cancel the operation. If<br />
you choose to replace the existing file, the existing file will<br />
be given the extension .BAK and still be available on the<br />
disk.<br />
Tip. Give all your messages sequential names such <strong>as</strong><br />
OUT.000, OUT.001, ... and keep them in a separate<br />
directory or on a separate disk.<br />
45
<strong>TT</strong>-<strong>3000E</strong> <strong>mini</strong>-C <strong>GMDSS</strong> <strong>User</strong> <strong>Manual</strong><br />
5.3.6 OPENING AN EXISTING MESSAGE<br />
1. Choose File, Load file (Alt, F, L).<br />
The Select file window<br />
The current drive and directory<br />
Figure 7 Opening an Existing Message<br />
Use Path to change if necessary<br />
2. Select the desired file from the Select File<br />
window.<br />
5.3.7 REVISING A MESSAGE<br />
You can delete, copy and move text in the message. If you<br />
want to copy or move text, you must indicate which text<br />
you want to change by selecting it. When doing minor<br />
deletions you do not need to select the text.<br />
46
<strong>TT</strong>-<strong>3000E</strong> <strong>mini</strong>-C <strong>GMDSS</strong> <strong>User</strong> <strong>Manual</strong><br />
5.3.8 TYPING OVER TEXT<br />
To delete a Press this key<br />
Character left of the cursor BACKSPACE<br />
Character under the cursor DEL<br />
Line ALT+F4<br />
Word ALT+F3<br />
Normally the Editor is operating in Insert mode, which<br />
means that if you type a character, the existing characters<br />
are pushed forward. However you can operate the Editor in<br />
Overwrite mode too, where the characters that you type will<br />
replace the existing ones.<br />
1. Press Ins key to toggle between Overwrite and<br />
Insert mode.<br />
5.3.9 SELECTING A BLOCK OF TEXT<br />
1. Position the cursor at the beginning of the text<br />
you want to select.<br />
Figure 8 Selecting a Block of Text<br />
2. Hold down the SHIFT key while you move the<br />
cursor to where you want the selection to end.<br />
To cancel a selection, move the cursor without holding the<br />
SHIFT key down.<br />
47
<strong>TT</strong>-<strong>3000E</strong> <strong>mini</strong>-C <strong>GMDSS</strong> <strong>User</strong> <strong>Manual</strong><br />
5.3.10 MOVING TEXT<br />
Moving text from one place to another is known <strong>as</strong> cutting<br />
and p<strong>as</strong>ting.<br />
1. Select the text you want to move.<br />
2. Choose Edit, Cut (Alt, E, T). The selected text is<br />
then removed from your message and placed<br />
in a temporary storage area. The text will<br />
reside there until you choose the Cut or the<br />
Copy command again.<br />
3. Position the cursor where you want to move<br />
the text.<br />
4. Choose Edit, P<strong>as</strong>te (Alt, E, P). The Editor now<br />
inserts the text from the temporary storage<br />
area. You can choose P<strong>as</strong>te <strong>as</strong> many times <strong>as</strong><br />
you want inserting the same text at other<br />
locations in your message.<br />
5.3.11 COPYING TEXT<br />
1. Select the text you want to copy.<br />
2. Choose Edit, Copy (Alt, E, C). The selected text<br />
is then copied from your message and placed<br />
in a temporary storage area. The text will<br />
reside there until you choose the Cut or the<br />
Copy command again.<br />
3. Position the cursor where you want to insert<br />
the text.<br />
4. Choose Edit, P<strong>as</strong>te (Alt, E, P). The Editor now<br />
inserts the text from the temporary storage<br />
area. You can choose P<strong>as</strong>te <strong>as</strong> many times <strong>as</strong><br />
48
<strong>TT</strong>-<strong>3000E</strong> <strong>mini</strong>-C <strong>GMDSS</strong> <strong>User</strong> <strong>Manual</strong><br />
you want to insert the same text at other<br />
locations in your message.<br />
5.3.12 DELETING SELECTED TEXT<br />
1. Select the text you want to delete.<br />
2. Choose Edit, Clear (Alt, E, E).<br />
5.3.13 FINDING AND REPLACING TEXT<br />
The Editor allows you to find and replace text patterns in<br />
your message. The search is always performed from the<br />
cursor and onwards.<br />
5.3.14 FINDING TEXT<br />
1. Choose Edit, Search (Alt, E, S).<br />
2. Type in the text that you want to find. The<br />
Editor searches for the exact pattern, so ple<strong>as</strong>e<br />
watch your upper- and lowerc<strong>as</strong>e letters.<br />
If the text is found the cursor is positioned<br />
immediately after the pattern. If the pattern is not<br />
found, an error message is displayed.<br />
5.3.15 REPLACING TEXT<br />
1. Choose Edit, Replace (Alt, E, R).<br />
2. Type in the text that you want to replace and<br />
press Enter.<br />
3. Type in the replacement text and press Enter.<br />
When an instance of the pattern is found, the Editor<br />
highlights the text, and you are <strong>as</strong>ked whether this<br />
particular instance should be replaced or not.<br />
49
<strong>TT</strong>-<strong>3000E</strong> <strong>mini</strong>-C <strong>GMDSS</strong> <strong>User</strong> <strong>Manual</strong><br />
5.3.16 PRINTING<br />
or<br />
1. Choose File, Print text (Alt, F, T) to print the<br />
text shown in the Editor.<br />
2. Choose File, Print file (Alt, F, P) to print a<br />
message from the disk.<br />
5.3.17 CUSTOMISING THE EDITOR<br />
1. Choose Edit, Setup (Alt, E, U).<br />
In the Setup window the following parameters can be<br />
changed:<br />
• The right margin of your message can be<br />
changed from 69 to any value in the range 5-<br />
77.<br />
• The status line can be turned Off and On.<br />
• The Insert mode can be toggled.<br />
• The Input mode may be set to either ASCII or<br />
Telex.<br />
• The ‘Save with CR/LF’ (Save with Carriage<br />
Return and Linefeed) can be toggled to<br />
instruct the editor to save the current message<br />
with the wordwrapping facility turned off.<br />
This will allow other programs to read your<br />
message files.<br />
50
<strong>TT</strong>-<strong>3000E</strong> <strong>mini</strong>-C <strong>GMDSS</strong> <strong>User</strong> <strong>Manual</strong><br />
Figure 9 Customising the Editor<br />
In addition to this the colour set-up of the editor may be<br />
changed from the System application. Press F10 and open<br />
the Paint menu.<br />
5.4 CAPSAT ADDRESS BOOK<br />
The Address Book conveniently stores the details of all<br />
your destinations. Up to 100 destinations can be stored.<br />
or<br />
1. Press F3 to access the Address Book<br />
2. In Capsat choose Transmit and press Spacebar<br />
in the address field (Alt, T, Spacebar).<br />
51
<strong>TT</strong>-<strong>3000E</strong> <strong>mini</strong>-C <strong>GMDSS</strong> <strong>User</strong> <strong>Manual</strong><br />
5.4.1 ADDRESS BOOK WINDOW<br />
Figure 10 Address Book Window<br />
Menu bar Contains menus. Open the menus and choose the<br />
appropriate command.<br />
Names of Destinations Holds the names of all your<br />
destinations. You can move the highlight by pressing Arrow<br />
Up/Down, Page Up/Down and Home/End.<br />
Destination data Holds the data of the highlighted<br />
Destination Name. When you move the highlight to another<br />
name, this field is updated with the data corresponding to<br />
this name. Tip. To move highlight to 'T&T Fax' press Alt+T.<br />
Type of destination Allows you to select different network<br />
types. Not all of the listed types may be available at a<br />
particular Land Station. Press Spacebar on the desired type.<br />
Presentation Enables you to select whether your<br />
transmission should be done using either 5, 7 or 8 bit<br />
presentation. The 7 bit option is supported by all Land<br />
Stations. The 5 bit presentation can be used with all<br />
Destination types and will reduce the transmission costs<br />
52
<strong>TT</strong>-<strong>3000E</strong> <strong>mini</strong>-C <strong>GMDSS</strong> <strong>User</strong> <strong>Manual</strong><br />
approximately 33%. Press Spacebar on the desired<br />
presentation.<br />
Special Options You can specify that you want your message<br />
to always include the latest position and time (if available)<br />
when the message is sent. Capsat automatically inserts this<br />
information <strong>as</strong> text in front of your message text, if you<br />
check the Position box. The information that Capsat inserts<br />
h<strong>as</strong> the same format <strong>as</strong> what you will get if you had<br />
manually used Edit, Position Ins from the menu. If the<br />
position is not available from a built-in GPS, Capsat will <strong>as</strong>k<br />
you if you want to send the message anyway. The latest<br />
available position will then be inserted instead.<br />
The Prefixed box allows you to use the ‘prefixed store-andforward’<br />
service found at selected Land Stations. If you<br />
check this box you will need to type a two digit code in the<br />
appropriate field. This two digit code will be put in front<br />
(prefixed) of your destination address when the message is<br />
sent. You should contact the LES operator of the selected<br />
LES to find out which prefix codes are available at that<br />
station.<br />
53
<strong>TT</strong>-<strong>3000E</strong> <strong>mini</strong>-C <strong>GMDSS</strong> <strong>User</strong> <strong>Manual</strong><br />
5.4.2 ADDRESS BOOK FACILITIES<br />
The following facilities are presented on the menu bar:<br />
Select Selects one or several entries to be<br />
used for a transmission.<br />
Mark Marks up to 10 destinations by<br />
placing a mark to the left of the<br />
entry. When Select is chosen<br />
afterwards, all 10 destinations are<br />
selected. To unmark an entry<br />
choose Mark once again. Instead of<br />
using Mark, you can use the<br />
Spacebar.<br />
New Creates a new entry in the Address<br />
Book. First time you access the<br />
Address Book, it will be empty and<br />
you must select New and fill in a<br />
destination in order to use the<br />
Address Book.<br />
Revise Enables you to change the contents<br />
of a particular entry.<br />
Er<strong>as</strong>e Er<strong>as</strong>es an entry from the Address<br />
Book.<br />
Options - Find Searches for a name or a part<br />
thereof. The search is sensitive to<br />
upper- and lowerc<strong>as</strong>e letters.<br />
Options - Save Saves the contents of the Address<br />
Book in a file on the disk. Give the<br />
file a name of up to 8 characters.<br />
The file will be appended the<br />
extension '.DST'. I.e. if you specify<br />
54
<strong>TT</strong>-<strong>3000E</strong> <strong>mini</strong>-C <strong>GMDSS</strong> <strong>User</strong> <strong>Manual</strong><br />
the name to be myfile, the name<br />
will actually be myfile.dst.<br />
Options - Load Clears the present contents of the<br />
Address Book and reads in the<br />
contents of the selected file.<br />
Options - Print Prints the contents of the Address<br />
Book.<br />
Options - P<strong>as</strong>sword Enables you to protect the contents<br />
of the Address Book with a<br />
p<strong>as</strong>sword. To clear p<strong>as</strong>sword<br />
protection, choose this menu again<br />
and re-enter your p<strong>as</strong>sword twice.<br />
5.4.3 INSERTING A NEW DESTINATION<br />
1. Choose New from the menu bar and type in<br />
the name of your new destination and press<br />
Enter to move the highlight to the Destination<br />
type fields.<br />
2. The default destination type is telex <strong>as</strong><br />
marked by: '(•) telex' . If you want another<br />
type than telex, then move the highlight to the<br />
desired destination type by pressing Arrow<br />
Down and press the Spacebar to move the '•'<br />
to this field; i.e. to make the selection.<br />
3. Move the highlight to the Number field by<br />
pressing Enter and type in the destination<br />
preceded by the country code. When<br />
addressing another Inmarsat-C mobile unit,<br />
remember to specify the Ocean Region. See<br />
table below.<br />
55
<strong>TT</strong>-<strong>3000E</strong> <strong>mini</strong>-C <strong>GMDSS</strong> <strong>User</strong> <strong>Manual</strong><br />
4. If you want to change the default<br />
presentation of 7 bit, move the highlight with<br />
the Arrow keys to the desired field and press<br />
Spacebar to move the '•' to this field.<br />
5. Press Enter to move the highlight to the OK<br />
field and press Enter once more.<br />
56
<strong>TT</strong>-<strong>3000E</strong> <strong>mini</strong>-C <strong>GMDSS</strong> <strong>User</strong> <strong>Manual</strong><br />
5.4.4 ACCESSING THE DIFFERENT NETWORKS.<br />
Type Format of number Presentation<br />
Telex Country code + Subscriber No 5 or 7 bit<br />
Mobile Ocean Region + Mobile No<br />
580 – All Oceans<br />
581 - E<strong>as</strong>t Atlantic<br />
582 - Pacific<br />
583 - Indian<br />
584 - West Atlantic<br />
5 or 7 bit<br />
Mobile Ocean Region + Mobile No<br />
1110 – All Oceans<br />
1111 - E<strong>as</strong>t Atlantic<br />
1112 - Pacific<br />
1113 - Indian<br />
1114 - West Atlantic<br />
8 bit<br />
X.25 DNIC + Subscriber No 5, 7 or 8 bit<br />
Fax Country code + Subscriber No 5, 7 or 8 bit<br />
PSTN<br />
(Telepho<br />
ne)<br />
Country code + Subscriber No 5, 7 or 8 bit<br />
Special Pre-defined codes:<br />
5, 7 or 8 bit<br />
(Pre- 32 - Medical Advice<br />
defined 33 - Technical Assistance<br />
<strong>GMDSS</strong> 38 - Medical Assistance<br />
services) 39 - Maritime Assistance<br />
41 - Meteorological Reports<br />
42 - Navigational Hazards and<br />
Warnings<br />
43 - Ship Position and Sail Plan<br />
Reports<br />
DNID DNID number and Member<br />
number. See your DNID Table<br />
for valid entries<br />
5, 7 or 8 bit<br />
E-mail Standard email address 5, 7 or 8 bit<br />
57
<strong>TT</strong>-<strong>3000E</strong> <strong>mini</strong>-C <strong>GMDSS</strong> <strong>User</strong> <strong>Manual</strong><br />
5.5 CAPSAT<br />
or<br />
1. Press F2 to access Capsat.<br />
2. Press Esc a number of times until all<br />
overlaying windows are removed.<br />
5.5.1 TRANSMISSION<br />
The Inmarsat-C Network is a Store-And-Forward system.<br />
This means that when a message is sent off, it is stored<br />
within the system for a period of time before the message<br />
is forwarded to the final destination. A message can be sent<br />
to several destinations at the same time (Multi-addressing.<br />
Maximum is 10).<br />
Destinations<br />
Telex<br />
Inmarsat-C Mobiles<br />
E-mail addresses<br />
X.25<br />
Telefax<br />
Telephone modems<br />
5.5.2 DESTINATIONS<br />
In the table is shown the destinations that can be reached<br />
from your mobile unit. Not all Land Stations supports all<br />
types, <strong>as</strong> only Telex and Inmarsat-C mobile are mandatory.<br />
Addressing the different destination types is thoroughly<br />
discussed in the chapter Capsat Address Book on page 51.<br />
5.5.3 PRESENTATION<br />
The message can be sent in 3 different formats known <strong>as</strong> 5<br />
bit, 7 bit and 8 bit presentation.<br />
58
<strong>TT</strong>-<strong>3000E</strong> <strong>mini</strong>-C <strong>GMDSS</strong> <strong>User</strong> <strong>Manual</strong><br />
5 bit Is also known <strong>as</strong> the Baudot or Telex<br />
presentation (ITA2). Reduces the<br />
transmission costs approximately 33%, but<br />
only valid Telex characters will be<br />
transmitted transparently.<br />
7 bit Is supported by all Land Stations and is<br />
also known <strong>as</strong> the ASCII presentation. All<br />
characters represented by values from 0 to<br />
127 is sent transparently to the Land<br />
Station. Values above 127 are truncated.<br />
8 bit Is known <strong>as</strong> data. All characters are<br />
transmitted transparently over the satellite<br />
link. When the Land Station forwards the<br />
message this will also be done<br />
transparently if possible.<br />
Note. Some Land Stations inserts a header<br />
in the message, which the recipient must<br />
remove before being able to use the<br />
message, if the message for instance w<strong>as</strong> a<br />
spread-sheet data file.<br />
59
<strong>TT</strong>-<strong>3000E</strong> <strong>mini</strong>-C <strong>GMDSS</strong> <strong>User</strong> <strong>Manual</strong><br />
5.5.4 THE TRANSMIT WINDOW<br />
Landstation<br />
Hint field<br />
Address field<br />
Message Selector<br />
60<br />
Send Button<br />
Figure 11 The Transmit Window<br />
Pr ior ity<br />
Selection<br />
Hint Field Shows here the key to press in order to have the<br />
list of Land Stations presented <strong>as</strong> the highlight is placed on<br />
that field.<br />
Address Field Holds the address information of your<br />
destination. Place highlight on the field and press Spacebar<br />
to access the Address Book.<br />
Tip. To select the destination 'Thrane & Thrane' from the<br />
Address Book, type 'Th' in the address field and press<br />
Enter. The Address Book is then searched for an entry<br />
starting with these letters and if found, the data of this<br />
entry is copied to the Transmit window.<br />
Priority Selection Allows the user to give a message a special<br />
priority, to be used when handled by the Land Station.
<strong>TT</strong>-<strong>3000E</strong> <strong>mini</strong>-C <strong>GMDSS</strong> <strong>User</strong> <strong>Manual</strong><br />
Priority Explanation<br />
Distress Routed directly to SAR<br />
Routine Forwarded immediately<br />
Non-<br />
Urgent<br />
Delayed forwarding<br />
Table 3 Message Priority<br />
Land Station Is the station to use for the transmission.<br />
Message Selector Selects whether the text in the editor or a<br />
file on the disk should be transmitted.<br />
Send Button Sends the message when pressing Enter here.<br />
5.5.5 TRANSMI<strong>TT</strong>ING A MESSAGE<br />
1. Choose Transmit (Alt, T) to open the Transmit<br />
window. The highlight will be positioned on<br />
the address field.<br />
2. Activate the Address Book by pressing<br />
Spacebar.<br />
3. Position the highlight on the desired<br />
destination and choose Select. See also the<br />
chapter Capsat Address Book on page 51.<br />
4. Press Spacebar to get a list of Land Stations.<br />
61
<strong>TT</strong>-<strong>3000E</strong> <strong>mini</strong>-C <strong>GMDSS</strong> <strong>User</strong> <strong>Manual</strong><br />
Figure 12 Transmitting a Message<br />
5. Position the highlight on the desired Land<br />
Station and choose Select.<br />
6. Press Enter to move the highlight to the '<<br />
SEND >' field.<br />
7. Press Enter once on '< SEND >' to transmit the<br />
message. The Transmit window is now<br />
removed and you are back in the Text Field.<br />
The message is saved in the message log on<br />
the disk along with addressing information<br />
allowing you to send the message again if<br />
necessary.<br />
5.5.6 TRANSMI<strong>TT</strong>ING AN EMAIL<br />
1. Choose Transmit (Alt, T) to open the Transmit<br />
window. The highlight will be positioned on<br />
the address field.<br />
2. Activate the Address Book by pressing<br />
Spacebar.<br />
62
<strong>TT</strong>-<strong>3000E</strong> <strong>mini</strong>-C <strong>GMDSS</strong> <strong>User</strong> <strong>Manual</strong><br />
3. Position the highlight on the desired email<br />
destination and choose Select. See also the<br />
chapter Capsat Address Book on page 51.<br />
4. Press Spacebar to get a list of Land<br />
Stations/Internet Service Providers. Ple<strong>as</strong>e<br />
notice that only stations that are configured to<br />
support Internet Email will be on the list<br />
(ple<strong>as</strong>e see section 5.5.49).<br />
5. Position the highlight on the desired Land<br />
Earth Station / Internet Service Provider and<br />
choose Select.<br />
6. Press the arrows to move the highlight to the<br />
'' field.<br />
Figure 13 Transmit Email Window<br />
7. In the window standard<br />
additional email entries <strong>as</strong> “Cc”, “Bcc” and<br />
“Subject” can be available. Only entries<br />
supported by the selected Internet Service<br />
Provider will be present.<br />
8. Fill in the necessary extra information using<br />
the arrow key to move between the different<br />
fields.<br />
9. Press Enter once on '< OK >' to return to the<br />
normal transmit window<br />
63
<strong>TT</strong>-<strong>3000E</strong> <strong>mini</strong>-C <strong>GMDSS</strong> <strong>User</strong> <strong>Manual</strong><br />
10. Press Enter once on '< SEND >' to transmit the<br />
message. The Transmit window is now<br />
removed and you are back in the Text Field.<br />
The message is saved in the message log on<br />
the disk along with addressing information<br />
allowing you to send the message again if<br />
necessary.<br />
5.5.7 SELECTING A FILE FOR TRANSMISSION<br />
1. Move the highlight in the Transmit window to '<br />
[X] Text in editor' and press Spacebar to<br />
remove the 'X'. This reveals the field 'File'<br />
immediately below.<br />
2. Press Arrow Down to move highlight to the<br />
File field and press Spacebar to have the Select<br />
File window presented.<br />
3. Select the desired file by choosing Select.<br />
Note. The size of the file must not exceed 10 Kb, which is<br />
the absolute maximum message length.<br />
5.5.8 SCHEDULING A FILE FOR LATER TRANSMISSION<br />
1. Move the highlight in the Transmit window to '<br />
[X] Immediate transmission' and press<br />
Spacebar to remove the 'X'. This reveals the<br />
field 'Time' immediately below.<br />
2. Press Arrow Down to move highlight to the<br />
Time field and enter the time of the<br />
transmission.<br />
64
<strong>TT</strong>-<strong>3000E</strong> <strong>mini</strong>-C <strong>GMDSS</strong> <strong>User</strong> <strong>Manual</strong><br />
5.5.9 PRINTING A MESSAGE ON TRANSMISSION<br />
1. Move the highlight in the Transmit window to '<br />
[ ] Print' and press Spacebar to insert an 'X' .<br />
5.5.10 PASSWORD PROTECTION<br />
Transmissions can be p<strong>as</strong>sword protected to avoid<br />
unauthorised use. Distress priority transmissions are not<br />
affected.<br />
1. Choose Options, Configuration, P<strong>as</strong>sword (Alt,<br />
O, W).<br />
2. Type in your p<strong>as</strong>sword and press Enter.<br />
3. Type in your p<strong>as</strong>sword again for verification<br />
and press Enter.<br />
Note. To clear p<strong>as</strong>sword protection, choose this menu again<br />
and re-enter your p<strong>as</strong>sword twice.<br />
5.5.11 ABORTING A TRANSMISSION<br />
It is possible to abort a transmission at any time by<br />
selecting “Abort transmission” from the Options menu.<br />
65
<strong>TT</strong>-<strong>3000E</strong> <strong>mini</strong>-C <strong>GMDSS</strong> <strong>User</strong> <strong>Manual</strong><br />
5.5.12 TRANSMIT LOG<br />
The transmit log keeps track of all outgoing messages. All<br />
transmitted messages are recorded in a message log file on<br />
the disk together with all received messages. The transmit<br />
log is automatically updated every time the status of a<br />
message is changed.<br />
1. Choose Logs, Transmit log (Alt, L, T).<br />
Figure 14 Transmit Log<br />
Message Name (Msg) Is <strong>as</strong>signed by the transceiver at the<br />
time of transmission. The numbering will be sequential<br />
starting with '000'.<br />
Kbits Specifies how many kilobits actually sent. You will be<br />
charged per kilobit by the Land Station.<br />
Ref is the message reference number of the message <strong>as</strong><br />
given by the Land Station.<br />
66
<strong>TT</strong>-<strong>3000E</strong> <strong>mini</strong>-C <strong>GMDSS</strong> <strong>User</strong> <strong>Manual</strong><br />
Status Shows the current status of the message. On the<br />
next page is shown the possible values of this field.<br />
67
<strong>TT</strong>-<strong>3000E</strong> <strong>mini</strong>-C <strong>GMDSS</strong> <strong>User</strong> <strong>Manual</strong><br />
Status Field Explanation<br />
Waiting The message h<strong>as</strong> not yet been scheduled for<br />
transmission.<br />
Sending The message is scheduled for transmission<br />
Acknowledged The message h<strong>as</strong> been successfully received at the<br />
Land Station. Confirmation w<strong>as</strong> not requested.<br />
ConfReq The message h<strong>as</strong> been successfully received by the<br />
Land Station, but so far the delivery to the final<br />
destination h<strong>as</strong>n't been done.<br />
ConfOK The message h<strong>as</strong> been delivered to final<br />
Failed<br />
destination. You will only see ConfOk if you have<br />
requested confirmation in the Transmit window.<br />
Otherwise you will only get 'Acknowlg'.<br />
The Land Station failed to deliver a message on<br />
which confirmation had been requested or the<br />
transmission protocol failed. The failure code will<br />
be printed out.<br />
Pending The Land Station h<strong>as</strong> postponed the transmission<br />
for a short time. The transmission will be done<br />
when the Land Station tells the transceiver to go<br />
ahead.<br />
Rejected The transmission w<strong>as</strong> rejected by the Land Station.<br />
I.e. nothing w<strong>as</strong> sent.<br />
NotDeliv Will only be shown, if you explicitly try to get a<br />
confirmation on a message by selecting Confirm<br />
from the Txlog menu. It indicates that the Land<br />
Station h<strong>as</strong> not yet been able to deliver the<br />
message, but is still trying. When giving up, the<br />
status will change to 'Failed'.<br />
Unknown The message is no longer recorded in the<br />
transceiver and the final status is not known.<br />
Table 4 Message Transmission Status<br />
68
<strong>TT</strong>-<strong>3000E</strong> <strong>mini</strong>-C <strong>GMDSS</strong> <strong>User</strong> <strong>Manual</strong><br />
5.5.13 THE TRANSMIT LOG FACILITIES<br />
The following facilities are presented on the menu bar:<br />
View View a message.<br />
Resubmit Send a message again.<br />
Confirm Explicitly requests confirmation status at<br />
the Land Station of a particular entry.<br />
Er<strong>as</strong>e Deletes an entry from the log. You cannot<br />
delete an entry which h<strong>as</strong> status<br />
'Sending'.<br />
Print Prints out the log.<br />
5.5.14 SENDING A MESSAGE AGAIN<br />
Any outgoing message can be send again with the Resubmit<br />
facility of the Transmit Log.<br />
1. Choose Logs, Transmit log (Alt, L, T).<br />
2. Place the highlight on the message you want<br />
to send again, by using the Arrow Up/Down<br />
keys.<br />
3. Choose Resubmit (R) to have the Resubmit<br />
window presented. You now have the option<br />
to change the Land Station or the destination.<br />
4. Press Enter to move the highlight to the '<<br />
SEND >' field.<br />
5. Press Enter once on '< SEND >' to transmit the<br />
message.<br />
69
<strong>TT</strong>-<strong>3000E</strong> <strong>mini</strong>-C <strong>GMDSS</strong> <strong>User</strong> <strong>Manual</strong><br />
Figure 15 Resubmit Message<br />
5.5.15 RECEPTION<br />
By default all incoming messages are saved in the log files<br />
on the disk. In addition to this you may choose to have the<br />
messages printed. The messages may also be saved in<br />
separate files on the disk. When a new message h<strong>as</strong> been<br />
transferred to disk, this is indicated in the Status Field of<br />
the Capsat window with either "Mail" or "Egc-Mail".<br />
70
<strong>TT</strong>-<strong>3000E</strong> <strong>mini</strong>-C <strong>GMDSS</strong> <strong>User</strong> <strong>Manual</strong><br />
5.5.16 MESSAGE ROUTING<br />
1. Choose Options, Configuration, Routing (Alt,<br />
O, C, R).<br />
Figure 16Message Routing<br />
Change the routing to suit your needs by setting/removing<br />
the 'X' in the brackets.<br />
Important note. As the <strong>3000E</strong> system does not support a<br />
remote printer, you should always select local printer or<br />
disk. The local printer is connected to the 3606E Message<br />
Terminal.<br />
The Capsat program will change your routing selections if<br />
they conflict with the Inmarsat specifications:<br />
If the Message Log files box h<strong>as</strong> no checkmark and none of<br />
the 3 boxes for Mail h<strong>as</strong> a checkmark, then the program will<br />
put a mark in Local Prn for you.<br />
The same goes for the 4 EGC Message types.<br />
71
<strong>TT</strong>-<strong>3000E</strong> <strong>mini</strong>-C <strong>GMDSS</strong> <strong>User</strong> <strong>Manual</strong><br />
If none of the printer boxes for EGC SafetyNET messages<br />
have checkmarks then the program will put a mark in Local<br />
Prn for you.<br />
5.5.17 RECEIVE LOG<br />
The receive log holds information concerning the incoming<br />
mail. By default all received messages are stored in the log<br />
files on the disk. The receive log is automatically updated<br />
every time the status of a message is changed.<br />
1. Choose Logs, Receive log (Alt, L, R).<br />
View Mark<br />
Figure 17 Receive Log<br />
Mail Indication<br />
Mail Indicator Indicates the reception of a message on the<br />
disk since the l<strong>as</strong>t inspection of the receive log. Viewing the<br />
log clears this field.<br />
72
<strong>TT</strong>-<strong>3000E</strong> <strong>mini</strong>-C <strong>GMDSS</strong> <strong>User</strong> <strong>Manual</strong><br />
View Mark Is set on messages on the disk, which haven't<br />
been viewed with the View function. Will be cleared after<br />
viewing.<br />
File Is <strong>as</strong>signed by the transceiver at the time of reception.<br />
The numbering will be sequential starting with '000'. Note.<br />
If you don't do a Logout before turning off you transceiver,<br />
the current number will not be saved - So always do a<br />
logout...<br />
Type Indicates the type; DATA (8 bit), ASCII (7 bit) or<br />
PACKED (5 bit).<br />
Priority Is usually NOR for normal, but can be SOS in c<strong>as</strong>e a<br />
message with distress priority is received.<br />
Status Indicates whether the message h<strong>as</strong> been routed to<br />
local printer (Prn), diskette (Disk), remote printer (Rmt) or a<br />
combination thereof.<br />
5.5.18 THE RECEIVE LOG FACILITIES<br />
The following facilities are presented on the menu bar:<br />
View Views a message stored on disk.<br />
Print Prints a message stored on disk.<br />
Logprint Prints out the log.<br />
Mail Request Send a request for mail to a Capsat<br />
Gateway.<br />
5.5.19 REQUESTING MAIL<br />
If you normally receive your mail from a Company Mail<br />
System on a computer network (that connects to a Land<br />
Earth Station via a Capsat Gateway), you can use the<br />
Request Mail menu function to tell the Gateway to forward<br />
your mail to you.<br />
73
<strong>TT</strong>-<strong>3000E</strong> <strong>mini</strong>-C <strong>GMDSS</strong> <strong>User</strong> <strong>Manual</strong><br />
When people on the Mail Network send messages to you,<br />
the messages will not be sent directly, but will instead be<br />
stored in the Gateways mailbox until you call in and request<br />
them with the Request Mail command<br />
Setting up DNIDs for<br />
the 4 ocean regions<br />
Figure 18 Requesting Mail<br />
74<br />
DNID List<br />
The active DNID for this<br />
ocean region<br />
Your Transceiver must be registered at the Capsat Gateway<br />
for “Using Mailbox Service” if you want to be able to use<br />
this facility.<br />
The request is sent <strong>as</strong> a datareport to a DNID. You must<br />
set-up which DNID to use before you can send any requests.<br />
The Capsat program can have one DNID for each ocean<br />
region.<br />
5.5.20 ENHANCED GROUP CALL (EGC)<br />
The Enhanced Group Call (EGC) facility enables your system<br />
to receive messages from different information providers.<br />
EGC messages will normally be printed, but you are able to
<strong>TT</strong>-<strong>3000E</strong> <strong>mini</strong>-C <strong>GMDSS</strong> <strong>User</strong> <strong>Manual</strong><br />
route the messages to disk <strong>as</strong> well. Ple<strong>as</strong>e consult the<br />
chapter Message Routing on page 71.<br />
The EGC messages can be divided in 3 major categories.<br />
SafetyNET Maritime Safety Information (MSI) from<br />
Information Providers registered by IMO<br />
for <strong>GMDSS</strong> purposes.<br />
FleetNet Information from authorised commercial<br />
Information Providers.<br />
System Supplied by Inmarsat.<br />
Table 5 gives a quick view of the different EGC services.<br />
75
<strong>TT</strong>-<strong>3000E</strong> <strong>mini</strong>-C <strong>GMDSS</strong> <strong>User</strong> <strong>Manual</strong><br />
Service Abbreviated Addressing Type<br />
General Call GENERAL All mobiles System<br />
Group call GROUP ENID FleetNET<br />
Navigational<br />
Warnings to<br />
Rectangular are<strong>as</strong>.<br />
NAV_WARN Position SafetyNET<br />
Meteorological and<br />
navigational<br />
Warnings to<br />
circular are<strong>as</strong><br />
NAV_WARN Position SafetyNET<br />
Inmarsat system INMARSAT All or all in System<br />
messages<br />
Ocean Region<br />
Co<strong>as</strong>tal Warning COASTAL Navarea, SafetyNET<br />
(NAVTEX).<br />
subarea (A-Z)<br />
Shore-ship Distress<br />
alert to circular<br />
area<br />
DISTRESS Position SafetyNET<br />
EGC system<br />
SYSTEM Mobile<br />
System<br />
message<br />
number<br />
Meteorological or<br />
Navarea warning or<br />
Meteorological<br />
Forec<strong>as</strong>t.<br />
MET_WARN Navarea SafetyNET<br />
Download Group ENID Mobile<br />
System<br />
Identity<br />
number<br />
Search and Rescue<br />
Co-ordination to<br />
rectangular area<br />
SAR Position SafetyNET<br />
Search and Rescue<br />
Co-ordination to<br />
circular area<br />
SAR Position SafetyNET<br />
Chart correction<br />
service<br />
CHART Enid FleetNET<br />
Chart Correction<br />
Service for fixed<br />
are<strong>as</strong><br />
CHART Area SafetyNET<br />
Table 5 Enhanced Group Call (EGC)<br />
Note. If your position h<strong>as</strong> the status INVALID in the Position<br />
window (Alt, P), the transceiver will receive all EGCs<br />
addressed by position.<br />
76
<strong>TT</strong>-<strong>3000E</strong> <strong>mini</strong>-C <strong>GMDSS</strong> <strong>User</strong> <strong>Manual</strong><br />
5.5.21 THE EGC WINDOW<br />
1. Choose Options, Configuration, EGC (Alt, O, C,<br />
E) to get the EGC window.<br />
Fixed Positions<br />
Figure 19 The EGC Window<br />
77<br />
EGC Service<br />
Sel ecti on<br />
Co<strong>as</strong>tal Warning<br />
Sub ar ea (A-Z)<br />
Co<strong>as</strong>tal Warning<br />
Service Selection<br />
EGC Service Selection Makes it possible to choose whether<br />
you want to receive a particular service type or not.<br />
FleetNET messages cannot be blocked. On maritime units<br />
this also applies to SafetyNET messages.<br />
Co<strong>as</strong>tal Warning Subarea (A-Z) Allows you to specify<br />
reception of messages addressed to one or several subare<strong>as</strong><br />
within a NAVAREA. For instance you specify subarea A,C,E<br />
by typing 'ACE' in the field.<br />
Co<strong>as</strong>tal Warning Service Selection Allows you to mark 'X' the<br />
desired types of services for reception.<br />
Fixed Positions Allows you to type in 5 additional positions<br />
in order to receive EGCs addressed to geographic are<strong>as</strong><br />
including these.
<strong>TT</strong>-<strong>3000E</strong> <strong>mini</strong>-C <strong>GMDSS</strong> <strong>User</strong> <strong>Manual</strong><br />
Additional NAVAREA Allows you to receive EGCs addressed<br />
to one additional area besides the one currently given by<br />
your position in the Position window.<br />
5.5.22 EGC LOG<br />
The EGC log holds information concerning the received EGC<br />
messages. The layout and the facilities strongly resemble<br />
those of the Receive Log, which we kindly <strong>as</strong>k you to<br />
consult. All EGC messages are named EGC.000, EGC.001 and<br />
so on. The priority field in the log may show the following<br />
codes.<br />
78
<strong>TT</strong>-<strong>3000E</strong> <strong>mini</strong>-C <strong>GMDSS</strong> <strong>User</strong> <strong>Manual</strong><br />
Short Type Remarks<br />
NOR Normal<br />
SAF Safety<br />
URG Urgent A message box will be displayed on the<br />
screen and a Beep will issued at regular<br />
intervals until you remove the box by<br />
pressing Esc.<br />
In addition the Distress Msg LED and the<br />
audio alarm on the Remote Alarm Box will<br />
be activated. The audio alarm is stopped by<br />
pressing the buzzer reset button on the<br />
Remote Alarm Box. The Distress Msg LED is<br />
turned off by pressing Esc at the Message<br />
Terminal or by pressing the Stop button on<br />
the transceiver.<br />
SOS Distress A message box will be displayed on the<br />
screen and a Beep will issued at regular<br />
intervals until you remove the box by<br />
pressing Esc.<br />
In addition the Distress Msg LED and the<br />
audio alarm on the Remote Alarm Box will<br />
be activated. The audio alarm is stopped by<br />
pressing the buzzer reset button on the<br />
Remote Alarm Box. The Distress Msg LED is<br />
turned off by pressing Esc at the Message<br />
Terminal or by pressing the Stop button on<br />
the transceiver.<br />
Table 6 EGC priority<br />
5.5.23 ENID - EGC NETWORK ID<br />
The ENIDs are downloaded to your transceiver by the<br />
Download Group Identity service. When you have a<br />
particular ENID stored, you can receive EGCs addressed to<br />
this ENID. To check your ENIDs:<br />
1. Choose Options, Configuration, ENIDs (Alt, O,<br />
C, I).<br />
By Disabling an ENID, you will subsequently not receive<br />
EGCs addressed to this ENID. You can make an ENID active<br />
79
<strong>TT</strong>-<strong>3000E</strong> <strong>mini</strong>-C <strong>GMDSS</strong> <strong>User</strong> <strong>Manual</strong><br />
again by selecting Enable from the menu of the ENID<br />
window.<br />
5.5.24 DISTRESS<br />
You cannot send a Distress Alert from the Capsat Program, but<br />
you can set the Distress Message via the Distress Menu:<br />
Figure 20 Setting Distress Message Window<br />
Land Station Will normally be filled in with the station, that<br />
you used for your latest transmission. You may edit the<br />
field by pressing Spacebar.<br />
Position Field Allows you to enter your current position.<br />
Nature of Distress Shows here the types available for Maritime<br />
Distress.<br />
The Maritime Distress Alert parameters set-up in the<br />
Distress Menu are transferred to the transceiver. The<br />
parameters are valid in the transceiver for an hour or until<br />
a distress acknowledgement is received. You don’t send a<br />
Maritime Distress Alert from the Distress Menu. You will get<br />
a warning about this when you leave the Distress Menu:<br />
80
<strong>TT</strong>-<strong>3000E</strong> <strong>mini</strong>-C <strong>GMDSS</strong> <strong>User</strong> <strong>Manual</strong><br />
To actually send a Maritime Distress Alert you must press<br />
the Distress button on the AP5042 Alarm panel for at le<strong>as</strong>t 5<br />
seconds until the Alarm indicator is continuously lit.<br />
After you have sent a Maritime Distress Alert you may then<br />
send a Detailed Distress Message (see later).<br />
5.5.25 SENDING A DETAILED DISTRESS MESSAGE.<br />
1. Type in the message in the Text Field of the<br />
Editor.<br />
2. Choose Transmit (Alt, T).<br />
Press the Tabulation Key to move the highlight<br />
one position to the right to the priority field '(<br />
•) Routine'.<br />
3. Press Arrow Down twice to move to '( )<br />
Distress' and press Spacebar to select. This<br />
causes the address field to show 'SEARCH &<br />
RESCUE'.<br />
4. Press Enter to move the highlight to '< SEND >'<br />
and press Enter again to transmit.<br />
Note. If the Land Station field is empty, the<br />
highlight will be positioned there instead.<br />
Press Spacebar to get the Land Station list and<br />
select a station. Press Enter to move to '< SEND<br />
>'.<br />
81
<strong>TT</strong>-<strong>3000E</strong> <strong>mini</strong>-C <strong>GMDSS</strong> <strong>User</strong> <strong>Manual</strong><br />
5. Confirm the distress priority transmission by<br />
pressing Enter.<br />
5.5.26 POSITION & GPS<br />
Your geographical position is a key element in a maritime<br />
system. It is used in EGC reception to selectively receive the<br />
messages addressed to certain are<strong>as</strong>. Also, a correct<br />
position is vital when sending Distress in c<strong>as</strong>e of<br />
emergency.<br />
The transceiver h<strong>as</strong> a built-in GPS unit, which ensures that<br />
your equipment knows the correct position. If your<br />
transceiver h<strong>as</strong> a built-in GPS, this will be indicated in the<br />
main Capsat window <strong>as</strong> shown below.<br />
The mode of the GPS is displayed using small boxes. See<br />
Table 7.<br />
82
<strong>TT</strong>-<strong>3000E</strong> <strong>mini</strong>-C <strong>GMDSS</strong> <strong>User</strong> <strong>Manual</strong><br />
GPS Mode Comment<br />
� � � Acquisition The GPS module is trying to acquire<br />
83<br />
the correct position. To e<strong>as</strong>e the<br />
acquisition, the approximate<br />
position and time could be entered.<br />
Upon power-up the GPS module will<br />
always enter this mode. If the<br />
transceiver h<strong>as</strong> a valid position<br />
stored in non-volatile memory, this<br />
will be fed to the GPS.<br />
� � � 2-D The time, latitude and longitude are<br />
known. The number of small boxes<br />
indicates the quality of the GPS<br />
signal.<br />
� � � 3-D The time, latitude and longitude are<br />
known.<br />
Table 7 GPS Status<br />
The time supplied by the GPS will be used <strong>as</strong> the system<br />
time. This also includes the PC or Message Terminal. When<br />
the GPS is in 2-D or 3-D mode, you are not able to change<br />
the time or the position. If you do not have the correct local<br />
time, ple<strong>as</strong>e check your time-zone. (Press F10, Select<br />
Options and Clock).<br />
Maritime Units Only. If the position h<strong>as</strong>n't been updated in 4<br />
hours an ‘Update Position’ warning is shown. This warning is<br />
acknowledged using the Esc key. In addition the Status<br />
Field of the main Capsat window will show 'Position' next to<br />
the Ocean Region. This indication is removed when the<br />
position h<strong>as</strong> been updated. If it isn't updated within 12<br />
hours, the position will become invalid.
<strong>TT</strong>-<strong>3000E</strong> <strong>mini</strong>-C <strong>GMDSS</strong> <strong>User</strong> <strong>Manual</strong><br />
5.5.27 SE<strong>TT</strong>ING THE POSITION<br />
1. Choose Position (Alt, P)<br />
2. Type in the position; Longitude: degrees,<br />
minutes and hundreds of a minute and so on.<br />
3. Press Enter on the OK button to actually set<br />
the position.<br />
Figure 21 Setting the Position<br />
When the position is shown on the screen, the values<br />
shown will be updated by the program allowing you to<br />
monitor the position generated by a the GPS module.<br />
5.5.28 POSITION REPORTING<br />
This facility allows you to program the Transceiver to send<br />
position reports unattended. The reports are sent <strong>as</strong> Data<br />
Reports to a DNID-mailbox in a compressed format.<br />
This makes the reporting inexpensive compare to sending a<br />
text message containing a position and time like explained<br />
in the section about Special Options on page 53.<br />
A brief description of DNIDs is given on page 95.<br />
84
<strong>TT</strong>-<strong>3000E</strong> <strong>mini</strong>-C <strong>GMDSS</strong> <strong>User</strong> <strong>Manual</strong><br />
The transceiver may also be commanded remotely to send<br />
position reports. This is done by Polling. You need to<br />
contact the LES Operator on the LES you want to use for<br />
instruction on how to use polling.<br />
The Transceiver can control up to four connections,<br />
numbered from 0 to 3. Each of these connections can hold<br />
one reporting program, but only one of the connections can<br />
be local. This is the one that you can program from the<br />
Capsat program. The other 3 connections must be set up<br />
from a remote site via polling.<br />
Below is a example of the status of connection 0 and 1<br />
when they are un-programmed (closed). If you want to see<br />
connection 2 and 3 you can select More on the menu.<br />
Figure 22 Data Reporting<br />
5.5.29 SE<strong>TT</strong>ING UP POSITION REPORTS<br />
85<br />
Connection 0<br />
Information Area<br />
Connection 1<br />
Information Area<br />
Important: Before you start to set up a program you should<br />
make sure that your Transceiver h<strong>as</strong> a good satellite signal,<br />
<strong>as</strong> the transceiver needs the timing information from the<br />
Inmarsat-C System to be able to set up the program.<br />
To set up a Position Report program on your Transceiver,<br />
you must proceed <strong>as</strong> below:
<strong>TT</strong>-<strong>3000E</strong> <strong>mini</strong>-C <strong>GMDSS</strong> <strong>User</strong> <strong>Manual</strong><br />
1. Choose Options, Configuration, Position Report<br />
(Alt, O, C P) to get the Position Report window.<br />
2. Select Change, Open from the menu.<br />
Figure 23 Setting up Data Reporting<br />
You will now see a list of available DNIDs. You can<br />
mark one or more from the list, but the DNIDs must be<br />
from different ocean regions.<br />
You can find out which ocean region the DNID belongs to<br />
by looking at its LES ID. The first digit of the (3 digit) LES<br />
ID is the ocean region number:<br />
0: Atlantic West<br />
1: Atlantic E<strong>as</strong>t<br />
2: Pacific<br />
3: Indian<br />
86
<strong>TT</strong>-<strong>3000E</strong> <strong>mini</strong>-C <strong>GMDSS</strong> <strong>User</strong> <strong>Manual</strong><br />
Two marked<br />
DNID’s<br />
Figure 24 Setting Ocean Area on Data Reporting<br />
87<br />
List of available<br />
DNIDs<br />
You can use Spacebar or choose Mark to mark entries.<br />
When you choose Select and press ENTER you will be<br />
returned back to the Position Window and the Transceiver<br />
will now open the connection for you.<br />
Figure 25 Changing Status on Data Reporting<br />
You can see that the Connection Area for Connection 0 h<strong>as</strong><br />
now been filled with information about the Position Report<br />
program.<br />
3. Select Program from the menu.
<strong>TT</strong>-<strong>3000E</strong> <strong>mini</strong>-C <strong>GMDSS</strong> <strong>User</strong> <strong>Manual</strong><br />
You can now specify how often you want your reports to be<br />
sent. The default is 60 minutes between each report.<br />
Report Configuration<br />
for Connection 0<br />
Figure 26 Reporting Interval<br />
4. To finally start the reporting choose Start<br />
from the menu, and you will see a result like<br />
the one below:<br />
Figure 27 Starting Data Reporting<br />
You now have an active Position Report Program!<br />
88<br />
DNID List for<br />
Connection 0<br />
The Report Configuration shows you the details of the<br />
current program:<br />
Type: Can be Local or Remote. This tells you if the<br />
connection is one that you have made via the Capsat
<strong>TT</strong>-<strong>3000E</strong> <strong>mini</strong>-C <strong>GMDSS</strong> <strong>User</strong> <strong>Manual</strong><br />
Program or if it h<strong>as</strong> been set up via polling from a remote<br />
site. One of the 4 connections can be local.<br />
State: Can be Started or Stopped. This informs you if the<br />
connection is currently sending any reports.<br />
Contents: Can be None, ADS or Inmarsat. The indication is<br />
None <strong>as</strong> long <strong>as</strong> the connection h<strong>as</strong> not been programmed,<br />
ADS if the connection sends Position Reports in the RTCA<br />
DO-212 Automatic Dependent Surveillance data format (not<br />
supported by <strong>TT</strong>-<strong>3000E</strong>), and Inmarsat if the position<br />
reports are sent in the Inmarsat specified Landmobile or<br />
Maritime format. If this field is blank the connection is<br />
either not programmed or sends reports without positions.<br />
5.5.30 CHECKING THE REPORTING FUNCTIONS<br />
By selecting Status from the menu you can see the technical<br />
details of the local connection. The menu will be<br />
unavailable if you do not have a local connection open.<br />
Below is an example:<br />
The active DNID in<br />
this ocean region<br />
The start time of<br />
the program and<br />
the time of the next<br />
report in frame<br />
numbers and UTC<br />
time<br />
The number of reports that<br />
h<strong>as</strong> been sucessfully sent<br />
since the system w<strong>as</strong> turned<br />
on<br />
89<br />
Report interval me<strong>as</strong>ured in<br />
frames (8.64 seconds). 417<br />
frames = 60 minutes.<br />
The status of the program scheduler. You may<br />
see ‘frametiming error’ here if your system<br />
does not have synchronization.<br />
Figure 28 Data Reporting Program Details
<strong>TT</strong>-<strong>3000E</strong> <strong>mini</strong>-C <strong>GMDSS</strong> <strong>User</strong> <strong>Manual</strong><br />
5.5.31 OCEAN REGION MANAGEMENT<br />
The coverage are<strong>as</strong> of neighbouring satellites overlap. In<br />
many are<strong>as</strong> you will be able to use more than one ocean<br />
region.<br />
5.5.32 SCAN<br />
The transceiver scans the satellite frequencies in order to<br />
find the strongest signal. When the best signal is found, a<br />
login will be issued if need be. A scan may be performed<br />
within the limits of one Ocean Region or in all regions. You<br />
control this by:<br />
5.5.33 LOGIN<br />
1. Choose Options, Scan (Alt, O, S) to get the Scan<br />
menu.<br />
2. Initiate a scan by selecting a specific Ocean<br />
Region or selecting an All ocean-scan. The '•'<br />
marks your selection.<br />
The transceiver will automatically perform a login if<br />
necessary when you turn on the power. This is true in all<br />
c<strong>as</strong>es, but one. A Land mobile unit will do nothing, if it's<br />
not commissioned. In that c<strong>as</strong>e you must manually perform<br />
a login.<br />
1. Choose Options, Login and select the desired<br />
Ocean Region. A '•' will mark your selection<br />
and the Status Field of the Capsat window will<br />
show '' until the login is completed.<br />
You may force the transceiver to login on a specific satellite<br />
channel by choosing Channel... from the Login menu.<br />
90
<strong>TT</strong>-<strong>3000E</strong> <strong>mini</strong>-C <strong>GMDSS</strong> <strong>User</strong> <strong>Manual</strong><br />
Do <strong>Manual</strong><br />
Login when...<br />
5.5.34 LOGOUT<br />
- You have logged out and you haven't<br />
turned off your equipment in the<br />
meantime.<br />
- You have turned on your system for the<br />
first time.<br />
- You want to operate in another Ocean<br />
Region.<br />
Before turning off your system you should perform a<br />
logout. This will instruct the transceiver to save certain<br />
system parameters (Numbers of EGC-, IN- and OUT-files).<br />
Also the Inmarsat-C system will be able to notify any calling<br />
parties, that your transceiver at the moment cannot be<br />
reached.<br />
1. Choose Options, Logout (Alt, O, O) and confirm<br />
the Logout. The Status Field of the Capsat<br />
window will show ''.<br />
2. When the Status Field h<strong>as</strong> changed to 'Logged<br />
Out', you are welcome to turn off your<br />
equipment.<br />
5.5.35 MISCELLANEOUS<br />
5.5.36 NMEA-OUT<br />
In this chapter we will briefly describe some of the<br />
rarely used facilities in the user interface.<br />
The NMEA-out feature allows <strong>TT</strong>-<strong>3000E</strong> to send GPS NMEA<br />
sentences to external equipment via the secondary COM<br />
port (RS-232) of the message terminal. The system complies<br />
with:<br />
• NMEA 0183, version 3.00, July 1, 2000<br />
91
<strong>TT</strong>-<strong>3000E</strong> <strong>mini</strong>-C <strong>GMDSS</strong> <strong>User</strong> <strong>Manual</strong><br />
• IEC 61162-1:2000, November 2000.<br />
• IEC 61262-2, 1998<br />
Not that in order to fully comply with IEC 61162-1/2, the<br />
<strong>TT</strong>-3606E opt. 003 NMEA Adapter must be used between the<br />
TALKER (3606E) and the LISTENER (External equipment).<br />
The internal GPS unit of <strong>TT</strong>-3026C provides the position for<br />
the NMEA sentences.<br />
The following sentences are transmitted:<br />
• GLL – Geographic Position – Latitude/Longitude<br />
• VTG – Course Over Ground and Ground Speed<br />
• GGA – Global Positioning System Fix Data<br />
• ZDA – Time & Date<br />
An example of the sentences is shown below:<br />
$GPGLL,5547.60,N,01231.40,E,143055,A,A*41<br />
$GPVTG,28,T,,M,0,N,0,K,A*29<br />
��$GPGGA,143055,5547.60,N,01231.40,E,1,,01,,M,,M,,*5B��<br />
$GPZDA,143055,22,12,2006,,*49<br />
Note, below is a list of unused fields in the sentences.<br />
These fields are empty <strong>as</strong> can be seen in the above<br />
example.<br />
Type Field Data of unused field<br />
VTG 3 Course over ground, degrees magnetic.<br />
GGA 7 Number of satellites in use.<br />
9 Antenna altitude above/below mean sea<br />
level (geoid).<br />
92
<strong>TT</strong>-<strong>3000E</strong> <strong>mini</strong>-C <strong>GMDSS</strong> <strong>User</strong> <strong>Manual</strong><br />
11 Geoidal separation.<br />
13 Age of differential GPS data.<br />
ZDA 5 Local zone hours.<br />
There is approximately a one second interval between<br />
two equal sentences. The position is updated every 30<br />
seconds.<br />
NMEA-out is enabled/disabled from “Secondary serial<br />
port…” in the Options menu. When enabled, <strong>TT</strong>-<strong>3000E</strong><br />
will immediately start sending out sentences at the<br />
secondary serial port. The port (COM1/COM2) used can<br />
be changed in the serial ports settings. Refer to 5.7.4<br />
Configuring the Serial Port.<br />
5.5.37 LINK TEST<br />
The Link Test checks if your equipment meets the<br />
specifications set out by Inmarsat. As previously described,<br />
a Link Test will be carried out when performing a login for<br />
the first time. The test is then regarded <strong>as</strong> a commissioning<br />
procedure. You may do a Link Test at any time if you want<br />
to check your system again.<br />
1. Choose Options, Link test (Alt, O, I) to have the<br />
Link Test window displayed. If a test h<strong>as</strong> been<br />
carried out, the results will be shown. Each item<br />
will have the verdict OK or FAIL. If no test h<strong>as</strong><br />
been done with this unit, no results will be<br />
available.<br />
93
<strong>TT</strong>-<strong>3000E</strong> <strong>mini</strong>-C <strong>GMDSS</strong> <strong>User</strong> <strong>Manual</strong><br />
2. Do a Link Test by choosing Activate from the<br />
menu bar. The Status Field of the Capsat window<br />
will show '' until the test h<strong>as</strong> been<br />
completed.<br />
3. During the Link Test the message:<br />
Automatic test mode: Normal communication<br />
disabled. Do not press any distress buttons unless<br />
you are in distress<br />
will be displayed.<br />
4. When the link test is completed, the 'Link Test<br />
Finished' message is displayed/printed along with<br />
the results of the test. This may take up to 15<br />
minutes!<br />
5.5.38 POLLING<br />
A "Poll" is a message, but it differs from normal messages<br />
in the way that it can only sent in the direction from a<br />
terrestrial user (telex, x.25 or telephone modem) towards<br />
the mobile unit and in the way that it may simultaneously<br />
be received by several mobile units.<br />
A Poll can be addressed to:<br />
• One specific mobile.<br />
• A group of mobiles.<br />
• A group of mobiles within a specified<br />
geographic or navigational area.<br />
The reception of a poll can initiate the transmission of a<br />
position report or trigger some other pre-defined event. As<br />
shipped your system only supports transmission of<br />
94
<strong>TT</strong>-<strong>3000E</strong> <strong>mini</strong>-C <strong>GMDSS</strong> <strong>User</strong> <strong>Manual</strong><br />
position reports in return to a poll. When a Capsat mobile<br />
unit responds to a Poll, the response is either forwarded to<br />
the terrestrial user at once, or it is stored at the Land<br />
Station for later retrieval. When receiving a poll the<br />
transceiver will generate a file containing the data of the<br />
poll. These files named POLLFILE.000, POLLFILE.001,... will<br />
be transferred to disk. No further action will be taken.<br />
5.5.39 DNID - THE DATA NETWORK ID<br />
The DNID is a unique number, which serves <strong>as</strong> a link<br />
between the terrestrial user and the mobile unit(s), i.e. the<br />
DNID is used when the terrestrial user issues a Poll and also<br />
when the mobile responds. A user may very well have<br />
several DNIDs. This is also the c<strong>as</strong>e for the mobile.<br />
When several mobiles have the same DNID, this is called a<br />
group. Each mobile in the group is also designated a<br />
member number, which enables the terrestrial user to<br />
differentiate between the mobiles in the group. This is<br />
especially important, when responses from the mobiles are<br />
processed at the premises of the terrestrial user.<br />
The user interface allows you to enable or disable DNIDs. If<br />
a DNID is disabled you will not receive any poll with this<br />
DNID or be able to use it for position reporting.<br />
To change the status of a DNID:<br />
1. Choose Options, Configuration, DNIDs (Alt, O,<br />
C, D) to have the DNID window displayed.<br />
2. Choose Enable or Disable to change the status<br />
of a DNID entry. The entries can have the<br />
status Enabled, Disabled, T&TPos on and<br />
T&TPos off. The l<strong>as</strong>t two types will only<br />
appear if you have set this DNID to use the old<br />
T&T type position reporting.<br />
95
<strong>TT</strong>-<strong>3000E</strong> <strong>mini</strong>-C <strong>GMDSS</strong> <strong>User</strong> <strong>Manual</strong><br />
The user interface also allows you to send a data report<br />
directly to a DNID:<br />
1. Choose Options, Configuration, DNIDs (Alt, O,<br />
C, D) to have the DNID window displayed.<br />
2. Move the highlight to the DNID, that you want<br />
to send to.<br />
3. Choose Transmit and select either the current<br />
content of the editor or a disk file to be<br />
transmitted <strong>as</strong> a datareport. Ple<strong>as</strong>e note that<br />
the size of the data report is limited to 120<br />
bytes. If your message/file is too big, only the<br />
first 120 bytes are transmitted.<br />
5.5.40 NCS CHANNELS<br />
The system comes with 4 pre-programmed NCS channels.<br />
Upon receiving information from Inmarsat you may insert<br />
new channels in this table.<br />
1. Choose Options, Configuration, NCS-channels<br />
(Alt, O, C, N) to have the NCS window<br />
displayed.<br />
2. Choose Insert to insert a new NCS-channel.<br />
96
<strong>TT</strong>-<strong>3000E</strong> <strong>mini</strong>-C <strong>GMDSS</strong> <strong>User</strong> <strong>Manual</strong><br />
5.5.41 TRANSCEIVER STATUS INFORMATION<br />
General information of the transceiver is available. The<br />
given information is discussed in detail in the Installation<br />
and Service <strong>Manual</strong>. Only in c<strong>as</strong>e of problems, you may<br />
need to see this information.<br />
1. Choose Options, Transceiver status (Alt, O, T)<br />
to have the Status window displayed.<br />
2. Choose Update just once to have the window<br />
updated automatically every 5 seconds.<br />
5.5.42 GPS STATUS INFORMATION<br />
5.5.43 PASSWORD<br />
1. Choose Options, GPS status (Alt, O, G) to have<br />
the Status window displayed.<br />
2. Choose Update just once to have the window<br />
updated automatically every 5 seconds.<br />
5.5.43.1 CAPSAT APPLICATION<br />
The Capsat application h<strong>as</strong> two p<strong>as</strong>swords: One for<br />
message transmission and one for the program<br />
configuration.<br />
Choose Options, Configuration, P<strong>as</strong>sword for entering<br />
p<strong>as</strong>swords for the Configuration and Transmit Window.<br />
You will be <strong>as</strong>ked for the p<strong>as</strong>sword in the following places:<br />
Configuration P<strong>as</strong>sword:<br />
The EGC Window when you select OK and press Enter. The Routing<br />
Window when you select OK and press Enter. The Open, Program,<br />
Start, Stop and Close menu selections in the Change Menu of the<br />
97
<strong>TT</strong>-<strong>3000E</strong> <strong>mini</strong>-C <strong>GMDSS</strong> <strong>User</strong> <strong>Manual</strong><br />
Position Report Window. The DNID and ENID Windows when you select<br />
Enable or Disable and press ENTER.<br />
Transmit P<strong>as</strong>sword:<br />
The Transmit Window when you select OK and press Enter.<br />
You can remove the p<strong>as</strong>swords again if you choose<br />
P<strong>as</strong>sword again and re-enter your p<strong>as</strong>sword twice.<br />
5.5.43.2 THE CAPSAT TRANSCEIVER<br />
The Transceivers own configuration can also be protected<br />
by a p<strong>as</strong>sword. If this feature is enabled you may see an<br />
error message like the one below when you start the Capsat<br />
program.<br />
Figure 29 P<strong>as</strong>sword needed message<br />
You can ignore this message if you do not need to change<br />
any Transceiver configuration (like message routing,<br />
printer settings etc.)<br />
If you do need to change the Transceivers configuration<br />
you must enter the p<strong>as</strong>sword in the Transceiver, by<br />
selecting the Terminal mode (Alt, O, C, T) and enter the<br />
following lines:<br />
su <br />
p<strong>as</strong>sword<br />
98
<strong>TT</strong>-<strong>3000E</strong> <strong>mini</strong>-C <strong>GMDSS</strong> <strong>User</strong> <strong>Manual</strong><br />
where user level is either “sysadm” or another name<br />
supplied by your dealer. p<strong>as</strong>sword is the p<strong>as</strong>sword<br />
<strong>as</strong>sociated with that user level. Ple<strong>as</strong>e note that the<br />
Transceiver will display stars instead of the letters in your<br />
p<strong>as</strong>sword.<br />
5.5.44 TEST MODE<br />
The Distress Test Mode facility (Alt, O, E) allows test of the<br />
Distress Buttons, Distress LED’s and wiring. When Distress Test<br />
Mode option is selected the Distress Test Mode message is<br />
displayed:<br />
Cancel Test Mode<br />
Yes No<br />
Distress buttons are under test.<br />
Cancel the test mode if a real distress alert<br />
needs to be sent.<br />
Cancel?<br />
Figure 30 Test Mode<br />
In Distress Test Mode the Distress Buttons can be activated<br />
and tested without issuing Distress Alerts. Distress Test<br />
Mode is terminated by pressing the Esc key. After Distress<br />
Test Mode is terminated activating the Distress Buttons will<br />
again result in a Distress Alert being sent. Read more about<br />
the distress test mode in the Alarm Panel installation<br />
manual.<br />
5.5.45 TERMINAL MODE<br />
Note. Do not use the Terminal Mode unless you know<br />
what you are doing. When the terminal window is open<br />
no information windows or error windows are shown.<br />
99
<strong>TT</strong>-<strong>3000E</strong> <strong>mini</strong>-C <strong>GMDSS</strong> <strong>User</strong> <strong>Manual</strong><br />
Always leave the Terminal Mode (Press Esc) when you're<br />
done to ensure the functionality of your system.<br />
The Terminal Mode is available for users wanting to<br />
customise their system to a degree not available from the<br />
windows of the Message Handling software.<br />
In Terminal Mode you are in direct contact with the<br />
transceiver and you are able to issue commands by typing<br />
them from the keyboard.<br />
5.5.46 MESSAGE LOG<br />
1. Choose Options, Configuration, Terminal mode<br />
(Alt, O, C, T) and wait for the blinking cursor<br />
to appear. This may take a while if the<br />
transceiver and the Message Handling<br />
program is communicating.<br />
2. Press Enter to see the prompt ' :' on the<br />
screen.<br />
3. Type 'HELP' and Enter to get a list of the<br />
available commands.<br />
4. Type in a command followed by ' ?' and press<br />
Enter to get detailed information.<br />
All in- and outgoing messages are recorded in special log<br />
files on disk. Each log file may hold <strong>as</strong> many <strong>as</strong> 50<br />
messages. The name of the log files have a special layout<br />
such <strong>as</strong>:<br />
LOG09-97.001 LOG10-97.001 LOG10-97.002<br />
where 09 and 10 is September and October respectively. 97<br />
is the year. 001 and 002 is a sequential number within each<br />
month. A new log file is generated when a new month<br />
begins or when the size of the file gets larger than 100 Kb.<br />
100
<strong>TT</strong>-<strong>3000E</strong> <strong>mini</strong>-C <strong>GMDSS</strong> <strong>User</strong> <strong>Manual</strong><br />
The information shown in the Transmit log, the Receive log<br />
and the EGC log is that of the 2 latest log files. This means,<br />
that the information in these log will show a maximum of<br />
100 messages all together.<br />
When the free disk space gets well below 150Kb, the<br />
program will <strong>as</strong>k you to insert an empty disk. A new log file<br />
is then generated on the new disk and you will be <strong>as</strong>ked to<br />
insert the previous disk to have the program copy the latest<br />
log file on to the new disk. In this way you get continuity in<br />
the logs.<br />
When using floppy diskettes, you may need to remove the<br />
message log disk from time to time in order to retrieve files<br />
on other disks. If the program needs the log file during this,<br />
you will be <strong>as</strong>ked to insert the disk with the log files again.<br />
5.5.47 INSPECTING OLD MESSAGE LOGS<br />
Old message log files may be inspected and messages may<br />
be retrieved. This is done by:<br />
1. Choose Logs, Old log files (Alt, L, O) to have a<br />
list of the log files presented.<br />
2. Move the highlight to the log file, you want to<br />
see and choose Select which then presents a<br />
window <strong>as</strong> shown below.<br />
3. Move the highlight to a message. You may now<br />
View, Print or even Copy the message to a<br />
separate file.<br />
101
<strong>TT</strong>-<strong>3000E</strong> <strong>mini</strong>-C <strong>GMDSS</strong> <strong>User</strong> <strong>Manual</strong><br />
5.5.48 ABOUT...<br />
Figure 31 Old Message Logs<br />
The About window gives you a summary information of<br />
your system, such <strong>as</strong> the program version, serial number,<br />
mobile number and type.<br />
1. Choose File, About (Alt, F, B)<br />
5.5.49 INTERNET MAIL<br />
When the Inmarsat-C network w<strong>as</strong> launched the Internet<br />
Email facility w<strong>as</strong> not commonly used and the Inmarsat-C<br />
protocols are therefore not prepared for sending Internet<br />
emails.<br />
This problem h<strong>as</strong> been solved such that the different<br />
Internet Email fields like address, CC address, Subject etc.<br />
are written into the normal Inmarsat-C mail <strong>as</strong> separate<br />
102
<strong>TT</strong>-<strong>3000E</strong> <strong>mini</strong>-C <strong>GMDSS</strong> <strong>User</strong> <strong>Manual</strong><br />
lines with a keyword and the corresponding text. An<br />
example could be<br />
TO: name@company.com<br />
Where the “TO:” is the keyword and the rest of the text line<br />
is the Email recipient.<br />
The different Inmarsat-C service providers do unfortunately<br />
not use the same keywords causing the email transmission<br />
to be somehow confusing.<br />
In the InternetMail menu (ple<strong>as</strong>e see Figure 32) the<br />
configuration for each service provider can be entered.<br />
When the parameters are correctly configured the Capsat<br />
program will automatically enter the service provider<br />
depending keywords and corresponding text in the<br />
Inmarsat-C message causing Internet Email message<br />
transmission to be <strong>as</strong> e<strong>as</strong>y <strong>as</strong> all other message formats in<br />
the Inmarsat-C network.<br />
Figure 32 InternetMail Configuration Menu<br />
When the Capsat is delivered all known service provider<br />
configurations are pre-entered, and it should therefore only<br />
103
<strong>TT</strong>-<strong>3000E</strong> <strong>mini</strong>-C <strong>GMDSS</strong> <strong>User</strong> <strong>Manual</strong><br />
be necessary to use this menu if additional service<br />
operators offer Inmarsat-C email facilities.<br />
If a new service provider h<strong>as</strong> to be configured ple<strong>as</strong>e use<br />
the following guidelines:<br />
1. Chose Options, Configuration, InternetMail (Alt, O,<br />
C, M) to have the configuration menu<br />
presented.<br />
2. Select New from the Menu bar and start with<br />
entering the service provider’s name.<br />
3. For each ocean area where the Operator is<br />
present the Inmarsat-C LES ID h<strong>as</strong> to be<br />
entered. Leave unsupported ocean area fields<br />
empty.<br />
4. For each of the items: “Internet Address<br />
Command”, “Carbon Copy”, “Blind Carbon Copy”,<br />
“Subject” and “Message Prefix” the<br />
corresponding text h<strong>as</strong> to be entered. Ple<strong>as</strong>e<br />
refer to information given by the Operator.<br />
Unused fields are left empty and will therefore<br />
not be available when transmitting the email<br />
(ple<strong>as</strong>e see section 5.5.6).<br />
5. Depending on service provider configuration<br />
the Internet Email message is either<br />
transferred using Special Access Code<br />
(Special) or using X.25. Ple<strong>as</strong>e select the<br />
correct format using the space button on the<br />
type field. The corresponding value field must<br />
be entered afterwards. Ple<strong>as</strong>e refer to service<br />
provider information on type and value.<br />
6. Finally it can be chosen that the service<br />
provider is used <strong>as</strong> default email operator<br />
104
<strong>TT</strong>-<strong>3000E</strong> <strong>mini</strong>-C <strong>GMDSS</strong> <strong>User</strong> <strong>Manual</strong><br />
5.6 DIRECTORY<br />
causing all emails be transmitted using this<br />
provider. This is done by checking the “Use<br />
this Service Provider <strong>as</strong> default”. Obviously only<br />
one operator can be selected <strong>as</strong> default.<br />
The Directory is a tool that you can use to organise and<br />
work with your files stored on disk.<br />
or<br />
1. Press F9 to access the Directory.<br />
1. In Capsat choose File, Directory (Alt, F, D).<br />
2. Press Esc to return.<br />
5.6.1 THE DIRECTORY WINDOW<br />
Number<br />
of Files<br />
Menu bar<br />
105<br />
Path<br />
Figure 33 Directory Window<br />
Free Space<br />
Selected file
<strong>TT</strong>-<strong>3000E</strong> <strong>mini</strong>-C <strong>GMDSS</strong> <strong>User</strong> <strong>Manual</strong><br />
Menu bar Contains menus.<br />
Selected File Is the file on which an operation is going to<br />
take place. Use Arrow Up/Down to select another file.<br />
Path Indicates the name of disk and directory in which the<br />
presented files are located. On <strong>TT</strong>-3606 Message Terminal<br />
directories are not supported.<br />
Free Space Is the space, that's free to use on the disk.<br />
Number of Files Is the number of files located on the disk or<br />
in the directory. Note. On the <strong>TT</strong>-3606 Message Terminal<br />
no more than 112 files can reside on a disk. Normally there<br />
will be Free Space left on the disk, but if the disk holds 112<br />
files, you will not be able to store anymore files on the disk.<br />
5.6.2 THE DIRECTORY FACILITIES<br />
The following facilities are presented on the menu bar:<br />
View Allows you to inspect the contents of a<br />
file. You cannot change the contents of<br />
the file.<br />
Er<strong>as</strong>e Deletes the selected file from the disk.<br />
You will be <strong>as</strong>ked to confirm the<br />
deletion. Tip. To delete a number of<br />
files, mark the files by pressing<br />
Spacebar when they are selected one by<br />
one. Er<strong>as</strong>e is then able to delete all the<br />
marked files in one operation.<br />
Print Prints the selected file.<br />
Rename Enables you to change the name of a<br />
file.<br />
Copy Makes a copy of the selected file.<br />
106
<strong>TT</strong>-<strong>3000E</strong> <strong>mini</strong>-C <strong>GMDSS</strong> <strong>User</strong> <strong>Manual</strong><br />
Tip. To copy a number of files, mark the<br />
files by pressing Spacebar when they<br />
are selected one by one. When selecting<br />
Copy, you must then specify the path to<br />
which you want copy, i.e. C:\CAPSAT or<br />
A: .<br />
Path Changes the path of Directory making it<br />
possible to have files from a different<br />
drive/directory presented.<br />
Note. Changing the path of the<br />
Directory does not affect the current<br />
path (Working directory) of Capsat and<br />
the Address Book.<br />
The following is only available in the PC<br />
version of the Capsat Program:<br />
When you select path you will see a<br />
graphical representation of the<br />
structure of your disk. You can now use<br />
the arrow keys to move the highlight to<br />
another directory.<br />
107
<strong>TT</strong>-<strong>3000E</strong> <strong>mini</strong>-C <strong>GMDSS</strong> <strong>User</strong> <strong>Manual</strong><br />
Drive selection menu Help information.<br />
Use Alt+D to go to<br />
the Drive selection<br />
menu.<br />
The current<br />
directory is<br />
selected.<br />
108<br />
Space opens up the<br />
highlighted<br />
subdirectoty and<br />
displays its contents.<br />
The arrow symbol<br />
indicates that<br />
there are<br />
subdirectories in<br />
this directory.<br />
Up arrow: Goes up the directory tree. If you move<br />
above the top of the window, you will<br />
be moved one level up in the tree.<br />
Down arrow: Goes down the tree.<br />
Left and right arrows: Scrolls the display left and right.<br />
Space: Opens the highlighted directory and<br />
shows its contents. Directories with<br />
small arrows after their name contain<br />
other subdirectories.<br />
ALT+D: Goes to the Drive selection menu. You<br />
can select a new drive to be displayed in<br />
the window.
<strong>TT</strong>-<strong>3000E</strong> <strong>mini</strong>-C <strong>GMDSS</strong> <strong>User</strong> <strong>Manual</strong><br />
Enter: Selects the highlighted directory and<br />
returns you to the Directory Window.<br />
5.7 SYSTEM<br />
System is a tool, that allows you to change certain system<br />
settings.<br />
or<br />
1. Press F10 to access the System window.<br />
1. In Capsat choose Applications, System (Alt, A,<br />
S).<br />
5.7.1 MOVING WINDOWS<br />
The Capsat Message Handling program is divided in 4 (5)<br />
major parts:<br />
Capsat<br />
Address Book<br />
Directory<br />
109
<strong>TT</strong>-<strong>3000E</strong> <strong>mini</strong>-C <strong>GMDSS</strong> <strong>User</strong> <strong>Manual</strong><br />
System<br />
At any time there will be at le<strong>as</strong>t one window active for<br />
each part. This is true, even if you cannot see a certain one<br />
of the above mentioned parts. The windows within each<br />
part are positioned relative to each other. Moving one<br />
window will also move all other connected windows. E.g.<br />
moving a window in the Address Book will affect all<br />
windows in that part, but not in any other part.<br />
Window<br />
To Move<br />
Figure 34 Moving Windows<br />
1. Get the window that you want to move, on top<br />
of the screen (i.e. with a shadow).<br />
2. Press F10 to access the System window.<br />
3. Choose Move, Customize (M, C).<br />
4. Move the window(s) with the Arrow Keys and<br />
press Enter when you are satisfied. A beep<br />
110
<strong>TT</strong>-<strong>3000E</strong> <strong>mini</strong>-C <strong>GMDSS</strong> <strong>User</strong> <strong>Manual</strong><br />
while moving a window indicates that it<br />
cannot be moved any further in this direction.<br />
5. Press Esc twice to return to the now moved<br />
window.<br />
If you want the default setting back, choose Standard setup<br />
from the Move menu.<br />
5.7.2 CHANGING COLOURS<br />
The Capsat Message Handling program is divided in 4 (5)<br />
major parts:<br />
Capsat<br />
Address Book<br />
Directory<br />
System<br />
The Capsat part is furthermore divided in 3 sub parts. Each<br />
part h<strong>as</strong> a different colour set-up. Each part or sub part h<strong>as</strong><br />
up to seven colour fields. The names of the colour fields<br />
allow e<strong>as</strong>y identification. However 3 names are standard:<br />
General The colour of the major parts of<br />
the window.<br />
Cursor The colour of the highlight or<br />
cursor found in all menus.<br />
Standout The colour of the window title and<br />
the short-cut character of the<br />
menus.<br />
111
<strong>TT</strong>-<strong>3000E</strong> <strong>mini</strong>-C <strong>GMDSS</strong> <strong>User</strong> <strong>Manual</strong><br />
Window<br />
To Paint<br />
Figure 35 Changing Colours<br />
To change the colours of a window do the following:<br />
1. Get the window that you want to paint, on top<br />
of the screen (I.e. with a shadow).<br />
2. Press F10 to access the System window.<br />
3. Choose Paint, Customise (P, C).<br />
4. In c<strong>as</strong>e of sub parts, choose the appropriate<br />
part.<br />
5. Select the colour field, you want change.<br />
6. Choose the new colour from the presented<br />
colour palette. All windows having the chosen<br />
colour field is updated immediately upon<br />
pressing Enter, allowing you to inspect the<br />
result right away.<br />
112
<strong>TT</strong>-<strong>3000E</strong> <strong>mini</strong>-C <strong>GMDSS</strong> <strong>User</strong> <strong>Manual</strong><br />
7. Press Esc twice to return to the now painted<br />
window or select another colour field.<br />
If you want the default setting back, choose Standard setup<br />
from the Paint menu.<br />
Note. When the program detects a colour CGA screen, the<br />
'Black & White' setting is not entirely black and white. This<br />
is because some LCD displays on portable PC's needs<br />
special colours in order to function correctly.<br />
5.7.3 SE<strong>TT</strong>ING DISPLAY OPTIONS<br />
1. Press F10 to access the System window.<br />
2. Choose Options, Display (O, D) to get the<br />
Display window presented.<br />
Figure 36 Setting Display Options<br />
In the Display window you edit the following items:<br />
113
<strong>TT</strong>-<strong>3000E</strong> <strong>mini</strong>-C <strong>GMDSS</strong> <strong>User</strong> <strong>Manual</strong><br />
43/50 lines You can get 43 lines on the screen with an EGA<br />
adapter and 50 lines with an VGA. Default is 25<br />
lines.<br />
Beep You may set beep off. This applies only to invalid<br />
keystrokes. Default is On.<br />
Screen save This facility shows a blank screen after a period of<br />
inactivity. On the blank screen the current ocean<br />
region, signal strength and time will be shown at<br />
different positions, e.g.:<br />
E<strong>as</strong>t Atlantic ����� 12:15<br />
Pressing a key on the keyboard will show the<br />
windows on the screen again. This is also the c<strong>as</strong>e,<br />
if a new window is displayed by the program.<br />
Screen save may be disabled. Default is Off.<br />
Visibility Controls the presentation of all the major parts of<br />
the program. Each part, called an Application, may<br />
be set to be shown at all times indicated by a '[X]'<br />
or only to be shown when you're actually using<br />
this part. Default is that Capsat and the Address<br />
Book are shown at all times. Directory and System<br />
are only shown, when you're actually using them.<br />
The following is only available on the <strong>TT</strong>-3606E Message Terminal.<br />
Brightness You can adjust the display- and softkey-backlight<br />
through the brightness level, which goes from 0<br />
(no light) to 100 (maximum light).<br />
The brightness level is not just the level of the display- and<br />
softkey-backlight, but also of the color setup of the display.<br />
Above a certain brightness level the program uses the<br />
colors chosen by you (b&w, standard or customized) and<br />
114
<strong>TT</strong>-<strong>3000E</strong> <strong>mini</strong>-C <strong>GMDSS</strong> <strong>User</strong> <strong>Manual</strong><br />
below a certain level the night setup is used (red characters<br />
on black background).<br />
The brightness control can be configured to manual or<br />
automatic. If the automatic brightness control is turned on<br />
the brightness level is b<strong>as</strong>ed on the light level around the<br />
terminal. The user can still change the brightness level, but<br />
the automatic control will begin to adjust the brightness<br />
level again after 2 minutes. If the automatic brightness<br />
control is turned off, the chosen brightness level is never<br />
changed.<br />
The brightness level can also be changed manually via the<br />
keyboard by pressing to incre<strong>as</strong>e the level or<br />
to decre<strong>as</strong>e the level.<br />
5.7.4 CONFIGURING THE SERIAL PORT<br />
1. Press F10 to access the System window.<br />
2. Choose Options, Serial ports (O, S) to get the<br />
Serial port window presented.<br />
Ple<strong>as</strong>e notice that it is not possible the select other than<br />
, while the transceiver is connected (Power ON).<br />
Therefore turn OFF the transceiver and wait for “Transceiver<br />
not connected!” to be displayed in the Status Field.<br />
115
<strong>TT</strong>-<strong>3000E</strong> <strong>mini</strong>-C <strong>GMDSS</strong> <strong>User</strong> <strong>Manual</strong><br />
5.7.5 USING COM2<br />
Figure 37 Configuring the Serial Port<br />
Normally you should not change this set-up, unless you<br />
want to use another port instead of Com1. To restore<br />
the default set-up move the highlight to '< Default >'<br />
and press Enter. Press Enter once more on '< OK >' to<br />
actually load the values.<br />
1. Press F10 to access the System window.<br />
2. Choose Options, Serial ports (O, S) to get the<br />
Serial port window presented.<br />
3. Move the highlight to the Com2-field by<br />
pressing Arrow-Right and Arrow-Down.<br />
4. Press Spacebar to get '(•) Com2'.<br />
116
<strong>TT</strong>-<strong>3000E</strong> <strong>mini</strong>-C <strong>GMDSS</strong> <strong>User</strong> <strong>Manual</strong><br />
5. Press Enter to move highlight to '< OK >', and<br />
press Enter once more.<br />
5.7.6 CONFIGURING THE PRINTER<br />
1. Press F10 to access the System window.<br />
2. Choose Options, Printer (O, P) to get the Printer<br />
window presented.<br />
In the Printer window, you can control the following<br />
parameters.<br />
Important: The <strong>TT</strong><strong>3000E</strong> <strong>GMDSS</strong> system only supports the <strong>TT</strong>-<br />
3608A printer and therefore these parameters are not<br />
configurable when using this system.<br />
Full page always If set On, a full page is always printed no<br />
matter how short the message may be. If<br />
you are using a l<strong>as</strong>er-printer you must set<br />
this On. Default is Off. In the Off position,<br />
a line '----' is printed between each<br />
printout.<br />
Use Formfeed If set On, a Formfeed character will be sent<br />
to the printer after every page printed. If<br />
you are using a l<strong>as</strong>er-printer you must set<br />
this On. Default is Off.<br />
Compressed If set On, the characters are printed in<br />
compressed form allowing up to 132<br />
characters per line. Only relevant for PC's<br />
having a local printer connected. Default is<br />
Off.<br />
Header/Footer If set On, a header and a footer is printed<br />
on every page. Only relevant for PC's<br />
having a local printer connected. Default is<br />
On.<br />
117
<strong>TT</strong>-<strong>3000E</strong> <strong>mini</strong>-C <strong>GMDSS</strong> <strong>User</strong> <strong>Manual</strong><br />
Lines per page Specify the maximum number of lines on a<br />
page. Default is 64.<br />
Left margin You may specify a number of characters<br />
for the left margin. Default is 5.<br />
Printer Filter This can have one of 3 settings:<br />
None: There is no filtering<br />
Normal: The program filters (removes) printer<br />
control characters from both the high and<br />
the low part of the ASCII table.<br />
Low: The program filters printer control<br />
characters only from the low part of the<br />
ASCII table.<br />
5.7.7 SE<strong>TT</strong>ING THE SYSTEM CLOCK<br />
The filter setting should remain at normal<br />
unless you need to print graphic data (set<br />
it to none), or print special language<br />
characters such <strong>as</strong> Cyrillic (set it to Low).<br />
1. Press F10 to access the System window.<br />
2. Choose Options, Clock (O, C) to get the Clock<br />
window presented.<br />
In the Clock window, you can change the current date and<br />
time of the system, i.e. both the transceiver and the<br />
PC/Message Terminal. You may also specify your timezone,<br />
whether you're E<strong>as</strong>t, West or right on UTC. If you're<br />
E<strong>as</strong>t or West, you can specify the hours and minutes of your<br />
time-zone.<br />
118
<strong>TT</strong>-<strong>3000E</strong> <strong>mini</strong>-C <strong>GMDSS</strong> <strong>User</strong> <strong>Manual</strong><br />
5.7.8 FORMA<strong>TT</strong>ING A FLOPPY DISK<br />
If you are using a Message Terminal, it is possible to format<br />
3½" 720 KB or 1.44 MB floppy disk within the program.<br />
1. Press F10 to select the System window.<br />
2. Choose Options, Format disk (O, F).<br />
3. Confirm that you want to format the floppy<br />
disk. Warning. All data on the disk will be<br />
er<strong>as</strong>ed!<br />
5.7.9 CONFIGURING THE MACRO KEY’S<br />
On each side of the <strong>TT</strong>-3606E Message Terminal display is a<br />
column with six softkeys. These softkeys are preprogrammed<br />
with a default macro from factory and this<br />
setting can be viewed by pressing and holding a softkey for<br />
more than two seconds.<br />
The default setting of the softkey macro’s can also be<br />
viewed or altered by entering the softkey menu.<br />
1. Press F10 to access the System window<br />
2. Choose Options, Macro (O, M) to get the Macro<br />
window presented.<br />
119
<strong>TT</strong>-<strong>3000E</strong> <strong>mini</strong>-C <strong>GMDSS</strong> <strong>User</strong> <strong>Manual</strong><br />
Figure 38 Macro Configuration Menu<br />
The Macro keys are numbered with the first key on the<br />
upper left corner the sixth key on the lower left corner, the<br />
seventh key on the upper right corner and the twelfth key<br />
on the lower right corner.<br />
When working with macro’s the current Macro status will be<br />
fl<strong>as</strong>hing in the lower left corner of the CAPSAT display (i.e.<br />
“running”, “recording” …).<br />
If you for some re<strong>as</strong>on want to stop the execution of a<br />
macro you can always press . This will stop all<br />
macro execution.<br />
A macro can hold a maximum of 494 keystrokes.<br />
The following facilities are presented on the menu bar<br />
Run Run the selected macro<br />
Record Start recording a new macro<br />
Stop Stop recording the macro<br />
Edit Edit the explaining text connected to a<br />
macro. Ple<strong>as</strong>e notice that it is not<br />
120
<strong>TT</strong>-<strong>3000E</strong> <strong>mini</strong>-C <strong>GMDSS</strong> <strong>User</strong> <strong>Manual</strong><br />
Delete Delete a macro<br />
Copy Copy a macro<br />
possible to edit the actual macro<br />
functionality.<br />
Exchange Exchange on macro with another. This<br />
option is used when a macro should<br />
be <strong>as</strong>signed to another softkey<br />
Export Macro configuration can be exported<br />
to a floppy disk for later import in<br />
(another) Message Terminal<br />
Import Import of prior stored macro<br />
configuration.<br />
5.7.10 RECORD A MACRO<br />
A new macro can be recorded with the Record facility of the<br />
Macro window.<br />
1. Press F10 to access the System window<br />
2. Choose Options, Macro (O, M) to get the Macro<br />
window presented.<br />
3. Place the highlight on the macro key, you want<br />
to <strong>as</strong>sign to a new macro.<br />
4. Choose Record to start recording a new macro<br />
and confirm by pressing that you will<br />
continue this action causing any prior<br />
recorded macro to be deleted.<br />
5. Enter a text that describes the macro<br />
functionality. Ple<strong>as</strong>e notice that if the first<br />
character is a “*” the macro will be executed<br />
121
<strong>TT</strong>-<strong>3000E</strong> <strong>mini</strong>-C <strong>GMDSS</strong> <strong>User</strong> <strong>Manual</strong><br />
from the current window. All other macros are<br />
executed starting in the Capsat main window.<br />
If the first character is a “#” the macro will be<br />
executed with a delay of approximately half a<br />
second between each keystrokes.<br />
6. Press any key, when you are ready to start<br />
recording the macro. Ple<strong>as</strong>e see Figure 39.<br />
Figure 39 Start Recording Macro<br />
7. You are now transferred to the main Capsat<br />
window and any keystroke you perform will<br />
be entered into the macro. Ple<strong>as</strong>e notice that<br />
the text RECORDING is fl<strong>as</strong>hing in the lower<br />
left corner of the display.<br />
8. When you have completed the actions you<br />
want to have included in the Macro press<br />
to save/stop recording. The new<br />
macro is now saved and ready to be executed<br />
from the selected softkey or from the macro<br />
menu.<br />
5.7.11 DELETING A MACRO<br />
A macro can be deleted with the Delete facility of the Macro<br />
window.<br />
1. Press F10 to access the System window<br />
2. Choose Options, Macro (O, M) to get the Macro<br />
window presented.<br />
122
<strong>TT</strong>-<strong>3000E</strong> <strong>mini</strong>-C <strong>GMDSS</strong> <strong>User</strong> <strong>Manual</strong><br />
3. Place the highlight on the macro key, you want<br />
to delete.<br />
4. Choose Delete to delete the macro. You are<br />
requested to confirm the deletion. Ple<strong>as</strong>e<br />
press to confirm.<br />
123
<strong>TT</strong>-<strong>3000E</strong> <strong>mini</strong>-C <strong>GMDSS</strong> <strong>User</strong> <strong>Manual</strong><br />
6 TROUBLE SHOOTING<br />
If the <strong>TT</strong>-<strong>3000E</strong> fails to work correctly ple<strong>as</strong>e refer to the [1]<br />
<strong>TT</strong>-<strong>3000E</strong> Installation <strong>Manual</strong> and check that the system is<br />
coorectly installed.<br />
124
<strong>TT</strong>-<strong>3000E</strong> <strong>mini</strong>-C <strong>GMDSS</strong> <strong>User</strong> <strong>Manual</strong><br />
7 GE<strong>TT</strong>ING FURTHER INFORMATION<br />
If this <strong>User</strong>/Operator manual did not answer your question<br />
or you like to read more ple<strong>as</strong>e refer to section 1.1 Related<br />
Documents that includes a list of other Thrane & Thrane<br />
documents that might be of interest.<br />
125
<strong>TT</strong>-<strong>3000E</strong> <strong>mini</strong>-C <strong>GMDSS</strong> <strong>User</strong> <strong>Manual</strong><br />
8 TRANSMISSION ERROR CODES<br />
The following table lists the error codes the LES or NCS<br />
returns when a transmission error occurs. The error code<br />
will be shown in an ERROR window in the CAPSAT<br />
application.<br />
Code Comment<br />
ACB Access barred<br />
ADR Addressee refuses<br />
ATD Attempting to deliver the message<br />
BUS Busy<br />
CCD Call cut or disconnected<br />
CIE The LES ran out of processing/communications capacity to<br />
process your message<br />
CNS Call not started<br />
FAU Faulty<br />
FSA F<strong>as</strong>t select acceptance not subscribed<br />
IAM W<strong>as</strong> unable to process the address information in the<br />
following message:<br />
IDS Invalid data from ship<br />
IDT Input data timeout<br />
IFR Invalid facility request<br />
IMS Message size is invalid<br />
IND Incompatible destination<br />
INH W<strong>as</strong> unable to establish the type of message from the<br />
header<br />
ISR Invalid ship request<br />
LEF Local equipment failure<br />
LPE Local procedure error<br />
MBB Message broken by higher priority<br />
MCC Message channel congestion<br />
MCF Message channel failure<br />
MKO Message killed by operator<br />
126
<strong>TT</strong>-<strong>3000E</strong> <strong>mini</strong>-C <strong>GMDSS</strong> <strong>User</strong> <strong>Manual</strong><br />
Code Comment<br />
MSO Machine switched off<br />
NAL No address line w<strong>as</strong> present<br />
NDA There w<strong>as</strong> no delivery attempt<br />
NFA No final answerback<br />
NIA No initial answerback<br />
NOB Not obtainable<br />
NOC No connection<br />
NP No party<br />
NTC Network congestion<br />
OAB Operator aborted<br />
OCC Telex occupied<br />
OOO Out of order<br />
PRC Premature clearing<br />
PRF Protocol failure<br />
RCA Reverse charging acceptance not subscribed<br />
REF There w<strong>as</strong> a failure in the remote equipment<br />
RLE Resource limit exceeded<br />
RPE Remote protocol error<br />
RPO RPOA (Recognised Private Operating Agency) out of order<br />
SCC Call completed successfully<br />
SHE Mobile unit hardware error<br />
SNF The satellite network h<strong>as</strong> failed<br />
SPE Mobile unit protocol error<br />
SUC Test results being delivered<br />
TBY Trunks busy<br />
TGR TDM group reset<br />
TIM Timeout<br />
WFA Wrong final answerback<br />
WIA Wrong initial answerback<br />
Table 8 Transmission Error Codes<br />
127