The Topfield TF5800 and the Asus WL-500g - Toppy.org.uk
The Topfield TF5800 and the Asus WL-500g - Toppy.org.uk
The Topfield TF5800 and the Asus WL-500g - Toppy.org.uk
You also want an ePaper? Increase the reach of your titles
YUMPU automatically turns print PDFs into web optimized ePapers that Google loves.
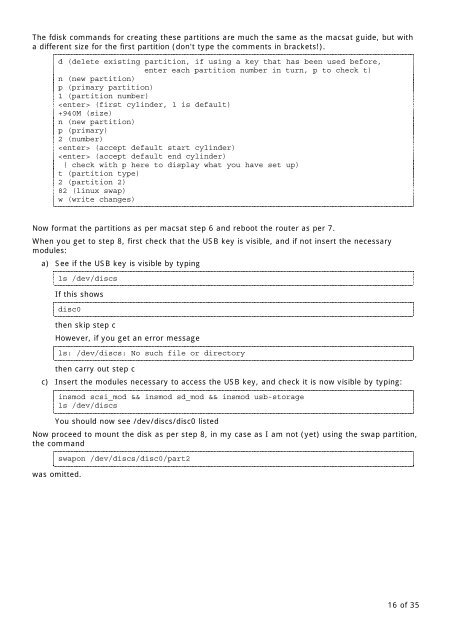
<strong>The</strong> fdisk comm<strong>and</strong>s for creating <strong>the</strong>se partitions are much <strong>the</strong> same as <strong>the</strong> macsat guide, but with<br />
a different size for <strong>the</strong> first partition (don't type <strong>the</strong> comments in brackets!).<br />
d (delete existing partition, if using a key that has been used before,<br />
enter each partition number in turn, p to check t)<br />
n (new partition)<br />
p (primary partition)<br />
1 (partition number)<br />
(first cylinder, 1 is default)<br />
+940M (size)<br />
n (new partition)<br />
p (primary)<br />
2 (number)<br />
(accept default start cylinder)<br />
(accept default end cylinder)<br />
( check with p here to display what you have set up)<br />
t (partition type)<br />
2 (partition 2)<br />
82 (linux swap)<br />
w (write changes)<br />
Now format <strong>the</strong> partitions as per macsat step 6 <strong>and</strong> reboot <strong>the</strong> router as per 7.<br />
When you get to step 8, first check that <strong>the</strong> USB key is visible, <strong>and</strong> if not insert <strong>the</strong> necessary<br />
modules:<br />
a) See if <strong>the</strong> USB key is visible by typing<br />
ls /dev/discs<br />
If this shows<br />
disc0<br />
<strong>the</strong>n skip step c<br />
However, if you get an error message<br />
ls: /dev/discs: No such file or directory<br />
<strong>the</strong>n carry out step c<br />
c) Insert <strong>the</strong> modules necessary to access <strong>the</strong> USB key, <strong>and</strong> check it is now visible by typing:<br />
insmod scsi_mod && insmod sd_mod && insmod usb-storage<br />
ls /dev/discs<br />
You should now see /dev/discs/disc0 listed<br />
Now proceed to mount <strong>the</strong> disk as per step 8, in my case as I am not (yet) using <strong>the</strong> swap partition,<br />
<strong>the</strong> comm<strong>and</strong><br />
was omitted.<br />
swapon /dev/discs/disc0/part2<br />
16 of 35


