The Topfield TF5800 and the Asus WL-500g - Toppy.org.uk
The Topfield TF5800 and the Asus WL-500g - Toppy.org.uk
The Topfield TF5800 and the Asus WL-500g - Toppy.org.uk

Create successful ePaper yourself
Turn your PDF publications into a flip-book with our unique Google optimized e-Paper software.
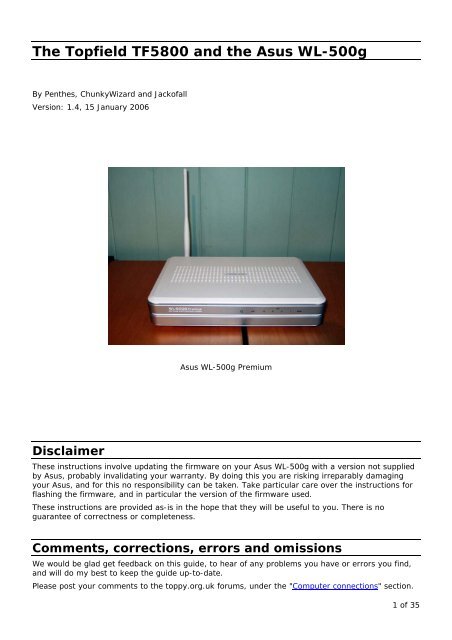
<strong>The</strong> <strong>Topfield</strong> <strong>TF5800</strong> <strong>and</strong> <strong>the</strong> <strong>Asus</strong> <strong>WL</strong>-<strong>500g</strong><br />
By Pen<strong>the</strong>s, ChunkyWizard <strong>and</strong> Jackofall<br />
Version: 1.4, 15 January 2006<br />
Disclaimer<br />
<strong>Asus</strong> <strong>WL</strong>-<strong>500g</strong> Premium<br />
<strong>The</strong>se instructions involve updating <strong>the</strong> firmware on your <strong>Asus</strong> <strong>WL</strong>-<strong>500g</strong> with a version not supplied<br />
by <strong>Asus</strong>, probably invalidating your warranty. By doing this you are risking irreparably damaging<br />
your <strong>Asus</strong>, <strong>and</strong> for this no responsibility can be taken. Take particular care over <strong>the</strong> instructions for<br />
flashing <strong>the</strong> firmware, <strong>and</strong> in particular <strong>the</strong> version of <strong>the</strong> firmware used.<br />
<strong>The</strong>se instructions are provided as-is in <strong>the</strong> hope that <strong>the</strong>y will be useful to you. <strong>The</strong>re is no<br />
guarantee of correctness or completeness.<br />
Comments, corrections, errors <strong>and</strong> omissions<br />
We would be glad get feedback on this guide, to hear of any problems you have or errors you find,<br />
<strong>and</strong> will do my best to keep <strong>the</strong> guide up-to-date.<br />
Please post your comments to <strong>the</strong> toppy.<strong>org</strong>.<strong>uk</strong> forums, under <strong>the</strong> "Computer connections" section.<br />
1 of 35
Guide History<br />
Version Date Comments<br />
0.1 7 January 2006 Initial version<br />
1.0 8 January 2006 Integrated ChunkyWizard's guide. Incorporated comments <strong>and</strong><br />
corrected errors based on feedback from forums<br />
1.1 9 January 2006 Incorporated Jackofall's guide. Added esmtp for sending emails.<br />
Incorporated fur<strong>the</strong>r feedback.<br />
1.2 12 January 2006 Updated ssh section, included PuTTY example.<br />
1.3 12 January 2006 Minor typos corrected<br />
Added section on how to set up startup script for built-in cron.<br />
Amended rt2mei – cron does not need installing, just configuring<br />
Changed <strong>the</strong> rt2mei crontab log to /tmp/var/log/rt2mei to make<br />
consistent with o<strong>the</strong>r logs<br />
Changed email section, <strong>the</strong>re needs to be a blank line before <strong>the</strong><br />
email body, or <strong>the</strong> email headers get messed up.<br />
Modification to post-boot so that information <strong>and</strong> error messages<br />
from init.d scripts are captured in <strong>the</strong> post-boot log.<br />
1.4 15 January 2006 Automatic BST/GMT changeover (important for cron)<br />
Corrected <strong>the</strong> "- pastes as ." problem when pasting text from <strong>the</strong><br />
guide<br />
Instructions for how to use crontab with nano<br />
Added information on vi <strong>and</strong> nano text editors, <strong>and</strong> links to<br />
instructions<br />
Setting <strong>the</strong> default crontab editor to be nano<br />
O<strong>the</strong>r corrections <strong>and</strong> clarifications<br />
2 of 35
Document conventions<br />
Entering comm<strong>and</strong>s<br />
You will be typing comm<strong>and</strong>s for <strong>the</strong> <strong>Asus</strong> in a telnet session, using MS Windows telnet, PuTTY or<br />
<strong>the</strong> telnet client of your choice (see Accessing your <strong>Asus</strong> using Telnet on p7 for more on this).<br />
Comm<strong>and</strong>s that you type are shown as follows:<br />
mkdir /opt/etc/samba<br />
ls '/a path to a long directory name to show <strong>the</strong> format of text wrapping in<br />
this document/*'<br />
touch /opt/etc/samba/smb.conf<br />
In your telnet session, you will see a prompt something like [admin@<strong>WL</strong><strong>500g</strong>P root]$ -- type <strong>the</strong><br />
comm<strong>and</strong>s at this prompt, terminating each comm<strong>and</strong> with <strong>the</strong> key.<br />
If a new line of text has been started because of <strong>the</strong> formatting of this document, <strong>the</strong> new line will<br />
be shown indented. This does not mean that you press at this point, nor should you be<br />
doing any indenting when you type <strong>the</strong> comm<strong>and</strong> in.<br />
Editing files<br />
You will also be creating <strong>and</strong> editing files on <strong>the</strong> <strong>Asus</strong>. To do this you need to use an editor (such as<br />
vi or nano, see Text editors: vi <strong>and</strong> nano on p8), again through a telnet session.<br />
Files that you are editing are shown in this document as follows, with <strong>the</strong> heading showing <strong>the</strong> full<br />
path <strong>and</strong> name of <strong>the</strong> file.<br />
/opt/etc/init.d/S00set-dns.sh<br />
#!/bin/sh<br />
#<br />
# S00-set-dns.sh<br />
#<br />
# add <strong>the</strong> dns server to resolv.conf<br />
echo '# resolv.conf' > /etc/resolv.conf<br />
echo '# just a long comment to show how long lines of text wrap in this<br />
document' >> resolve.conf<br />
echo "# generated by $0" >> /etc/resolv.conf<br />
echo 'nameserver 10.1.1.1' >> /etc/resolv.conf<br />
Where lines of text have been wrapped due to <strong>the</strong> formatting of this document, <strong>the</strong>y are shown<br />
indented (so in <strong>the</strong> example above, <strong>the</strong> line starting echo '# just a long comment, <strong>and</strong> <strong>the</strong><br />
following indented line, are in fact all part of <strong>the</strong> same line). Do not start a new line in your editor at<br />
this point, <strong>and</strong> don't add any indenting of your own.<br />
Files used in this document<br />
All of <strong>the</strong> files that you will be creating in this document are available in a zip file from<br />
http://www.toppy.<strong>org</strong>.<strong>uk</strong>/~chunkywizard/<strong>WL</strong><strong>500g</strong>/<strong>Toppy</strong>And<strong>Asus</strong><strong>WL</strong>-<strong>500g</strong>.zip.<br />
<strong>The</strong> folder structure in <strong>the</strong> zip file matches <strong>the</strong> directory structure used on <strong>the</strong> <strong>Asus</strong>.<br />
Take care if you use <strong>the</strong>se files as a starting point, make sure you follow <strong>the</strong> guide carefully, as<br />
some of <strong>the</strong>se files will need editing to suit your own configuration, <strong>and</strong> <strong>the</strong>refore won't work if you<br />
use <strong>the</strong>m just as <strong>the</strong>y are.<br />
3 of 35
Contents<br />
Why get an <strong>Asus</strong> <strong>WL</strong>-<strong>500g</strong>?..................................................................5<br />
What is involved? .................................................................................5<br />
<strong>The</strong> PC, Windows <strong>and</strong> your home network ...........................................5<br />
<strong>The</strong> Hardware.......................................................................................5<br />
<strong>Asus</strong> firmware version..........................................................................6<br />
Accessing your <strong>Asus</strong>.............................................................................7<br />
Upgrading <strong>the</strong> firmware .......................................................................8<br />
Basic configuration using <strong>the</strong> web interface.......................................10<br />
Adding a USB key: partition, format, mount on boot ..........................14<br />
DNS setup ..........................................................................................19<br />
Using <strong>the</strong> built-in FTP server <strong>and</strong> Samba server .................................20<br />
FTP access to files on <strong>the</strong> <strong>Toppy</strong> using ftpd-topfield...........................21<br />
Windows file sharing access to <strong>the</strong> <strong>Asus</strong> using Samba .......................24<br />
Comm<strong>and</strong>-line access to <strong>the</strong> <strong>Toppy</strong> using Puppy ................................25<br />
Set up cron for scheduling tasks ........................................................25<br />
Automated download of Radio Times EPG using rt2mei .....................27<br />
Secure access using ssh: external access to your <strong>Asus</strong> ......................29<br />
Sending emails from your <strong>Asus</strong> ..........................................................31<br />
O<strong>the</strong>r hints <strong>and</strong> tips............................................................................33<br />
FAQ ....................................................................................................34<br />
Thanks ...............................................................................................35<br />
References .........................................................................................35<br />
4 of 35
Why get an <strong>Asus</strong> <strong>WL</strong>-<strong>500g</strong>?<br />
<strong>The</strong> <strong>Toppy</strong> doesn't have an E<strong>the</strong>rnet port or any wireless capability, out-of-<strong>the</strong>-box <strong>the</strong> only way to<br />
connect it to a PC is through its USB port.<br />
If you wish to add your <strong>Toppy</strong> to your wireless network, you will need a wireless device that<br />
supports attached USB storage, such as <strong>the</strong> <strong>Asus</strong> <strong>WL</strong>500. <strong>The</strong>re are various flavours of <strong>the</strong>se but <strong>the</strong><br />
most currently available is <strong>the</strong> <strong>WL</strong>-<strong>500g</strong> Premium, or <strong>WL</strong><strong>500g</strong>P for short, <strong>and</strong> that is <strong>the</strong> model that<br />
is used in this guide, though most of <strong>the</strong> instructions also apply to <strong>the</strong> <strong>WL</strong>-<strong>500g</strong> Deluxe. It can<br />
currently be ordered from Komplett for £69.99+postage.<br />
<strong>The</strong> <strong>Asus</strong> comes with two external USB ports, one of which you can use for connecting to your<br />
<strong>Toppy</strong>. So ra<strong>the</strong>r than having to connect a USB lead from your <strong>Toppy</strong> to your PC, with <strong>the</strong> <strong>Asus</strong> it's<br />
possible to connect wirelessly to <strong>the</strong> <strong>Toppy</strong>, avoiding trailing cables all around <strong>the</strong> house.<br />
<strong>The</strong> <strong>Asus</strong> is a small Linux-based (BusyBox) device, <strong>and</strong> with <strong>the</strong> addition of Oleg's firmware you can<br />
install additional software on it.<br />
You will also need a USB key, which plugs into <strong>the</strong> second USB port. This provides <strong>the</strong> extra storage<br />
necessary for installing <strong>the</strong> various software packages; we would recommend at least 128MB.<br />
By following <strong>the</strong> instructions in this guide, it will be possible for you to transfer recordings from <strong>the</strong><br />
<strong>Toppy</strong> to your PC for archiving <strong>and</strong> burning to DVD, to access files on <strong>the</strong> <strong>Asus</strong> itself using Windows<br />
File <strong>and</strong> Printer Sharing (SMB), <strong>and</strong> to have a daily automated download of <strong>the</strong> Radio Times EPG to<br />
<strong>the</strong> <strong>Toppy</strong> for use with <strong>the</strong> MyStuff TAP.<br />
What is involved?<br />
To get <strong>the</strong> <strong>Asus</strong> to perform <strong>the</strong>se functions you need to add functionality to it. This involves<br />
upgrading <strong>the</strong> firmware <strong>and</strong> loading o<strong>the</strong>r packages on. This is technical, but <strong>the</strong>re should be<br />
enough information out <strong>the</strong>re (<strong>and</strong> in this guide) so you are following line-by-line instructions to<br />
complete this task. <strong>The</strong> tricky bit is when it does not work, <strong>and</strong> <strong>the</strong>n you may need to ask on<br />
toppy.<strong>org</strong>.<strong>uk</strong> forums for help.<br />
How long does it take?<br />
It took <strong>the</strong> authors of this guide about 3 days on <strong>and</strong> off (mostly on) to get it working. Should<br />
everything run smoothly it should take a lot less, as we didn't have this guide to work from!<br />
<strong>The</strong> PC, Windows <strong>and</strong> your home network<br />
This guide was written for a PC running Windows 2000 or Windows XP. It is assumed you are on an<br />
ADSL broadb<strong>and</strong> connection with a wireless ADSL modem/router, though it is also possible to use<br />
<strong>the</strong> <strong>Asus</strong> with a wired E<strong>the</strong>rnet connection. And if your ADSL modem/router is not wireless, it's also<br />
possible to add a second wireless router to provide <strong>the</strong> link to <strong>the</strong> <strong>Asus</strong>, though you will have to do<br />
some messing around with routing tables.<br />
It's based on a home network with a network address of 192.168.1.0 <strong>and</strong> a subnet mask of<br />
255.255.255.0 (192.168.1.0/24). <strong>The</strong> <strong>Asus</strong> has a default IP address of 192.168.1.1. If your<br />
network uses different network addresses you will need to modify <strong>the</strong> appropriate values in this<br />
guide.<br />
<strong>The</strong> Hardware<br />
<strong>The</strong> hardware you will need is<br />
a) An <strong>Asus</strong> <strong>WL</strong>-<strong>500g</strong> (<strong>the</strong> Premium was used for this guide, most of <strong>the</strong> instructions are also<br />
applicable to <strong>the</strong> Deluxe)<br />
b) A USB key, minimum size 128MB. A 1GB key was used for this guide, but all of <strong>the</strong> software<br />
installed in <strong>the</strong> making of this guide will fit into 64MB of storage.<br />
5 of 35
So what do you get for your money? See below.<br />
As you can see, <strong>the</strong> <strong>Asus</strong> is about A5 size. It comes with a Quick Start guide (which you will not<br />
need), a CD (containing a manual <strong>and</strong> some tools which hopefully you will not need), <strong>and</strong> an<br />
E<strong>the</strong>rnet cable <strong>and</strong> power supply which you will need. If you got your router from Komplett <strong>the</strong>n<br />
<strong>the</strong>y ship US versions <strong>and</strong> a plug adapter. This works fine but might mean you have to rearrange<br />
your plugs for it to fit, see below.<br />
<strong>Asus</strong> firmware version<br />
<strong>The</strong> instructions in this guide have been tested with <strong>the</strong> <strong>Topfield</strong> <strong>TF5800</strong>, <strong>the</strong> <strong>Asus</strong> <strong>WL</strong>-<strong>500g</strong>P <strong>and</strong><br />
Oleg's firmware version 1.9.2.7-7f. <strong>The</strong>y should also be applicable to <strong>the</strong> <strong>Asus</strong> <strong>WL</strong>-<strong>500g</strong> Deluxe.<br />
<strong>The</strong> Firmware upgrade, basic configuration, USB key <strong>and</strong> ftpd-topfield sections were all taken from<br />
6 of 35
Jackofall's original "Connecting an <strong>Asus</strong> <strong>WL</strong><strong>500g</strong> deluxe to your network" guide. Great care must be<br />
taken in selecting <strong>the</strong> correct firmware version for your model.<br />
Accessing your <strong>Asus</strong><br />
Your initial access to <strong>the</strong> <strong>Asus</strong> will be through a wired E<strong>the</strong>rnet connection, until you have <strong>the</strong><br />
wireless connection set up.<br />
You will need to make sure that your PC <strong>and</strong> <strong>the</strong> <strong>Asus</strong> are on <strong>the</strong> same IP address range (subnet),<br />
by default this is <strong>the</strong> address range from 192.168.1.1 to 192.168.1.254. <strong>The</strong> <strong>Asus</strong> itself has a<br />
default IP address of 192.168.1.1, <strong>and</strong> this is <strong>the</strong> one that is used in this guide. Make sure your<br />
existing ADSL modem/router's IP address, <strong>and</strong> any o<strong>the</strong>r PCs on your network, don't conflict with<br />
<strong>the</strong> address you use for <strong>the</strong> <strong>Asus</strong>.<br />
If you are connecting your PC straight to <strong>the</strong> <strong>Asus</strong> with an E<strong>the</strong>rnet cable to do <strong>the</strong> initial<br />
configuration, you will need to assign a static IP address to your PC, eg 192.168.1.2.<br />
If you need help in setting up a static IP on your PC visit<br />
http://www.portforward.com/networking/static-xp.htm<br />
Accessing your <strong>Asus</strong> through a web browser<br />
<strong>The</strong> normal way of accessing your <strong>Asus</strong> is through a web browser, with <strong>the</strong> IP address of your <strong>Asus</strong><br />
as <strong>the</strong> address (<strong>the</strong> default is 192.168.1.1).<br />
This gives you <strong>the</strong> web configuration interface of <strong>the</strong> <strong>Asus</strong>, <strong>and</strong> you'll be using that to set up <strong>the</strong><br />
basic configuration.<br />
Accessing your <strong>Asus</strong> using Telnet<br />
In most of <strong>the</strong> procedures in this guide you will need to enter Linux comm<strong>and</strong>s <strong>and</strong> edit files.<br />
This is done by using telnet – this gives you comm<strong>and</strong>-line access to <strong>the</strong> router. <strong>The</strong>re are a number<br />
of telnet clients you can run on your PC to do this, <strong>and</strong> Windows comes with a comm<strong>and</strong>-prompt<br />
version of Telnet built in. PuTTY comes highly-recommended as a telnet client.<br />
Please note that if you want to access your <strong>Asus</strong> using telnet before you have installed Oleg's<br />
firmware, you will need to turn it on in <strong>the</strong> web interface. Enable it under System Setup -><br />
Services.<br />
If you get as far as installing <strong>the</strong> dropbear sshd server, you can also access <strong>the</strong> router using an ssh<br />
client (PuTTY is an ssh client as well as a telnet client).<br />
MS Windows Telnet<br />
To start Telnet, open a comm<strong>and</strong> prompt window (you can do this by clicking on Run from <strong>the</strong> Start<br />
button, <strong>and</strong> entering cmd, or you can find it elsewhere in <strong>the</strong> start menu).<br />
<strong>The</strong>n type<br />
telnet 192.168.1.1<br />
<strong>and</strong> enter your user id <strong>and</strong> password (<strong>the</strong> defaults are admin <strong>and</strong> admin).<br />
Hints <strong>and</strong> tips:<br />
a) You can paste stuff into <strong>the</strong> telnet window by positioning <strong>the</strong> mouse pointer over it <strong>and</strong> rightclicking.<br />
Note that if you are using <strong>the</strong> vi editor you will need to press i to get into insert mode<br />
first. If you paste multiple lines of text that contain indentations into vi, vi does some strange<br />
things with <strong>the</strong> indentations, so you are probably better off pasting line-by-line.<br />
b) You can copy text from <strong>the</strong> telnet window by selecting it by clicking <strong>and</strong> dragging with <strong>the</strong><br />
mouse, <strong>and</strong> <strong>the</strong>n pressing <strong>the</strong> Enter key. <strong>The</strong> selected text will be highlighted in white (unless<br />
you have changed <strong>the</strong> default comm<strong>and</strong> prompt colours).<br />
c) If you get into a mess, <strong>and</strong> nothing seems to be responding, type ctrl-] <strong>and</strong> type quit at <strong>the</strong><br />
Microsoft Telnet> prompt. This will close <strong>the</strong> telnet session <strong>and</strong> return you to <strong>the</strong> Windows<br />
comm<strong>and</strong> prompt<br />
7 of 35
PuTTY<br />
PuTTY is an excellent Windows telnet client. You can get it from<br />
http://www.chiark.greenend.<strong>org</strong>.<strong>uk</strong>/~sgtatham/putty/<br />
Hints <strong>and</strong> tips:<br />
a) Connect by entering <strong>the</strong> <strong>Asus</strong> IP address (default 192.168.1.1) in <strong>the</strong> Host Name box. Select<br />
<strong>the</strong> telnet protocol. Enter your user name <strong>and</strong> password (default admin <strong>and</strong> admin) when<br />
prompted.<br />
b) You can paste into <strong>the</strong> PuTTY window using right-click.<br />
c) You can copy text from <strong>the</strong> PuTTY window simply by selecting it (mouse click-<strong>and</strong>-drag). <strong>The</strong><br />
text is automatically copied to <strong>the</strong> clipboard.<br />
Text editors: vi <strong>and</strong> nano<br />
Whe<strong>the</strong>r you choose to use MS Windows Telnet, PuTTY or some o<strong>the</strong>r Telnet or SSH client, a lot of<br />
<strong>the</strong> instructions in this guide ask you to edit files.<br />
This involves using a text editor once you are in a telnet session.<br />
Oleg's firmware comes with a built-in text editor, called vi. It's pretty basic in terms of user<br />
interface, but it does work. Alternatively you can install nano, which is a bit more user-friendly.<br />
You'll need to have got past <strong>the</strong> section Macsat: Installing basic software (p17) before you can do<br />
this.<br />
To install nano, in a telnet window type<br />
ipkg install nano<br />
For information on editing files using vi <strong>and</strong> nano, try<br />
vi: http://unixhelp.ed.ac.<strong>uk</strong>/vi/index.html <strong>and</strong> http://www.cs.rit.edu/~cslab/vi.html#A1.1<br />
nano: http://www.nano-editor.<strong>org</strong>/dist/v2.0/nano.html<br />
Upgrading <strong>the</strong> firmware<br />
Upgrading <strong>the</strong> firmware consists of replacing <strong>the</strong> <strong>Asus</strong>-provided firmware with Oleg's firmware. This<br />
allows you to plug a USB key into <strong>the</strong> machine, mount it <strong>and</strong> install additional software on it.<br />
It is recommended that you avoid making any configuration changes (eg user name, password,<br />
network configuration) until you have installed Oleg's firmware.<br />
You are also recommended to make sure you have a copy of <strong>the</strong> official <strong>Asus</strong> firmware, <strong>and</strong> <strong>the</strong><br />
firmware restoration tool. Both of <strong>the</strong>se can be obtained from http://<strong>uk</strong>.asus.com/, <strong>and</strong> can<br />
hopefully be used to restore <strong>the</strong> <strong>Asus</strong> to its original state, ei<strong>the</strong>r using <strong>the</strong> web interface or by using<br />
Recovery Mode.<br />
Downloading <strong>the</strong> firmware<br />
<strong>The</strong> latest version of Oleg's firmware is available from http://oleg.wl<strong>500g</strong>.info/#latest. <strong>The</strong> version<br />
used in this guide is 1.9.2.7-7f <strong>and</strong> we recommend you use this version. People have ended up<br />
destroying <strong>the</strong>ir <strong>Asus</strong> using some of <strong>the</strong> earlier versions, so if you plan to use a version o<strong>the</strong>r than<br />
this, do your own research to make sure it will work with your model of <strong>the</strong> <strong>Asus</strong> <strong>WL</strong>-<strong>500g</strong> first. And<br />
make sure you download <strong>the</strong> correct version for your model – as <strong>the</strong>re are different versions for<br />
different models.<br />
<strong>The</strong> firmware is in a zip file, you'll need to unzip it <strong>and</strong> extract <strong>the</strong> .trx file.<br />
Installing <strong>the</strong> firmware using <strong>the</strong> web interface<br />
You can use <strong>the</strong> web interface of <strong>the</strong> <strong>Asus</strong> to upload <strong>the</strong> firmware.<br />
If you have any problems with this, <strong>the</strong>re is an alternative method that involves putting <strong>the</strong> <strong>Asus</strong><br />
into Recovery Mode, which is covered in <strong>the</strong> next section.<br />
It is recommended that you do this with a wired E<strong>the</strong>rnet connection.<br />
Browse to http://192.168.1.1/ (or your chosen <strong>Asus</strong> IP), enter your login details <strong>and</strong> navigate to<br />
8 of 35
System Setup -> Firmware Upgrade<br />
Click on browse <strong>and</strong> find <strong>the</strong> previously downloaded .trx file, click open <strong>the</strong>n upload. <strong>The</strong> <strong>Asus</strong> will<br />
<strong>the</strong>n show a progress bar <strong>and</strong> reboot when upgrade is complete.<br />
Installing <strong>the</strong> firmware using Recovery Mode<br />
It is recommended that you do this with a wired E<strong>the</strong>rnet connection.<br />
To install <strong>the</strong> firmware:<br />
a) Unplug <strong>the</strong> power cable from <strong>the</strong> <strong>Asus</strong>, <strong>and</strong> leave it for at least 20 seconds<br />
b) Press <strong>and</strong> hold <strong>the</strong> "Restore" button on <strong>the</strong> router<br />
c) Plug <strong>the</strong> power cable back into <strong>the</strong> <strong>Asus</strong>.<br />
d) Continue to hold <strong>the</strong> button in until <strong>the</strong> power light starts blinking<br />
e) In a comm<strong>and</strong> prompt window on your PC navigate to <strong>the</strong> directory containing your firmware<br />
<strong>and</strong> type<br />
tftp -i 192.168.1.1 put <strong>WL</strong><strong>500g</strong>p-1.9.2.7-7f.trx<br />
Note that if you have changed <strong>the</strong> IP address of your <strong>Asus</strong>, you should replace 192.168.1.1<br />
with <strong>the</strong> new IP address. You should replace <strong>WL</strong><strong>500g</strong>p-1.9.2.7-7f.trx with <strong>the</strong> filename of<br />
<strong>the</strong> firmware you downloaded, if it is different.<br />
<strong>The</strong> <strong>Asus</strong> should respond with a message something like:<br />
Transfer successful: 7938048 bytes in 28 seconds, 283501 bytes/s<br />
<strong>The</strong> router will <strong>the</strong>n reboot, this can take a few minutes, wait until <strong>the</strong> power light is steady.<br />
9 of 35
Basic configuration using <strong>the</strong> web interface<br />
<strong>The</strong> web interface is used to perform <strong>the</strong> basic LAN <strong>and</strong> wireless setup<br />
This covers configuring <strong>the</strong> <strong>Asus</strong> in Hybrid mode, so it should be able to connect to your main<br />
wireless router using WDS, <strong>and</strong> also allow wireless connections to itself. We also cover using <strong>the</strong><br />
<strong>Asus</strong> in Station mode, which means it connects to your main ADSL modem/router in <strong>the</strong> same way<br />
your PC does, in case your main ADSL modem/router does not support WDS, or you have problems<br />
connecting through that route.<br />
Using your browser navigate to <strong>the</strong> <strong>Asus</strong> current IP of http://192.168.1.1/. You will need to enter<br />
<strong>the</strong> default username <strong>and</strong> password of admin <strong>and</strong> admin (you can change <strong>the</strong>se once you have<br />
completed setting up <strong>the</strong> <strong>Asus</strong>)<br />
Operation mode<br />
First we are going to change <strong>the</strong> operation mode of <strong>the</strong> <strong>Asus</strong>, changing it to an access point so using<br />
<strong>the</strong> menu on <strong>the</strong> left of <strong>the</strong> screen navigate to System Setup -> Operation Mode<br />
Click on Access Point <strong>and</strong> click on apply.<br />
Check <strong>the</strong> ASUS is set to <strong>the</strong> correct time zone in<br />
IP Config -> Miscellaneous<br />
10 of 35
IP Config - LAN<br />
We are now going to change <strong>the</strong> IP address of <strong>the</strong> <strong>Asus</strong>, so navigate to<br />
IP Config -> LAN<br />
Here we need to make <strong>the</strong> following changes<br />
Change Get IP Automatically? No<br />
Enter <strong>the</strong> IP see note 1<br />
<strong>The</strong> Subnet mask is 255.255.255.0<br />
<strong>The</strong> Default Gateway see note 2<br />
1) <strong>The</strong> IP address you choose for <strong>the</strong> <strong>Asus</strong> will depend on what IP addresses you are using for<br />
o<strong>the</strong>r devices on your network, particularly your main ADSL modem/router. If your main<br />
ADSL modem/router is on a different IP address from 192.168.1.1, you can leave <strong>the</strong> <strong>Asus</strong> on<br />
<strong>the</strong> default IP address. O<strong>the</strong>rwise you need to choose a different one, eg 192.168.1.151 – if<br />
you change <strong>the</strong> IP address here, make sure that this is <strong>the</strong> IP address you use for <strong>the</strong> rest of<br />
this guide.<br />
2) This should be <strong>the</strong> IP address of your main ADSL modem/router.<br />
Next click Apply <strong>and</strong> <strong>the</strong>n Finish you will <strong>the</strong>n be taken to <strong>the</strong> following screen.<br />
Click Save&Restart <strong>and</strong> <strong>the</strong>n <strong>the</strong> ASUS will <strong>the</strong>n reboot.<br />
11 of 35
Wireless setup<br />
If you changed <strong>the</strong> IP address in <strong>the</strong> previous section, you now need to point your browser to <strong>the</strong><br />
new IP address.<br />
Enter your login details as before, <strong>and</strong> navigate to<br />
Wireless -> Interface<br />
Here you will need to enter <strong>the</strong> following information<br />
SSID: <strong>The</strong> same as your existing AP<br />
Channel: <strong>The</strong> same as your existing AP<br />
Au<strong>the</strong>ntication Method: Open System or Shared Key<br />
WEP Encryption: <strong>The</strong> same as your existing AP<br />
Passphrase or WEP keys: <strong>The</strong> same as your existing AP<br />
This guide only covers setting up <strong>the</strong> <strong>Asus</strong> as part of a WEP encrypted network<br />
12 of 35
Click Apply <strong>and</strong> <strong>the</strong>n navigate to<br />
Wireless -> Bridge<br />
Here you will need to enter <strong>the</strong> following information<br />
AP Mode: Hybrid (1)<br />
Channel: As Before<br />
Connect to AP’s in remote bridge list? Yes<br />
Allow anonymous? No<br />
1) If you are going to use Station mode, instead of WDS, <strong>the</strong>n choose WDS Only here<br />
You will need to add <strong>the</strong> MAC Address of <strong>the</strong> AP you wish <strong>the</strong> <strong>Asus</strong> to become a client of enter it in<br />
<strong>the</strong> format 000F66251CAE omitting any : <strong>and</strong> click Add.<br />
Click Apply<br />
If you are going to use Station mode, instead of WDS, you will also need to navigate to<br />
Wireless -> Advanced, <strong>and</strong> set <strong>the</strong> Extended Mode to station, <strong>and</strong> again click Apply.<br />
Click Finish as before you will be taken to <strong>the</strong> Save&Restart page.<br />
Click Save&Restart <strong>and</strong> <strong>the</strong>n <strong>the</strong> ASUS will <strong>the</strong>n reboot<br />
(Optionally you can apply any MAC address filtering on <strong>the</strong> Wireless -> Access Control page)<br />
13 of 35
You will now need to go to <strong>the</strong> web interface of your Access Point. in this case we are using a<br />
Linksys WRT54G running <strong>the</strong> DD-WRT firmware. Please refer to <strong>the</strong> documentation relating to your<br />
individual Access point regarding WDS.<br />
Here you will need to enter <strong>the</strong> MAC address of <strong>the</strong> <strong>Asus</strong> (you can find this on <strong>the</strong> white sticker on<br />
<strong>the</strong> side of <strong>the</strong> product), change <strong>the</strong> setting to LAN <strong>and</strong> in this case we also enabled Lazy WDS <strong>and</strong><br />
clicked Save Settings. <strong>The</strong> <strong>Asus</strong> should now show as a WDS Node in your o<strong>the</strong>r AP’s status page.<br />
Now disconnect your CAT5 cable, <strong>and</strong> if you previously assigned a static IP to your PC change <strong>the</strong><br />
connection settings to <strong>the</strong>ir previous value.<br />
Using a wireless client go to <strong>the</strong> IP Address of <strong>the</strong> <strong>Asus</strong> <strong>and</strong> ensure that you can connect.<br />
You can now change <strong>the</strong> username <strong>and</strong> password settings in <strong>the</strong> System Setup <strong>and</strong> associated sub<br />
menus.<br />
Once you are happy that all is working as it should be Navigate to<br />
System Setup -> Settings Management<br />
And follow <strong>the</strong> instructions for saving a config file that you can use at a later date if needed.<br />
Adding a USB key: partition, format, mount on boot<br />
This is covered by <strong>the</strong> macsat guide at http://www.macsat.com/macsat/content/view/22/29/.<br />
For <strong>the</strong> most part we will be following <strong>the</strong> macsat guide, but <strong>the</strong>re are some minor differences, <strong>and</strong><br />
some additional information to help you through.<br />
Here we are into <strong>the</strong> techy stuff. You might want to refer back to Accessing your <strong>Asus</strong> using Telnet<br />
(p7) <strong>and</strong> Text editors: vi <strong>and</strong> nano (p8) for information on how to connect <strong>and</strong> issue <strong>the</strong> comm<strong>and</strong>s<br />
in this <strong>and</strong> subsequent sections, <strong>and</strong> how to edit files on your <strong>Asus</strong>.<br />
Macsat steps 1, 2, 3 <strong>and</strong> 4: Adding <strong>the</strong> key <strong>and</strong> preparing for partitioning<br />
You need to follow <strong>the</strong>se instructions carefully. To ensure everything goes smoothly, it's best to turn<br />
<strong>the</strong> router on without <strong>the</strong> USB key inserted, <strong>the</strong>n plug it in once <strong>the</strong> <strong>Asus</strong> has booted up. <strong>The</strong>n follow<br />
<strong>the</strong> macsat instructions.<br />
Macsat step 1 to 4: Logging in to <strong>the</strong> router <strong>and</strong> unmounting <strong>the</strong> USB key<br />
Follow <strong>the</strong>se instructions as per <strong>the</strong> macsat guide.<br />
If you have problems at step 4 – ie <strong>the</strong> umount comm<strong>and</strong> gives an error message, <strong>the</strong>n as well as<br />
killall stupid-ftpd<br />
14 of 35
try<br />
killall smbd<br />
killall nmbd<br />
in case <strong>the</strong> built-in samba server is also started. <strong>The</strong>n try <strong>and</strong> umount again with<br />
umount /tmp/harddisk/<br />
If you still get an error message, <strong>the</strong>n try <strong>the</strong> following:<br />
d) Reboot your router leaving <strong>the</strong> USB key plugged in<br />
reboot<br />
b) See if <strong>the</strong> USB key is visible by typing<br />
ls /dev/discs<br />
If this shows disc0<br />
<strong>the</strong>n skip step c <strong>and</strong> proceed with <strong>the</strong> next section. You do not need to umount <strong>the</strong> USB key.<br />
However, if you get an error message<br />
ls: /dev/discs: No such file or directory<br />
<strong>the</strong>n carry out step c<br />
(If FTP or Samba are enabled in <strong>the</strong> web interface, <strong>the</strong> modules inserted in c) below are<br />
loaded automatically <strong>and</strong> you won't get an error.)<br />
c) Insert <strong>the</strong> modules necessary to access <strong>the</strong> USB key, <strong>and</strong> check it is now visible by typing:<br />
insmod scsi_mod && insmod sd_mod && insmod usb-storage<br />
ls /dev/discs<br />
You should now see /dev/discs/disc0 listed<br />
As <strong>the</strong> normal <strong>Asus</strong> automount has not happened, <strong>the</strong>re is no need to unmount <strong>the</strong> key.<br />
Macsat step 5 to 8: partitioning, formatting, rebooting <strong>and</strong> mounting<br />
You can now proceed with partitioning <strong>and</strong> formatting, steps 5 <strong>and</strong> 6 in <strong>the</strong> macsat guide.<br />
<strong>The</strong> partitions you set up will depend on <strong>the</strong> size of your USB key. <strong>The</strong>se instructions are for a 1GB<br />
USB key, <strong>the</strong> macsat guide is for a 256MB key.<br />
You can determine what partition sizes to use by typing<br />
fdisk /dev/discs/disc0/disc -l<br />
<strong>The</strong> first three lines will show <strong>the</strong> geometry <strong>and</strong> size, mine shows<br />
Disk /dev/discs/disc0/disc: 1009 MB, 1009254400 bytes<br />
64 heads, 32 sectors/track, 962 cylinders<br />
Units = cylinders of 2048 * 512 = 1048576 bytes<br />
So <strong>the</strong> total size is shown as 1009MB, deducting 69MB for <strong>the</strong> swap partition leaves 940MB for <strong>the</strong><br />
remainder. <strong>The</strong>se calculations are not 100% accurate. In fact <strong>the</strong>se figures result in a swap partition<br />
size of 65MB, so when you are doing your own calculations you might want to add on 5-10MB to <strong>the</strong><br />
swap partition size you want just to make sure it ends up big enough.<br />
This results in a partition setup of:<br />
part1: 940MB e2fs partition (<strong>the</strong> main <strong>Asus</strong> partition)<br />
part2: remainder swap partition, currently not used, I might remove this at some point<br />
15 of 35
<strong>The</strong> fdisk comm<strong>and</strong>s for creating <strong>the</strong>se partitions are much <strong>the</strong> same as <strong>the</strong> macsat guide, but with<br />
a different size for <strong>the</strong> first partition (don't type <strong>the</strong> comments in brackets!).<br />
d (delete existing partition, if using a key that has been used before,<br />
enter each partition number in turn, p to check t)<br />
n (new partition)<br />
p (primary partition)<br />
1 (partition number)<br />
(first cylinder, 1 is default)<br />
+940M (size)<br />
n (new partition)<br />
p (primary)<br />
2 (number)<br />
(accept default start cylinder)<br />
(accept default end cylinder)<br />
( check with p here to display what you have set up)<br />
t (partition type)<br />
2 (partition 2)<br />
82 (linux swap)<br />
w (write changes)<br />
Now format <strong>the</strong> partitions as per macsat step 6 <strong>and</strong> reboot <strong>the</strong> router as per 7.<br />
When you get to step 8, first check that <strong>the</strong> USB key is visible, <strong>and</strong> if not insert <strong>the</strong> necessary<br />
modules:<br />
a) See if <strong>the</strong> USB key is visible by typing<br />
ls /dev/discs<br />
If this shows<br />
disc0<br />
<strong>the</strong>n skip step c<br />
However, if you get an error message<br />
ls: /dev/discs: No such file or directory<br />
<strong>the</strong>n carry out step c<br />
c) Insert <strong>the</strong> modules necessary to access <strong>the</strong> USB key, <strong>and</strong> check it is now visible by typing:<br />
insmod scsi_mod && insmod sd_mod && insmod usb-storage<br />
ls /dev/discs<br />
You should now see /dev/discs/disc0 listed<br />
Now proceed to mount <strong>the</strong> disk as per step 8, in my case as I am not (yet) using <strong>the</strong> swap partition,<br />
<strong>the</strong> comm<strong>and</strong><br />
was omitted.<br />
swapon /dev/discs/disc0/part2<br />
16 of 35
Macsat: Installing basic software<br />
Install ipkg as per macsat's "Installing Basic Software". However at this point <strong>the</strong> <strong>Asus</strong> won't have<br />
<strong>the</strong> IP address of a DNS server, so won't be able to resolve <strong>the</strong> URL for <strong>the</strong> ipkg software.<br />
To resolve this<br />
echo nameserver 10.1.2.3 > /etc/resolv.conf<br />
replacing 10.1.2.3 with <strong>the</strong> IP address of your DNS server. This might be <strong>the</strong> IP address of your<br />
main ADSL modem/router if this performs DNS forwarding (usually <strong>the</strong> case), or might be <strong>the</strong> IP<br />
address of your ISP's DNS server. If you are not sure what to use, on your PC use ipconfig /all in<br />
a comm<strong>and</strong> prompt window to see what DNS server address your PC is using, <strong>and</strong> use that.<br />
You can confirm this has worked with<br />
ping www.google.com<br />
Type Ctrl-C to stop pinging.<br />
This change is not permanent, <strong>the</strong> next section covers making it permanent.<br />
<strong>The</strong>n proceed with <strong>the</strong> rest of this section in <strong>the</strong> macsat guide.<br />
Macsat: Configuring <strong>the</strong> router to mount on boot<br />
You can now set up <strong>the</strong> post-boot script as per macsat's "Configuring <strong>the</strong> router to mount on boot",<br />
but use <strong>the</strong> post-boot script in this guide, which differs in <strong>the</strong> following respects:<br />
1) As <strong>the</strong> modules scsi_mod, sd_mod <strong>and</strong> usb-storage (necessary for accessing <strong>the</strong> USB key) are<br />
not inserted by default if FTP <strong>and</strong> Samba are disabled, <strong>the</strong>re is a section at <strong>the</strong> beginning to<br />
check <strong>and</strong> load <strong>the</strong>m if necessary.<br />
2) <strong>The</strong> comm<strong>and</strong> to mount <strong>the</strong> swap partition, this line was commented out (currently not felt to<br />
be necessary, but as <strong>the</strong> partition is <strong>the</strong>re it can be included later if it turns out to be needed).<br />
3) Logging has been added, to /tmp/var/log/post-boot, so if <strong>the</strong>re are problems with <strong>the</strong> boot<br />
process you can check this file. This will also capture any error messages generated by <strong>the</strong><br />
/opt/etc/init.d scripts.<br />
<strong>The</strong> post-boot script follows.<br />
Make sure that you<br />
flashfs save<br />
flashfs commit<br />
flashfs enable<br />
after creating this file, or you will loose your changes when you reboot!<br />
17 of 35
usr/local/sbin/post-boot<br />
#!/bin/sh<br />
#<br />
# post-boot<br />
# 1. insert modules for USB storage, if needed<br />
# 2. mount part1 of usb drive as /opt<br />
#<br />
log=/tmp/var/log/post-boot<br />
echo `date '+%F %T'` $0 started >>$log<br />
# test if USB disc has been attached<br />
# if not <strong>the</strong>n insert needed modules<br />
if [ ! -d /dev/discs ]<br />
<strong>the</strong>n<br />
echo `date '+%F %T'` /dev/discs not found, inserting usb modules >>$log<br />
insmod scsi_mod 2>>$log<br />
insmod sd_mod 2>>$log<br />
insmod usb-storage 2>>$log<br />
sleep 5s<br />
fi<br />
# check /dev/discs now visible<br />
if [ ! -d /dev/discs ]<br />
<strong>the</strong>n<br />
echo `date '+%F %T'` error: /dev/discs not found, check USB key inserted<br />
>>$log<br />
else<br />
echo `date '+%F %T'` /dev/discs found, USB key present >>$log<br />
fi<br />
# Wait for /opt to mount<br />
mount /dev/discs/disc0/part1 /opt 2>>$log<br />
i=0<br />
while [ $i -le 30 ]<br />
do<br />
if [ -d /opt/etc ]<br />
<strong>the</strong>n<br />
echo `date '+%F %T'` USB key partition mounted as /opt >>$log<br />
break<br />
fi<br />
sleep 1<br />
i=`expr $i + 1`<br />
done<br />
# check it worked<br />
if [ ! -d /opt/etc ]<br />
<strong>the</strong>n<br />
echo `date '+%F %T'` error: could not mount USB key partition >>$log<br />
fi<br />
# Activate swap<br />
# removed, not currently using swap partition<br />
# swapon /dev/discs/disc0/part2<br />
# Run all active services (all in /opt/etc/init.d starting with S)<br />
echo `date '+%F %T'` starting rc.unslung >>$log<br />
/opt/etc/init.d/rc.unslung >>$log 2>&1<br />
echo `date '+%F %T'` $0 finished >>$log<br />
Take care with lines that have split onto two because of <strong>the</strong> formatting in this document –<br />
<strong>the</strong>se should be fairly obvious as <strong>the</strong> second half of <strong>the</strong> line is indented significantly. You can<br />
18 of 35
copy/paste straight from this guide. Also note <strong>the</strong> backwards-apostrophe character used in<br />
some of <strong>the</strong> "echo" statements. This is probably on <strong>the</strong> top left key on your keyboard.<br />
After you have rebooted as per <strong>the</strong> macsat guide, you can check for any problems with<br />
cat /tmp/var/log/post-boot<br />
DNS setup<br />
Oleg's firmware does not allow you to enter DNS servers in <strong>the</strong> web interface. (If you are obtaining<br />
<strong>the</strong> <strong>Asus</strong>' IP address automatically, this section might not apply).<br />
<strong>The</strong>refore it is necessary to set <strong>the</strong> IP address(s) of DNS servers when <strong>the</strong> <strong>Asus</strong> boots up.<br />
Depending on <strong>the</strong> model of your <strong>Asus</strong>, you may or may not need to do this.<br />
To check, use Telnet <strong>and</strong> type<br />
ping www.google.com<br />
If you get <strong>the</strong> message<br />
ping: www.google.com: Unknown host<br />
<strong>the</strong>n you do need to proceed with <strong>the</strong>se instructions.<br />
If you get a response something like<br />
PING www.l.google.com (209.85.129.99): 56 data bytes<br />
64 bytes from 209.85.129.99: icmp_seq=0 ttl=238 time=24.3 ms<br />
64 bytes from 209.85.129.99: icmp_seq=1 ttl=238 time=23.1 ms<br />
64 bytes from 209.85.129.99: icmp_seq=2 ttl=238 time=24.9 ms<br />
64 bytes from 209.85.129.99: icmp_seq=3 ttl=238 time=24.4 ms<br />
<strong>The</strong>n press Ctrl-C to stop ping running. This means you do not need to follow <strong>the</strong> rest of <strong>the</strong>se DNS<br />
setup instructions.<br />
Setting <strong>the</strong> DNS server IP address on boot-up<br />
To do this, set up a script in /opt/etc/init.d as follows:<br />
/opt/etc/init.d/S00set-dns.sh<br />
#!/bin/sh<br />
#<br />
# S00set-dns.sh<br />
#<br />
# add <strong>the</strong> dns server to resolv.conf<br />
echo '# resolv.conf' > /etc/resolv.conf<br />
echo "# generated by $0" >> /etc/resolv.conf<br />
echo 'nameserver 10.1.1.1' >> /etc/resolv.conf<br />
You should replace 10.1.1.1 with <strong>the</strong> IP address of your DNS server. If you have more than one, you<br />
can duplicate <strong>the</strong> last line as many times as you need.<br />
<strong>The</strong>n make this script executable with<br />
chmod +x /opt/etc/init.d/S00set-dns.sh<br />
You can check that this is worked by typing<br />
/opt/etc/init.d/S00set-dns.sh<br />
ping www.google.com<br />
Use Ctrl-C to stop <strong>the</strong> pinging.<br />
19 of 35
Using <strong>the</strong> built-in FTP server <strong>and</strong> Samba server<br />
Oleg's firmware contains both an FTP server (stupid-ftpd) <strong>and</strong> Samba, which can be used to access<br />
files on <strong>the</strong> USB key only (<strong>the</strong>y can't be used to access <strong>the</strong> <strong>Toppy</strong>, nor can <strong>the</strong>y be used to access<br />
files on <strong>the</strong> <strong>Asus</strong> itself – for this you should refer to <strong>the</strong> instructions for installing ftpd-topfield <strong>and</strong><br />
Samba).<br />
<strong>The</strong>se are configured from <strong>the</strong> web interface.<br />
Once you have set up a post-boot script <strong>the</strong>se services only start if <strong>the</strong> USB key is plugged in after<br />
<strong>the</strong> <strong>Asus</strong> has booted up, which means any additional software on <strong>the</strong> USB key won't run.<br />
And if you <strong>the</strong>n reboot <strong>the</strong> <strong>Asus</strong> with <strong>the</strong> key left in, <strong>the</strong> built-in FTP <strong>and</strong> Samba services will not<br />
start this time around.<br />
(If you haven't set up <strong>the</strong> post-boot script, or haven't made it executable, <strong>the</strong>n <strong>the</strong> built-in services<br />
will start.)<br />
This means you can leave both <strong>the</strong> built-in FTP server <strong>and</strong> Samba server enabled, as <strong>the</strong>re should<br />
be no conflict with ftpd-topfield <strong>and</strong> <strong>the</strong> custom Samba configuration.<br />
Warning: some people have had problems transferring large files with ftpd-topfield when <strong>the</strong> builtin<br />
FTP server is turned on.<br />
In normal operation (booting up with <strong>the</strong> USB key present) <strong>the</strong> built-in services won't start, <strong>and</strong> you<br />
can instead use ftpd-topfield to browse <strong>the</strong> <strong>Toppy</strong>'s files, <strong>and</strong> a custom Samba configuration to<br />
browse <strong>the</strong> <strong>Asus</strong> filing system, if you have set one up.<br />
It is also safe for both ftpd-topfield <strong>and</strong> <strong>the</strong> built-in ftp server to use <strong>the</strong> same port (21) as <strong>the</strong>y will<br />
never be running at <strong>the</strong> same time.<br />
Using <strong>the</strong> built-in FTP server<br />
To enable <strong>the</strong> FTP server in <strong>the</strong> web interface:<br />
1) Open a browser <strong>and</strong> put in your <strong>Asus</strong> IP address, <strong>and</strong> enter your user name <strong>and</strong> password<br />
when prompted.<br />
2) Click on USB Application on <strong>the</strong> left h<strong>and</strong> side<br />
3) Click on FTP Server on <strong>the</strong> left h<strong>and</strong> side<br />
4) Set <strong>the</strong> Enable FTP Server option to Yes<br />
5) You also have options to allow anonymous users, <strong>and</strong> to allow <strong>the</strong> Super User (ie <strong>the</strong> admin<br />
user), <strong>and</strong> <strong>the</strong> ability to add o<strong>the</strong>r user accounts. I just allow anonymous access.<br />
6) Use <strong>the</strong> Apply button to apply your changes, <strong>the</strong>n click on <strong>the</strong> Finish button, <strong>and</strong> when <strong>the</strong><br />
next page appears click on <strong>the</strong> button to restart <strong>the</strong> <strong>Asus</strong><br />
You can now use your favourite FTP client to browse <strong>the</strong> directories <strong>and</strong> files on <strong>the</strong> USB<br />
Remember: <strong>the</strong> FTP server will only start if you boot up <strong>the</strong> <strong>Asus</strong> without <strong>the</strong> USB key present, <strong>and</strong><br />
<strong>the</strong>n insert it.<br />
<strong>The</strong> FTP root directory corresponds to <strong>the</strong> root of <strong>the</strong> USB key. <strong>The</strong>refore <strong>the</strong> folder you normally see<br />
as /opt/etc if you boot with <strong>the</strong> USB key present will now be visible as /etc.<br />
Using <strong>the</strong> built-in Samba server<br />
To enable <strong>the</strong> Samba server in <strong>the</strong> web interface:<br />
1) Open a browser <strong>and</strong> put in your <strong>Asus</strong> IP address, <strong>and</strong> enter your user name <strong>and</strong> password<br />
when prompted.<br />
2) Click on USB Application on <strong>the</strong> left h<strong>and</strong> side<br />
3) Click on Samba on <strong>the</strong> left h<strong>and</strong> side<br />
4) Set <strong>the</strong> option Enable Samba Demo Mode to Yes<br />
5) Set <strong>the</strong> Enable hidden read-write share to Yes<br />
6) Change <strong>the</strong> Workgroup name to <strong>the</strong> workgroup you use on your Windows PC<br />
20 of 35
7) Use <strong>the</strong> Apply button to apply your changes, <strong>the</strong>n click on <strong>the</strong> Finish button, <strong>and</strong> when <strong>the</strong><br />
next page appears click on <strong>the</strong> button to restart <strong>the</strong> <strong>Asus</strong>.<br />
Remember: <strong>the</strong> Samba server will only start if you boot up <strong>the</strong> <strong>Asus</strong> without <strong>the</strong> USB key present,<br />
<strong>and</strong> <strong>the</strong>n insert it.<br />
<strong>The</strong> shared folder on <strong>the</strong> <strong>Asus</strong> is called "share", <strong>and</strong> this corresponds to <strong>the</strong> root of <strong>the</strong> USB key.<br />
<strong>The</strong>refore <strong>the</strong> folder you normally see as /opt/etc if you boot with <strong>the</strong> USB key present will now be<br />
visible as /etc.<br />
FTP access to files on <strong>the</strong> <strong>Toppy</strong> using ftpd-topfield<br />
ftp-topfield allows you to see <strong>the</strong> files on your <strong>Toppy</strong> through an ftp client on your PC.<br />
ftpd-topfield is less well known than <strong>the</strong> puppy application. However, although it is slightly slower<br />
than puppy it does allow a GUI interface on <strong>the</strong> Windows PC by using any suitable ftp program. In<br />
comparison <strong>the</strong> puppy is only comm<strong>and</strong> line, <strong>and</strong> only gives you access from <strong>the</strong> <strong>Asus</strong> itself.<br />
ftpd-topfield supports only a single active connection at a time, so if your ftp client supports multiple<br />
connections make sure you disable this.<br />
Installation<br />
Telnet into <strong>the</strong> ASUS as before <strong>and</strong> log in with your username <strong>and</strong> password.<br />
Install <strong>the</strong> ftpd-topfield application by typing:<br />
ipkg update<br />
ipkg install ftpd-topfield<br />
<strong>The</strong> first comm<strong>and</strong> gets <strong>the</strong> latest list of packages available <strong>and</strong> <strong>the</strong> second installs <strong>the</strong> latest version<br />
of ftpd-topfield. Note <strong>the</strong> same pair of comm<strong>and</strong> will also update any previous installed version too.<br />
When a new version of ftpd-topfield is available you can upgrade with <strong>the</strong> ipkg comm<strong>and</strong> <strong>the</strong> same<br />
as for a fresh install. Note this will stop <strong>the</strong> current ftpd-topfield, install <strong>the</strong> new one, <strong>and</strong> restart<br />
ftpd-topfield so <strong>the</strong>re is nothing else you need to do. If <strong>the</strong> install objects <strong>the</strong>n you can also remove<br />
ftpd-topfield by typing<br />
ipkg remove ftpd-topfield<br />
This will start you with a clean slate for <strong>the</strong> install<br />
Configuration<br />
<strong>The</strong> comm<strong>and</strong><br />
ipkg files ftpd-topfield<br />
Will return two pieces of information, <strong>the</strong> program location <strong>and</strong> <strong>the</strong> startup script. <strong>The</strong> results will be<br />
something like this:<br />
Package ftpd-topfield (0.6.4-3) is installed on root <strong>and</strong> has <strong>the</strong> following<br />
files:<br />
/opt/sbin/ftpd-topfield<br />
/opt/etc/init.d/S67ftpd-topfield<br />
To find out <strong>the</strong> program options enter <strong>the</strong> comm<strong>and</strong>:<br />
/opt/sbin/ftpd-topfield --help<br />
21 of 35
This will return something like this:<br />
Usage: /opt/sbin/ftpd-topfield [OPTION] ...<br />
Internet File Transfer Protocol server.<br />
-A, --anonymous-only Server configure for anonymous service only<br />
-b, --turbo Default to turbo mode on for transfers<br />
-D, --daemon Start <strong>the</strong> ftpd st<strong>and</strong>alone<br />
-d, --debug Debug mode<br />
-E, --eplf Send listing in EPLF mode<br />
-l, --logging Increase verbosity of syslog messages<br />
-p, --pidfile=[PIDFILE] Change default location of pidfile<br />
-P, --port=[port] Change <strong>the</strong> port to listen on in server mode<br />
-q, --no-version Do not display version in banner<br />
-t, --timeout=[TIMEOUT] Set default idle timeout<br />
-T, --max-timeout Reset maximum value of timeout allowed<br />
-u, --umask Set default umask(base 8)<br />
--help Print this message<br />
-V, --version Print version<br />
-a, --auth=[AUTH] Use AUTH for au<strong>the</strong>ntication, it can be:<br />
default passwd au<strong>the</strong>ntication.<br />
To change <strong>the</strong> behaviour of ftpd-topfield you need to edit <strong>the</strong> startup script.<br />
To restart ftpd-topfield with your new options just run <strong>the</strong> start up script, which with <strong>the</strong> details as<br />
above, would be <strong>the</strong> comm<strong>and</strong>:<br />
/opt/etc/init.d/S67ftpd-topfield<br />
Turbo Mode<br />
<strong>The</strong> USB link to <strong>the</strong> topfield can be operated in turbo mode. This gives <strong>the</strong> fastest file transfer<br />
however playback is interrupted <strong>and</strong> <strong>the</strong> remote control does not function. <strong>The</strong> default turbo state is<br />
controlled by <strong>the</strong> <strong>the</strong> –b (or alternatively –turbo) option in <strong>the</strong> startup script /opt/etc/init.d/S67ftpdtopfield.<br />
If this is included on <strong>the</strong> comm<strong>and</strong> in <strong>the</strong> start up script <strong>the</strong>n turbo is on by default,<br />
o<strong>the</strong>rwise it is off. <strong>The</strong> default start up script setting is turbo off.<br />
If you change this option, restart ftpd-topfield:<br />
/opt/etc/init.d/S67ftpd-topfield<br />
If your ftp client allows raw ftp comm<strong>and</strong>s like filezilla <strong>the</strong>n you can change <strong>the</strong> turbo setting on <strong>the</strong><br />
fly. <strong>The</strong> ftp comm<strong>and</strong> is one of:<br />
site turbo<br />
site turbo 1<br />
site turbo 0<br />
<strong>The</strong> first toggles <strong>the</strong> turbo state so if it was off it becomes on <strong>and</strong> vice versa. <strong>The</strong> second turns turbo<br />
on in all cases <strong>and</strong> <strong>the</strong> last turbo off in all cases. For all 3 <strong>the</strong> ftp response window reports <strong>the</strong> new<br />
state of turbo.<br />
Note that when you connect to <strong>the</strong> <strong>Asus</strong> a new version of ftpd-topfield is started so each time <strong>the</strong><br />
starting state of turbo is as set in <strong>the</strong> start up script, not how you last left it when you logged off <strong>the</strong><br />
ftp session.<br />
FTP clients<br />
Windows has a built-in comm<strong>and</strong>-prompt ftp client. Just type<br />
ftp 192.168.1.1<br />
(use <strong>the</strong> IP address of your <strong>Asus</strong> if you have changed it from <strong>the</strong> default).<br />
You will be prompted for a user name <strong>and</strong> password, use anonymous, <strong>and</strong> blank for <strong>the</strong> password.<br />
22 of 35
Filezilla<br />
Filezilla (http://filezilla.sourcef<strong>org</strong>e.net/) is an open-source ftp client that is easy to use with <strong>the</strong><br />
<strong>Asus</strong>.<br />
You just need to put <strong>the</strong> IP address for <strong>the</strong> ASUS in (ie 192.168.1.151), leave <strong>the</strong> port as <strong>the</strong> default<br />
<strong>and</strong> logontype as Anonymous. If you click connect you should get <strong>the</strong> directory structure of <strong>the</strong><br />
<strong>Toppy</strong> in <strong>the</strong> right h<strong>and</strong> plane.<br />
Novell NetDrive<br />
Novell NetDrive is an FTP client that allows you to map FTP sites to a Windows drive letter, so you<br />
can browse your <strong>Toppy</strong>'s files using Windows Explorer (it also supports <strong>the</strong> WebDAV protocol).<br />
It is very easy to set up, just install, fill in one page of options <strong>and</strong> it just works. <strong>The</strong> URL is your<br />
<strong>Asus</strong> IP address, server type is FTP <strong>and</strong> it is an anonymous login.<br />
It's available from a variety of sources, just search for ‘Novell Netdrive’.<br />
23 of 35
Windows file sharing access to <strong>the</strong> <strong>Asus</strong> using Samba<br />
With ftpd-topfield installed, you now have ftp access to files on <strong>the</strong> <strong>Toppy</strong>, but no mechanism for<br />
transferring files to <strong>and</strong> from <strong>the</strong> <strong>Asus</strong> – this is necessary if you want to install rt2mei.<br />
Samba can be used for this – it basically shares directories using <strong>the</strong> same protocol as Windows File<br />
<strong>and</strong> Printer Sharing (<strong>the</strong> SMB protocol, using NetBIOS over TCP/IP, also known as NBT).<br />
This allows you to browse your Network Places in Windows Explorer to navigate through <strong>the</strong> <strong>Asus</strong><br />
filing system, <strong>and</strong> you can map <strong>the</strong> <strong>Asus</strong> shared drives as Windows drives.<br />
Samba comes preinstalled as part of Oleg's firmware, but <strong>the</strong> web interface is not comprehensive<br />
enough to configure it properly.<br />
<strong>The</strong>re is a macsat guide at http://www.macsat.com/macsat/content/view/27/29/ covering Samba<br />
configuration, which formed <strong>the</strong> basis of my configuration. However <strong>the</strong> configuration in this guide is<br />
a little different. <strong>The</strong> log files are stored in <strong>the</strong> /tmp directory structure (which is based in RAM) <strong>and</strong><br />
<strong>the</strong> startup script contains additional lines to stop any previously-running instances (which means<br />
<strong>the</strong> script can be repeatedly called to restart Samba, for instance if you change <strong>the</strong> configuration<br />
file.<br />
One important point here is that you must set a Host Name in <strong>the</strong> web configuration interface – go<br />
to <strong>the</strong> LAN section under IP Config if you haven't done this already, enter a Host Name, <strong>and</strong> don't<br />
f<strong>org</strong>et to Apply, Finish <strong>and</strong> Save & Restart.<br />
Set up <strong>the</strong> Samba configuration file<br />
Create a directory for <strong>the</strong> Samba configuration file, <strong>and</strong> create <strong>the</strong> file<br />
mkdir /opt/etc/samba<br />
touch /opt/etc/samba/smb.conf<br />
Edit <strong>the</strong> configuration file to be as follows:<br />
/opt/etc/samba/smb.conf<br />
[global]<br />
workgroup = WORKGROUP<br />
guest account = nobody<br />
security = share<br />
browseable = yes<br />
guest ok = yes<br />
log level = 1<br />
max log size = 100<br />
encrypt passwords = yes<br />
dns proxy = no<br />
[opt]<br />
path = /opt<br />
writeable = yes<br />
browseable = yes<br />
force user = admin<br />
Replace WORKGROUP with <strong>the</strong> name of <strong>the</strong> workgroup you are using on <strong>the</strong> windows network.<br />
You can add as many additional shares as you like, following <strong>the</strong> structure of <strong>the</strong> [opt] section.<br />
Note that <strong>the</strong> section name (opt) is <strong>the</strong> folder name as it will be seen by your Windows PC,<br />
<strong>and</strong> this is mapped to <strong>the</strong> <strong>Asus</strong> folder defined by <strong>the</strong> path variable.<br />
For instance, if you wanted to share <strong>the</strong> <strong>Asus</strong> /tmp folder, which is where logs are stored, <strong>and</strong><br />
where <strong>the</strong> rt2mei output is stored (see later) you would add to <strong>the</strong> bottom of smb.conf:<br />
[tmp]<br />
path = /tmp<br />
writeable = yes<br />
browseable = yes<br />
force user = admin<br />
24 of 35
Set up <strong>the</strong> Samba start-on-boot script<br />
Create a Samba startup script in /opt/etc/init.d, so that Samba will be started automatically when<br />
you reboot <strong>the</strong> <strong>Asus</strong>:<br />
/opt/etc/init.d/S97Samba<br />
#!/bin/sh<br />
# get rid of any already-running instances<br />
killall smbd<br />
killall nmbd<br />
# start samba<br />
/usr/sbin/smbd -D -l /tmp/var/log/smb -s /opt/etc/samba/smb.conf<br />
/usr/sbin/nmbd -D -n <strong>WL</strong><strong>500g</strong>P -o -l /tmp/var/log/nmb -s<br />
/opt/etc/samba/smb.conf<br />
Replace <strong>WL</strong><strong>500g</strong>p in <strong>the</strong> /usr/sbin/nmbd line with <strong>the</strong> name of your <strong>Asus</strong>. This is <strong>the</strong> Windows filesharing<br />
name of your <strong>Asus</strong>, we suggest for consistency you use <strong>the</strong> same name as <strong>the</strong> host name of<br />
your <strong>Asus</strong> (though <strong>the</strong>y don't have to be <strong>the</strong> same).<br />
Now make this script executable:<br />
chmod +x /opt/etc/init.d/S97Samba<br />
You can now reboot <strong>the</strong> <strong>Asus</strong>. When it has restarted, check that Samba is running using<br />
ps | grep mbd<br />
If Samba is running, <strong>the</strong>n you should see three lines of output, two of which identify smbd <strong>and</strong><br />
nmbd.<br />
Comm<strong>and</strong>-line access to <strong>the</strong> <strong>Toppy</strong> using Puppy<br />
Puppy provides comm<strong>and</strong>-line access to <strong>the</strong> <strong>Toppy</strong> from <strong>the</strong> <strong>Asus</strong> itself (but not from your PC). It is<br />
needed by <strong>the</strong> automated rt2mei EPG download process so that <strong>the</strong> EPG can be copied to <strong>the</strong> <strong>Toppy</strong>.<br />
Install it using ipkg:<br />
ipkg install puppy<br />
Refer to <strong>the</strong> puppy documentation for more information.<br />
Set up cron for scheduling tasks<br />
cron allows scripts to be scheduled <strong>and</strong> run at regular intervals. Oleg's firmware includes cron.<br />
It is also possible to install cron using ipkg. If you do this, <strong>the</strong> instructions below won't work (<strong>and</strong><br />
nor will <strong>the</strong> rt2mei automation instructions). If you want to check if you have <strong>the</strong> ipkg version of<br />
cron installed, type<br />
ipkg list_installed | grep cron<br />
If you see <strong>the</strong> cron package listed, you can remove it using <strong>the</strong> following comm<strong>and</strong> but please note<br />
that any existing cron jobs you have set up will be lost, so you will have to add <strong>the</strong>m again.<br />
ipkg remove cron<br />
To start cron, <strong>and</strong> configure it to run from files on <strong>the</strong> USB key 1 it's necessary to create a startup<br />
script in /opt/etc/init.d, <strong>and</strong> to create a directory on <strong>the</strong> USB key to store <strong>the</strong> files.<br />
1 By default, crond <strong>and</strong> crontab expect to use /var/spool/cron/crontabs for <strong>the</strong> crontab location. As this is a filing system in<br />
RAM, rebooting would loose changes, or would involve flashfs save && flashfs commit every time a change is involved.<br />
<strong>The</strong>refore <strong>the</strong> configuration in this guide is to create a symbolic link from /var/spool/cron to /opt/var/cron on <strong>the</strong> USB key.<br />
25 of 35
So, create <strong>the</strong> directory with<br />
mkdir -p /opt/var/cron/crontabs<br />
And <strong>the</strong>n create <strong>the</strong> startup script as:<br />
/opt/etc/init.d/S10cron<br />
#!/bin/sh<br />
#<br />
# Startup script for cron<br />
#<br />
# use built-in cron, which expects<br />
# to use /var/spool/cron/crontabs for<br />
# crontabs, but symlink /var/spool/cron<br />
# to /opt/var/cron, so changes stored on<br />
# USB storage<br />
# first check /var/spool is present, if not, create<br />
if [ ! -d /var/spool ]<br />
<strong>the</strong>n<br />
mkdir /var/spool<br />
fi<br />
# check if /var/spool/cron present, if not,<br />
# symlink to /opt/var/cron<br />
if [ ! -d /var/spool/cron ]<br />
<strong>the</strong>n<br />
ln -s /opt/var/cron /var/spool/cron<br />
fi<br />
# Stop myself if running<br />
killall crond<br />
# start (built-in) cron<br />
crond<br />
Now make <strong>the</strong> script executable:<br />
chmod +x /opt/etc/init.d/S10cron<br />
You can ei<strong>the</strong>r reboot to start cron, or execute this script manually with<br />
/opt/etc/init.d/S10cron<br />
Set up automatic switching between GMT <strong>and</strong> BST<br />
This describes how to set up <strong>the</strong> timezone on <strong>the</strong> <strong>Asus</strong> so that it correctly compensates for changes<br />
between summer <strong>and</strong> winter time.<br />
Without this, you will find your cron jobs jump ahead (or back) an hour when <strong>the</strong> changeover<br />
occurs.<br />
To do this, in a telnet session type:<br />
nvram set time_zone=GMT+0BST-1,M3.5.0/01:00:00,M10.5.0/02:00:00<br />
nvram commit<br />
Note <strong>the</strong> nvram commit to save this – this information is not saved on <strong>the</strong> USB key, which is why<br />
you need to issue this comm<strong>and</strong>.<br />
Adding cron jobs<br />
To add <strong>and</strong> edit scheduled jobs, type<br />
crontab -e<br />
This launches <strong>the</strong> vi editor to edit your existing crontabs.<br />
26 of 35
If you would prefer to use nano, type<br />
export VISUAL=nano<br />
crontab -e<br />
You need to type <strong>the</strong> export comm<strong>and</strong> every time – if you want to make nano default editor (so you<br />
don't have to type <strong>the</strong> export comm<strong>and</strong>) <strong>the</strong>n see Setting up a .profile file to store <strong>the</strong> default<br />
crontab editor on page 33.<br />
Add your new job at <strong>the</strong> end. Refer to documentation on cron <strong>and</strong> crontab for <strong>the</strong> syntax for <strong>the</strong>se<br />
lines, for example http://www.adminschoice.com/docs/crontab.htm.<br />
Automated download of Radio Times EPG using rt2mei<br />
This section covers <strong>the</strong> installation of wooder's rt2mei, which is a php program to download <strong>the</strong><br />
Radio Times EPG <strong>and</strong> transform it into a suitable format for <strong>the</strong> MyStuff TAP, <strong>and</strong> also includes how<br />
to automate this so it runs once a day.<br />
<strong>The</strong> NSLU2 package is used, as it contains <strong>the</strong> automation script, from<br />
http://www.wooders.co.<strong>uk</strong>/rt2mei/nslu2.php, follow <strong>the</strong> download link to download <strong>the</strong> latest<br />
version of <strong>the</strong> package.<br />
Install prerequisites <strong>and</strong> configure<br />
Make sure you have installed puppy <strong>and</strong> have set up cron according to <strong>the</strong> previous sections.<br />
Install php <strong>and</strong> libuclibc++ (required by php).<br />
ipkg install php<br />
ipkg install libuclibc++<br />
Php requires some initial configuration to set <strong>the</strong> timezone. Edit <strong>the</strong> php.ini file so that <strong>the</strong> top two<br />
lines match this (insert <strong>the</strong> date.timezone line beneath <strong>the</strong> [PHP] line – in fact <strong>the</strong> date.timezone<br />
line can go anywhere in <strong>the</strong> [PHP section)<br />
/opt/etc/php.ini<br />
[PHP]<br />
date.timezone = "Europe/London"<br />
Install, configure <strong>and</strong> test rt2mei<br />
Rt2mei will be installed at /opt/usr/local/rt2mei, with output files <strong>and</strong> logs stored at<br />
/tmp/var/rt2mei.<br />
Create <strong>the</strong> directory for rt2mei:<br />
mkdir -p /opt/usr/local/rt2mei<br />
You now need to transfer files from <strong>the</strong> rt2mei package you downloaded to <strong>the</strong> <strong>Asus</strong>. <strong>The</strong> easiest<br />
way to do this is if you have installed Samba, you can <strong>the</strong>n use Windows Explorer to map a drive to<br />
<strong>the</strong> <strong>Asus</strong> opt share.<br />
From <strong>the</strong> rt2mei package you downloaded, locate <strong>the</strong> files rt2mei.cfg <strong>and</strong> rt2mei.php, <strong>and</strong> copy<br />
<strong>the</strong>m to /opt/usr/local/rt2mei<br />
Configure rt2mei by editing /opt/usr/local/rt2mei.cfg, refer to<br />
http://www.wooders.co.<strong>uk</strong>/rt2mei/configuration.php for more details on this.<br />
Test that it works:<br />
cd /opt/usr/local/rt2mei<br />
php rt2mei.php<br />
This will take a few minutes to execute, you'll be able to see <strong>the</strong> progress in your telnet window.<br />
Once it has finished you should see output files in this directory (with ls). Once you are happy with<br />
your configuration <strong>and</strong> that all is working, remove <strong>the</strong>se output files (using rm 'filename'). When<br />
you've set up <strong>the</strong> automated version /tmp will be used for <strong>the</strong>se files.<br />
27 of 35
Install <strong>and</strong> test <strong>the</strong> automation<br />
Copy <strong>the</strong> automation shell script to /opt/usr/local/rt2mei/ -- this is in <strong>the</strong> package you<br />
downloaded, <strong>and</strong> is named rt2mei.<br />
Make <strong>the</strong> script executable<br />
chmod +x /opt/usr/local/rt2mei/rt2mei<br />
Test <strong>the</strong> script, first creating <strong>the</strong> /tmp directory for <strong>the</strong> output:<br />
mkdir /tmp/var/rt2mei<br />
/opt/usr/local/rt2mei/rt2mei -new -tmp /tmp/var/rt2mei -ramdisk<br />
Again this will take several minutes to complete.<br />
Check <strong>the</strong> files under /tmp/var for correct output (you might like to add a Samba share for /tmp,<br />
see <strong>the</strong> Samba section for more details).<br />
Now we need to set up a calling script for this, that will also create <strong>the</strong> /tmp directory automatically:<br />
/opt/usr/local/rt2mei/do-rt2mei.sh<br />
#!/bin/sh<br />
#<br />
# rt2mei calling script<br />
#<br />
# make sure /tmp directory exists<br />
# <strong>the</strong>n call <strong>the</strong> rt2mei script<br />
if [ ! -d /tmp/var/rt2mei ]<br />
<strong>the</strong>n<br />
mkdir -p /tmp/var/rt2mei<br />
fi<br />
/opt/usr/local/rt2mei/rt2mei -new -tmp /tmp/var/rt2mei -ramdisk<br />
Make this script executable with<br />
chmod +x /opt/usr/local/rt2mei/do-rt2mei.sh<br />
Now you need to set up <strong>the</strong> scheduled cron job to run <strong>the</strong> rt2mei process daily.<br />
We do this using crontab (note, this assumes you don't have any o<strong>the</strong>r cron jobs set up, if you do<br />
<strong>the</strong>y will be deleted).<br />
To do this, type<br />
echo "5 7 * * * /opt/usr/local/rt2mei/do-rt2mei.sh >>/tmp/var/log/rt2mei<br />
2>&1" | crontab -<br />
If you have o<strong>the</strong>r crontab entries already set up (you can list <strong>the</strong>m with crontab -l) <strong>the</strong>n you can use<br />
crontab -e<br />
to launch <strong>the</strong> vi editor (or see Adding cron jobs on page 26 for how to do this with nano), <strong>and</strong> add<br />
<strong>the</strong> entry<br />
manually.<br />
5 7 * * * /opt/usr/local/rt2mei/do-rt2mei.sh >>/tmp/var/log/rt2mei 2>&1<br />
If you want to test this first, you can use different time entries.<br />
a) <strong>the</strong> "5" corresponds to minutes-past-<strong>the</strong>-hour<br />
b) <strong>the</strong> "7" corresponds to <strong>the</strong> hour (using 24hour time)<br />
If you do this, choose a time at least 5 minutes ahead of <strong>the</strong> current time. You can find <strong>the</strong> current<br />
time (<strong>and</strong> date) on <strong>the</strong> <strong>Asus</strong> by typing<br />
date<br />
28 of 35
Remember to reissue <strong>the</strong> echo comm<strong>and</strong> above with <strong>the</strong> correct time in it once you've finished<br />
testing.<br />
You might also want to add a <strong>Toppy</strong> wake-up timer, set for 10 minutes or so prior to <strong>the</strong> crontab<br />
time of 7:05am, with a duration of an hour or so, to ensure <strong>the</strong> <strong>Toppy</strong> is on when <strong>the</strong> rt2mei update<br />
occurs.<br />
Secure access using ssh: external access to your <strong>Asus</strong><br />
Oleg's firmware includes <strong>the</strong> dropbear sshd daemon.<br />
This allows you to start a terminal session with <strong>the</strong> <strong>Asus</strong> using ssh instead of telnet for comm<strong>and</strong>line<br />
access.<br />
ssh also allows "tunnelling".<br />
Tunnelling means that network traffic of a particular protocol (eg http, port 80), is "tunnelled" by <strong>the</strong><br />
ssh client on <strong>the</strong> PC, <strong>and</strong> is actually sent over port 22 using <strong>the</strong> secure ssh protocol to <strong>the</strong> <strong>Asus</strong>.<br />
dropbear on <strong>the</strong> <strong>Asus</strong> <strong>the</strong>n un-tunnels <strong>the</strong> traffic (ie converting it back to http, port 80 traffic) <strong>and</strong><br />
sends it on to <strong>the</strong> recipient application (ie <strong>the</strong> web server). <strong>The</strong> same process occurs when <strong>the</strong><br />
recipient application (in this case a web server) responds – <strong>the</strong> response is also tunnelled through<br />
port 22. As all traffic is sent via ssh, this means it is securely encrypted.<br />
<strong>The</strong>re are many different configuration options for ssh tunnelling, <strong>and</strong> you are recommended to read<br />
a guide such as<br />
http://www.ssh.com/support/documentation/online/ssh/winhelp/32/Tunneling_Explained.html for<br />
more information.<br />
<strong>The</strong> particular configuration we will use here is:<br />
a) An http server is running on <strong>the</strong> <strong>Asus</strong> on <strong>the</strong> st<strong>and</strong>ard http port 80 (this is <strong>the</strong> normal web<br />
administration interface of your <strong>Asus</strong>)<br />
b) We wish to connect from a PC (possibly any PC connected to <strong>the</strong> internet)<br />
c) <strong>The</strong> PC will be configured so <strong>the</strong> ssh client forwards localhost (ie traffic addressed to <strong>the</strong> PC)<br />
on port 1234 (we use 1234 just in case you are also running a web server on <strong>the</strong> PC) through<br />
ssh<br />
So when you type <strong>the</strong> address localhost:1234 in your browser, <strong>the</strong> traffic is forwarded to http port<br />
80 on <strong>the</strong> <strong>Asus</strong>, but it is tunnelled through ssh, forming a secure connection. <strong>The</strong> same principle<br />
can be used for o<strong>the</strong>r protocols.<br />
As ssh is highly secure, you can <strong>the</strong>n set up port/address mappings in your main ADSL<br />
modem/router to allow access from <strong>the</strong> outside world.<br />
You would configure your ADSL modem/router to forward all traffic on port 22 to <strong>the</strong> IP address of<br />
your <strong>Asus</strong>. And if you were trying to access your <strong>Asus</strong> from an internet-connected PC, you would<br />
use <strong>the</strong> public IP address of your main ADSL modem/router.<br />
IMPORTANT SECURITY NOTE:<br />
If you set up a port mapping in your ADSL modem/router to give external access, make sure you<br />
change your password to a strong one. O<strong>the</strong>rwise it won't be long before someone has hacked into<br />
your <strong>Asus</strong>. And remember if someone does manage to hack in with ssh, <strong>the</strong>y effectively could gain<br />
access to your whole network.<br />
dropbear configuration<br />
<strong>The</strong> dropbear configuration in this guide has <strong>the</strong> key files stored in /opt/etc/dropbear, <strong>and</strong> <strong>the</strong>re is<br />
an init.d script to start it automatically.<br />
Note that for ssh tunnelling, <strong>the</strong> configuration is all done by <strong>the</strong> client, you do not need to set up<br />
anything on <strong>the</strong> <strong>Asus</strong> for tunnelling to happen.<br />
29 of 35
Create dropbear security keys<br />
To set up dropbear, you first need to create a directory for <strong>the</strong> key files, <strong>and</strong> <strong>the</strong>n need to create<br />
<strong>the</strong>se keys:<br />
mkdir /opt/etc/dropbear<br />
dropbearkey -t dss -f /opt/etc/dropbear/dropbear_dss_host_key<br />
dropbearkey -t rsa -f /opt/etc/dropbear/dropbear_rsa_host_key<br />
Create dropbear start-on-boot script<br />
<strong>The</strong>n create <strong>the</strong> script to start dropbear on boot:<br />
/opt/etc/init.d/S51dropbear<br />
#!/bin/sh<br />
#<br />
# S51dropbear<br />
#<br />
# start dropbear<br />
# kill already running instances<br />
killall dropbear<br />
# start, using config from /opt/etc/dropbear<br />
dropbear -d /opt/etc/dropbear/dropbear_dss_host_key -r<br />
/opt/etc/dropbear/dropbear_rsa_host_key<br />
<strong>The</strong>n make this script executable with<br />
chmod +x /opt/etc/init.d/S51dropbear<br />
You'll need to reboot <strong>the</strong> <strong>Asus</strong>, or run this script manually, to start dropbear.<br />
Starting a terminal session using ssh: PuTTY<br />
This allows you to do <strong>the</strong> same as you would normally do in a telnet session, but through ssh, for<br />
added security.<br />
If you are using PuTTY, <strong>the</strong>n<br />
a) For Host Name, enter <strong>the</strong> IP address of <strong>the</strong> <strong>Asus</strong><br />
b) For Protocol, select SSH<br />
c) Click Open to connect<br />
You will be prompted to save <strong>the</strong> server's key fingerprint in <strong>the</strong> registry. Select "Yes" here, <strong>and</strong> you<br />
won't get this prompt <strong>the</strong> next time you connect. Or select "No" <strong>and</strong> you'll get <strong>the</strong> prompt every<br />
time.<br />
As with a Telnet session, you'll be prompted for your user ID <strong>and</strong> password.<br />
Starting a terminal session using ssh: Cygwin/OpenSSH<br />
If you are using comm<strong>and</strong>-line ssh (eg you have Cygwin <strong>and</strong> OpenSSH installed), <strong>the</strong>n simply type.<br />
ssh admin@192.168.1.1<br />
Change <strong>the</strong> IP address to match that of your <strong>Asus</strong>, <strong>and</strong> if you’re not using <strong>the</strong> default admin<br />
user ID change that as well. If you are trying to connect through a remote internet-connected<br />
PC, replace <strong>the</strong> IP address with <strong>the</strong> public IP address of your ADSL modem/router.<br />
You'll be prompted to log in in <strong>the</strong> normal way. You also may be asked whe<strong>the</strong>r you trust <strong>the</strong><br />
server, answer yes to this.<br />
Using ssh tunnelling to connect to your <strong>Asus</strong>: PuTTY<br />
<strong>The</strong> following configuration will map <strong>the</strong> localhost:1234 address to port 80 on your <strong>Asus</strong>, ie http,<br />
through a secure ssh tunnel.<br />
a) For Host Name, put <strong>the</strong> IP address of your <strong>Asus</strong>. If you are connecting through a remote,<br />
internet-connected PC, put <strong>the</strong> IP address of your ADSL modem/router<br />
30 of 35
) Select SSH for <strong>the</strong> protocol<br />
c) Click on "Tunnels" under Connection -> SSH<br />
d) Under Source Port, put 1234<br />
e) Under Destination, put <strong>the</strong> IP address of your <strong>Asus</strong>, <strong>and</strong> <strong>the</strong> port to forward, eg<br />
192.168.1.1:80 (use <strong>the</strong> IP address of <strong>the</strong> <strong>Asus</strong> on your local network for 192.168.1.1)<br />
f) Click on Add<br />
g) Click on Open to connect<br />
Log on in <strong>the</strong> normal way in <strong>the</strong> terminal window.<br />
You can now point your browser at localhost:1234 to access <strong>the</strong> web administration interface of your<br />
<strong>Asus</strong>.<br />
You can use <strong>the</strong> PuTTY window as a normal terminal session in <strong>the</strong> mean time.<br />
Once you have finished, type exit to close <strong>the</strong> session.<br />
Using ssh tunnelling to connect to your <strong>Asus</strong>: Cygwin/OpenSSH<br />
<strong>The</strong> following comm<strong>and</strong> on your client PC will cause traffic addressed to localhost:1234 to be<br />
forwarded through ssh to your <strong>Asus</strong> on port 80 (ie http).<br />
ssh admin@192.168.1.1 -L 1234:192.168.1.1:80<br />
Note that if you are connecting from a remote PC over <strong>the</strong> internet:<br />
a) <strong>The</strong> first IP address (part of admin@192.168.1.1) should be replaced by <strong>the</strong> public IP address<br />
of your main ADSL modem/router<br />
b) <strong>The</strong> second IP address (part of 1234:192.168.1.1:80) should be <strong>the</strong> IP address of your <strong>Asus</strong><br />
on your home network.<br />
If you now type localhost:1234 in your browser, you will see <strong>the</strong> web configuration interface of your<br />
<strong>Asus</strong>.<br />
You can also use <strong>the</strong> ssh comm<strong>and</strong> prompt window as a normal ssh terminal session.<br />
Once you've finished, type exit in <strong>the</strong> ssh comm<strong>and</strong> prompt window to shut down <strong>the</strong> session <strong>and</strong><br />
disconnect.<br />
Sending emails from your <strong>Asus</strong><br />
Macsat has a guide for installing esmtp, which is an email client, at<br />
http://www.macsat.com/macsat/content/view/26/29/.<br />
<strong>The</strong> installation is very straightforward.<br />
Instead of using <strong>the</strong> macsat instructions for creating a config file, you can instead use a text editor<br />
(nano or vi for example) to create one, an example one is:<br />
/opt/etc/esmtprc<br />
hostname = smtp.yourisp.com:25<br />
username = "yourname"<br />
password = "yourpassword"<br />
Replace <strong>the</strong> values with <strong>the</strong> ones appropriate to your ISP's mailserver. If your ISP doesn't<br />
require a username <strong>and</strong> password (many don't) <strong>the</strong>n just omit <strong>the</strong>se lines.<br />
Note that <strong>the</strong> macsat instructions quote <strong>the</strong> value of <strong>the</strong> hostname – this is not necessary.<br />
Also note <strong>the</strong> :25 at <strong>the</strong> end of <strong>the</strong> mail server address. Again <strong>the</strong> macsat instructions don't<br />
mention this. You do need to include this value. 25 is normal value for smtp, check your ISP<br />
mail server information if you are not sure.<br />
31 of 35
You can test this with<br />
echo -e "\nTest Message" | sendmail recipient@example.<strong>org</strong> -f<br />
sender@example.<strong>org</strong><br />
Replace recipient@example.<strong>org</strong> with <strong>the</strong> email address where you want to send <strong>the</strong> message<br />
to, <strong>and</strong> replace sender@example.<strong>org</strong> with <strong>the</strong> address <strong>the</strong> email is being sent from (<strong>the</strong> reply<br />
address). Note <strong>the</strong> –e <strong>and</strong> <strong>the</strong> \n in <strong>the</strong> text, this makes sure <strong>the</strong>re is a blank line before <strong>the</strong><br />
body of <strong>the</strong> message, which is necessary so <strong>the</strong> email headers are picked up correctly.<br />
You can <strong>the</strong>n use this in shell scripts to automatically notify you of things happening on your <strong>Asus</strong>.<br />
For example, here is an init.d script to email <strong>the</strong> post-boot log file whenever <strong>the</strong> <strong>Asus</strong> boots up. <strong>The</strong><br />
filename starts with S99 so that it is <strong>the</strong> last init.d script to run. Note that we also set one of <strong>the</strong><br />
email header fields – <strong>the</strong> subject – at <strong>the</strong> start, <strong>and</strong> also that this includes line breaks to indicate<br />
where <strong>the</strong> body of <strong>the</strong> message starts (\n).<br />
/opt/etc/init.d/S99Email-post-boot-log.sh<br />
#!/bin/sh<br />
#<br />
# S99Email-post-boot-log.sh<br />
#<br />
# Email myself <strong>the</strong> post-boot log file<br />
#<br />
message=/tmp/boot-message.txt<br />
# create a file for <strong>the</strong> email message<br />
echo -e "Subject: <strong>Asus</strong> has rebooted\n" > $message<br />
echo "/tmp/var/log/post-boot contents follows" >> $message<br />
echo "===START===" >> $message<br />
cat /tmp/var/log/post-boot >> $message<br />
echo "====END====" >> $message<br />
# send it<br />
cat $message | /opt/sbin/sendmail recipient@example.<strong>org</strong> -f<br />
sender@example.<strong>org</strong><br />
Replace recipient@example.<strong>org</strong> with where you want <strong>the</strong> email sent to, <strong>and</strong> change<br />
sender@example.<strong>org</strong> to a suitable reply address (probably both will be your own email<br />
address).<br />
Don't f<strong>org</strong>et to make <strong>the</strong> script executable, or it won't run:<br />
chmod +x /opt/etc/init.d/S99Email-post-boot-log.sh<br />
If you're using rt2mei, you could amend <strong>the</strong> /opt/usr/local/rt2mei/do-rt2mei.sh script to email<br />
yourself <strong>the</strong> rt2mei logs every time an update is done.<br />
32 of 35
O<strong>the</strong>r hints <strong>and</strong> tips<br />
Shutting down <strong>and</strong> rebooting your <strong>Asus</strong><br />
You can shut down your <strong>Asus</strong> using telnet interface by typing<br />
halt<br />
You can also shut it down from <strong>the</strong> box itself by pressing <strong>and</strong> holding in <strong>the</strong> Restore button until <strong>the</strong><br />
power light goes off.<br />
In both cases it should only take a few seconds to shut down – this is indicated by all <strong>the</strong> lights<br />
going off.<br />
You can reboot your <strong>Asus</strong> using telnet by typing<br />
reboot<br />
Disabling services from starting on boot<br />
<strong>The</strong> directory /opt/etc/init.d contains all <strong>the</strong> scripts to run services such as ftpd-topfield <strong>and</strong><br />
samba when <strong>the</strong> <strong>Asus</strong> boots up.<br />
Only scripts starting with a capital letter S are run, <strong>and</strong> <strong>the</strong>se are run in order of <strong>the</strong> two digits<br />
following <strong>the</strong> S in <strong>the</strong> filename.<br />
To disable a service, eg ftpd-topfield, rename <strong>the</strong> script:<br />
mv /opt/etc/init.d/S67ftpd-topfield /opt/etc/init.d/T67ftpd-topfield<br />
<strong>The</strong> ftpd-topfield service will no longer start up <strong>the</strong> next time <strong>the</strong> <strong>Asus</strong> is booted.<br />
To enable it again, rename <strong>the</strong> file back:<br />
mv /opt/etc/init.d/T67ftpd-topfield /opt/etc/init.d/S67ftpd-topfield<br />
Upgrading <strong>the</strong> <strong>Toppy</strong>'s firmware<br />
You can upgrade your <strong>Toppy</strong>'s firmware using an ftp client <strong>and</strong> ftpd-topfield running on <strong>the</strong> <strong>Asus</strong>.<br />
Simply drop <strong>the</strong> .tfd firmware file into <strong>the</strong> <strong>Toppy</strong>'s firmware directory.<br />
<strong>The</strong> <strong>Toppy</strong> automatically recognises <strong>the</strong> new firmware file, reboots <strong>and</strong> loads it.<br />
Setting up a .profile file to store <strong>the</strong> default crontab editor<br />
Setting up a /tmp/local/root/.profile file means you can store common settings that will get<br />
recreated when you reboot.<br />
<strong>The</strong> example here is to store <strong>the</strong> default editor for crontab, saved in <strong>the</strong> environment variable<br />
VISUAL.<br />
Create <strong>the</strong> .profile file as (note <strong>the</strong> filename starts with a dot):<br />
/tmp/local/root/.profile<br />
export VISUAL=nano<br />
As this is part of <strong>the</strong> flashfs filing system, we need to add it to <strong>the</strong> list of files to be saved, so type<br />
echo /tmp/local/root/.profile >> /usr/local/.files<br />
And save to make <strong>the</strong> change permanent with<br />
flashfs save<br />
flashfs commit<br />
flashfs enable<br />
You can test this by rebooting, <strong>the</strong>n using crontab -e to see if nano is started by default.<br />
If you want to change your .profile file, you can do that whenever you want, but remember that you<br />
will need to save it with flashfs to make <strong>the</strong> changes permanent.<br />
33 of 35
FAQ<br />
Here we hope to include answers to <strong>the</strong> most commonly asked questions on <strong>the</strong> forums.<br />
<strong>The</strong> rt2mei scheduled download doesn't seem to be working<br />
First of all, check <strong>the</strong> log file that <strong>the</strong> scheduled cron job produces. This is /tmp/var/log/rt2mei.<br />
Make sure you haven't rebooted your <strong>Asus</strong> in <strong>the</strong> meantime, o<strong>the</strong>rwise <strong>the</strong>se files will not be<br />
present.<br />
If this contains any errors <strong>the</strong>y might point to <strong>the</strong> source of <strong>the</strong> problem. If it is not present, it<br />
suggests a problem ei<strong>the</strong>r with your cron installation, or with your crontab. Double-check against<br />
<strong>the</strong> instructions in <strong>the</strong> guide.<br />
You can step through <strong>the</strong> rt2mei process manually to see if that gives any clues:<br />
1) Try running <strong>the</strong> rt2mei download process manually from telnet (this process does not transfer<br />
files to <strong>the</strong> <strong>Toppy</strong>, it just downloads <strong>the</strong>m to <strong>the</strong> <strong>Asus</strong>).<br />
cd /opt/usr/local/rt2mei<br />
php rt2mei.php<br />
If <strong>the</strong>re are any errors, it may be a problem with your rt2mei.cfg file<br />
2) Try running <strong>the</strong> full download <strong>and</strong> transfer to <strong>Toppy</strong> process with<br />
mkdir /tmp/var/rt2mei<br />
/opt/usr/local/rt2mei/rt2mei -new -tmp /tmp/var/rt2mei -ramdisk<br />
<strong>The</strong> mkdir comm<strong>and</strong> will give you an error if <strong>the</strong> /tmp directory already exists – you can safely<br />
ignore that.<br />
Watch for any o<strong>the</strong>r error messages.<br />
Once it is complete, check <strong>the</strong> output files /tmp/var/rt2mei/My Stuff.mei <strong>and</strong><br />
/tmp/var/rt2mei/My Favourites.mcl – if you set up <strong>the</strong> custom Samba configuration <strong>and</strong><br />
created a share for /tmp you can examine <strong>the</strong>se files on your PC.<br />
Now check <strong>the</strong> files on <strong>the</strong> <strong>Toppy</strong>, using ftp (assuming you have ftpd-topfield running on <strong>the</strong><br />
<strong>Asus</strong>). Look in <strong>the</strong> ProgramFiles directory for My Stuff.mei <strong>and</strong> My Favourites.mcl.<br />
3) If all of that looks fine, check <strong>the</strong> EPG on <strong>the</strong> <strong>Toppy</strong>. If that doesn't reflect <strong>the</strong> downloaded<br />
EPG files, it suggests a problem with your EPG (eg MyStuff) configuration, so check that.<br />
What is stored on <strong>the</strong> USB key, <strong>and</strong> what is stored on <strong>the</strong> <strong>Asus</strong>?<br />
<strong>The</strong> majority of <strong>the</strong> instructions in this guide make changes to files stored on <strong>the</strong> USB key.<br />
<strong>The</strong> exceptions are<br />
a) any configuration changes you make in <strong>the</strong> web interface<br />
b) <strong>the</strong> changes made under cron setup to set up <strong>the</strong> <strong>Asus</strong> for daylight saving<br />
c) <strong>the</strong> /usr/local/sbin/post-boot file<br />
d) a /tmp/local/root/.profile file (if you have created one)<br />
You can make a backup of all configuration changes you make in <strong>the</strong> web interface, <strong>and</strong> <strong>the</strong> daylight<br />
saving changes, from <strong>the</strong> web interface. Go to System Setup -> Settings Management, <strong>and</strong> follow<br />
<strong>the</strong> instructions <strong>the</strong>re (this page also tells you to how to restore a saved configuration file)<br />
You can make a backup of <strong>the</strong> flashfs file system on <strong>the</strong> <strong>Asus</strong> itself, which contains <strong>the</strong> post-boot file<br />
<strong>and</strong> <strong>the</strong> .profile file by going to System Setup -> Flashfs Management <strong>and</strong> following <strong>the</strong> instructions<br />
<strong>the</strong>re (this page also tells you how to restore a saved flashfs file).<br />
So to back up everything, you need to make a copy of<br />
a) <strong>The</strong> configuration file saved from <strong>the</strong> web interface<br />
b) <strong>The</strong> flashfs file saved from <strong>the</strong> web interface<br />
c) Everything on <strong>the</strong> USB key<br />
34 of 35
Thanks<br />
We would never have got our <strong>Asus</strong> <strong>WL</strong>-<strong>500g</strong>P's working with <strong>the</strong> <strong>Toppy</strong> without much help from<br />
o<strong>the</strong>rs.<br />
<strong>The</strong> toppy.<strong>org</strong>.<strong>uk</strong> forums proved an invaluable source of information, toge<strong>the</strong>r with Jackofall's guide<br />
for <strong>the</strong> <strong>Asus</strong> <strong>WL</strong>-500G Deluxe, <strong>the</strong> macsat guides, wooders' rt2mei package <strong>and</strong> web pages <strong>and</strong> <strong>the</strong><br />
Oleg firmware forums.<br />
Particular thanks go to mdryden, vroomfondle, downswalker, paragon <strong>and</strong> ubuntu for providing help<br />
<strong>and</strong> information, <strong>and</strong> for road-testing <strong>and</strong> providing feedback on some of <strong>the</strong> forum posts which<br />
were a precursor of this guide.<br />
And of course thanks to Nigel Whitfield for setting up, hosting <strong>and</strong> administering toppy.<strong>org</strong>.<strong>uk</strong>.<br />
References<br />
<strong>Toppy</strong>.<strong>org</strong>.<strong>uk</strong> http://www.toppy.<strong>org</strong>.<strong>uk</strong>/ <strong>and</strong> forums http://forum.toppy.<strong>org</strong>.<strong>uk</strong>/forum/index.php<br />
Jackofall's guide http://www.itsallgeek.info/Connecting%20an%20ASUS%20<strong>WL</strong>-<br />
500G%20DELUXE%20to%20your%20wireless%20network.pdf<br />
macsat guides http://www.macsat.com/macsat/content/category/3/13/29/<br />
rt2mei http://www.wooders.co.<strong>uk</strong>/rt2mei/index.php<br />
Oleg firmware http://oleg.wl<strong>500g</strong>.info/ <strong>and</strong> forums http://wl<strong>500g</strong>.info/forumdisplay.php?f=61<br />
35 of 35