EA eDIP128-6 compiler help - Electronic Assembly
EA eDIP128-6 compiler help - Electronic Assembly
EA eDIP128-6 compiler help - Electronic Assembly

Create successful ePaper yourself
Turn your PDF publications into a flip-book with our unique Google optimized e-Paper software.
50<br />
11 How-to-use<br />
<strong>EA</strong> <strong>eDIP128</strong>-6 <strong>compiler</strong> <strong>help</strong><br />
To find an easy start, you will find a project under "..\ELECTRONIC_ASSEMBLY_LCD-Tools-<br />
Portable\Data\eDIP - intelligent graphic displays\<strong>eDIP128</strong>-6\My first project\my_first_project.KMC". In<br />
that example all main commands are used.<br />
There are two different classes of examples. The ones starting with "BEGINNER.." are good to get an<br />
easy start. The ones starting with "EXPERT" describe special functions, such as using constants,<br />
definitions and <strong>compiler</strong> functions.<br />
Open file in KitEditor<br />
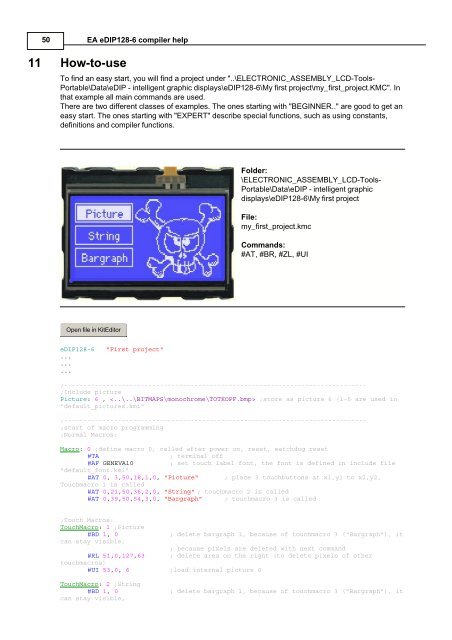
<strong>eDIP128</strong>-6 "First project"<br />
...<br />
...<br />
...<br />
Folder:<br />
\ELECTRONIC_ASSEMBLY_LCD-Tools-<br />
Portable\Data\eDIP - intelligent graphic<br />
displays\<strong>eDIP128</strong>-6\My first project<br />
File:<br />
my_first_project.kmc<br />
Commands:<br />
#AT, #BR, #ZL, #UI<br />
;-------------------------------------------------------------------------------<br />
;Include picture<br />
Picture: 6 , ;store as picture 6 (1-5 are used in<br />
"default_pictures.kmi"<br />
;-------------------------------------------------------------------------------<br />
;start of macro programming<br />
;Normal Macros:<br />
Macro: 0 ;define macro 0, called after power on, reset, watchdog reset<br />
#TA ; terminal off<br />
#AF GENEVA10 ; set touch label font, the font is defined in include file<br />
"default_font.kmi"<br />
#AT 0, 3,50,18,1,0, "Picture" ; place 3 touchbuttons at x1,y1 to x2,y2,<br />
Touchmacro 1 is called<br />
#AT 0,21,50,36,2,0, "String" ; touchmacro 2 is called<br />
#AT 0,39,50,54,3,0, "Bargraph" ; touchmacro 3 is called<br />
;Touch Macros:<br />
TouchMacro: 1 ;Picture<br />
#BD 1, 0 ; delete bargraph 1, because of touchmacro 3 ("Bargraph"), it<br />
can stay visible,<br />
; because pixels are deleted with next command<br />
#RL 51,0,127,63 ; delete area on the right (to delete pixels of other<br />
touchmacros)<br />
#UI 53,0, 6 ;load internal picture 6<br />
TouchMacro: 2 ;String<br />
#BD 1, 0 ; delete bargraph 1, because of touchmacro 3 ("Bargraph"), it<br />
can stay visible,