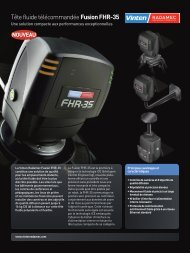
Robotic and Manual Pan & Tilt Head - Vinten Radamec
Robotic and Manual Pan & Tilt Head - Vinten Radamec
Robotic and Manual Pan & Tilt Head - Vinten Radamec

Create successful ePaper yourself
Turn your PDF publications into a flip-book with our unique Google optimized e-Paper software.
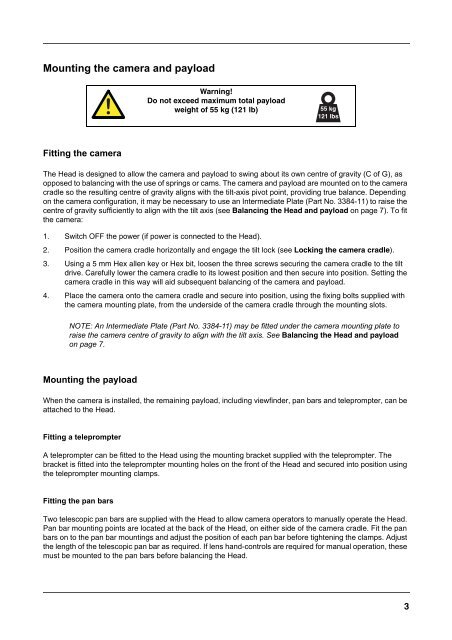
Mounting the camera <strong>and</strong> payload<br />
!<br />
Fitting the camera<br />
The <strong>Head</strong> is designed to allow the camera <strong>and</strong> payload to swing about its own centre of gravity (C of G), as<br />
opposed to balancing with the use of springs or cams. The camera <strong>and</strong> payload are mounted on to the camera<br />
cradle so the resulting centre of gravity aligns with the tilt-axis pivot point, providing true balance. Depending<br />
on the camera configuration, it may be necessary to use an Intermediate Plate (Part No. 3384-11) to raise the<br />
centre of gravity sufficiently to align with the tilt axis (see Balancing the <strong>Head</strong> <strong>and</strong> payload on page 7). To fit<br />
the camera:<br />
1. Switch OFF the power (if power is connected to the <strong>Head</strong>).<br />
2. Position the camera cradle horizontally <strong>and</strong> engage the tilt lock (see Locking the camera cradle).<br />
3. Using a 5 mm Hex allen key or Hex bit, loosen the three screws securing the camera cradle to the tilt<br />
drive. Carefully lower the camera cradle to its lowest position <strong>and</strong> then secure into position. Setting the<br />
camera cradle in this way will aid subsequent balancing of the camera <strong>and</strong> payload.<br />
4. Place the camera onto the camera cradle <strong>and</strong> secure into position, using the fixing bolts supplied with<br />
the camera mounting plate, from the underside of the camera cradle through the mounting slots.<br />
Mounting the payload<br />
When the camera is installed, the remaining payload, including viewfinder, pan bars <strong>and</strong> teleprompter, can be<br />
attached to the <strong>Head</strong>.<br />
Fitting a teleprompter<br />
A teleprompter can be fitted to the <strong>Head</strong> using the mounting bracket supplied with the teleprompter. The<br />
bracket is fitted into the teleprompter mounting holes on the front of the <strong>Head</strong> <strong>and</strong> secured into position using<br />
the teleprompter mounting clamps.<br />
Fitting the pan bars<br />
Warning!<br />
Do not exceed maximum total payload<br />
weight of 55 kg (121 lb)<br />
55 kg<br />
121 lbs<br />
NOTE: An Intermediate Plate (Part No. 3384-11) may be fitted under the camera mounting plate to<br />
raise the camera centre of gravity to align with the tilt axis. See Balancing the <strong>Head</strong> <strong>and</strong> payload<br />
on page 7.<br />
Two telescopic pan bars are supplied with the <strong>Head</strong> to allow camera operators to manually operate the <strong>Head</strong>.<br />
<strong>Pan</strong> bar mounting points are located at the back of the <strong>Head</strong>, on either side of the camera cradle. Fit the pan<br />
bars on to the pan bar mountings <strong>and</strong> adjust the position of each pan bar before tightening the clamps. Adjust<br />
the length of the telescopic pan bar as required. If lens h<strong>and</strong>-controls are required for manual operation, these<br />
must be mounted to the pan bars before balancing the <strong>Head</strong>.<br />
3