

Installation & Service Manual - Rex Materials Group
Installation & Service Manual - Rex Materials Group
Installation & Service Manual - Rex Materials Group

You also want an ePaper? Increase the reach of your titles
YUMPU automatically turns print PDFs into web optimized ePapers that Google loves.
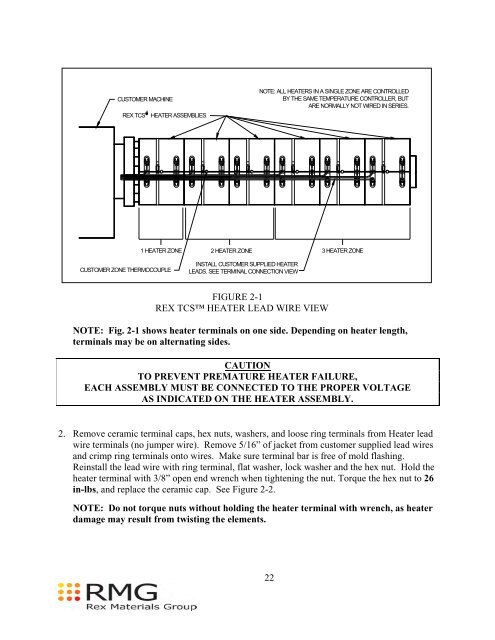
CUSTOMER MACHINE<br />
REX TCS HEATER ASSEMBLIES<br />
1 HEATER ZONE<br />
CUSTOMER ZONE THERMOCOUPLE<br />
2 HEATER ZONE<br />
INSTALL CUSTOMER SUPPLIED HEATER<br />
LEADS. SEE TERMINAL CONNECTION VIEW<br />
FIGURE 2-1<br />
REX TCS HEATER LEAD WIRE VIEW<br />
NOTE: ALL HEATERS IN A SINGLE ZONE ARE CONTROLLED<br />
BY THE SAME TEMPERATURE CONTROLLER, BUT<br />
ARE NORMALLY NOT WIRED IN SERIES.<br />
22<br />
3 HEATER ZONE<br />
NOTE: Fig. 2-1 shows heater terminals on one side. Depending on heater length,<br />
terminals may be on alternating sides.<br />
CAUTION<br />
TO PREVENT PREMATURE HEATER FAILURE,<br />
EACH ASSEMBLY MUST BE CONNECTED TO THE PROPER VOLTAGE<br />
AS INDICATED ON THE HEATER ASSEMBLY.<br />
2. Remove ceramic terminal caps, hex nuts, washers, and loose ring terminals from Heater lead<br />
wire terminals (no jumper wire). Remove 5/16” of jacket from customer supplied lead wires<br />
and crimp ring terminals onto wires. Make sure terminal bar is free of mold flashing.<br />
Reinstall the lead wire with ring terminal, flat washer, lock washer and the hex nut. Hold the<br />
heater terminal with 3/8” open end wrench when tightening the nut. Torque the hex nut to 26<br />
in-lbs, and replace the ceramic cap. See Figure 2-2.<br />
NOTE: Do not torque nuts without holding the heater terminal with wrench, as heater<br />
damage may result from twisting the elements.