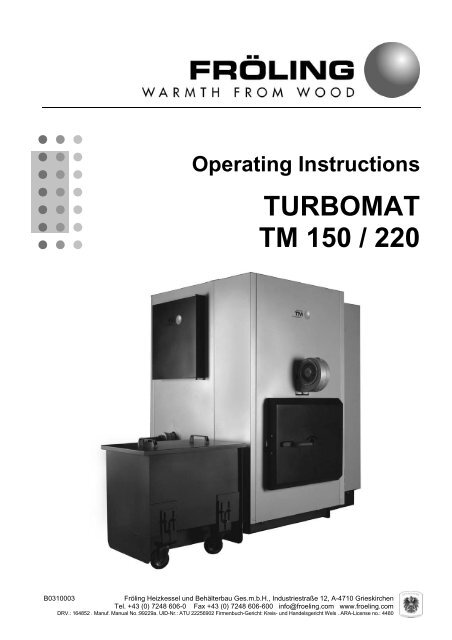
Operating Instructions TURBOMAT TM 150 / 220 - Econergy Ltd
Operating Instructions TURBOMAT TM 150 / 220 - Econergy Ltd
Operating Instructions TURBOMAT TM 150 / 220 - Econergy Ltd

Create successful ePaper yourself
Turn your PDF publications into a flip-book with our unique Google optimized e-Paper software.
<strong>Operating</strong> <strong>Instructions</strong><br />
<strong>TURBOMAT</strong><br />
<strong>TM</strong> <strong>150</strong> / <strong>220</strong><br />
B0310003 Fröling Heizkessel und Behälterbau Ges.m.b.H., Industriestraße 12, A-4710 Grieskirchen<br />
Tel. +43 (0) 7248 606-0 Fax +43 (0) 7248 606-600 info@froeling.com www.froeling.com<br />
DRV.: 164852 . Manuf. Manual No.:99229a. UID-Nr.: ATU 22256902 Firmenbuch-Gericht: Kreis- und Handelsgericht Wels . ARA-License no.: 4480
General<br />
Dear Customer,<br />
You have chosen to purchase one of our firm's quality products. We appreciate your choosing our<br />
product and we hope that you too will soon join the growing number of satisfied customers.<br />
Our systems represent the culmination of many long years of experience and the on-going<br />
development of the latest technological advances which result from that experience.<br />
Conscientious processing and control are the most important objectives in our firm. Defects can<br />
rarely be 100% ruled out, so, if in spite of all our efforts a defect should appear, our generous<br />
guarantee provides you with a high degree of security.<br />
It's important to note, however, that even the best-designed product will only perform well over a<br />
long period of time if it is properly serviced and operated.<br />
Grieskirchen, August 2003<br />
FRÖLING on the Internet<br />
On our Internet site, you can find information on our complete list of products or request more<br />
detailed information 24 hours a day.<br />
What's more, you will find current information on new developments and trends at Fröling and in<br />
the boiler field.<br />
Internet Address: http://www.froeling.com<br />
E-Mail Address: info@froeling.com<br />
2 B0310003 Edition 2003
Table of Contents<br />
Permitted Fuels 4<br />
Technical Data 5,6<br />
Safety Information 7<br />
Start-up 8<br />
Emergency Operation using Firewood 8<br />
Steps to Take during Malfunctions 9<br />
Servicing, Cleaning 10-14<br />
<strong>Instructions</strong> for Measuring Emissions 15<br />
Conformity Certificate 16<br />
<strong>Operating</strong> the Controller 17-26<br />
Quick Reference Guide 18<br />
Adjusting the Boiler 23<br />
Adjusting the Heating 21<br />
Setting the Clock Time 23<br />
Fault Messages, Eliminating Faults 25-26<br />
Edition 2003 B0310003 3<br />
Page
Use of Fuels<br />
The wood-chip system of the <strong>TURBOMAT</strong> series is intended exclusively for heating domestic water.<br />
Only the fuels described below may be used:<br />
Waste-wood<br />
Pellets:<br />
Shavings:<br />
Waste wood water content:<br />
Designation Type<br />
W20 air-dried<br />
W30 storage stability<br />
W35 limited storage only<br />
Waste-wood size:<br />
For Austria, the following applies: Waste-wood ÖNORM M 7133<br />
Energy waste-wood G 30 (finely chopped waste-wood)<br />
Energy waste-wood G 50 (medium-sized waste-wood)<br />
For Germany, the following applies:<br />
Waste-wood with a maximum edge length of 50 mm as per fuel class 4<br />
Federal Emissions Protection Ordinance (BimSchV) dated 15 July 1988)<br />
For Austria, the following applies: Pellets as per PVA - quality symbol<br />
For Germany, the following applies: Pellets as per DIN 51731<br />
Saw dust and carpentry waste can only be used in systems equipped with rotary valves!<br />
For Austria, the following applies: ECO STANDARD M 7133<br />
For Germany, the following applies: 1. BlmSchV, Fuel class 4<br />
Due to various air-quality protection regulations, the following fuels must not be used:<br />
- Cardboard waste, treated wood-wastes, pure grinding dust,<br />
- rubbish, large quantities of paper, cartons and<br />
- Coal (brown coal, anthracite coal, briquettes)<br />
Using other than permitted wood-wastes will void your warranty.<br />
In addition, the combustion chamber is susceptible to damage caused by burning plastics and finishes.<br />
The caustic layers will damage the boiler or the Lambda probe.<br />
What's more, the condensation which forms from burning damp fuel (water content>35%!) can cause seepage<br />
or corrosion in the combustion chamber, heat-exchanger, and chimney.<br />
4 B0310003 Edition 2003
Technical Specifications<br />
Technical documentation lt. Agreement between the Austrian Federal Regions as per Art. 15b B-<br />
VG on protective measures with regard to small boiler systems or energy conservation<br />
Boiler Type: Waste-wood Boiler, Turbomat<br />
Manufacturer: FRÖLING Heizkessel- und Behälterbau Ges.mb.H.<br />
Industriestrasse 12, 4710 Grieskirchen<br />
Data <strong>150</strong> <strong>220</strong><br />
Measured Quantity Unit Boiler Size<br />
Rated heating efficiency kW <strong>150</strong> 200<br />
Heating efficiency range kW 50-<strong>150</strong><br />
Fuel-heating efficiency at rated<br />
heating efficiency kW 164.8<br />
Permitted fuel See page 4<br />
Fuel through-put at rated<br />
heating efficiency kg/h 50 67<br />
Flue gas temperature °C 190 190<br />
Flue gas mass flow at G 50 m³/h 664 885<br />
Necessary draught requirement Pa 20 20<br />
Flue gas pipe diameter mm 200 250<br />
Permitted operating pressure bar 3 3<br />
Permitted operating temperature °C 95 95<br />
Testing Institute TÜV<br />
Test report no.<br />
Exhibition Date 01.08.2003<br />
Carbon monoxide (CO) mg/MJ 39<br />
Nitrous oxide (NOx) mg/MJ 91<br />
Organ. Hydrocarbons (OGC) mg/MJ 2<br />
Dust mg/MJ 18<br />
Boiler Efficiency Rating % 91.0<br />
Store Required Recommended<br />
Edition 2003 B0310003 5
Technical Specifications<br />
H5<br />
H2<br />
8 9<br />
10<br />
B2<br />
Waste-wood Boiler Turbomat <strong>150</strong> / <strong>220</strong><br />
Rated heat output kW <strong>150</strong> 200<br />
Permissible working over-pressure bar 3 3<br />
Permissible outfeed temperature °C 95 95<br />
Minimum return feed temperature °C 55 55<br />
Boiler contents (water ) Liters 385<br />
Total boiler mass kg 1690<br />
Chamber/Heat-exchanger kg 940 / 750<br />
Upstream resistance (T=20K)<br />
Flow-through (∆T = 20K) m³/h 6.44 9.45<br />
Chimney Construction Data:<br />
Flue gas temperature °C 190 190<br />
Amount of fuel required at G50 W30 kg/h 50 67<br />
Flue gas mass flow at G50 W 20 Lambda=2 m³/h 664 885<br />
Necessary draught requirement at the chimney Pa 15/8 20/10<br />
Flue gas pipe diameter mm 200 250<br />
Structural Dimensions<br />
L Boiler depth mm 3230 3390<br />
B Boiler width mm 1210 1490<br />
H Boiler height 1) mm 1870 1870<br />
H1/H2 Outfeed/return feed height mm 1930 / 495 1930 / 495<br />
H3 Flue pipe height860<br />
H4 Height of stoker connection (with blow-back flap) mm 775 860<br />
H5 Height of induced draught unit mm 1970 1970<br />
H6 Height of flue gas return mm 2365 2365<br />
Outfeed/return feed connection DN 65 65<br />
Connection for thermal discharge safety device sleeve 1/2" 1/2"<br />
L1 Length of boiler mm 1710 1750<br />
L2 Length of induced draught fan mm 600 670<br />
L3 Depth from back wall to centre of stoker mm 1200 1240<br />
L4 Length of ash trolley for chamber ash removal mm 930 930<br />
B1 Width of ash trolley for chamber ash removal mm 550 550<br />
B2 Width of heat-exchanger<br />
B4<br />
12<br />
H1<br />
11<br />
5 6 7<br />
L4 L1 L2<br />
mm 870 570<br />
B3 Distance from centre of stoker to the boiler mm 630 630<br />
B4 Length of stoker (incl. gearing) mm 845 845<br />
Min. clearance height 1,950 mm Dimensions in mm, technical modifications are not authorized<br />
Min. clearance width 1,000 mm<br />
6 B0310003 Edition 2003<br />
H3<br />
3<br />
1 2<br />
1 ..Conveyor grate 5 ..Upper cleanout port door 9 ..Outfeed<br />
2 ..Ash rake 6 ..Upright heat-exchanger 10 ..Return feed<br />
3 ..Stoker screw 7 ..Induced draught fan 11 ..Ash trolley<br />
4 ..Combustion chamber door 8 ..Combustion air blower fan 12 ..Ashcan<br />
L<br />
B<br />
H<br />
4
Assembly<br />
21....Underpressure measuring connector<br />
22....Boiler sensor, STB sensor<br />
23....Safety battery sensor<br />
24....Safety battery connections<br />
25....Combustion chamber temperature sensor<br />
26....RGTW (combustion chamber overpressure)<br />
27....Primary air setting motor<br />
28....Secondary air setting motor<br />
29 ...Igniter<br />
30....Cleaning port<br />
11 ... Grate and rake drive<br />
12 ... Stoker screw drive<br />
13 ... Stoker screw<br />
14 ... Blow-back flap<br />
15 ... Feed screw drive<br />
16 ... Lambda probe (3/4” connector)<br />
17 ... Flue gas sensor (1/2” connector)<br />
18 ... Heat exchanger drive<br />
19 ... STB housing<br />
20 ... Undepressure measuring port<br />
1 ..... Outfeed<br />
2 ..... Return feed<br />
3 ..... Induced draught fan<br />
4 ..... Combustion air blower fan<br />
5 ..... Ash trolley<br />
6 ..... Ash screw drive<br />
7 ..... Ash can<br />
8 ..... Ash can screw drive<br />
9 ..... Conveyor grate<br />
10 ... Ash rake<br />
Edition 2003 B0310003 7
Safety Information<br />
Five devices to counter over-heating:<br />
As a rule, the operator is not authorized to modify the safety equipment, to<br />
make substitutions, to by-pass any systems, or to change the settings.<br />
The boiler system's type and power rating also may not be modified without the<br />
concurrence of an expert.<br />
In order to avoid burn injuries, the boiler is only to be operated using the<br />
handles provided. For the same reason, you should avoid touching the flue<br />
pipes during operation.<br />
The operating door is located behind the insulating door. It can only be opened<br />
if the induced draught fan is running or starts running after the insulating door is<br />
opened.<br />
Caution: - Open the fill tank doors slowly when system is operating<br />
(explosions)<br />
If this is not the case, the temperature monitor safety device has disengaged<br />
the induced draught ventilator (See function below: "Five systems to prevent<br />
over-heating"). Opening the doors when the induced draught is not running<br />
could allow the incompletely burned gases in the boiler to escape into the boiler<br />
room, resulting in a powerful explosion!<br />
• Boiler controller: switches off the boiler if the boiler temperature is set 5°C<br />
above the set value<br />
• Temperature monitoring safety device (via control system): disengages the<br />
boiler if it reaches a temperature of 93°C, so that it can automatically reengage<br />
once the temperature drops below 89°C.<br />
• Thermal discharge safety device: opens a valve when the temperature<br />
reaches 95°C or 100°C. This valve allows cold water to flow into the boiler's<br />
safety heat-exchanger, to draw off the heat from the boiler and prevent its<br />
temperature going any higher. Using the water from the thermal discharge<br />
safety device or from the heating system as domestic hot water is absolutely<br />
forbidden.<br />
• Safety temperature limiter: disengages the induced draught when the boiler<br />
temperature reaches 100°C (the pumps continue to run). Physically unlatch<br />
the safety temperature limiter situated on the back side, as soon as the<br />
temperature has again dropped below 95°C (screw off the cap and push in the<br />
head approximately 0.5 cm using a matchstick or a small screw-driver).<br />
• Safety valve (SV): If all the previously mentioned systems fail to prevent a<br />
continuing rise in temperature, the system pressure will also rise (up to 2.5 or<br />
3 bar). If this is the case, the safety valve opens and vents off the hot water in<br />
the form of steam. If this should happen, water must be added before a new<br />
system start-up.<br />
8 B0310003 Edition 2003
Start-up<br />
Initial Start-up<br />
The initial start-up must be carried out by an authorized installer or Fröling's customer service department!<br />
Checking the Heating System:<br />
1. Check all electrical equipment<br />
2. Check to see whether the heating system has been completely vented.<br />
3. Check to see whether all the safety devices are in place and ensuring they are functioning properly.<br />
4. Check to see whether there is sufficient ventilation and venting of the boiler room.<br />
5. Configure and set parameters<br />
6. Prepare the Fuel<br />
Fill the fuel storage room with waste-wood or pellets, depending on the type of system.<br />
IMPORTANT! The conveyor in the storage room must be switched on during the filling process<br />
7. Pre-heating: See description page 17<br />
Pre-heat the system at low power until the combustion chamber has dried out.<br />
Turn the temperature controller to 70°C!<br />
Edition 2003 B0310003 9
What to do if unit stops operating<br />
If you discover damage to the heat producing component (boiler), the expansion tank, or the safety equipment,<br />
you must discontinue operating the system.<br />
� Check the power supply (fuses) or the switchgear panel fuses<br />
� Boiler controller correctly set (everything on "AUTO")<br />
� Check the safety temperature limiter (See page 7)<br />
� The boiler temperature can't be throttled:<br />
Too much material (See page 22)<br />
Chimney draught too high (> 0.3 mbar) - Install draught controller!<br />
Door seal not sound (boiler is burning with too much dead air)<br />
� Boiler output is too low:<br />
Boiler is probably dirty - See pages 10 - 13 "Maintenance and Cleaning"<br />
(See page 4 "fuels") - Solution: use a better quality of fuel<br />
� Over-heating:<br />
If the boiler system should over-heat in spite of all the safety systems, take the following<br />
precautions:<br />
- Keep all doors and covers closed on the boiler<br />
- Switch on all the pumps and open the stirrer<br />
- Leave the boiler room<br />
- Inform customer service<br />
If fault messages appear on the boiler controller display, see the error message list!<br />
For faults that occur on a frequent basis (safety temperature limiter has fallen) or for faults that can't be<br />
cleared by the operator, notify the installer, heating technician, or our customer service.<br />
10 B0310003 Edition 2003
Maintenance<br />
Boiler condensation:<br />
In order to achieve optimum combustion, problem-free automatic operation, and good system<br />
efficiency, ash and unburned residual fuel must be removed from the combustion chamber and the<br />
settling chamber under the heat-exchanger at regular intervals.<br />
This is also necessary for systems with automatic heat-exchanger ash removal.<br />
On the Turbomatic 85 - 110, the ash from the settling chamber under the heat-exchanger is<br />
likewise fed into an ash box by an ash screw.<br />
A return feed lift must ensure that the return feed temperature never falls below 55°C. Otherwise<br />
premature corrosion of the heating surfaces is possible.<br />
Therefore, during shut-down periods in the summer months, you must ensure that all of the boiler<br />
circuit water is circulated at least 1 x per week, to prevent sediments and changes to the<br />
concentrations.<br />
If the system in not operated during the winter, it should be completely emptied by a trained<br />
technician (danger of freezing, which could destroy the boiler or the pipes). Otherwise, the system<br />
remains filled.<br />
Filling or re-filling the system is done with the stirrer half-opened, pump disengaged, and check<br />
valves open. No special requirements are made on the quality of the water used, but avoid oversupplying<br />
the system (See page 5 "Standards, Regulations, and Equipment")<br />
The boiler must only be cleaned when the system is disconnected.<br />
Edition 2003 B0310003 11
Maintenance and cleaning:<br />
Weekly tasks:<br />
- Emptying the ash box:<br />
Depends on the operating hours and the heating material (bark content) and should be done<br />
when it reaches 2/3 full. The ash box can be removed in its entirety or it can be emptied<br />
using a vacuum. In addition, the flue dust from the settling chamber (Pos 8) under the heatexchanger<br />
must be removed using a scraper or ash vacuum.<br />
- For <strong>TM</strong> <strong>150</strong>, there are two ash boxes with a capacity of either 180 l or 25 l,<br />
so that the settling chamber under the heat-exchanger is automatically emptied.<br />
- Check system pressure<br />
The manometer should indicate 1 - 1.5 bar (in the cold state) depending on the system<br />
configuration or approximately 0.2 bar above the supply pressure of the expansion tank (in<br />
the heated state). If the system pressure is constantly less than this, water must be added. If<br />
this happens frequently, please consult your installer, since there may be an unsound seal<br />
somewhere in the heating system . Too much fresh water (from frequent refilling) can cause<br />
calcification of the boiler. Result: Decrease in output or breakdown. If significant fluctuations<br />
are noted at the manometer, the expansion tank is probably defective or too small (not<br />
sized properly) (See page 13 "Checking the Expansion Tank").<br />
12 B0310003 Edition 2003
Maintenance and cleaning:<br />
Monthly tasks:<br />
Annual tasks:<br />
- Clean the boiler:<br />
Open the combustion chamber door and switch on the ash screw and the conveyor grate.<br />
Sweep or vacuum the remaining ash in the combustion chamber forwards onto the ash<br />
screw .<br />
(For switching on the ash screw and grate, see below)<br />
Winter operation<br />
Heating<br />
- Boiler temp.<br />
- Flue gas temp.<br />
- Slide-in<br />
- Blower<br />
- Primary air<br />
- Residual O2<br />
- Secondary air<br />
- Boiler pump<br />
- Boiler temp.<br />
- Boiler pump<br />
- Outside temp.<br />
- Outfeed 1<br />
- Outfeed 2<br />
- Day: Th 09/07/02<br />
- Time: 13:30:00<br />
- Version: 13.12<br />
- Running time<br />
- Type: Turbomatic<br />
- Board temp.<br />
- The boiler<br />
must be<br />
- Operator name:<br />
CUSTOMER<br />
Enter<br />
Back<br />
SET<br />
MANUAL<br />
OPERATION<br />
TEST MODE<br />
- Feed screw forward/backward<br />
- Stoker screw forward/backward<br />
- Raise blow-back flap<br />
- Ash screw forward/backward<br />
- Heat-exchanger drive<br />
- Tipping drive (grate tipping)<br />
- Clean flue gas sensing elements (picture Pos1):<br />
Release the threaded pin and remove the sensing element from the flue gas pipe, wipe off<br />
the sensing element with a clean cloth and then re-install it.<br />
Edition 2003 B0310003 13<br />
Enter<br />
Back<br />
- Check induced draught blower fan for dirt and clean it (Pos2):<br />
After opening heat-exchanger cleaning port cover (Pos3), a visual check will determine<br />
whether the blower fan's traveling wheel must be removed for cleaning.<br />
If dirt or ash have collected, carefully clean (with a soft brush, paintbrush, etc.). While doing<br />
this, take care that the attached clips don't slip. The clips are balancing weights, which<br />
guarantee a smooth, even run. If the clips are altered in any way, the ventilator will not run<br />
smoothly. It will become too loud and will need to be replaced, since the motor bearings will<br />
soon be damaged.<br />
- Check the heat-exchanger for dirt - perform visual check or clean (Pos3)<br />
Open the heat-exchanger cleaning port cover (Pos3) and clean the settling chamber with the<br />
brush provided<br />
- Check supply-air blower fan for contaminants (dust, for example) (Pos9)<br />
If there is dirt, remove the protective grating and clean the traveling wheel with a cloth or<br />
compressed air.
Maintenance and cleaning:<br />
- Remove the separating plates (Pos5) and remove the accumulated soot deposits with the ash<br />
scraper.<br />
Also clean the boiler's inner walls.<br />
- Check the firebrick for damage (Pos6)<br />
Open the combustion chamber door and perform a simple visual check of the combustion<br />
chamber (small fissures or a rough surface are normal)<br />
- Check the grate; to see whether the grate elements have shifted (Pos7)<br />
Open the combustion chamber door and perform a simple visual check<br />
- Blow out any obstructions in the over-pressure monitor (Pos11)<br />
On the <strong>TM</strong> <strong>150</strong>, also blow out the under-pressure measuring port with air (Pos12)<br />
(CAUTION: Do not blow air into the differential pressure measuring transducer)<br />
- Check the gearbox for a good seal (Pos10)<br />
Important: As the system operator, you are legally obligated to have the thermal discharge safety<br />
device operationally checked annually by a specialist.<br />
- Thermal discharge safety device<br />
Press the test button - water must flow into the discharge funnel. After releasing the button,<br />
the funnel must seal again. If the amount of discharged water was very low, the thermal<br />
discharge safety device or the safety battery is calcified and must be flushed out with a deliming<br />
agent (thinned formic acid, for example). If the amount continues to decrease, the<br />
seals and the valve set must be cleaned.<br />
- Safety valve<br />
The safety valves have a test button. Press the test button. If the valve is operating correctly,<br />
water comes out. After the test button is released, the valve must re-seal!<br />
- Expansion Tank<br />
There is a test valve on each expansion tank (similar to the valve on a vehicle tire), which<br />
can be briefly actuated (pressed in). If water comes out, the expansion tank is defective. If<br />
nitrogen (anti-corrosion protection) comes out, everything is okay. However, to see clear<br />
evidence of the system's operability, the water pressure in the heating system must first be<br />
lowered to 0 bar.<br />
Have it checked by a specialist if necessary<br />
- Soundness of door seals<br />
By actuating the door, you can check to see whether it still closes tightly (by drawing shut).<br />
Next, check the ceramic fibre seal, to see whether it is still properly aligned on the door<br />
frame (by the imprint in the ceramic fibre cord). If not properly aligned, this will be evidenced<br />
by a black discoloration or a break in the imprint. If the soundness of the seal is no longer<br />
assured, the door latches must be re-tightened or the seal must be replaced.<br />
- Check the chimney and the connection line to the chimney<br />
The chimney should be regularly serviced (by a chimney sweep). After the chimney is<br />
cleaned, it is imperative to also have the connection line from the boiler to the chimney<br />
checked for sediments (for example due to chimney cleaning)<br />
- Check explosion flap and/or draught controller flap<br />
Check the explosion flap (and the draught controller too, if there is one) for ease of<br />
operation.<br />
14 B0310003 Edition 2003
<strong>Instructions</strong> for measuring emissions<br />
Clean the system three days before the measurement (not on the same day, since this<br />
unnecessarily stirs up the ash, which can lead to increased dust emission).<br />
Use the fuel that you always use and for which the system has been set!<br />
The boiler should already have been operating for some time.<br />
A boiler temperature of at least 60°C and<br />
a flue gas temperature of more than 140°C is required.<br />
The O2 - value should be between 7 - 9 [%].<br />
Under no circumstances should you make any changes to the system just before the<br />
measurement begins (5-10 minutes) (opening doors, etc.). This leads to erroneous (worse)<br />
results!<br />
Whether you are operating under partial load or not, is indicated by the flue gas temperature<br />
alone (see below). If your system is in the partial load zone (shown below) at the beginning of the<br />
measurement, do the partial load measurement first. If not, do the partial load measurement at the<br />
end. But not, if you disengage the blower fan, or perhaps attempt to reduce the ventilator RPM<br />
yourself .<br />
The Turbomatic has a continuously, via the primary or secondary rotary slide valve operating<br />
control system, which automatically adapts to the heat consumption. For a partial load<br />
measurement, it is therefore necessary to throttle the heat emission in order to carry out a partial<br />
load measurement, since otherwise this control function is disabled and no representative<br />
values would be attainable.<br />
Edition 2003 B0310003 15
Conformity certificate<br />
Heizkessel und Behälterbau Ges.m.b.H., Industriestraße 12, A-4710 Grieskirchen<br />
EC – Conformity certificate<br />
Product: Waste-wood combustion with automatic infeed<br />
Types: Turbomatic <strong>150</strong><br />
We, the manufacturer, do hereby affirm that the products shown meet the following<br />
guidelines.<br />
EU Guidelines:<br />
89/392/EC The Machinery Directive<br />
73/23/EC Electrical Machinery: Low Voltage Directives<br />
89/336/EC Electromagnetic Compatibility Directive<br />
Applicable standards:<br />
ECO STANDARD – EN 729-2 Welding Quality Requirement<br />
ECO STANDARD – EN 303 - 5 Boilers for Solid Fuels<br />
Grieskirchen, dated 12.11.2001 _____________________ ______________________<br />
Quality Assurance Dept. Company Management<br />
16 B0310003 Edition 2003
Operation<br />
Two column display<br />
Start - key I<br />
<strong>Operating</strong> - LED<br />
Cursor key<br />
Enter key<br />
Stop key O Cursor key<br />
Boiler nominal temperature Back key<br />
<strong>Operating</strong> elements<br />
Operation takes place via a 4-button control unit with a clear menu structure.<br />
All of the parameters necessary for operation are at the customer's disposal.<br />
No. Nomenclature Function<br />
1 Two column display Display modes, operating status, parameters, fault messages<br />
2<br />
Start - key I<br />
Stop - key O<br />
3 Status LED<br />
4<br />
Up-arrow key<br />
Down-arrow key<br />
Enter key<br />
Back - key<br />
Start boiler operation<br />
Stop boiler operation<br />
Indicates the system operating status:<br />
Blinking green, long : System switched on<br />
Blinking green, short: System switched off<br />
Blinking red, short: System error, not acknowledged<br />
Blinking red, short: System error, acknowledged<br />
Move the arrow up in the menu, increase or activate the parameters<br />
Move the arrow down in the menu, decrease or deactivate the parameters<br />
Switch between menus, call up or confirm inputs<br />
Switch between menus, not confirmed<br />
Edition 2003 B0310003 17
Switching on the System<br />
The main switch is located under the control unit.<br />
F R Ö L I N G<br />
. . . . . . . . .<br />
Switched off<br />
OFF ←<br />
!<br />
After switching on the control unit, the text FRÖLING appears.<br />
The control unit performs a system check.<br />
After the system check, the display is located in the display menu.<br />
You can read the actual (measured) values in this menu.<br />
DANGER: Never stop the boiler using the main switch!<br />
Stop the boiler using the red STOP key<br />
Important control steps<br />
Start system Press green button (I)<br />
or open the insulating<br />
door<br />
Shut down the<br />
system<br />
Modify parameters<br />
and values<br />
Press red button (0)<br />
1. Select menu<br />
2. Select<br />
parameters<br />
3. Press Enter-key<br />
4. Change the value<br />
5. Confirm with the<br />
"Enter" key<br />
Push-button Note<br />
O<br />
O<br />
Enter Back<br />
Enter<br />
Enter<br />
The main switch must be switched on<br />
CAUTION DANGER:<br />
Never stop the boiler using the main switch!<br />
You will find an overview of the menu structure<br />
in chapter Fehler! Verweisquelle konnte nicht<br />
gefunden werden.<br />
A question mark appears next to the parameter<br />
value. Now the value can be changed.<br />
The "up-arrow" key increases the value.<br />
The "down-arrow" key decreases the value.<br />
Value is saved.<br />
If the "Back" key is used instead of the "Enter"<br />
key, the change is not accepted<br />
18 B0310003 Edition 2003
Overview, Quick Reference Guide<br />
Winter operation<br />
Heating<br />
- Boiler temp.<br />
- Flue gas temp.<br />
- Slide-in<br />
- Blower<br />
- Primary air<br />
- Residual O2<br />
- Secondary air<br />
- Boiler pump<br />
- Boiler temp.<br />
- Boiler pump<br />
- Outside temp.<br />
- Outfeed 1<br />
- Outfeed 2<br />
- Day: Th 09/07/02<br />
- Time: 13:30:00<br />
- Version: 13.12<br />
- Running time<br />
- Type: Turbomatic<br />
- Board temp.<br />
- The boiler<br />
must be<br />
- Operator name:<br />
CUSTOMER<br />
Enter<br />
Back<br />
SET<br />
MANUAL<br />
OPERATION<br />
TEST MODE<br />
ERROR<br />
DISPLAY<br />
ERROR<br />
MEMORY<br />
Enter<br />
Back<br />
Enter<br />
Back<br />
Enter<br />
Back<br />
Boiler settings...<br />
Edition 2003 B0310003 19<br />
Enter<br />
Back<br />
Enter<br />
Back<br />
Enter<br />
Back<br />
Enter<br />
Back<br />
Enter<br />
Back<br />
Enter<br />
Back<br />
- Desired boiler temperature<br />
- Reload if boiler under<br />
- Start of 1st loading session<br />
- End of 1st loading session<br />
- Start of 2nd loading session<br />
- End of 2nd loading session<br />
Heating circuit 1... Weekly program<br />
Heating circuit 2...<br />
Screw times...<br />
Shaker motor...<br />
Boiler times...<br />
Set day<br />
Th 09.09.02<br />
Set time<br />
13:30:00<br />
- Manually feed fuel into chamber<br />
- Switch on igniter only<br />
- Feed screw forward/backward<br />
- Stoker screw forward/backward<br />
- Raise blow-back flap<br />
- Ash screw forward/backward<br />
- Heat-exchanger drive<br />
- Tipping drive<br />
Heating programs<br />
Enter<br />
Back<br />
Enter<br />
Back<br />
- Room temperature desired value<br />
- Room temp. desired value<br />
- Maximum slide-in unit<br />
- Burn maintaining feed time<br />
- Burn maintaining pause time<br />
- Ash screw cycle time<br />
- Ash screw feed time<br />
- How long should I run the shaker?<br />
- After how much slide-in time?<br />
- Start of the 1st heating phase<br />
- End of the 1st heating phase<br />
- Start of the 2nd heating phase<br />
- End of the 2nd heating phase<br />
- Transitional operation<br />
- Winter operation<br />
- Firewood operation<br />
- Summer (oil) operation<br />
- Summer operation<br />
NOTE: The number of parameters depends on the system settings – not all of them are visible in the display!<br />
Heating prg. 1<br />
Heating prg. 7
Modes<br />
Mode Functions<br />
Winter operation The boiler controls the heating and domestic hot water heating according to the timed<br />
program settings. No decrease in output � The boiler remains at temperature.<br />
Summer operation<br />
Systems without storage<br />
The boiler only controls the domestic hot water heating according to the timed program<br />
settings. No decrease in output �The boiler switches off.<br />
Summer (oil) operation Waste-wood System, Black-pot, Boiler � The boiler is heated by the black-pot.<br />
Transitional operation<br />
Systems without storage<br />
Transitional operation<br />
Systems with stores<br />
NOTE: Systems with stores �<br />
Always select "Transitional<br />
Operation"<br />
Heating for special occasions<br />
Chimney sweep<br />
The boiler produces heat during the set heating phases (parameter menu "boiler<br />
times") (in the morning or the evening, for example). Heating and domestic hot water<br />
heating are regulated according to the set times (heating times, boiler loading). No<br />
decrease in output � Boiler goes to standby. The boiler switches off at the end of the<br />
heating phase.<br />
The boiler switches on during the set store loading times as needed, until the store is<br />
fully loaded�The boiler then switches off.<br />
The boiler switches off at the end of the store loading times, even if the store is not fully<br />
loaded.<br />
NOTE: Make the time window large enough (00:00 to 24:00 hours means: as soon as<br />
the need for heat arises, the boiler loads the store).<br />
The boiler switches on for four hours, the controller is set to "Party Switching,"<br />
domestic water heating is active.<br />
(Starts after pressing and holding the start key (I) for 5 seconds).<br />
The boiler runs for half an hour at full load (all stirrers are opened); then the control unit<br />
switches over to normal heating operation.<br />
(Starts after pressing and holding the "Back" key for 5 seconds; the program can<br />
be ended by pressing the STOP (O) key).<br />
Firewood operation This mode is for firewood-EMERGENCY-operation. The fuel feeding system is not<br />
operational.<br />
Switched off If you press the 0 key, the boiler will switch off according to the shut-down routine. The<br />
system now only regulates the connected heating components<br />
NOTE:<br />
For systems with stores, always select "Transitional Operation"<br />
20 B0310003 Edition 2003
Boiler Statuses<br />
There are 11 boiler statuses:<br />
Boiler Status Functions<br />
Preparation The blow-back flap opens<br />
Heating up Fuel is fed into the chamber<br />
Pre-heating The blow-back flap closes and the igniter switches on<br />
Ignition The igniter runs and material is fed into the chamber<br />
Heating The boiler regulates the combustion according to the set boiler desired values and times<br />
Shut-down Close the blow-back flap and let stoker screw run until its empty<br />
Blower fan last runnings Burning the remaining embers<br />
Cleaning Switches on the shaker, tips the grate, switches on the ash screw<br />
Ready for operation The boiler has no decrease in output, supply air and induced draught are switched off<br />
Breakdown ATTENTION breakdown! Eliminating the cause: See chapter Fehler! Verweisquelle<br />
konnte nicht gefunden werden.<br />
The supply air blower fan and the induced draught are switched off, no slide-in<br />
Off The control unit now only regulates the connected heating components. This state is<br />
reached by pressing the "0" key or after finishing the store or boiler loading. All boiler<br />
drives are stopped. The pump control remains active.<br />
CAUTION When the boiler is in the HEATING UP, PRE-HEATING, and IGNITING<br />
states the DOOR must not be opened under any circumstances.<br />
Edition 2003 B0310003 21
Set boiler<br />
In the "SET" operator menu, parameters and values can be modified. In order to avoid unnecessarily operating the heating<br />
system under a full load, the loading times can be set on a timer for hot water preparation:<br />
for example, the boiler loading process should begin tomorrow before the start of the heating phase.<br />
The parameters "BEGIN and END the loading process" only appear if no storage tank was configured (See system<br />
schematics)<br />
Boiler ... ← Desired boiler temperature 55°←<br />
There is only a<br />
display if there<br />
is no store<br />
Set heating<br />
Reload if boiler under 45°←<br />
When the set temperature is reached in the boiler, the boiler loading<br />
pump disengages.<br />
Reloading of the boiler is authorized when the boiler temperature is<br />
below this temperature.<br />
Start of the first loading session 03:00← Start of the authorization for the first boiler loading session<br />
End of the first loading session 05:00← End of the authorization for the first boiler loading session<br />
Start of the second loading session 14:00← Start of the authorization for the second boiler loading session<br />
End of the second loading session 16:00← End of the authorization for the second boiler loading session<br />
In the "SET" operator menu, the heating program's parameters and values can be modified.<br />
It is possible to control two heating circuits<br />
(NOTE: It is not possible in the standard delivery configuration, but it is optional to buy).<br />
The heating phases represent the start and end of the increased heating demand in the course of one day.<br />
Each day can be given individual heating times (seven different heating times with two heating phases each), or the same<br />
heating times can be used on different days.<br />
This setting is made in the weekly program submenu.<br />
What's more, the room temperature desired value can be set to the heating or drawdown phase.<br />
Heating circuit 1... ← Weekly program<br />
M, Tu, W, Th, F, Sa, Su<br />
1 1 3 1 1 2 5<br />
Heating prog. Heating prog. 1<br />
Heating prog. 2 - 7<br />
Heating phase 1<br />
Start 06.00<br />
End 22:00<br />
Heating phase 2<br />
Start 24:00<br />
End 24:00<br />
Room temperature desired value 20°←<br />
Room temp. desired value<br />
in cool down mode 16°←<br />
For heating circuit 1, heating time programs 1-7 are<br />
assigned to the days of the week.<br />
Room temperature desired value during the heating phase<br />
� is only visible with the remote control.<br />
Room temperature desired value during the drawdown<br />
phase<br />
� is only visible with the remote control.<br />
Heating circuit 2... ← Programming as in heating circuit 1<br />
Heating program 1<br />
Heating program 2<br />
Heating program 3<br />
Heating program 4<br />
Heating program 5<br />
Heating program 6<br />
Heating program 7<br />
Start<br />
1. heating phase<br />
End<br />
1. heating phase<br />
Start<br />
2. heating phase<br />
End<br />
2. heating phase<br />
22 B0310003 Edition 2003
Set screw times<br />
To adjust the slide-in intervals to accommodate different consistencies of materials, the stoker or ash screw running times<br />
can be adjusted.<br />
Screw time ... ←<br />
Maximum<br />
Slide-in unit 20 % ←<br />
Burn maintaining-<br />
feed time 15 s ←<br />
Burn maintaining-<br />
pause time 20 min ←<br />
Ash screw<br />
Cycle time 1000 s ←<br />
Ash screw<br />
Feed time 30 s ←<br />
Setting the Shaker Motor<br />
Shaker motor ... ←<br />
How long should<br />
I run the shaker 2 s ←<br />
After how much<br />
Set boiler times<br />
slide-in time 160 s ←<br />
The maximum slide-in of 20% means that the feed screw is switched on 20% of<br />
the maximum possible running time.<br />
This parameter must be adapted to accommodate the characteristics of the<br />
material:<br />
(waste-wood, pellets, shavings)<br />
Does not function or has no effect on Turbomatic 28 - 110<br />
Does not function or has no effect on Turbomatic 28 - 110<br />
The more ash the fuel contains, the less the cycle time<br />
The more ash the fuel contains, the greater the feed time<br />
Depends on the amount of ash on the grate<br />
Depends on the amount of ash on the grate<br />
This parameter only has an effect in "Transitional Operation" mode.<br />
The boiler operating times must be set at this point.<br />
The heating circuit control and the boiler loader can only be operated in these set time windows.<br />
In summer operation, the boiler runs according to the boiler times.<br />
Boiler times ... ←<br />
Start of the first heating<br />
phase 03:00 ←<br />
End of the first heating phase<br />
10:00 ←<br />
Start of the second heating<br />
phase 18:00 ←<br />
End of the second<br />
heating phase 21:00 ←<br />
Start of the first storage tank<br />
loading process<br />
End of the first storage tank<br />
loading process<br />
Start of the second storage<br />
tank loading process<br />
End of the second storage<br />
tank loading process<br />
For systems without storage tanks<br />
the boiler is in heating mode during this time window.<br />
IMPORTANT: The boiler loading times and the heating phases must lie<br />
within the time window of the boiler times!<br />
Only on systems with storage tanks<br />
Edition 2003 B0310003 23
Set mode<br />
Mode:<br />
Winter operation ←<br />
Set day<br />
Choose here between: Description see page 19<br />
Winter operation<br />
Summer operation<br />
Summer (oil) operation<br />
Transitional operation<br />
Firewood operation (EMERGENCY OPERATION)<br />
This parameter should only be set after the first system start-up<br />
Set day<br />
Tu 09.07.02 ←<br />
Set time<br />
Set the current date and confirm by pressing the "Enter" key<br />
IMPORTANT - The summer/winter time must be changed manually<br />
Set time<br />
09:05:00 ←<br />
Setting the current time and confirming with the "Enter" key<br />
Winter operation<br />
Heating<br />
- Boiler temp.<br />
- Flue gas temp.<br />
- Slide-in<br />
- Blower<br />
- Primary air<br />
- Residual O2<br />
- Secondary air<br />
- Boiler pump<br />
- Boiler temp.<br />
- Boiler pump<br />
- Outside temp.<br />
- Outfeed 1<br />
- Outfeed 2<br />
- Day: Th 09/07/02<br />
- Time: 13:30:00<br />
- Version: 13.12<br />
- Running time<br />
- Type: Turbomatic<br />
- Board temp.<br />
- The boiler<br />
must be<br />
- Operator name:<br />
CUSTOMER<br />
Enter Enter<br />
SET<br />
Back Back<br />
SET<br />
Boiler settings....<br />
24 B0310003 Edition 2003<br />
_<br />
Set day<br />
Th 09.09.02<br />
Set time<br />
13:30:00<br />
Set time<br />
13:30:00<br />
Set time<br />
13?30:00<br />
- Set hours with +<br />
buttons and confirm<br />
Enter<br />
with button.<br />
Set time<br />
13:30?00<br />
- Set minutes with +<br />
buttons and confirm<br />
Enter<br />
with button.<br />
Set time<br />
13:30:00?<br />
- Set seconds with +<br />
buttons and confirm<br />
Enter<br />
with button.<br />
_<br />
_<br />
_
Manual operation<br />
In the "MANUAL MODE" operator menu, the feed screws can be activated to ensure that the feeder system is completely<br />
filled with waste-wood at system start-up.<br />
In addition, this parameter should be switched on when filling the stirrer discharge unit, so that the spring blades can rotate<br />
and come together. After filling, the system must be ignited manually.<br />
In addition, the igniter can be started in the "MANUAL OPERATION" menu.<br />
CAUTION The screws and the igniter run until the parameters are reset to "OFF."<br />
Manual operation... ←<br />
Test Mode<br />
Manually feed fuel<br />
into chamber OFF←<br />
Switch on igniter<br />
(only) OFF←<br />
In the "TEST MODE" operator menu, the screws, blow-back flap, heat-exchanger drive, and the grate tipping drive can be<br />
switched on or off to operationally check the individual units, for example when the feeder unit is clogged or for cleaning the<br />
chamber.<br />
Test Operation ... ← Feed screw forward/backward OFF←<br />
Stoker screw forward/backward OFF←<br />
Raise blow-back flap OFF←<br />
Ash screw forward/backward OFF← (only forward is possible)<br />
heat-exchanger drive<br />
Tipping drive<br />
OFF←<br />
OFF←<br />
Edition 2003 B0310003 25
Error display<br />
The "ERROR DISPLAY" operator menu shows the current error and warnings.<br />
The status LED simultaneously blinks red.<br />
Acknowledge errors and warnings by pressing the "ENTER" key.<br />
Short red flashes: Warning or error persists: not acknowledged<br />
Long red flashes: Warning or error persists: but acknowledged<br />
Warning: The status LED automatically changes to green, as soon as all errors are cleared.<br />
Error: The boiler is only authorized to operate after the error's elimination has been acknowledged by pressing<br />
the "ENTER" key – the status LED returns to green.<br />
Error message list<br />
Error text Type Cause of error Elimination of the error<br />
1 Flue gas temperature<br />
sensing element not OK<br />
2 Discharge unit empty (level<br />
measurement!)<br />
3 Boiler temperature sensing<br />
elements not OK<br />
4 Gravity shaft cover<br />
is open<br />
5 Gravity shaft full (level<br />
sensor!)<br />
6 Gravity shaft empty (level<br />
sensor!)<br />
7 Remote adjuster 1 sensing<br />
element not OK<br />
8 Remote adjuster 2 sensing<br />
element not OK<br />
9 Combustion chamber door<br />
open<br />
10 Combustion chamber<br />
temperature<br />
sensing element not OK<br />
11 Combustion chamber<br />
overpressure<br />
monitor not OK<br />
12 Hydraulic oil level or<br />
temperature<br />
13 Boiler return sensing<br />
element not OK<br />
14 Boiler temperature<br />
sensing element not OK<br />
W<br />
Signal interrupted, cable or sensing<br />
element defective<br />
Check sensing element and<br />
cable<br />
S Clogs, bridge formation, motor defective Refill fuel; remove bridge; or<br />
check motor and supply line<br />
W Signal interrupted, cable or sensing Check sensing element and<br />
element defective<br />
cable; (short-circuit=0°C,<br />
electrical open=127°C)<br />
S Curiosity, the cover can be pushed up by Close the cover, remove foreign<br />
shavings; the position switch is defective objects, and check the switch<br />
S<br />
S<br />
W<br />
W<br />
W<br />
W<br />
When using a light-barrier during material<br />
collection; over-filling or clogging in the<br />
gravity shaft; or too much dust in front of<br />
the light-barrier<br />
No fuel in gravity shaft; or clog in the<br />
dosing screw; or motor is defective<br />
Signal interrupted, cable or sensing<br />
element defective<br />
Signal interrupted, cable or sensing<br />
element defective<br />
Signal interrupted, cable or sensing<br />
element defective<br />
S The entire system, including the chimney,<br />
requires cleaning; Change out the fuel<br />
(too much fuel in the chamber); induced<br />
draught not functioning<br />
S Loss of Oil<br />
Overload<br />
W Signal interrupted,<br />
Cable or sensing element defective<br />
W<br />
Signal interrupted,<br />
Cable or sensing element defective<br />
Disengage the system and<br />
remove the clog or remove the<br />
dust deposits from the light-<br />
barrier<br />
Re-fill the fuel; remove the clog,<br />
check the motor and supply line<br />
Check sensing element and<br />
cable<br />
Check sensing element and<br />
cable<br />
Close and acknowledge error<br />
Check sensing element and<br />
cable;<br />
Clean the system; Adapt the<br />
max. slide-in (reduce; See<br />
"Screw Times"). Check the<br />
induced draught function<br />
Refill<br />
Clear overload<br />
Check sensing element and<br />
cable; (short-circuit=0°C,<br />
electrical open=127°C)<br />
Check sensing element and<br />
cable; (short-circuit=0°C,<br />
electrical open=127°C)<br />
26 B0310003 Edition 2003
Error message list<br />
Error text Type Cause of error Elimination of the error<br />
15 Boiler temperature low W No output (too much reducer: flow<br />
volume too great, thus temperature too<br />
low)<br />
Throttle the reducer<br />
16 Motor-protection failed<br />
Discharge screw!<br />
17 Motor-protection failed Ash<br />
screw<br />
18 Motor-protection failed<br />
Feed screw<br />
19 Motor-protection failed<br />
Boiler pump<br />
20 Motor-protection failed<br />
Stoker screw<br />
21 Motor-protection failed<br />
rotary valve<br />
22 Motor-Protection (sensor)<br />
Induced Draught Unit<br />
23 Motor-protection failed<br />
Hydraulic pump pusher<br />
24 Motor-protection failed<br />
Feeder<br />
S Clog in the discharge screw causing the<br />
motor protection to be overloaded; or 2phase<br />
operation<br />
S<br />
S<br />
Clog in the feed screw causing the<br />
motor-protection to be over-loaded; or 2phase<br />
operation<br />
S Overload 2-phase operation<br />
S<br />
S<br />
Clog in the stoker screw causing the<br />
motor-protection to be over-loaded; or<br />
Clog in the rotary valve causing the<br />
motor-protection to be over-loaded; or 2phase<br />
operation<br />
S Induced draught blower fan over-loaded<br />
S<br />
S See motor-protection feed screw<br />
25 Network pump 1<br />
Sensor error<br />
S Pump over-load<br />
26 Network pump 2<br />
Sensor error<br />
S<br />
27 Network pressure<br />
Signal erroneous<br />
S Pressure pick-off defective<br />
28 Black pot temp. sensing W Signal interrupted,<br />
element not OK<br />
Cable or sensing element defective<br />
29 Store temp. upper sensing W Signal interrupted,<br />
element not OK<br />
Cable or sensing element defective<br />
30 Store temp. lower sensing W Signal interrupted,<br />
element not OK<br />
Cable or sensing element defective<br />
31 Grate won't close S The "Grate jammed" (by stones, etc.)<br />
message appears after manual tipping<br />
32 Blow-back !!! Sprinkler ON S Sprinkler has activated<br />
33 Blow-back flap won't open S Jammed heating material, motor<br />
defective<br />
34 Back-burn flap will not<br />
close<br />
S<br />
Jammed heating material, motor<br />
defective<br />
Move back and forth in test<br />
mode, or switch off main switch<br />
and manually remove foreign<br />
objects; switch off main switch;<br />
open the switch cabinet and<br />
press the red key on the motorprotection<br />
completely in; then<br />
press the green key; check the<br />
wiring or power supply.<br />
Check the start-up and return<br />
time of the induced draught unit,<br />
check the wiring; check the<br />
motor for a short in the windings<br />
Check motor and wiring<br />
Check start-up and return time<br />
of the pump, check wiring<br />
Replace or check<br />
Check sensing element and<br />
cable<br />
Check sensing element and<br />
cable<br />
Check sensing element and<br />
cable<br />
Tip and clean<br />
Open gravity shaft cover<br />
(disengage system first)<br />
Open gravity shaft cover<br />
(disengage system first)<br />
Edition 2003 B0310003 27
Error message list<br />
Error text Type Cause of error Elimination of the error<br />
35 Return feed temp. LOW W Pump defective, pump too small,<br />
Check the pumps or the sizing of<br />
too long<br />
or heating burden too great<br />
the pumps<br />
36 Safety temperature<br />
S By releasing the EMER-OFF button, Unlock the safety temperature<br />
limiter/EMER-OFF/Pmin<br />
over-heating of the boiler (for example, limiter (white box on the back-<br />
released<br />
heating pump was disengaged or is side of the boiler; only possible<br />
defective, or cutoffs were closed) or by after cooling down the boiler);<br />
releasing the water shortage safety unlock the EMER-OFF button,<br />
device<br />
check system pressure<br />
37 Safety time transpired S The temperature fell below the "Min.<br />
boiler flue gas temp. diff." parameter for a<br />
period longer than the safety time (no<br />
heating material), or the oxygen content Re-fill the heating material in the<br />
is greater than the "Residual oxygen bunker, check the discharge unit<br />
combustion off" parameter, the duration and stoker, break up the bridge<br />
of the under-temperature state is longer in the gravity shaft (first switch<br />
than the safety time (in the HEATING off the system).<br />
state):<br />
material replenishing in the chamber is<br />
too little; bridge formation over the stoker,<br />
the stoker is not feeding<br />
Check stoker drive<br />
38 Over-filling the rotary valve S Only on systems with light-barriers over Open cleaning port cover and<br />
the rotary valve<br />
remove foreign objects or dust<br />
Foreign objects or dust in front of the<br />
light-barrier<br />
from the light-barrier<br />
39 Feeder over-time S Too little heating material in the screw See item 2<br />
40 Outfeed temperature 1<br />
sensing element not OK<br />
41 Outfeed temperature 2<br />
sensing elements not OK<br />
42 Ignition attempt<br />
unsuccessful<br />
43 Discharge screw overflows<br />
too often!<br />
44 Rotary valve overflows too<br />
often<br />
W<br />
W<br />
Signal interrupted, cable or sensing<br />
element defective<br />
Signal interrupted, cable or sensing<br />
element defective<br />
S Boiler remains in "IGNITE" state longer<br />
than the "maximum duration of ignition"<br />
Too little heating material in the<br />
combustion chamber (bunker empty)<br />
Igniter not functioning;<br />
Stoker not feeding<br />
S Clog in the discharge screw; causing the<br />
motor to switch back and forth between<br />
outfeed and return feed<br />
S Clog in the rotary valve; causing the<br />
motor to switch back and forth between<br />
outfeed and return feed<br />
Acknowledge error message;<br />
Boiler starts again<br />
Later, manually feed or ignite in<br />
test mode (CAUTION - igniter<br />
does not automatically switch off<br />
in test mode)<br />
See item 16<br />
See item 21<br />
28 B0310003 Edition 2003
Edition 2003 B0310003 29
Fröling Heizkessel und Behälterbau Ges.m.b.H., Industriestraße 12, A-4710 Grieskirchen<br />
Tel. +43 (0) 7248 606-0 Fax +43 (0) 7248 606-600 info@froeling.com www.froeling.com<br />
DRV.: 164852 . Manuf. Manual No.:99229a. UID-Nr.: ATU 22256902 Firmenbuch-Gericht: Kreis- und Handelsgericht Wels . ARA-License no.: 4480