RCP 2 Remote OM - Remote Support, Inc.
RCP 2 Remote OM - Remote Support, Inc.
RCP 2 Remote OM - Remote Support, Inc.
- TAGS
- remote
- support
- remotes.com

Create successful ePaper yourself
Turn your PDF publications into a flip-book with our unique Google optimized e-Paper software.
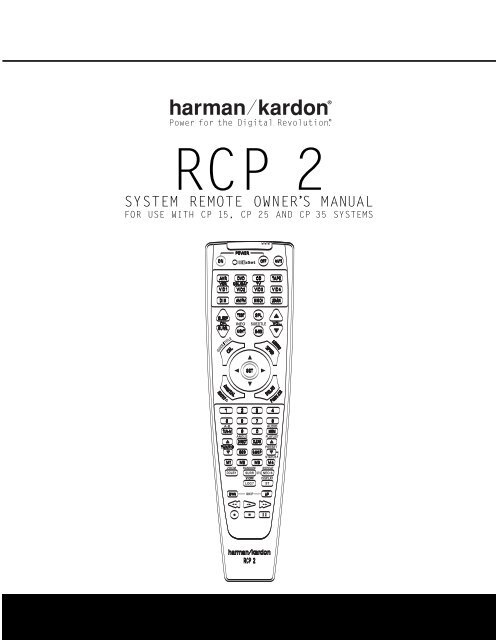
<strong>RCP</strong> 2<br />
SYSTEM REMOTE OWNER’S MANUAL<br />
FOR USE WITH CP 15, CP 25 AND CP 35 SYSTEMS
<strong>RCP</strong> 2 SYSTEM REMOTE<br />
2 <strong>RCP</strong> 2 System <strong>Remote</strong><br />
2 Using EzSet<br />
3 <strong>Remote</strong> Control Functions<br />
7 Programming the <strong>Remote</strong><br />
7 Programming Product Codes<br />
7 Direct Code Entry<br />
7 Auto Search Method<br />
7 Code Readout<br />
7 Learning Codes<br />
8 Macro Programming<br />
9 Volume Punch-Through<br />
9 Channel Control Punch-Through<br />
9 Transport Control Punch-Through<br />
9 Reassigning Device Control<br />
Selectors<br />
10 Resetting the <strong>RCP</strong> 2’s Memory<br />
10 Programmed Device Functions<br />
11 Function List<br />
13 Setup Code Tables<br />
Trademark acknowledgements on page 23.<br />
Typographical Conventions<br />
The typographical conventions used in this manual<br />
are the same as those found in the owner’s manuals<br />
packed with the individual AVR and DVD components<br />
that make up this CP Series system. Please note that<br />
the “Number in an Oval” icons (e.g., a) used in this<br />
manual refer to the numbers shown for the <strong>RCP</strong> 2<br />
as they appear on page 3 of this manual, not the<br />
numbers used in the AVR owner’s manual.<br />
<strong>RCP</strong> 2 System <strong>Remote</strong><br />
A key feature of your Harman Kardon CP Series<br />
home theater system is a unified remote that operates<br />
both the AVR and DVD player included with your system,<br />
as well as other products such as VCRs. This<br />
remote replaces the individual AVR and DVD remotes<br />
that would normally be present.<br />
As an added benefit of purchasing the CP system<br />
instead of separately purchasing each component, the<br />
<strong>RCP</strong> 2 remote features Harman Kardon’s exclusive,<br />
patented EzSet feature, which makes it easier than<br />
ever to properly calibrate your new system for maximum<br />
performance, and which is not available on the<br />
original AVR 135 remote. Also, its learning capability<br />
enables it to be programmed with remote codes for<br />
other devices, which is not available on the original<br />
remotes for the AVR 135, AVR 235 or AVR 335.<br />
Since the <strong>RCP</strong> 2 remote is an upgraded version of<br />
the remote that was originally included with the AVR,<br />
the instructions are slightly different. This manual<br />
replaces the sections of the AVR manual that explain<br />
the programming and operation of the remote.<br />
The visual differences between the original AVR<br />
remote and the <strong>RCP</strong> 2 are the relocation of the SPL<br />
Selector Button and the addition of a Learn Button.<br />
2 TABLE OF CONTENTS<br />
• The button that is labeled � has no function on<br />
the original AVR remote, but on the <strong>RCP</strong> 2 it has<br />
the same function as the AVR 235’s SPL Selector<br />
Button. Use this button to activate the EzSet feature,<br />
which is explained in the AVR 235 manual, and<br />
below for CP 15 users. CP 35 users should use the<br />
EzSet+ function described in the AVR 335 owner’s<br />
manual.<br />
• The button that is labeled � is the SPL Selector<br />
Button on the original AVR 235 remote, but on the<br />
<strong>RCP</strong> 2 that function has been changed to button<br />
�. Button � is now the Learn Button.<br />
We hope that you enjoy the added features of the<br />
<strong>RCP</strong> 2 remote, and wish you many years of listening<br />
and viewing pleasure with your new CP system.<br />
Using EzSet<br />
Harman Kardon’s EzSet remote makes it possible to<br />
quickly and accurately set the AVR’s output levels<br />
without the use of a sound-pressure-level meter.<br />
These instructions are provided for the benefit of<br />
CP 15 system users, for whom EzSet is an added<br />
feature that is not described in the AVR 135 owner’s<br />
manual. We recommend that CP 35 users refer to the<br />
AVR 335 manual for its description of EzSet+, and<br />
use the more comprehensive setup features EzSet+<br />
provides.<br />
Follow these steps while seated in the listening<br />
position:<br />
1. Make certain that all speaker positions have been<br />
properly configured for their “large” or “small”<br />
settings, and exit the OSD system.<br />
2. Adjust the volume so that it is at -10dB.<br />
3. Hold the remote in front 49of<br />
you 47at<br />
arm’s 45 length, 43<br />
being 49 sure 47not<br />
45 to cover 43<br />
48the<br />
EzSet 46 Sensor 44 42<br />
Microphone 48 46 44 at 42 the top of the remote.<br />
35 37 39 41<br />
35 37 39 41<br />
4. Press and hold the SPL 34 Selector 36 Button 38 40 for 37<br />
three 34 seconds. 36 38 Release 40<br />
33 it when 37the<br />
41 Program/ 47 51<br />
26 25 37 36<br />
SPL 33Indicator<br />
26 25 c stops 37 flashing 36 and 40 remains 46 50<br />
32 27 24 36 35<br />
lit. 32 Within 27 five seconds,<br />
24 36press<br />
the 5 Button r<br />
31<br />
35 39 45 49<br />
if your system is configured for<br />
28<br />
5.1<br />
23<br />
operation<br />
35 34<br />
31<br />
or<br />
28 23 35 30<br />
34 38 44 48<br />
the 7 Button r if your system 29 is 22 configured 34 33<br />
30<br />
for 6.1/7.1<br />
29 22<br />
operation.<br />
34 29<br />
33 43<br />
The test 30tone<br />
21will<br />
be 33heard32<br />
29<br />
from the 30 front left 21speaker.<br />
33 28 32 42<br />
31 20 32 31<br />
28 31 20 32 31<br />
5. EzSet will take over, adjusting the output level of<br />
each channel so that all levels are equal and at<br />
the set reference point. This process may take a<br />
few minutes.<br />
6. As the adjustment proceeds, a few things will<br />
happen simultaneously:<br />
• The channel position will flash in the Speaker/<br />
Channel Input Indicators ˆ. If the test noise<br />
is heard from a channel other than the one<br />
shown in the indicator, press the Test Button<br />
i TWICE to stop the adjustment. Then, turn<br />
the unit off and verify that all speakers are connected<br />
to the proper outputs.<br />
• As the individual channels are set, the channel<br />
name and the adjustment offset will appear in<br />
the on-screen display (if connected) and the<br />
Lower Display Line ¯. While the level is<br />
changing, the Program/SPL Indicator c will<br />
change colors to reflect the output level in relation<br />
to the reference. A red indication shows<br />
that the level is too high, while an amber indication<br />
shows that the level is too low. When the<br />
indicator is green, the level is correct, and the<br />
test noise will move to the next channel.<br />
• While adjustments are being made, the red LED<br />
under the AVR Selector f will flash.<br />
7. After the test noise has circulated once through<br />
each channel, it will send the tone to each channel<br />
once again, to verify the settings.<br />
8. After two complete circulations of the tone, the<br />
levels are set. The Program/SPL Indicator c<br />
will remain green at each channel, then it will<br />
flash green twice and go out. The tone will stop<br />
and the AVR will return to normal operation.<br />
If you find that the output levels chosen by EzSet are<br />
either uncomfortably low or high, you may repeat the<br />
procedure. Return to Step 2 and adjust the master<br />
volume to accommodate your particular room layout<br />
and your tastes. You may repeat this procedure as<br />
many times as necessary to achieve a desired result.<br />
In order to prevent possible damage to your hearing<br />
or your equipment, we emphasize that you should<br />
avoid setting the master volume above 0dB.<br />
Manual output adjustment is available by first pressing<br />
41<br />
the Test 47Tone<br />
51<br />
Button i, then pressing and releas-<br />
40 ing the 46SPL<br />
50 Selector Button �. EzSet will still indi-<br />
39 cate whether 45 49 the channel level is too high or low, but<br />
38 you may 44adjust<br />
48 it yourself using the ⁄/¤<br />
Navigation<br />
43<br />
Buttons n.<br />
NOTE: 42The<br />
subwoofer output is not adjusted when the<br />
test tone is in use. To adjust the subwoofer output, you<br />
must use an external source, following the instructions<br />
in the Advanced Features Section of the AVR owner’s<br />
manual.
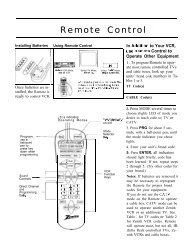
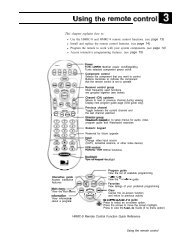
a Power Off Button<br />
b IR Transmitter Window<br />
c Program/SPL Indicator<br />
d Power On Button<br />
e Input Selectors<br />
f AVR Selector<br />
g AM/FM Tuner Select<br />
h Dim Button<br />
i Test Button<br />
j Sleep Button<br />
k DSP Surround Mode Selector Button<br />
l Night Mode/Info<br />
m Channel Select/Title Button<br />
n ⁄/¤ Buttons<br />
o ‹ /› Button<br />
p Set/Enter Button<br />
q Digital Select/Eject Button<br />
r Numeric Keys<br />
s Tuner Mode/Repeat A-B Button<br />
t Direct/Angle Button<br />
u Tuning Up/Down/Pic +/– Buttons<br />
v OSD Button<br />
w Dolby Mode Select/Zoom Button<br />
x DTS Digital Mode Selector/Random Button<br />
y Logic 7 Mode Select/Video Off Button<br />
z Skip/Chapter Up/Down Buttons<br />
` Transport Controls<br />
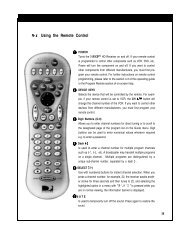
28 Stereo Mode Select/Display Button<br />
29 DTS Neo:6 Mode Select/Repeat Button<br />
30 Macro Buttons<br />
31 Disc Skip Button<br />
32 Preset Down/Status Button<br />
33 Preset Up/Playlist Button<br />
34 Clear Button<br />
35 Memory/Audio Button<br />
36 Delay/Previous Channel Button<br />
37 Speaker Select/Disc Menu Button<br />
38 Subtitle/Multiroom Button<br />
39 Volume Up/Down Buttons<br />
40 SPL Selector<br />
41 Learn Button<br />
42 6/8 Channel Direct Input Button<br />
43 Mute Button<br />
44 EzSet Sensor Microphone<br />
●<br />
●<br />
●<br />
●<br />
●<br />
●<br />
●<br />
●<br />
●<br />
●<br />
●<br />
●<br />
●<br />
●<br />
●<br />
●<br />
●<br />
NOTE:<br />
• The function names shown here are each button’s feature<br />
when used with the AVR or DVD in your CP system. Most<br />
buttons have additional functions when used with other<br />
devices. See pages 11–12 for a list of these functions.<br />
• The functions shown in blue type on the remote are for<br />
DVD operation.<br />
• To make it easier to follow the instructions that refer<br />
to this illustration, a larger copy may be downloaded<br />
from the Product <strong>Support</strong> section for this product at<br />
www.harmankardon.com.<br />
REMOTE CONTROL FUNCTIONS<br />
REMOTE CONTROL FUNCTIONS 3
REMOTE CONTROL FUNCTIONS<br />
The following information should be used in place of<br />
49the<br />
similar 47 45 pages 43in<br />
the manual that accompanies your<br />
48AVR.<br />
46 In addition 44 42 to adding an explanation for the<br />
35LEARN<br />
37 Button 39 41 , which is not on the original<br />
34remote,<br />
36 it 38 also adds 40 information 37 41about<br />
47 the 51controls<br />
that<br />
33are<br />
used to operate the DVD player. When buttons<br />
26 25 37 36 40 46 50<br />
32<br />
serve a function for both the DVD player and the AVR,<br />
27 24 36 35 39 45 49<br />
31<br />
the complete description of how the button operates<br />
28 23 35 34 38 44 48<br />
with the DVD player is found on page 9 of the owner’s<br />
30<br />
manual<br />
29 22<br />
included<br />
34 33 43<br />
in the DVD player carton.<br />
29 30 21 33 32 42<br />
28IMPORTANT<br />
31 20 NOTE: 32 The 31<strong>RCP</strong><br />
2 may be programmed<br />
to control up to eight devices, including the AVR and<br />
DVD. Before using the remote, it is important to remember<br />
to press the Input Selector Button e that corresponds<br />
to the unit you wish to operate. The <strong>RCP</strong> 2 is<br />
also capable of operating a wide variety of other products<br />
using the control codes that are part of the<br />
remote. Before using the <strong>RCP</strong> 2 with other products,<br />
follow the instructions on pages 7–23 to program the<br />
proper codes for the products in your system.<br />
It is also important to remember that many of the buttons<br />
on the <strong>RCP</strong> 2 take on different functions, depending<br />
on the product selected using the Device Control<br />
Selectors. The descriptions shown here primarily detail<br />
the functions of the <strong>RCP</strong> 2 when it is used to operate<br />
the AVR and DVD player that comes with your CP<br />
Series System. (See page 10 for information about<br />
alternate functions for the <strong>RCP</strong> 2’s buttons.)<br />
Before using the remote, remember to install the three<br />
supplied AAA batteries in the compartment on the bottom<br />
of the <strong>RCP</strong> 2, as shown in the diagram below. Be<br />
certain to follow the (+) and (–) polarity indicators that<br />
are printed on the bottom of the battery compartment.<br />
a Power Off Button: Press this button to place the<br />
AVR, DVD player or a selected device in the Standby<br />
mode.<br />
b IR Transmitter Window: Point this window<br />
towards the AVR or DVD player when pressing buttons<br />
on the remote to make certain that infrared commands<br />
are properly received.<br />
c Program/SPL Indicator: This three-color indicator<br />
is used to guide you through the process of programming<br />
the remote. It is also used as a level indicator<br />
when using the remote’s EzSet capabilities. See<br />
page 7 for information on programming the remote.<br />
4 REMOTE CONTROL FUNCTIONS<br />
d Power On Button: Press this button to turn on<br />
the power to a device selected by pressing one of the<br />
Input Selectors e.<br />
e Input Selectors: Pressing one of these buttons<br />
will perform three actions at the same time. First, if the<br />
AVR is not turned on, it will power up the unit. Next, it<br />
will select the source shown on the button as the input<br />
to the AVR. Finally, it will change the remote control so<br />
that it controls the device selected. After pressing one<br />
of these buttons you must press the AVR Selector<br />
Button f again to operate the AVR’s functions with<br />
the remote.<br />
f AVR Selector: Pressing this button will switch the<br />
remote so that it will operate the AVR’s functions. If the<br />
AVR is in the Standby mode, it will also turn the AVR on.<br />
g AM/FM Tuner Select: Press this button to select<br />
the AVR’s tuner as the listening choice. Pressing this<br />
button when the tuner is already in use will select<br />
between the AM and FM bands.<br />
h Dim Button: Press this button to activate the<br />
Dimmer function, which reduces the brightness of the<br />
front-panel display, or turn it off entirely. The first press<br />
of the button shows the default state, which is full brightness<br />
by indicating VFD FULL in the Lower<br />
Display Line ¯. Press the button again within five<br />
seconds to reduce the brightness by 50%, as indicated<br />
by VFD HALF showing in the Lower Display<br />
Line ¯. Press the button again within five seconds<br />
and the main display will go completely dark. Note that<br />
this setting is temporary, in that regardless of any<br />
changes, the display will always return to full brightness<br />
when the AVR is turned on. In addition, the Power<br />
Indicator 2 will always remain at full brightness<br />
regardless of the setting. This is to remind you that the<br />
AVR is still turned on.<br />
i Test Button: Press this button to begin the<br />
sequence used to calibrate the AVR’s output levels.<br />
j Sleep Button: Press this button to place the unit<br />
in the Sleep mode. After the time shown in the display,<br />
the AVR will automatically go into the Standby mode.<br />
Each press of the button changes the time until turnoff<br />
in the following order:<br />
This button may also be used to change channels on<br />
your TV, VCR, cable box or satellite receiver.<br />
k DSP Surround Mode Selector: Press this<br />
button to cycle through the DSP, VMAx ® and Stereo<br />
surround modes such as Hall, Theater, VMAx Near and<br />
Far, and Surround Off. This button is also used to tune<br />
channels when the TV, VCR or Cable/Satellite is selected<br />
using the device Input Selector e.<br />
l Night/Info Mode: Press this button to activate<br />
the Night mode. This mode is available in specially<br />
encoded digital sources, and it preserves dialogue<br />
(center channel) intelligibility at low volume levels.<br />
When used to control the DVD player, this button has<br />
the same function as the Info Button described in the<br />
DVD owner’s manual. Press it to display on-screen<br />
information about the disc currently loaded in the<br />
DVD player.<br />
m Channel Select/Title Button: This button is used<br />
to start the process of setting the AVR’s output levels to<br />
an external source. Once this button is pressed, use the<br />
AVR’s ⁄/¤ Buttons n to select the channel being<br />
adjusted, then press the Set Button p, followed<br />
by the ⁄/¤ Buttons n again, to change the level<br />
setting. When the <strong>RCP</strong> 2 is used to control the DVD<br />
player, this button has the same function as the Title<br />
Button as described in the DVD owner’s manual.<br />
Press it to jump to the next title (if available) on the<br />
disc being played.<br />
n ⁄/¤ Buttons: These multipurpose buttons are<br />
used to change or scroll through items in the onscreen<br />
AVR or DVD menus, make configuration settings<br />
or select surround modes. When changing a setting<br />
on the AVR, first press the button for the function<br />
or setting to be changed (e.g., press the DSP<br />
Surround Mode Selector k to select a sound<br />
field mode or the Digital Select Button q to<br />
change a digital input) and then press one of these<br />
buttons to scroll through the list of options or to<br />
increase or decrease a setting. The sections in the<br />
AVR manual describing the individual features and<br />
functions contain specific information on using these<br />
buttons for each application. When the <strong>RCP</strong> 2 is being<br />
programmed with the codes to operate another device,<br />
this button is also used in the “Auto Search” process.<br />
(See page 7 for more information on programming the<br />
remote.)<br />
o ‹/› Buttons: These buttons are used to change<br />
the menu selection or setting during some of the setup<br />
procedures for the AVR.<br />
NOTE: When using the DVD, the ‹/›/⁄/¤ Buttons<br />
have the same function as the Navigation Buttons<br />
described in the DVD owner’s manual. Press them to<br />
navigate through the Setup functions of the player or<br />
the menu for a DVD.
p Set/Enter Button: This button is used to enter<br />
settings into the AVR’s memory. It is also used in the<br />
setup procedures for delay time, speaker configuration<br />
and channel output level adjustment. When the <strong>RCP</strong> 2<br />
is used to control the DVD, this button has the same<br />
function as the Enter Button as described in the DVD<br />
owner’s manual. Press it to activate the highlighted<br />
setting in a menu for either player setup or the disc<br />
currently being played.<br />
q Digital Select/Eject Button: Press this button<br />
to assign one of the AVR’s digital inputs to a source.<br />
When the <strong>RCP</strong> 2 is used to control the DVD player,<br />
this button has the same function as the Eject (Open/<br />
Close) Button as described in the DVD owner’s<br />
manual. Press it to open or close the disc drawer.<br />
r Numeric Keys: These buttons serve as a 10button<br />
numeric keypad to enter tuner preset positions.<br />
They are also used to select channel numbers when<br />
TV, VCR, Cable or SAT has been selected on the<br />
remote, or to select track numbers on the DVD,<br />
depending on how the <strong>RCP</strong> 2 has been programmed.<br />
s Tuner Mode/Repeat A-B Button: Press this<br />
button when the tuner is in use to select between<br />
automatic tuning and manual tuning. When the button<br />
is pressed so that MANUAL appears in the Lower<br />
Display Line ¯, pressing the Tuning Buttons<br />
u9 will move the frequency up or down in singlestep<br />
increments. When the FM band is in use, pressing<br />
this button when a station’s signal is weak will change<br />
to monaural reception. When used to control the DVD<br />
player, this button has the same function as the<br />
Repeat A-B Button described in the DVD owner’s<br />
manual. Press it once to mark the beginning of the<br />
passage you wish to repeat, and press it again to<br />
mark the end of the passage. Press it a third time to<br />
cancel the repeated play.<br />
t Direct/Angle Button: Press this button when<br />
the tuner is in use to start the sequence for direct<br />
entry of a station’s frequency. After pressing the button,<br />
simply press the proper Numeric Keys r to<br />
select a station. When the remote is used to control<br />
the DVD, this button has the same function as the<br />
Angle Button as described in the DVD owner’s manual.<br />
Press it to change the viewing angle on discs<br />
equipped with that capability. It may also be used to<br />
rotate a JPEG still image as described in the DVD<br />
owner’s manual.<br />
u Tuning Up/Down/Pic +/–: When the tuner is in<br />
use, these buttons will tune up or down through the<br />
selected frequency band. If the Tuner Mode Button<br />
s& has been pressed so that AUTO appears in<br />
the on-screen display and Lower Display Line ¯,<br />
pressing and holding either of the buttons for three sec-<br />
REMOTE CONTROL FUNCTIONS<br />
onds will cause the tuner to seek the next station with<br />
acceptable signal strength for quality reception. When<br />
MANUAL appears in the Lower Display Line ¯,<br />
pressing these buttons will tune stations in single-step<br />
increments. When used to control the DVD player, these<br />
buttons have the same function as the Pic+ and Pic –<br />
Buttons described in the DVD owner’s manual. Press<br />
either button to advance forward or backward through<br />
the JPEG still images stored on a disc.<br />
v OSD Button: Press this button to activate the<br />
On-Screen Display (OSD) system used to set up or<br />
adjust the AVR’s parameters. It may also be used to<br />
access the DVD’s on-screen menu system when that<br />
device has been selected.<br />
w Dolby Mode Selector/Zoom: This button is<br />
used to select from among the available Dolby*<br />
Surround processing modes. Each press of this button<br />
will select one of the Dolby Pro Logic* II modes or<br />
Dolby 3 Stereo, Dolby Pro Logic IIx or Dolby Virtual<br />
speaker, when available. When a Dolby Digital-encoded<br />
source is in use, the Dolby Digital mode may also be<br />
selected. This button may also be used to control the<br />
Zoom feature as described in the DVD owner’s manual.<br />
The Zoom feature is available, to varying degrees, with<br />
DVD, VCD and JPEG discs.<br />
x DTS Digital Mode Selector/Random: When a<br />
DTS ® -encoded digital source is selected, each press of<br />
this button will scroll through the available DTS modes.<br />
The specific choice of modes will vary according to<br />
whether or not the source material contains DTS-ES ®<br />
6.1 Discrete encoding. When a DTS source is not in<br />
use, this button has no function. However, when used<br />
to control the DVD player, this button has the same<br />
function as the Random Button described in the DVD<br />
owner’s manual, enabling you to randomize play of<br />
audio tracks on CDs, MP3 and WMA discs.<br />
y Logic 7 Mode Select/Video Off Button: Press<br />
this button to select from among the available Logic 7 ®<br />
surround modes. When used to control the DVD player,<br />
this button has the same function as the Video Off<br />
Button described in the DVD Owner’s Manual, and may<br />
be used to temporarily disable the video circuits during<br />
audio playback.<br />
z Skip Chapter Up/Down Buttons: These buttons<br />
are preprogrammed to have the same function as<br />
the Skip Buttons as described in the DVD Owner’s<br />
Manual. Pressing these buttons will go to the beginning<br />
of the current chapter or track or the start of the next<br />
chapter or track, depending on whether a DVD or CD<br />
is playing. Press the button again to step back or forward<br />
through the available chapters or tracks on the disc.<br />
To step one frame at a time, press the Pause Button<br />
`, then select either the Skip Up or Skip Down<br />
buttons.<br />
` Transport Controls: These buttons are preprogrammed<br />
with the same functions as the Search<br />
(Rev) ‹‹, Play ›, Search (Fwd) ››, Stop Í and<br />
Pause ± buttons on the DVD player. Press them to<br />
operate<br />
49 47<br />
the respective<br />
45 43<br />
transport functions. The Record<br />
button 48 46 may be 44used<br />
42when<br />
a VCR, tape deck, CDR or<br />
other 35 recording 37 39 device 41 has been selected. The<br />
Forward 34 36and<br />
38Reverse<br />
40 Search 37 41 Buttons 47 operate 51 at<br />
fast 33 speeds 26 as<br />
25<br />
described 37 in 36the<br />
40 DVD owner’s 46 50manual<br />
when 32 pressed<br />
27<br />
repeatedly. To engage the Slow<br />
24 36 35 39 45 49<br />
Search 31 speeds, press the Pause Button first, then<br />
28 23 35 34 38 44 48<br />
repeatedly 30 press the desired Forward or Reverse<br />
29 22 34 33 43<br />
Search Button.<br />
29 30 21 33 32 42<br />
28 Stereo 31 20 Mode 32Select/Display 31 Button: When<br />
the button is pressed so that DSP SURR OFF<br />
appears in the Lower Display Line ¯, the AVR will<br />
operate in a bypass mode with true, fully analog, twochannel<br />
left/right stereo mode with no surround processing<br />
or bass management, as opposed to other<br />
modes where digital processing is used. When the<br />
button is pressed so that SURROUND OFF<br />
appears in the Lower Display Line ¯, you may<br />
enjoy a two-channel presentation of the sound along<br />
with the benefits of bass management. Depending on<br />
whether your system is configured for 5.1 or 6.1/7.1<br />
channels, the next press of the button will cause either<br />
5 CH STEREO or 7 CH STEREO to<br />
appear, 49 47 and 45 the stereo 43 signal will be routed to all five<br />
(or 48seven)<br />
46 speakers. 44 42When<br />
used to control the DVD<br />
player, 35 37 this button 39 has 41 the same function as the<br />
Display 34 36Button<br />
38 as 40described<br />
37 in 41 the DVD 47 owner’s 51<br />
manual. 33 Press it to reduce the brightness of the DVD’s<br />
26 25 37 36 40 46 50<br />
front-panel 32 display to half, and again to turn the front-<br />
27 24 36 35 39 45 49<br />
panel<br />
31<br />
display off completely. Press it once more to<br />
28 23 35 34 38 44 48<br />
restore the display to full brightness.<br />
30 29 22 34 33 43<br />
29 DTS 30 Neo:6 21 Mode 33 Select/Repeat: 32 42 Press this<br />
button 28 31 to select 20 a 32 DTS Neo:6 31 mode. These modes<br />
take 49 a 47 two-channel 45 43 stereo- or matrix surround-encoded<br />
source 48 46 and create 44 42 a full five-, six- or seven-channel<br />
sound 35 37 field. When 39 41 used to control the DVD player, this<br />
button 34 36 has the 38same<br />
40function<br />
37 as 41 the Repeat 47 51Button<br />
described 33 in the DVD owner’s manual, 40 enabling you<br />
26 25 37 36 46 50<br />
to repeat play of a chapter, title,<br />
39<br />
track, folder, disc or<br />
32 27 24 36 35 45 49<br />
programmed playlist.<br />
31 28 23 35 34 38 44 48<br />
30 Macro 29 22 Buttons: 34 Press 33these<br />
buttons 43 to store or<br />
recall 29 a 30 “Macro”, 21 which 33 is a 32 preprogrammed 42 sequence<br />
of 28commands<br />
31 20<br />
stored<br />
32<br />
in the<br />
31<br />
remote. (See page 8 for<br />
more information on storing and recalling macros.)<br />
REMOTE CONTROL FUNCTIONS 5
49<br />
48<br />
35<br />
34<br />
33<br />
32<br />
31<br />
30<br />
29<br />
28<br />
49<br />
48<br />
47<br />
46<br />
45<br />
44<br />
43<br />
42<br />
REMOTE CONTROL FUNCTIONS<br />
35 37 39 41<br />
34 36 38 40 37 41 47 51<br />
33 26 25 37 36 40 46 50 49 47 45 43<br />
32 27 24 36 35 39 45 49 48 46 44 42<br />
49 47 45 43<br />
31 Disc 28 Skip 23 Button: 35 This 34 button 38 has 44 no 48 direct 35<br />
function 49 30 47<br />
29for<br />
the 45<br />
22AVR<br />
34<br />
43but<br />
is 33 most often 43 used to change 34<br />
to 48 29the<br />
next 46<br />
30<br />
disc 44 21 in<br />
33<br />
42 a CD or 32 DVD changer 42 when the 33<br />
<strong>RCP</strong> 35 28 2 37 31<br />
is programmed 39 20 32 41 for<br />
31<br />
that type of device. (See 32<br />
page 34 10 36for<br />
38 more 40 information 37 on 41using<br />
47the<br />
51 remote<br />
31<br />
with<br />
33<br />
other products.)<br />
26 25 37 36 40 46 50 30<br />
32 Preset 27 24 Down/Status 36 35Button:<br />
39 When 45 49 the tuner is 29<br />
in 31use,<br />
28 press 23 this button 35 to 34 scroll 38 through 44 the 48stations<br />
28<br />
programmed 30 29 22 into the 34AVR’s<br />
33memory.<br />
When 43 the remote<br />
is 49 29used<br />
47 to control the DVD, this button has the same<br />
30<br />
45 21 33<br />
43 32 42<br />
function 48 28 46as<br />
the Status button on the DVD player.<br />
31 44 20 32 42 31<br />
Press<br />
35<br />
it<br />
37<br />
while<br />
39<br />
playing<br />
41<br />
a DVD, VCD, SVCD, MP3, WMA<br />
or JPEG selection to display the Status Bar.<br />
34 36 38 40 37 41 47 51 49 47<br />
33 Preset 26 25 Up/Playlist 37 Button: 36 40When<br />
46 the 50tuner<br />
48 is in 46<br />
use, 32 press 27 this<br />
24<br />
button 36 to scroll 35 up 39through<br />
45 the 49stations<br />
35 37<br />
programmed 31 into the AVR’s memory. When the<br />
28 23 35 34 38 44 48 34 36<br />
remote 30 is used to control the DVD, this button has the<br />
29 22 34 33 43<br />
same function as the Playlist button described in<br />
33<br />
the 26<br />
29 30 21 33 32 42<br />
DVD owner’s manual. Press it to select playback in 32<br />
49<br />
the 27<br />
28 47 45 43<br />
31<br />
order the tracks<br />
20 32 31<br />
appear on the disc, or to play a pro- 31<br />
48 46 44 42<br />
28<br />
grammed playlist of tracks instead.<br />
30 29<br />
35 37 39 41<br />
29<br />
Clear Button: Press this button to clear incorrect<br />
30<br />
34 36 38 40 37 41 47 51 49 28 47<br />
entries when using the remote to directly enter a radio<br />
31<br />
33 26 25 37 36 40 46 50<br />
49 47 48 45 46<br />
station’s 32 frequency. When the remote is used to control<br />
27 24 36 35 39 45 49<br />
the DVD, this button has the same function as 48 the 46 35 44 37<br />
31 28 23 35 34 38 44 48<br />
Clear Button as described in the DVD owner’s 35 37 34 39 36<br />
49 30 47 45 43<br />
29 22 34 33 43<br />
manual. Press it to remove an on-screen menu. 34 36 33 38 26<br />
48 29 46<br />
30 21 44<br />
33<br />
42 32 42<br />
33 32<br />
Memory/Audio Button: Press this button to enter 26 25<br />
27<br />
35 28 37 31 20 39 32 41 31<br />
a radio station into the AVR’s preset memory. 32<br />
31<br />
First, tune 27 24<br />
28<br />
34 36 38 40 37 41 47 51<br />
to the desired station, and then press this button. 31<br />
30<br />
Two 28 23 29<br />
33 26 25 37 36 40 46 50<br />
underline indicators will flash at the right side 30 29<br />
of the29<br />
22 30<br />
32 27 24 36 35 39 45 49<br />
Upper Display Line ˜, and within five seconds 29<br />
28<br />
30 21 31<br />
31 28 23 35 34 38 44 48<br />
press the Numeric Keys r for the preset 28number<br />
30<br />
31 20<br />
between<br />
29 22<br />
01 and 30<br />
34 33 43<br />
that you wish to assign to the<br />
29<br />
station. 30 When 21the<br />
remote 33 32 42<br />
is used to control the DVD,<br />
28<br />
this button 31 has 20the<br />
32 same function 31 as the Audio Button<br />
as 47described<br />
45 43 in the DVD owner’s manual. Press it<br />
to 46change<br />
44 the 42audio<br />
language or format type on<br />
the<br />
37<br />
disc<br />
39<br />
being<br />
41<br />
played.<br />
37 Speaker 39 41Select/Disc<br />
Menu Button: 48 Press46<br />
44<br />
this 36 button 38 to 40begin<br />
37 the process 41 47of<br />
configuring 51 35 the 37 39<br />
AVR’s bass-management system for use with the<br />
26 25 37 36 40 46 50 34 36 38<br />
type of speakers used in your system. Once the but-<br />
27 24 36 35 39 45 49 49 33 47 26 45 25<br />
ton has been pressed, use the ⁄/¤ Buttons n<br />
28 23 35 34 38 44 48 48 32 46 27 44<br />
to select the channel you wish to set up. Press the<br />
24<br />
Set<br />
29 22<br />
Button<br />
34 33 43<br />
p again, and use the ⁄/¤ 35 31<br />
Buttons 37 28 39 23<br />
n30 to<br />
21<br />
select 33 32 42<br />
the speaker size, as described 34 30<br />
in the 36 29 38 22<br />
AVR 31 owner’s 20 32manual. 31Press<br />
the Set Button33 29<br />
p26 30 to 25 21<br />
select another channel to configure. When 32<br />
28<br />
all adjust- 31 27 24 20<br />
ments have been completed, press the Set31Button 49 47<br />
28 23<br />
p twice to exit the settings and return to 30 normal 48 46<br />
29 22<br />
operation. When the remote is used to control 29 the 35<br />
30 21 37<br />
DVD, 45 this 43 button has the same function as the 28 DVD’s 34 31 20 36<br />
Disc 44 Menu 42 Button. Press it to view the menu on 33a<br />
26<br />
DVD disc.<br />
39 41<br />
32 27<br />
38 Multiroom/Subtitle 40 37 41 47 Button: 51 When the remote 31 28<br />
is 25used<br />
37 to control 36 the 40DVD<br />
46 player, 50this<br />
button has the 30 29<br />
same function as the Subtitle Button as described 29in<br />
24 36 35 39 45 49<br />
30<br />
the DVD owner’s manual. Press it to turn the subtitles<br />
23 35 34 38 44 48<br />
28 31<br />
on or off, or to select from the various subtitle lan-<br />
22 34 33 43<br />
guages that the disc may offer. When used with the<br />
21<br />
AVR 335,<br />
33 32 42<br />
45 43 as part of the CP 35 system only, this button<br />
20<br />
activates<br />
32<br />
the<br />
31<br />
Multiroom system.<br />
43 44 42<br />
42 39 Volume 41 Up/Down: Press these buttons to raise<br />
or<br />
41 38lower<br />
40the<br />
system 37 41 volume. 47 51<br />
40 25 SPL 37 37Selector:<br />
41 36<br />
47 40<br />
This button 51 46 50<br />
activates the AVR’s<br />
EzSet 37 24 function 36 36 40 35 to quickly 46 39 and 50 45 accurately 49 calibrate the<br />
AVR’s 36 23 output 35 35 levels. 39 34 45 38 Press 49 44 and hold 48 the button for<br />
three seconds and then release it. Press the “7”<br />
35<br />
22 34 34 38<br />
33 44 48<br />
43<br />
Numeric Key r to indicate that you are using a<br />
34<br />
21 33 33 32 43 42<br />
6.1/7.1-channel speaker system with the AVR. If you<br />
33<br />
20 32 32 31 42<br />
install only five speakers, with no rear surround chan-<br />
32 31<br />
nel, press the “5” Numeric Key r. The test tone<br />
will begin circulating, and the Program/SPL Indicator<br />
c will change colors. During this sequence, EzSet<br />
will automatically adjust the output levels for all channels<br />
until they are equal, as shown by the Program/<br />
SPL Indicator c lighting green for each channel.<br />
Press this button again when the adjustment is com-<br />
42 6-Channel/8-Channel Direct Input: Press<br />
this 41button<br />
to select the device connected to the AVR’s<br />
6/8-Channel 40 37 Direct 41 47Inputs.<br />
51<br />
37 43 Mute: 36 Press 40 this 46button<br />
50 to momentarily silence<br />
the 36 42AVR<br />
35 or TV 39 set being 45 controlled, 49 depending on<br />
which 35 41 device 34 has 38 been 44 selected. 48 When the <strong>RCP</strong> 2<br />
is 34 40<br />
being programmed 37 33 41 47 43to<br />
operate 51 another device, this<br />
button is pressed<br />
40<br />
with the Input Selector Button e<br />
37 33 32 36 42 46 50<br />
to begin the programming process. (See page 7 for<br />
32 39<br />
more<br />
36 35 31 45 49<br />
45 information 43 on programming the remote.)<br />
35 34 38 44 48<br />
44 EzSet 42<br />
34 33Sensor<br />
43 Microphone: The sensor microphone<br />
39 41 for the EzSet microphone is behind these slots.<br />
33 32 42<br />
When 38 using 40 the 37remote<br />
41 to 47 calibrate 51 speaker output<br />
32 31<br />
levels using EzSet, be 40sure<br />
that you do not hold the<br />
25 37 36 46 50<br />
remote in a way that covers these slots.<br />
24 36 35 39 45 49<br />
23 35 34 38 44 48<br />
22 34 33 43<br />
21 33 32 42<br />
20 32 31<br />
36 Delay/Previous 38 40 37Channel<br />
41 47 Button: 51 Press this plete to turn off the test tone. See page 2 for more<br />
button 26 25 to begin 37 the process 36 40for<br />
46 setting 50the<br />
delay times<br />
used 27 by<br />
24<br />
the 36 AVR when 35processing<br />
39 45 surround 49 sound.<br />
After pressing this button, 38 the delay times are 49entered<br />
28 23 35 34 44 48 47 45<br />
by pressing the Set Button p and then using 48 the<br />
29 22 34 33 43<br />
46 44<br />
⁄/¤ Buttons n to change the setting. Press the<br />
30 21 33 32 42 35 37 39<br />
Set Button p again to complete the process. When<br />
31<br />
34 36 38<br />
the remote<br />
20 32 31<br />
is used to control a TV, VCR, cable box or<br />
satellite receiver, this button functions as the<br />
33<br />
Previous 26 25<br />
Channel or “Flashback” button when properly 32 27 24<br />
information. If you have a CP 35 system, we recommend<br />
that you use the EzSet+ function described in<br />
the 43AVR<br />
335 manual, as it provides additional benefits<br />
over 42 EzSet.<br />
41 Learn Button: Press this button to begin the<br />
process 40 37 of “learning” 41 47the<br />
codes 51 from another product’s<br />
remote<br />
37<br />
into 36 the 40AVR’s<br />
46remote.<br />
50 (See page 7 for more<br />
information<br />
36 35on<br />
39 using 45 the remote’s 49 learning function.)<br />
programmed.<br />
31 28 23 35 34 38 44 48<br />
30 29 22 34 33 43<br />
29 30 21 33 32 42<br />
28 31 20 32 31<br />
6 REMOTE CONTROL FUNCTIONS
Your new Harman Kardon CP Series System is<br />
equipped with the powerful <strong>RCP</strong> 2 remote control that<br />
will control not only the receiver’s functions, but also<br />
most popular brands of audio and video equipment,<br />
including CD players, cassette decks, TV sets, cable<br />
boxes, VCRs, satellite receivers and other home<br />
theater equipment. Once the <strong>RCP</strong> 2 is programmed<br />
with the codes for the products you own, it is possible<br />
to eliminate most other remotes and replace them with<br />
the convenience of a single universal remote control.<br />
Programming Product Codes<br />
The <strong>RCP</strong> 2 is factory-programmed for all AVR functions,<br />
as well as for those of most Harman Kardon CD<br />
changers, DVD players, CD players and cassette decks.<br />
In addition, by following one of the methods below, you<br />
may program the remote to operate a wide range of<br />
devices from other manufacturers.<br />
Direct Code Entry<br />
This method is the easiest way to program your<br />
remote to work with different products.<br />
1. Use the tables in the following pages to determine<br />
the three-digit code or codes that match both the<br />
product type (e.g., VCR, TV) and the specific brand<br />
name. If there is more than one number for a<br />
brand, make note of the different choices.<br />
2. Turn on the unit you wish to program into the<br />
<strong>RCP</strong> 2.<br />
3. Press and hold both the Input Selector e for<br />
the product you wish to control (e.g., VCR, TV)<br />
and the 49 Mute 47 Button 45 43 at the same time.<br />
When 48the<br />
red 46light<br />
44under<br />
42the<br />
Input Selector e<br />
stays lit and the Program/SPL Indicator c<br />
35 37 39 41<br />
turns amber and begins flashing, release the<br />
buttons. 34 It is 36important<br />
38 that 40 you begin<br />
37 41<br />
the next<br />
47 51<br />
step 33 within 26 20 seconds. 25 37 36 40 46 50<br />
32 27 24 36 35 39 45 49<br />
4. Point the <strong>RCP</strong> 2 towards the unit to be pro-<br />
31<br />
grammed, and<br />
28<br />
enter<br />
23<br />
the<br />
35 34 38 44 48<br />
first three-digit code num-<br />
30<br />
ber using the 29Numeric<br />
22 34 Keys r.<br />
33<br />
If the unit<br />
43<br />
turns<br />
off, the 29correct<br />
30code<br />
21has<br />
33 been entered. 32 Press 42<br />
the<br />
Input 28Selector<br />
31 e20 again, 32 and 31 note that the red<br />
light will flash three times before going dark to confirm<br />
the entry.<br />
5. If the device to be programmed in does NOT turn<br />
off, continue to enter three-digit code numbers<br />
until the equipment turns off. At this point, the<br />
correct code has been entered. Press the Input<br />
Selector e again and note that the red light<br />
under the Input Selector e will flash three<br />
times before going dark to confirm the entry.<br />
6. Try all of the functions on the <strong>RCP</strong> 2 to make<br />
certain that the product operates properly. Keep in<br />
mind that many manufacturers use a number of<br />
different combinations of codes, so it is a good<br />
idea to make certain that not only the power<br />
control, but the volume, channel and transport<br />
controls work as they should. If functions do not<br />
work properly, you may need to use a different<br />
remote code.<br />
7. If a code cannot be entered to turn the unit off,<br />
if the code for your product does not appear in<br />
the tables in this manual, or if not all functions<br />
operate properly, try programming the remote<br />
with the Auto Search Method.<br />
Auto Search Method<br />
If the unit you wish to include in the <strong>RCP</strong> 2 is not<br />
listed in the code tables in this manual or if the<br />
code does not seem to operate properly, you may<br />
wish to program the correct code using the Auto<br />
Search method that follows:<br />
1. Turn on the unit that you wish to include in the<br />
<strong>RCP</strong> 2.<br />
2. Press the Input Selector e for the type of<br />
product to be entered (e.g., VCR, TV) and the<br />
49 Mute 47 Button 45 43 at the same time. Hold both<br />
48 buttons 46 until 44 the 42 red light under the Input Selector<br />
e stays lit and the Program/SPL Indicator c<br />
35 37 39 41<br />
turns amber and begins flashing. The next step<br />
34 must 36take<br />
38place<br />
40 while the 37red<br />
41<br />
light is 47 on, and<br />
51<br />
it<br />
33 must 26begin<br />
25within<br />
3720<br />
seconds 36 40 after 46 the light 50<br />
32 appears. 27 24 36 35 39 45 49<br />
31<br />
3. Point 28the<br />
23 <strong>RCP</strong> 2 35toward<br />
34<br />
the unit 38to<br />
be<br />
44<br />
programmed, 48<br />
30 and 29press<br />
22either<br />
34 ⁄ or ¤ 33Button<br />
n. 43Each<br />
press<br />
29 will 30 send 21 out a series 33 of 32 codes from 42 the <strong>RCP</strong> 2’s<br />
28 built-in 31 database. 20 32When 31 the unit being programmed<br />
turns off, release ⁄ /¤ Button n, as that is your<br />
indication that the correct code is in use.<br />
4. Press the Input Selector e; the red light under<br />
the Input Selector will flash three times before<br />
going dark to confirm the entry.<br />
5. Try all of the functions on the <strong>RCP</strong> 2 to make certain<br />
that the product operates. Keep in mind that<br />
many manufacturers use a number of different<br />
combinations of codes, and it is a good idea to<br />
make certain that not only the power control<br />
works, but also the volume, channel and transport<br />
controls, as appropriate. If all functions do not work<br />
properly, you may need to Auto-Search for a different<br />
code, or enter a code via the Direct Code<br />
Entry method.<br />
Code Readout<br />
When the code has been entered using the Auto<br />
Search method, it is always a good idea to find out the<br />
exact code so that it may be easily reentered if necessary.<br />
You may also read the codes to verify which<br />
device has been programmed to a specific Control<br />
Selector button.<br />
PROGRAMMING THE REMOTE<br />
1. Press and hold both the Input Selector e<br />
for the device you wish to find the code for and<br />
the 49 Mute 47 Button 45 43 at the same time. The<br />
Program/SPL 48 46 44Indicator<br />
42 c will turn amber<br />
and begin flashing, and the red light under the<br />
35 37 39 41<br />
Input Selector e will stay lit. Release the buttons<br />
34 and 36begin<br />
38the<br />
40 next step 37within<br />
41<br />
20 47 seconds.<br />
51<br />
33 26 25 37 36 40 46 50<br />
2. Press the Set Button p. The Program/SPL<br />
32 27<br />
Indicator c<br />
24 36 35 39 45 49<br />
will then blink green in a sequence<br />
31<br />
that corresponds 28 23 to 35 34<br />
the three-digit code,<br />
38 44<br />
with a one-<br />
48<br />
second<br />
30 29 pause 22 between 34 each 33 digit. Count 43 the number<br />
29of<br />
blinks 30 between 21 33each<br />
pause 32 to determine 42 the<br />
digit 28 of 31 the code. 20 One 32blink is 31 the number 1, two<br />
blinks is the number 2, and so forth. Ten blinks are<br />
used to indicate a “0.”<br />
Example: One blink, followed by a one-second pause,<br />
followed by six blinks, followed by a one-second<br />
pause, followed by ten blinks indicates that the code<br />
has been set to 160.<br />
For future reference, enter the setup codes for the<br />
equipment in your system here:<br />
DVD ____________ CD ________________<br />
VID1/VCR __________ VID2/CBL __________<br />
VID2/SAT ________ VID3/TV __________<br />
VID4* ____________ TAPE______________<br />
* The AVR 135 has no Video 4 source input;<br />
therefore, remote commands associated with the<br />
VID4 button will not have any effect on the AVR 135,<br />
although you may use the remote to operate another<br />
component.<br />
Learning Codes<br />
In addition to using codes from the remote’s internal<br />
code library, the <strong>RCP</strong> 2 is able to “learn”codes from<br />
remotes that may not be in the code library. In addition,<br />
this function will allow you to program additional<br />
codes from the DVD remote or to “learn over” the<br />
codes from a preprogrammed device to add functions<br />
not included in the preprogrammed codes. To learn<br />
or transfer codes from an IR remote to the <strong>RCP</strong> 2,<br />
follow these steps:<br />
1. Place the front of the original remote with the code<br />
being sent so that it is facing the IR Transmitter<br />
Window b on the <strong>RCP</strong> 2 “head-to-head.” The<br />
two remotes should be between one and three<br />
inches apart.<br />
2. Select the button on the <strong>RCP</strong> 2 that you wish to<br />
use as the device selector for the codes about<br />
to be entered. This may be any of the Input<br />
Selectors e.<br />
PROGRAMMING THE REMOTE 7
PROGRAMMING THE REMOTE<br />
49<br />
47<br />
45<br />
43<br />
3. Press 48 the 46Input<br />
44Selector<br />
42 e button chosen and<br />
the 35Learn<br />
37 Button 39 41 at the same time. Hold<br />
these 34 buttons 36 38 until the 40Program/SPL<br />
37 41 Indicator 47 51<br />
c<br />
33<br />
flashes amber and the light under the device<br />
26<br />
selector button<br />
25 37 36 40 46 50<br />
turns red. Release the buttons.<br />
32 27 24 36 35 39 45 49<br />
4. Press 31 the 28button<br />
23on<br />
35 the <strong>RCP</strong>34 2 that 38you<br />
44 wish to48<br />
program. 30 29<br />
The<br />
22<br />
Program/SPL<br />
34 33 Indicator c43 will<br />
stop 29 flashing.<br />
30 21 33 32 42<br />
5. Within 28 5 31 seconds, 20 press 32 and 31 hold the button on the<br />
original remote that you wish to “teach” into the<br />
<strong>RCP</strong> 2. When the Program/SPL Indicator c turns<br />
green three times, release the button. The Program<br />
Indicator will then begin to flash amber again.<br />
NOTE: If the Program/SPL Indicator c turns<br />
red during Step 4 or 5, the programming was not<br />
successful. Repeat the steps to see whether the<br />
code will “take.”<br />
6. Repeat Steps 4 and 5 for each button on the<br />
source remote that you wish to transfer to the<br />
<strong>RCP</strong> 2 remote.<br />
49 47 45 43<br />
7. Once all codes have been transferred from the<br />
48original<br />
46 source 44 remote 42 to the <strong>RCP</strong> 2, press the<br />
35Learn<br />
37 Button 39 41 .<br />
34<br />
8. Repeat<br />
36<br />
Steps<br />
38<br />
1<br />
40 37 41 47 51<br />
through 7 for any additional<br />
33remotes<br />
26 you 25 wish 37to<br />
“teach” 36 into 40the<br />
46 <strong>RCP</strong> 2. 50<br />
32 27 24 36 35 39 45 49<br />
31<br />
Erasing Learned Codes<br />
28 23 35 34 38 44 48<br />
The <strong>RCP</strong> 2 allows you to remove or erase the code<br />
30<br />
learned 29 into a 22single<br />
34 33 43<br />
button for a single device, to<br />
29<br />
remove 30 or erase 21 the 33code<br />
set 32for<br />
all the 42 codes that<br />
28 have been 31 programmed 20 32 into 31 specific device buttons,<br />
or to erase all commands that have been learned<br />
to all devices.<br />
If you erase a code that is part of a macro, that macro<br />
sequence will no longer operate properly.<br />
5. Press and release the individual button for which the<br />
code is to be erased. The Program/SPL Indicator<br />
c will blink green twice and then return to amber.<br />
49<br />
48<br />
35<br />
34<br />
33<br />
32<br />
31<br />
30<br />
29<br />
28<br />
To erase a single learned code from within a single<br />
device’s settings, follow these steps:<br />
49 47 45 43<br />
1. Press and hold both the Input Selector ef<br />
within which the individual 48button<br />
46to<br />
be 44erased<br />
42has<br />
been programmed and the 35Learn<br />
37 Button 39 41 .<br />
34 36 38 40<br />
2. When the red LED under the Input Selector turns<br />
red and the Program/SPL 33Indicator<br />
26 25 c flashes 37<br />
37<br />
36<br />
amber, release the buttons. 32 27 24 36 35<br />
31 28 23 35<br />
3. Press and release the Input Selector ef<br />
30<br />
again for the device within which 29the<br />
individual<br />
22 34<br />
button to be erased has<br />
29<br />
been programmed. 30 21 33<br />
28 31 20 32<br />
4. Press the 7 Button r four times.<br />
34<br />
33<br />
32<br />
31<br />
8 PROGRAMMING THE REMOTE<br />
35 37 39 41<br />
34 36 38 40 37 41 47 51<br />
33 26 25 37 36 40 46 50<br />
6. To erase other buttons within the same device, press<br />
them as 49described<br />
47 in 45Step<br />
43 5.<br />
32 27 24 36 35 39<br />
1. Press the 4931<br />
Mute 4728<br />
Button 4523<br />
4335and<br />
the 34Macro<br />
38<br />
Button4830 46 to 29 be 44 programmed 22 4234<br />
or 33 the<br />
45<br />
44<br />
43<br />
49<br />
48<br />
7. When all 48buttons<br />
46 to 44 be erased 42 have been pressed,<br />
press the 35Learn<br />
37 Button 39 41 to complete the<br />
process. 34 36 38 40 37 41 47<br />
To erase all 33codes<br />
26within<br />
25a<br />
single 37 device,<br />
36<br />
follow 40 these<br />
46<br />
steps: 32 27 24 36 35 39 45<br />
49 473145<br />
284323<br />
35 34 38 44<br />
1. Press and hold both the Input Selector ef<br />
48 for 4630<br />
which 44 you 29 wish 4222<br />
to erase 34 33 43<br />
the codes and the<br />
35Learn<br />
37<br />
29<br />
Button 39 304121<br />
. 33 32 42<br />
28<br />
34 36 38 314020<br />
37 32 41 3147<br />
51<br />
2. When the red LED under the Input Selector turns<br />
33red<br />
26 and the 25Program/SPL<br />
37 36<br />
Indicator 40 46<br />
c 50 flashes<br />
51<br />
50<br />
49<br />
48<br />
Power On Button d at the same time.<br />
3529<br />
37303921<br />
4133<br />
32 42<br />
An Input 28 Selector will light red, and the Program/<br />
SPL Indicator<br />
34 3631<br />
c<br />
3820<br />
will flash<br />
4032<br />
373141<br />
47 51<br />
amber.<br />
33 26 25 37 36 40 46 50<br />
2. Enter the 32steps<br />
for the macro sequence by press-<br />
27 24 36 35 39 45 49<br />
ing the<br />
31<br />
button for the actual command step.<br />
Although the<br />
28 23<br />
macro may<br />
35 34 38 44 48<br />
contain up to 19 steps,<br />
30<br />
each button press, 29 22 including 34 33 43<br />
those used to change<br />
devices, 29counts<br />
30as<br />
21 a step. 33 The Program/SPL 32 42<br />
Indicator 28 c31will 20 flash green 32 to 31 confirm each<br />
button press as you enter commands.<br />
NOTE: While entering commands for Power On/Off of<br />
32amber,<br />
27 release 24 the 36buttons.<br />
35 39 45 49 any device during a macro sequence, press the Mute<br />
31 28 23 35 34 38 44 48 49 47 Button 45 43 . DO NOT press the actual Power button.<br />
3. Press and release the Input Selector ef<br />
30<br />
again 29for<br />
22<br />
the device 34 33 43 48 46 44 42<br />
whose codes you wish to erase. 3. When all the steps have been 49 entered, 47 press 45 the43<br />
29 30 21 33 32 42 35 37 39Sleep<br />
41Button<br />
j to enter the 48commands.<br />
46 44The42<br />
28 4. Press<br />
31<br />
the<br />
20<br />
8 Button<br />
32<br />
r31 four times.<br />
34 36 38red<br />
light 40 under 37the<br />
41 Input 47 Selectors 51 ef will<br />
35 37 39 41<br />
5. The Program/SPL Indicator c will turn off and 33 26 25<br />
blink<br />
37<br />
and then 36turn<br />
40 off. 46 50<br />
34 36 38 40 37 4<br />
the red light under the Input Selector will flash on 32 27 24Example:<br />
36 To<br />
35<br />
program 39the<br />
45<br />
Macro 49<br />
331<br />
button so that it<br />
and off once to indicate that the codes have been<br />
26 25 37 36 4<br />
31 28 23turns<br />
35 on the AVR, 34 TV 38and<br />
44 a cable 48box,<br />
follow these<br />
erased.<br />
32 27 24 36 35 3<br />
30 29 22steps:<br />
34 33 43<br />
31 28 23 35 34 3<br />
To erase all codes that have been programmed to all 29 30 21<br />
• Press 33 32 42<br />
the Macro 1 Button 30 and 29Mute<br />
22 34 33<br />
devices in the remote, follow these steps: 28<br />
49 31 20 47 Button 45 32 4331at<br />
the same time 29and<br />
30 then release 21 33 32<br />
47 45 43<br />
1. Press any Input Selector ef for which 48 46 them. 44 42<br />
28 31 20 32 31<br />
46 you 44wish<br />
42 to erase the codes and also the Learn 35 37•<br />
Note 39that<br />
41 the Program/SPL Indicator c will<br />
37 Button 39 41 .<br />
34 36 flash 38amber.<br />
40 37 41 47 51<br />
36 38 40 37 41 47 51<br />
2. When the red LED under the Input Selector turns 33 26 • Press 25 the 37 36 40 46 50<br />
AVR Selector f.<br />
26red<br />
25 and the 37Program/SPL<br />
36 40 Indicator<br />
46 50c<br />
flashes 32 27 24 36 35 39 45 49<br />
27amber,<br />
24 release 36 the 35 buttons. 39 45 49<br />
31 28<br />
• Press<br />
23<br />
49 the<br />
35<br />
Mute 47 Button 34 45 38 43 44 to store 48the<br />
AVR’s<br />
28 23 35 34 38 44 48<br />
power 48 on command. 46 44 42<br />
3. Press and release the Input Selector ef<br />
30 29 22 34 33 43<br />
29again<br />
22<br />
for 34 33 43<br />
the device whose codes you wish to erase. 29 30 • Press 2135<br />
the 33 VID 373<br />
Input 32 39 Selector 41 42Button<br />
e to<br />
30 21 33 32 42<br />
28 31 indicate 2034the<br />
32next 36 command 31 38 40is<br />
for “TV 37 Power 41 On.” 47 51<br />
31<br />
4. Press<br />
20<br />
the<br />
32<br />
9 Button 31r<br />
four times.<br />
33<br />
40<br />
• Press 49 the Mute 47 26 Button 25 45 37 36 46 50<br />
43 to store the TV<br />
5. The Program/SPL Indicator c will turn off and<br />
Power 32<br />
48 On Command.<br />
39<br />
46<br />
27 24 44<br />
36 35 45 49<br />
42<br />
the red light under the Input Selector will flash on<br />
31 28 23 35 34 38 44 48<br />
and off once to indicate that the codes have been • Press 35 the VID 372<br />
Input 39 Selector 41<br />
30<br />
Button e to<br />
29 22 34 33 43<br />
erased.<br />
indicate 34the<br />
next 36 command 38 40 is for “Cable 37 Power 41 On.” 47 51<br />
29 30 2149<br />
3347<br />
32 45 43 42<br />
33<br />
40<br />
Macro Programming<br />
• Press 49 the Mute 47 26Button<br />
45 25<br />
48 43 37 36 46<br />
28<br />
50<br />
31 20 3246to store 31 44 the 42 Cable<br />
Power 32 On command.<br />
39<br />
Macros enable you to easily repeat frequently used<br />
48 46<br />
27<br />
44 24<br />
35 42<br />
36 35 45 49<br />
41 47 51<br />
31<br />
37 39 41<br />
28 23 35 34 38 44 48<br />
40 combinations 46 50of<br />
commands with the press of a single • Press 35 the Sleep/Channel 37 3934<br />
41Up<br />
36Button<br />
38 j40to 37 41<br />
30<br />
47<br />
button on 49 the <strong>RCP</strong> 472.<br />
Once 45 programmed, 43 a macro will<br />
29 22 34 33 43<br />
39 45 49<br />
complete 34 the 36 process 3833<br />
and 40store<br />
26 the 37 25<br />
macro 41<br />
37 47365140<br />
46<br />
send out up 48to<br />
19 46different<br />
44 remote 42 codes in a prede-<br />
29<br />
sequence. 30 21 33 32 42<br />
38<br />
33 26 32<br />
39<br />
termined<br />
44<br />
sequential 48 order, enabling you to automate<br />
25 3727<br />
36<br />
24<br />
40 36 46<br />
28<br />
3550<br />
45<br />
35 37 39 41<br />
31 20 32 31<br />
the process 43 of turning on your system, changing<br />
After following 32 27 these 24 steps, 31 36 each 28time<br />
35 23you<br />
39 35 press<br />
45344938<br />
44<br />
34 36 38 40 37 41 47 51<br />
devices, 42or<br />
other common tasks. The <strong>RCP</strong> 2 can store the Macro 31 1 Button 28 2330<br />
35 the 29remote<br />
34 22 will 38 34 send443348<br />
43<br />
33<br />
40<br />
up to five separate 26macro<br />
25command<br />
37 36 46 50<br />
sequences: one the Power 30On/Off<br />
29 command. 2229<br />
3430<br />
33 21 33 4332<br />
42<br />
that is associated 32 27 with the 24Power<br />
36 On 35 Button39d 45 and 49 29 30 2128<br />
3331<br />
32 20 32 4231<br />
four more 31 that are 28accessed<br />
23 by 35pressing<br />
34the<br />
38 Macro 44 48 28 31 20 32 31<br />
Buttons 30 . 29 22 34 33 43<br />
29 30 21 33 32 42<br />
28 31 20 32 31<br />
49<br />
48<br />
47<br />
46<br />
45<br />
44<br />
43<br />
42
49<br />
48<br />
47<br />
46<br />
45<br />
44<br />
43<br />
42<br />
PROGRAMMING THE REMOTE<br />
Erasing Macro 35 Commands 37 39 41<br />
NOTE: Should you wish to return the <strong>RCP</strong> 2 to the all devices except CD and TAPE. To program the remote<br />
To remove the 34commands<br />
36 38that<br />
have 40 been 37pro41<br />
47 51original<br />
configuration after entering a Volume Punch- for Transport Control Punch-Through, follow these steps:<br />
grammed into 33one<br />
of 26the<br />
25 Macro 37 buttons, 36 follow 40 46 50Through,<br />
you will need to repeat the steps shown<br />
these steps:<br />
above. However, press the same Input Selector in<br />
1. Press the Input Selector e for the device you<br />
32 27 24 36 35 39 45 49<br />
Steps 1 and 3.<br />
wish to have the channel control associated with and<br />
1. Press 49 the 31 Mute 4728<br />
Button 4523<br />
4335and<br />
the 34Macro<br />
38 44 48<br />
49 the Mute 47 Button 45 43 at the same time until the<br />
Button4830 46 that 29contains<br />
4422<br />
42the<br />
34commands<br />
33 you 43 Channel Control Punch-Through<br />
48 red light 46appears<br />
44 under 42 the Input Selector e and<br />
wish to 35erase.<br />
29 37303921<br />
4133<br />
32 42<br />
the Program/SPL Indicator c flashes amber.<br />
The <strong>RCP</strong> 2 may be programmed to operate so that the 35 37 39 41<br />
2. The Program/SPL 34<br />
28<br />
363138<br />
Indicator 20 4032c37will<br />
31flash<br />
41 47 51 channel control function for either the TV, cable or satel- 2. 34 Press the 36 Play 38Button<br />
40 `. 37The<br />
Program/SPL 41 47 51<br />
amber, 33 and the 26LED<br />
25<br />
under 37the<br />
AVR 36Selector<br />
40 46 f 50 lite receiver used in your system may be used in con- 33 Indicator<br />
26<br />
c<br />
will turn red.<br />
25<br />
will<br />
37<br />
stop flashing 36 and 40stay<br />
46amber.<br />
50<br />
32 27 24 36 35 39 45 49 junction with one of the other devices controlled by the<br />
3. Within ten seconds, press the Surround Mode<br />
remote. For example, while using and controlling the<br />
3. 32 Press and 27 release 24 the 36Input<br />
35<br />
Selector 39 Button<br />
45 49 e<br />
31 28 23 35 34 38 44 48<br />
31<br />
Selector/Channel Down Button k.<br />
VCR, you may wish to change channels on a cable box<br />
for the 28 device 23that<br />
will 35be<br />
used 34to<br />
38 change 44the<br />
chan- 48<br />
30 29 22 34 33 43<br />
30<br />
or satellite receiver without having to change the device<br />
nels. The 29Program/SPL<br />
22 34 Indicator 33 c43 will blink<br />
29<br />
4. The red LED30 under 21 the AVR 33 Selector 32 f will 42<br />
selected by the AVR or the <strong>RCP</strong> 2. To program the 29 green<br />
30<br />
three times 21 and<br />
33<br />
then 32 go out to confirm 42 the<br />
go out, 28and<br />
the 31Program/SPL<br />
20 32 Indicator 31 c remote for Channel Control Punch-Through, follow 28 data entry.<br />
31 20 32 31<br />
will turn green and flash three times before it these steps:<br />
Example: To control the transport of the DVD while<br />
goes out.<br />
1. Press the Input Selector Button e for the device<br />
the <strong>RCP</strong> 2 is set to control the TV, first press the<br />
5. When the Program/SPL Indicator c goes<br />
49<br />
you wish to have the channel control associated with<br />
VID 473/TV<br />
45Input<br />
43 Selector Button e and the<br />
out, the Macro has been erased.<br />
and 49 the Mute 47 Button 45 43 at the same time until<br />
48 Mute 46 Button 44 42 at the same time. Next, release<br />
Volume Punch-Through<br />
the red light appears under the Input Selector e 35 them 37and<br />
39press<br />
41 the Play Button `, followed by<br />
49 47 45 43<br />
48 46 44 42<br />
and the Program/SPL Indicator c flashes<br />
the DVD Input Selector Button e.<br />
49 47 45 43 34 36 38 40 37 41 47 51<br />
The <strong>RCP</strong><br />
48<br />
2 may<br />
46<br />
be<br />
44<br />
programmed<br />
42<br />
35 37 39 41<br />
to operate the<br />
amber.<br />
48 46 44 42 33 NOTES: 26 25 37 36 40 46 50<br />
Volume 35Control<br />
37 and Mute functions of<br />
34 36 38 40 37 41 51<br />
4939<br />
474145<br />
43<br />
47<br />
•<br />
either the TV or the AVR in conjunction with any of the<br />
2. Press the Volume Down 35 Button 37 39 . The 41 32 To 27 remove<br />
24<br />
the 36 Channel 35 Control 39 Punch-Through 45 49 and<br />
34 36<br />
33 26 25 37 36 40 46 50<br />
4838<br />
464044<br />
37 42 41 47 51<br />
devices controlled by the remote. For example, since<br />
Program/SPL Indicator c will stop flashing<br />
return the <strong>RCP</strong> 2 to its original configuration, repeat<br />
34 36 38 40 37 4131<br />
47285123<br />
35 34 38 44 48<br />
33<br />
32 27<br />
the AVR will likely be used as the sound system for TV<br />
and stay amber.<br />
24 36 35 39 45 49<br />
263525<br />
37 3739<br />
36 41 40 46 50<br />
the steps in the example above. However, press the<br />
33<br />
30<br />
VID<br />
29 22<br />
3/TV Input<br />
34 33 43<br />
26 25 37 36 40 46 50<br />
32<br />
31 28 23 35 34 38 44<br />
viewing, you<br />
27<br />
48<br />
Selector e in Steps 1 and 3.<br />
may 34wish<br />
24 36 to<br />
36<br />
have 38 35<br />
the 40 39<br />
AVR’s volume<br />
3745<br />
4149<br />
acti-<br />
47 51<br />
29<br />
3. Press and release the Input Selector Button e 30 21 33 32 42<br />
31<br />
30 29 22 32 34 273324<br />
3643<br />
35 39 45 49<br />
vated, although 2833<br />
the 23 remote 2635<br />
34<br />
is 25set<br />
to 37run<br />
38<br />
the 3644<br />
TV. Either 4048<br />
46 50<br />
for the device that will be used to change the chan-<br />
28 • Before 31 programming 20 32 the 31 <strong>RCP</strong> 2 for Volume, Channel<br />
the AVR 30<br />
29 31 28 23 35 34 38 44 48<br />
or TV 29volume<br />
control may be associated with<br />
30 21 33 32 42<br />
3222<br />
2734<br />
33<br />
24 36 3543<br />
39 45 49nels.<br />
The Program/SPL Indicator c will blink<br />
or Transport Punch-Through, make certain that any<br />
30<br />
any of 29<br />
28<br />
the <strong>RCP</strong> 2’s devices. The factory default is to<br />
29 22 34 33 43<br />
303121<br />
31 20 32 31<br />
283323<br />
32<br />
35 3442<br />
38 44 48green<br />
three times and then go out to confirm the<br />
programming needed for the specific TV, CD, DVD,<br />
have the 28AVR’s<br />
volume controls active for all devices<br />
29<br />
data entry.<br />
30 21 33 32 42<br />
313020<br />
cable or satellite receivers has been completed.<br />
293222<br />
31 34 33 43<br />
except CD and TAPE. To program the remote for<br />
28 31 20 32 31<br />
29<br />
Volume Punch-Through, 30follow<br />
21<br />
these 33 32 42<br />
steps:<br />
Example: To control the channels using your cable Reassigning Device Control Selectors<br />
28 31 20 32 31<br />
box or satellite receiver while the <strong>RCP</strong> 2 is set to Although each Input Selector e is normally<br />
1. Press the Input Selector e for the unit you wish control the VCR, first press the VID 1/VCR Input assigned to the category of product shown on the<br />
to have associated with the volume control and the<br />
49 47 45 43<br />
Selector Button e and 49 the Mute 47 Button 45 43<br />
<strong>RCP</strong> 2, it is possible to reassign one of these buttons to<br />
49 Mute 47 Button 45 43 at the same time until the red at the same time. 48Next,<br />
46 release 44them<br />
42<br />
48 46and<br />
44press<br />
42 operate a second device of another type. For example,<br />
48 light 46appears<br />
44 under 42 49 the Input 47 Selector 45 43 e; the the Volume Down 35 Button 37 39 , followed 41 by the if you have two VCRs but no satellite receiver, you may<br />
Program/SPL Indicator c will flash amber.<br />
35 37 39 41<br />
35 37 39 41 48 46 44 42<br />
VID 3/TV Input 34 Selector 36 Button 38 e. 40 37 41 47program<br />
51<br />
34 36 38 40 37 41 47 the “SAT” 51 button to operate a second VCR.<br />
342.<br />
Press 36 the 38Volume<br />
40 35 Up Button 37 37 4139<br />
47 ; the 41Program/<br />
51 NOTE: To remove 33 the Channel 26 Control 25 37 Punch-Through<br />
36 40 46Before<br />
50 following the normal programming steps for<br />
33<br />
SPL Indicator c will stop flashing and stay amber.<br />
26 25 37 36 40 46 50<br />
33<br />
and return the <strong>RCP</strong>32 2 to its 27original<br />
configuration, repeat 39 either Three-Digit entry or Auto Search code entry, you<br />
26 25 37 34 36 36 4038<br />
4640<br />
50 37 41 47 51<br />
24 36 35 45 49<br />
32 27 24 36 35<br />
3. Press either the AVR Selector f or the Input<br />
the steps shown in 31 the example above. However, press<br />
must<br />
39<br />
first<br />
45<br />
reassign<br />
49<br />
the button with the following steps:<br />
32 27 24 36 33 3526<br />
3925<br />
4537<br />
49 36 40 46 50 28 23 35 34 38 44<br />
31<br />
48<br />
38<br />
Selector e, depending on which system’s<br />
the VID 1/VCR Input 30Selector<br />
29 22 e<br />
28<br />
in<br />
34<br />
Steps<br />
23<br />
1 33 and<br />
35 34 44 48<br />
31<br />
3.<br />
28 23 35 32 3427<br />
3824<br />
4436<br />
48 35 39 45 49<br />
30<br />
431.<br />
Press the Input Selector e you wish to reassign<br />
29 22 34 33 43<br />
30 volume 29 control 22 34 you 31 wish 33 to 28 have 23 attached 4335<br />
for the 34 38 Transport 44 48 Control 29 Punch-Through<br />
30 21 33 32 42 and 49 the Mute 47 Button 45 43 at the same time until<br />
29<br />
punch-through mode. The Program/SPL Indicator<br />
28<br />
30 21 33 32 42<br />
29<br />
31 20 32 31<br />
the red 48 light 46appears<br />
44 under 42 the Input Selector e<br />
30 21 33 30 3229<br />
224234<br />
33 43<br />
28<br />
c will blink green three times and then go out to The <strong>RCP</strong> 2 may be programmed to operate 31 20 so that 32the 31<br />
28<br />
and the Program/SPL Indicator c flashes<br />
31 20 32 29 3130<br />
21 33 32 42<br />
35 37 39 41<br />
confirm the data entry.<br />
Transport Control Functions ` (Play, Stop, Fast amber.<br />
28 31 20 32 31 Forward, Rewind, Pause and Record) for a VCR, DVD<br />
34 36 38 40 37 41 47 51<br />
Example: To have the AVR’s volume control acti- or CD will operate in conjunction with one of the other<br />
2. Press 33the<br />
Input<br />
26<br />
Selector<br />
25 37<br />
e for 36the<br />
40 device 46you<br />
50<br />
vated even though the <strong>RCP</strong> 2 is set to control the devices controlled by the <strong>RCP</strong> 2. For example, while<br />
wish<br />
32<br />
to program into the reassigned button.<br />
49 47 45 43<br />
27 24 36 35 39 45 49<br />
TV, first press the VID 3/TV Input Selector e using and controlling the TV, you may wish to start or 3. Enter 31the<br />
three-digit 28 23 code 35for<br />
the 34specific<br />
38 model 44 48<br />
and 49 the Mute 47 Button 45 48 43 46 at 44 the same 42time.<br />
Next, stop your VCR or DVD without having to change the you 30 wish the reassigned button to operate.<br />
press the Volume Up Button , followed by<br />
29 22 34 33 43<br />
48 46 44 35 42 37 39 41<br />
device selected by the AVR or the <strong>RCP</strong> 2. The factory<br />
the AVR Selector f.<br />
29<br />
default is to have the DVD’s transport controls active for 4. Press the same 30 Input<br />
21<br />
Selector 33 32 42<br />
35 37 39 34 41 36 38 40 37 41 47 51<br />
e pressed in<br />
28<br />
33<br />
40<br />
Step 1 once 31again<br />
20to<br />
store 32 the selection. 31<br />
34 36 38 4026<br />
25 37 37 41 4736<br />
51 46 50<br />
The red<br />
33<br />
32<br />
31<br />
30<br />
29<br />
26<br />
27<br />
28<br />
29<br />
30<br />
25<br />
32<br />
3727<br />
31<br />
24 3628<br />
30<br />
23 3529<br />
22<br />
29<br />
3430<br />
28<br />
21 3331<br />
24 36<br />
23 35<br />
22 34<br />
21 33<br />
20 32<br />
36 40<br />
35 39<br />
34 38<br />
33<br />
32<br />
4635<br />
5039<br />
4534<br />
4938<br />
4433<br />
48<br />
4332<br />
4231<br />
45<br />
44<br />
43<br />
42<br />
49<br />
48<br />
PROGRAMMING THE REMOTE 9
PROGRAMMING THE REMOTE<br />
LED under the reassigned Input Selector will flash<br />
three times and then go out.<br />
Example: To use the CBL/SAT button to operate<br />
a second VCR, first press the VID 2/CBL/SAT<br />
Input Selector e and 49 the Mute 47 Button 45 43<br />
at the same time until the 48 red light 46glows<br />
44under<br />
42<br />
the VID 2/CBL/SAT Button e. Press the VCR<br />
35 37 39 41<br />
Button e, followed by the three-digit code for the<br />
specific model you wish to<br />
34<br />
control.<br />
36<br />
Finally,<br />
38<br />
press<br />
40<br />
the<br />
37<br />
VID 2/CBL/SAT Button e33 again. 26 25 37 36<br />
32 27 24 36 35<br />
Resetting the <strong>RCP</strong> 2’s Memory<br />
31 28 23 35 34<br />
As you add components to your 30 home 29 theater 22 system, 34 33<br />
occasionally you may wish to 29 totally<br />
30<br />
reprogram 21 the<br />
33 32<br />
remote control without the confusion 28 of any commands,<br />
31 20 32 31<br />
macros or “Punch-Through” programming that you may<br />
have done. To do this, it is possible to reset the <strong>RCP</strong> 2<br />
to the original factory defaults and command codes by<br />
following these steps. However, once the remote is<br />
reset, all commands or codes that you have entered<br />
will be erased and will need to be reentered:<br />
1. Press any of the Input Selector Buttons e and<br />
the “O” Button r at the same time until the<br />
Program/SPL Indicator c begins to flash amber.<br />
2. Press the “3” Button r three times.<br />
3. The red LED under the Input Selector e will go<br />
out and the Program/SPL Indicator c will stop<br />
flashing and turn green.<br />
4. The Program/SPL Indicator c will remain green<br />
until the <strong>RCP</strong> 2 is reset. Note that this may take a<br />
while, depending on how many commands are in the<br />
memory and need to be erased.<br />
5. When the Program/SPL Indicator c goes out,<br />
the <strong>RCP</strong> 2 has been reset to the factory settings.<br />
Programmed Device Functions<br />
Once the <strong>RCP</strong> 2 has been programmed for the codes<br />
of other devices, press the appropriate Input Selector<br />
e to change the remote from controlling the AVR to<br />
controlling the additional product. When you press any<br />
one of the selectors, it will briefly flash in red to indicate<br />
that you have changed the device being controlled.<br />
When operating a device other than the AVR, the controls<br />
may not correspond exactly to the function printed<br />
on the remote or button. Some commands, such as<br />
the volume control, are the same as they are with the<br />
AVR. Other buttons will change their function so that<br />
they correspond to a secondary label on the remote.<br />
For example, the Sleep and Surround mode selector<br />
buttons also function as the Channel Up and Channel<br />
Down buttons when operating most TV sets, VCRs or<br />
cable boxes. The Channel Up/Down indication is printed<br />
10 PROGRAMMING THE REMOTE<br />
directly on the remote. For many standard CD players,<br />
cassette decks, VCRs and DVD functions, the standard<br />
function icons are printed on top of the buttons.<br />
For some products, however, the function of a particular<br />
button does not follow the command printed on<br />
the remote. In order to see which function a button<br />
controls, consult the Function List tables on pages 11<br />
and 12. To use those tables, first check the type of<br />
41 47 51<br />
device being controlled (e.g., TV, VCR). Next, look at<br />
the<br />
40<br />
remote<br />
46<br />
control<br />
50<br />
diagram in the figure at right. Note<br />
that 39 each 45button<br />
49 has a number on it.<br />
38 44 48<br />
To find out what function a particular button has for<br />
a specific<br />
43<br />
device, find the button number on the<br />
Function 42List<br />
and then look in the column for the device<br />
you are controlling. For example, button number 46<br />
is the Direct button for the AVR, but it is the “Favorite”<br />
button for many cable television boxes and satellite<br />
receivers. Button number 30 is the Digital Selection<br />
button for the AVR, but the Open/Close button for CD<br />
players.<br />
NOTE: The numbers used to describe the button<br />
functions in the diagram on this page for the purposes<br />
of describing how a button operates are a different set<br />
of numbers than those used in the rest of this manual<br />
to describe the button functions for the AVR.<br />
Notes on Using the <strong>RCP</strong> 2 With Other Devices<br />
• Manufacturers may use different code sets for the<br />
same product category. For that reason, it is important<br />
that you check to see whether the code set you<br />
have entered operates as many controls as possible.<br />
If it appears that only a few functions operate, check<br />
to see whether another code set will work with more<br />
buttons.<br />
• When a button is pressed on the <strong>RCP</strong> 2, the red<br />
light under the Input Selector e for the product<br />
being operated should flash briefly. If the Device<br />
Control Selector flashes for some but not all buttons<br />
for a particular product, it does NOT indicate a<br />
problem with the remote but rather that no function<br />
is programmed for the button being pushed.
FUNCTION LIST<br />
No. Button Name AVR Function DVD CD/CD-R Tape VCR (VID1) CBL (VID2) SAT (VID2) TV (VID3)<br />
1 Power On Power On Power On Power On Power On Power On Power On Power On<br />
2 Power Off Power Off Power Off Power Off Power Off Power Off Power Off Power Off<br />
3 Mute Mute Mute Mute Mute Mute Mute<br />
4 AVR AVR Select AVR Select AVR Select AVR Select AVR Select AVR Select AVR Select AVR Select<br />
5 DVD DVD Input Select DVD Select DVD Select DVD Select DVD Select DVD Select DVD Select DVD Select<br />
6 CD CD Input Select CD Select CD Select CD Select CD Select CD Select CD Select CD Select<br />
7 Tape Tape Input Select Tape Select Tape Select Tape Select Tape Select Tape Select Tape Select Tape Select<br />
8 VID 1 (VCR) Video 1 Select VCR Select VCR Select VCR Select VCR Select VCR Select VCR Select VCR Select<br />
9 VID 2 (CBL/SAT) Video 2 Select VID2 Select VID2 Select VID2 Select VID2 Select CBL Select SAT Select VID2 Select<br />
10 VID 3 (TV) Video 3 Select TV Select TV Select TV Select TV Select TV Select TV Select TV Select<br />
11 VID 4 Video 4 Select VID4 Select VID4 Select VID4 Select VID4 Select VID4 Select VID4 Select VID4 Select<br />
12 Dim Dim Dim Dim Dim Dim Dim Dim Dim<br />
13 AM/FM Tuner Select Tuner Select Tuner Select Tuner Select Tuner Select Tuner Select Tuner Select Tuner Select<br />
14 6/8 Ch. Select 6/8 Ch. Input Select 6/8 Ch. Select 6/8 Ch. Select 6/8 Ch. Select 6/8 Ch. Select 6/8 Ch. Select 6/8 Ch. Select 6/8 Ch. Select<br />
15 Learn Learn Learn Learn Learn Learn Learn Learn Learn<br />
16 Sleep/Ch + Sleep Test Channel + Channel + Channel + Channel +<br />
17 Test Test Tone TV/DVD Input Select TV/VCR TV/CBL TV/SAT TV/VCR<br />
18 SPL EzSet/SPL EzSet/SPL EzSet/SPL EzSet/SPL EzSet/SPL EzSet/SPL EzSet/SPL EzSet/SPL<br />
19 Volume Up Volume Up Volume Up Input Level Up Volume Up Volume Up Volume Up Volume Up<br />
20 Surround Select/Ch – Surround Mode Select Subtitle On/Off CDR Select Channel – Channel – Channel – Channel –<br />
21 Night/Info Night Mode Select Info CDP Select<br />
22 Multiroom/Subtitle Multiroom Select Subtitle<br />
23 Volume Down Volume Down Volume Down Input Level Down Volume Down Volume Down Volume Down Volume Down<br />
24 Channel/Guide/Title Channel Trim Title Continuous Play Info/Guide Info/Guide<br />
25 ⁄ Move/Adjust Up Up Up Up Up Up<br />
26 Speaker/Menu Speaker Adjust Disc Menu Intro Scan Menu Menu Menu Menu<br />
27 fi Move/Adjust Left Left Left Left Left Left<br />
28 Set Set Enter Enter Enter Enter Enter<br />
29 fl Move/Adjust Right Right Right Right Right Right<br />
30 Digital/Exit/Open/Close Digital Input Select Open/Close Open/Close<br />
31 ¤ Move/Adjust Down Down Down Down Down Down<br />
32 Delay/Prev. Ch. Delay Adjust Return Prev Channel Prev Channel Prev Channel<br />
33 1 1 1 1 1 1 1 1<br />
34 2 2 2 2 2 2 2 2<br />
35 3 3 3 3 3 3 3 3<br />
36 4 4 4 4 4 4 4 4<br />
37 5 5 5 5 5 5 5 5<br />
38 6 6 6 6 6 6 6 6<br />
39 7 7 7 7 7 7 7 7<br />
40 8 8 8 8 8 8 8 8<br />
41 Tun-M/A-B Tuner Mode A-B Repeat<br />
42 9 9 9 9 9 9 9 9<br />
43 0 0 0 0 0 0 0 0<br />
44 Memory/Audio Memory Audio Time<br />
FUNCTION LIST 11
FUNCTION LIST<br />
No. Button Name AVR Function DVD CD/CD-R Tape VCR (VID1) CBL (VID2) SAT (VID2) TV (VID3)<br />
45 Tune Up/Pic+ Tune Up Pic+ Track Direct Cancel PPV Cancel Sleep<br />
46 Direct/Angle Direct Tuner Entry Angle Random Play FAV FAV<br />
47 Clear Clear Clear Clear Clear Bypass Next<br />
48 Preset Up/Playlist Preset Tune Up Playlist +10 Music Alt<br />
49 Tune Down/Pic – Tune Down Pic – Track <strong>Inc</strong>rement<br />
50 OSD OSD OSD Program OSD OSD OSD OSD<br />
51 D. Skip Disc Skip (DVD) Disc Skip Disc Skip<br />
52 Preset Down/Status Preset Tune Down Status<br />
53 M1 Macro 1 Macro 1 Macro 1 Macro 1 Macro 1 Macro 1 Macro 1 Macro 1<br />
54 M2 Macro 2 Macro 2 Macro 2 Macro 2 Macro 2 Macro 2 Macro 2 Macro 2<br />
55 M3 Macro 3 Macro 3 Macro 3 Macro 3 Macro 3 Macro 3 Macro 3 Macro 3<br />
56 M4 Macro 4 Macro 4 Macro 4 Macro 4 Macro 4 Macro 4 Macro 4 Macro 4<br />
57 Dolby/Zoom Dolby Mode Select Zoom<br />
58 DTS Surr/Random DTS Digital Modes Random<br />
59 DTS Neo:6/Repeat DTS Neo:6 Select Repeat<br />
60 Logic 7/V. Off Logic 7 Select Video Off<br />
61 Stereo/Display Stereo Mode Select Display Dim<br />
62 Skip Down Skip Down (DVD) Chapter + Skip – Scan – Skip Down (DVD) Skip Down (DVD) Skip Down (DVD)<br />
63 Skip Up Skip Up (DVD) Chapter – Skip + Scan + Skip Up (DVD) Skip Up (DVD) Skip Up (DVD)<br />
64 Rewind R. Search (DVD) R. Search R. Search Rewind Rewind R. Search (DVD) R. Search (DVD) R. Search (DVD)<br />
65 Play Play (DVD) Play Play Play Play Play (DVD) Play (DVD) Play (DVD)<br />
66 Fast Forward F. Search (DVD) F. Search F. Search Fast Fwd Fast Fwd F. Search (DVD) F. Search (DVD) F. Search (DVD)<br />
67 Record Record Record Record<br />
68 Stop Stop (DVD) Stop Stop Stop Stop Stop (DVD) Stop (DVD) Stop (DVD)<br />
69 Pause Pause (DVD) Pause Pause Pause Pause (DVD) Pause (DVD) Pause (DVD)<br />
12 FUNCTION LIST
SETUP CODE TABLE: TV<br />
Manufacturer/Brand Setup Code Number<br />
A MARK 103 132<br />
ADMIRAL 192 217<br />
ADVENT 004<br />
AKAI 001 160<br />
AMPRO 070 164<br />
AMSTRAD 053<br />
ANAM 045 055 057 076 095 099 103 106 109 112 122 138 240<br />
AOC 001 011 103<br />
APEX 007<br />
BLAUPUNKT 084<br />
BROKSONIC 140 205 206<br />
CANDLE 001 002 003 011<br />
CAPEHART 059<br />
CENTURION 170 171<br />
CENTRONIC 045<br />
CITIZEN 001 002 003 011 045 092 094 132<br />
CLASSIC 045<br />
CONCERTO 011<br />
CONTEC 041 045 051 052<br />
CORANDO 172<br />
CORNEA SYSTEM 006<br />
CORONADO 132<br />
CRAIG 045 055 157 158 159<br />
CROWN 045 132<br />
CURTIS MATHES 001 011 092 132<br />
CXC 045<br />
DAEWOO 011 022 023 038 045 046 056 068 073 094 098 102 105 108 111 114 116 118 119 127 132 241<br />
DAYTRON 011 132<br />
DIGI LINK 200<br />
DYNASTY 045<br />
DYNATECH 063<br />
ELECTROH<strong>OM</strong>E 074 132<br />
EMERSON 001 008 011 012 033 045 048 049 051 052 091 132 137 139 141 157 158 162 205<br />
FISHER 013 058<br />
FUJITSU 135<br />
FUNAI 008 033 045<br />
FUTURETECH 045<br />
GE 001 011 014 015 038 057 070 071 121 133 141 145 163 199 219<br />
GOLDSTAR (LG) 011 093 097 101 103 104 110 113 118 128 132<br />
GRADIENTE 222<br />
GRUNDIG 193<br />
HAIER 009<br />
HALL MARK 011<br />
HARMAN KARDON 201<br />
HITACHI 001 011 015 016 017 018 029 043 072 132 144 147<br />
INFINITY 148<br />
INKEL 120<br />
JBL 148<br />
JC PENNEY 001 011 014 015 030 035 092 132 145<br />
JENSEN 019<br />
SETUP CODES 13
SETUP CODE TABLE: TV<br />
Manufacturer/Brand Setup Code Number<br />
JVC 010 038 040 079<br />
KAWASHO 173<br />
KEC 045<br />
KENWOOD 001 204<br />
KLOSS 002 060<br />
KMC 132<br />
KTV 001 045 132 162<br />
LLOYTRON 172 173<br />
LODGENET 069<br />
LOGIK 069<br />
LUXMAN 011<br />
LXI 013 021 053 077 145 148<br />
MAGNAVOX 001 003 011 060 061 062 064 065 066 118 132 145 148 220 226 227<br />
MARANTZ 001 074 148<br />
MATSUI 148<br />
MEMOREX 011 013 069 230<br />
METZ 084<br />
MGA 001 011 033 044 050 074<br />
MIDLAND 199<br />
MINERVA 084<br />
MITSUBISHI 001 011 030 033 042 044 100 115 134 154 160 167 168 229<br />
MOTOROLA 221<br />
MTC 175 176<br />
NAD 021 031<br />
NATIONAL 169 177 178 179 181 182<br />
NEC 001 013 022 025 030 042 057 121 123 125<br />
NIKEI 045<br />
ONKING 045<br />
ONWA 045<br />
OPTONICA 025 077<br />
ORION 207 208 209 210 211<br />
PANASONIC 038 057 076 081 087 148 169<br />
PENNEY 199<br />
PHILCO 001 003 011 030 045 057 060 061 064 065 118 132 148<br />
PHILIPS 001 003 011 040 060 066 067 088 132 145 148 242<br />
PIONEER 001 011 024 029 031 032 213 214<br />
PORTLAND 011 132<br />
PROSCAN 133<br />
PROTON 011 059 122 132 165<br />
QUASAR 038 057 087<br />
RADIO SHACK 011 025 045 048 118 132 195 196 197 198<br />
RCA 001 011 029 030 057 071 082 133 145 161 163 199 224 225<br />
REALISTIC 013 025 045 048 195 196 197<br />
RUNCO 152 153<br />
SAA 183<br />
SAMPO 001 011 059<br />
SAMSUNG 011 051 085 092 096 104 118 124 128 132 145 243<br />
SANYO 013 026 027 037 041 054 058 078 216 228<br />
SCOTT 011 033 045 049 132<br />
SEARS 011 013 021 033 035 049 058 078 092 132 145<br />
14 SETUP CODES
Manufacturer/Brand Setup Code Number<br />
SHARP 011 020 025 028 033 034 077 086 132 154 244<br />
SIEMENS 084<br />
SIGNATURE 069<br />
SONY 005 043 067 075 089 107 117 130 136 194 212 218 223<br />
SOUNDESIGN 003 011 033 045<br />
SPECTRICON 103<br />
SSS 011 045<br />
SUPREMACY 002<br />
SYLVANIA 001 003 008 011 060 061 064 065 118 131 145 148 215<br />
SYMPHONIC 008 184<br />
TANDY 077<br />
TATUNG 057 063<br />
TECHNICS 080<br />
TECHWOOD 011<br />
TEKNIKA 001 002 003 011 030 033 036 045 069 074 092 094 132<br />
TELEFUNKEN 039 047 083<br />
TELERENT 069<br />
TERA 156<br />
TH<strong>OM</strong>AS 008<br />
TH<strong>OM</strong>SON 190 191<br />
TMK 011<br />
TOSHIBA 013 021 035 042 052 063 092 126 129 202<br />
TOTEVISION 132<br />
UNIVERSAL 014 015<br />
VIDEO CONCEPTS 160<br />
VIDTECH 011<br />
WARDS 011 014 015 025 033 061 062 064 065 069 071 132 148<br />
WHITE WESTINGHOUSE 008<br />
YAMAHA 001 011<br />
YORK 011<br />
YUPITERU 045<br />
ZENITH 069 070 090 094 245<br />
ZONDA 103<br />
SETUP CODE TABLE: VCR<br />
Manufacturer/Brand Setup Code Number<br />
AIWA 040<br />
AKAI 022 048 050 108 109 126<br />
AMPRO 076<br />
AMSTRAD 133<br />
ANAM 037 039 089<br />
ASA 134<br />
AUDIO DYNAMICS 018 029 044 048<br />
BROKSONIC 041 043 110 147 166<br />
CANDLE 134 135 137<br />
CANON 034 037 039 135 140<br />
CAPEHART 094<br />
CITIZEN 134<br />
CRAIG 003 045 116<br />
CURTIS MATHES 037 039<br />
SETUP CODE TABLE: TV<br />
SETUP CODES 15
SETUP CODE TABLE: VCR<br />
Manufacturer/Brand Setup Code Number<br />
DAEWOO 012 014 017 068 069 094 096 097 098 102 103 104<br />
DAYTRON 094<br />
DBX 018 029 044 048<br />
DUAL 136<br />
DIRECTV-TIVO 189 190<br />
DYNATECH 040 057<br />
ELECTROH<strong>OM</strong>E 063<br />
EMERSON 013 023 031 033 035 037 040 041 042 043 050 087 110 112 119<br />
FERGUSON 136<br />
FINLUX 133<br />
FISHER 003 015 016 017<br />
FUNAI 040 133<br />
GE 037 039 067 076 093 095 124 127<br />
GO VIDEO 113 117<br />
GOLDSTAR (LG) 018 019 026 087 092 100 107<br />
GRAETZ 136<br />
HARMAN KARDON 018 049<br />
HITACHI 011 040 048 067 118 130<br />
INSTANT REPLAY 037 039<br />
ITT 136<br />
JCL 037 039<br />
JC PENNEY 018 019 021 039 045 070 087<br />
JENSEN 048<br />
JVC 018 037 039 048 052 054 059 064 111 130 132<br />
KENWOOD 020 044 048 052<br />
LLOYD 040<br />
LXI 019 020 040 087<br />
MAGIN 045<br />
MAGNAVOX 037 039 040 071 072<br />
MARANTZ 018 037 039 071 073<br />
MARTA 087<br />
MATSUI 033 036<br />
MEI 037 039<br />
MEMOREX 003 017 020 037 039 040 057 076 087 115 120<br />
MGA 049 050 063<br />
MINOLTA 019 026<br />
MITSUBISHI 019 026 049 050 053 055 063 065 131 145 146 178<br />
MOTOROLA 175 176<br />
MTC 133<br />
MULTITECH 030 040<br />
NAD 139<br />
NATIONAL 140<br />
NEC 018 029 044 048 052<br />
NORDMENDE 048<br />
OPTIMUS 159<br />
OPTONICA 057 058<br />
ORION 147 166<br />
PANASONIC 007 009 010 037 070 074 078 114 125 150 167 172 177 183 185 186<br />
PENTAX 019 026 037 039 067<br />
PHILCO 037 039 040 071<br />
16 SETUP CODES
Manufacturer/Brand Setup Code Number<br />
PHILIPS 037 039 040 058 071 075 087 188<br />
PILOT 087<br />
PIONEER 019 027 052<br />
PIONEER-TIVO 194<br />
PORTLAND 094<br />
PROSCAN 179 180<br />
PULSAR 076<br />
QUARTZ 001 020<br />
QUASAR 039 070 079 125 144<br />
RADIO SHACK 133 134 137 140 141 142 152 158 159 160 161<br />
RCA 019 026 039 066 067 093 095 124 125 127 157 172 184<br />
REALISTIC 003 015 017 020 037 039 040 045 057 058 087 137 152 159 160<br />
REPLAY 192<br />
RICO 062<br />
RUNCO 128<br />
SABA 136<br />
SAISHO 143<br />
SALORA 020<br />
SAMSUNG 038 045 088 090 091 093 095 098 099 101 105 106 109 182<br />
SANSUI 028 048 052 116 147 166<br />
SANYO 003 014 017 020 115<br />
SCHAUB LORENZ 136<br />
SCOTT 023 043 098 110 112<br />
SEARS 003 015 016 017 019 020 026 037 047 077 084 087<br />
SHARP 006 037 058 129 156<br />
SHINT<strong>OM</strong> 030<br />
SONY 002 003 005 016 037 056 060 061 062 080 081 082 129 173<br />
SONY-TIVO 191<br />
SOUNDESIGN 040<br />
STS 019<br />
SYLVANIA 008 037 039 040 063 071<br />
SYMPHONIC 040<br />
TANDY 017 040<br />
TASHICO 134<br />
TATUNG 044 048<br />
TEAC 040 044 048<br />
TECHNICS 037 039<br />
TEKNIKA 025 037 039 040 087<br />
TELEFUNKEN 136<br />
TH<strong>OM</strong>AS 040<br />
TH<strong>OM</strong>SON 136<br />
THORN 136<br />
TIVO 187 193<br />
TMK 013<br />
TOSHIBA 015 019 047 051 063 085 098 112 155<br />
TOSHIBA-TIVO 195<br />
TOTEVISION 045 087<br />
UNITECH 045<br />
VECTOR RESEARCH 018<br />
VICTOR 052<br />
SETUP CODE TABLE: VCR<br />
SETUP CODES 17
SETUP CODE TABLE: VCR<br />
Manufacturer/Brand Setup Code Number<br />
VIDEO CONCEPTS 018 040 050<br />
VIDEOSONIC 045<br />
WARDS 003 019 023 030 037 039 040 045 057 058 112<br />
YAMAHA 018 040 044 048<br />
ZENITH 040 052 060 062 076 083 087 181<br />
SETUP CODE TABLE: CD<br />
Manufacturer/Brand Setup Code Number<br />
ADC 012<br />
ADC<strong>OM</strong> 049 063 069<br />
AIWA 072 111 118 156 170<br />
AKAI 050 177 184<br />
AUDIO TECHNICA 053<br />
AUDIOACCESS 125<br />
AUDIOFILE 211<br />
BSR 044 064<br />
CALIFORNIA AUDIO 015 109<br />
CAPETRONIC 070<br />
CARRERA 064 087<br />
CARVER 051 057 136 140 141 143 144 145 185 186<br />
CASIO 066 117 122<br />
CLARINETTE 122<br />
CROWN 042<br />
CURTIS MATHES 066<br />
DENON 187 188 213<br />
EMERSON 049 052 108<br />
FISHER 023 055 057 068<br />
FRABA 117<br />
FUNAI 126<br />
GE 164<br />
GENEXXA 017 096 108<br />
GOLDSTAR (LG) 016 087<br />
HAITAI 099 214<br />
HARMAN KARDON 001 002 025 040 054 190 218 219 221 222 223 224 225 226 227 228 229 230 231<br />
HITACHI 049<br />
INKEL 026 027 216<br />
JC PENNEY 021 066 098 147<br />
JENSEN 153<br />
JVC 029 176 195 196<br />
KENWOOD 014 020 023 030 062 078 079 148 151 176 178 181<br />
KYOCERA 012<br />
LOTTE 108<br />
LUXMAN 018 035 077 102<br />
LXI 066 164<br />
MAGNAVOX 039 051 113<br />
MARANTZ 043 051 058 084 191 192 193<br />
MCINTOSH 194<br />
MCS 021 066 080 098<br />
18 SETUP CODES
Manufacturer/Brand Setup Code Number<br />
MEMOREX 096<br />
MGA 032<br />
MISSION 051<br />
MITSUBISHI 032<br />
MITSUMI 152<br />
MODULAIRE 122<br />
NAD 013 074 197 198<br />
NAKAMICHI 199 200 201<br />
NEC 021 069<br />
NIKKO 053 055<br />
NSM 051<br />
ONKYO 037 038 045 046 171 175 202 203<br />
OPTIMUS 020 036 056 057 064 065 089 090 091 092 096 099 104 212<br />
PANASONIC 015 075 109 119 158 183 204<br />
PHILIPS 039 051 138 149 209<br />
PIONEER 017 036 071 094 096 100 112 123 131 160 161 162 215<br />
PROTON 051 210<br />
QUASAR 015 109<br />
RADIO SHACK 122 126 213<br />
RCA 024 049 081 150<br />
RCX 169<br />
REALISTIC 049 056 057 058 095 104 105 108 122 164<br />
ROTEL 051<br />
SAE 051<br />
SAMSUNG 028<br />
SANSUI 047 051 081 134 157 172<br />
SANYO 033 057 068 082 095 168<br />
SCOTT 108<br />
SEARS 066<br />
SHARP 020 058 073 105 114 151 159 167 180 181<br />
SHERWOOD 003 026 027 041 058 105 133<br />
SIGNATURE 040<br />
SONY 060 103 115 116 118 132 139 163 205 206 207 208 212 217<br />
SOUNDSTREAM 124<br />
STS 012<br />
SYLVANIA 051<br />
SYMPHONIC 059 110<br />
TAEKWANG 177<br />
TANDY 096<br />
TEAC 011 022 048 058 085 086 106 107 110 121 137 146 154<br />
TECHWOOD 083<br />
THETA DIGITAL 039<br />
TOSHIBA 013 074 097 151 155 173<br />
VECTOR RESEARCH 087<br />
VICTOR 029 120 130<br />
WARDS 040 095<br />
YAMAHA 019 031 053 061 135 169<br />
YORX 122<br />
SETUP CODE TABLE: CD<br />
SETUP CODES 19
SETUP CODE TABLE: TAPE<br />
Manufacturer/Brand Setup Code Number<br />
HARMAN KARDON 001<br />
SETUP CODE TABLE: DVD<br />
Manufacturer/Brand Setup Code Number<br />
APEX 082<br />
APEX DIGITAL 061 076<br />
CALIFORNIA AUDIO 040<br />
CYBERH<strong>OM</strong>E 092<br />
DAEWOO 083 094<br />
DENON 002 019 022 034 051<br />
DVD-VIDEO 074<br />
EMERSON 097<br />
GE 003 004<br />
GOLDSTAR (LG) 005 055 064 070<br />
GO-VIDEO 095 098<br />
GRADIENTE 071 072<br />
HARMAN KARDON 001 032 066 079<br />
JVC 006<br />
KENWOOD 007 050 069<br />
KLH 068<br />
LOTTE 008<br />
MAGNAVOX 033 056 084 085<br />
MARANTZ 033 059<br />
MITSUBISHI 023 036<br />
NAD 010 062<br />
ONKYO 009 015 048<br />
OPTIMUS 011 050<br />
PANASONIC 024 025 030 034 035 044 052 078 086 087 104<br />
PHILIPS 033 056 084 093<br />
PIONEER 012 020 038 041 046 047 065<br />
PROCEED 060<br />
PROSCAN 003 004 037<br />
RCA 003 004 018 037 088<br />
RUNCO 027<br />
SAMSUNG 031 053 054 081 099 105<br />
SANYO 013 049<br />
SHARP 021 028 050 073<br />
SONY 015 029 043 045 067 075 089 101<br />
SYLVANIA 090 096<br />
TECHNICS 026<br />
TH<strong>OM</strong>SON 003 004<br />
TOSHIBA 009 033 047 057 058 077 091 102 103<br />
YAMAHA 016 017 030 063<br />
ZENITH 005 033 055 064<br />
ZENITH DIVX 039<br />
20 SETUP CODES
SETUP CODE TABLE: SAT<br />
Manufacturer/Brand Setup Code Number<br />
ALPHASTAR 472<br />
ALPHASTAR DBS 450<br />
ALPHASTAR DSR 422 442<br />
AMPLICA 356<br />
BIRDVIEW 414 425<br />
BSR 359<br />
CAPETRONICS 359<br />
CHANNEL MASTER 320 321 322 325 361<br />
CHAPARRAL 315 316 319 380 451<br />
CITOH 360<br />
CURTIS MATHES 356<br />
DRAKE 312 313 317 318 413 481<br />
DX ANTENNA 331 352 362 379 483<br />
ECHOSTAR 304 364 395 397 452 453 463 477 478 484 485<br />
ELECTRO H<strong>OM</strong>E 392<br />
EUROPLUS 415<br />
FUJITSU 324 328 329 334<br />
GENERAL INSTRUMENT 303 311 323 365 403 454 468 474<br />
HITACHI DBS 455<br />
HOUSTON TRACKER 463<br />
HUGHES 372 437 486<br />
HYTEK 359<br />
JANIEL 366<br />
JERROLD 367 454 464 468<br />
JVC 308<br />
KATHREIN 410<br />
LEGEND 453<br />
LUXOR 368<br />
MAC<strong>OM</strong> 317 365 369 370 371<br />
MAGNAVOX 461 473<br />
MEMOREX 453<br />
NEXTWAVE 423 424<br />
NORSAT 373 374<br />
OPTIMUS 466<br />
PANASONIC 366 469<br />
PANASONIC DBS 457<br />
PANSAT 420<br />
PERSONAL CABLE 418<br />
PHILIPS 304 375<br />
PICO 407<br />
PRESIDENT 326 404<br />
PRIMESTAR 412 454 464 475<br />
RCA 301 306 408 436 439 458 465 488<br />
REALISTIC 349 377 480<br />
SAMSUNG 306 307 422 442<br />
SATELLITE SERVICE CO 335 341 353 388<br />
SCIENTIFIC ATLANTA 339<br />
SONY 305 405 487<br />
STAR CHOICE DBS 459<br />
STARCAST 347<br />
SUPER GUIDE 327 423 424<br />
TEEC<strong>OM</strong> 330 333 378 390 391 393 409<br />
TOSHIBA 302 426 460 461 462 470<br />
UNIDEN 323 332 348 349 350 351 354 355 381 382 383 389 403 466 479 480<br />
ZENITH 385 386 387 394 419<br />
SETUP CODES 21
SETUP CODE TABLE: CBL<br />
Manufacturer/Brand Setup Code Number<br />
ABC 001 003 011 045 048 052 059 110<br />
ALLEGRO 111<br />
AMERICAST 212<br />
ANTRONIX 021<br />
ARCHER 012 014 021 031 112<br />
AT&T 005<br />
BELCOR 113<br />
CABLE STAR 033 113<br />
CENTURION 092<br />
CENTURY 014<br />
CITIZEN 014 111<br />
CLEARMAX 006<br />
COLOUR VOICE 069 090<br />
C<strong>OM</strong>BANO 083 084<br />
C<strong>OM</strong>TRONICS 026 037<br />
DIAMOND 030<br />
DIGI 114<br />
EAGLE 027 037 046 186<br />
EASTERN 063 066 070 115<br />
ELECTRICORD 039<br />
EMERSON 112<br />
FOCUS 116<br />
G.I. 001 003 011 015 017 093 095 096 097<br />
GC ELECTRONICS 113<br />
GE 076<br />
GEMINI 015 029 032 060<br />
GENERAL 210<br />
GENERAL INSTRUMENT 168<br />
GOLDEN CHANNEL 037<br />
GOODMIND 112<br />
HAMLIN 055 056 061 099 100 101 117 175 207 208<br />
HITACHI 001 061 188<br />
HOSPITALITY 074 080<br />
JASCO 111<br />
JERROLD 001 002 003 011 015 016 017 073 093 095 096 097 162 167<br />
LINDSAY 118<br />
M-NET 043<br />
MAC<strong>OM</strong> 040 191<br />
MAGNAVOX 017 019 068 082<br />
MEMOREX 058<br />
MOTOROLA 005<br />
MOVIE TIME 035 039<br />
NSC 022 035 044 075 190<br />
OAK 023 038 043 059 094 196 197<br />
PACE 179<br />
PANASONIC 050 053 176 177 189 214<br />
PANTHER 114<br />
PARAGON 058<br />
PHILIPS 013 019 020 027 069 085 090<br />
PIONEER 001 041 057 119 171 200 209<br />
POPULAR MECHANICS 116<br />
22 SETUP CODES
SETUP CODE TABLE: CBL<br />
Manufacturer/Brand Setup Code Number<br />
POST NEWSWEEK 023<br />
PRELUDE 120<br />
PRIMESTAR 162<br />
PTS 018 054 075 076<br />
PULSAR 058<br />
RADIO SHACK 111 112 213<br />
RCA 053 214<br />
RECOTON 116<br />
REGAL 055 056 061 099 100 101 207<br />
REGENCY 063 115<br />
REMBRANT 032<br />
SAMSUNG 004 037 072 186<br />
SCIENTIFIC ATLANTA 003 018 047 048 049 051 052 058 110 183 184 203 204 215 216 217 218 219 220 221 222 223<br />
224 225 227 228<br />
SEAM 121<br />
SHERITECH 029<br />
SIGNAL 037<br />
SIGNATURE 001 188<br />
SL MARX 037<br />
SONY 229<br />
SPRUCER 053 081 177 189<br />
STARC<strong>OM</strong> 002 011 015 016 163<br />
STARGATE 015 037 120<br />
SYLVANIA 071<br />
TADIRAN 037<br />
TANDY 024<br />
TELECAPATION 028<br />
TEXSCAN 036 071<br />
TFC 122<br />
TIMELESS 123<br />
TOC<strong>OM</strong> 045 046 062 170 205<br />
TOSHIBA 058<br />
UNIKA 014 021 031<br />
UNITED CABLE 011 059<br />
UNIVERSAL 012 014 021 031 033 034 039 042 113<br />
VIDEOWAY 124 211<br />
VIEWSTAR 019 022 025 086 087 088 089 190<br />
ZENITH 058 065 098 125 211<br />
ZENTEK 116<br />
Harman Kardon, Power for the Digital Revolution and Logic 7 are registered trademarks of<br />
Harman International Industries, <strong>Inc</strong>orporated.<br />
TM<br />
(patent no. 5,386,478) and + are trademarks of Harman International Industries, <strong>Inc</strong>orporated.<br />
*Manufactured under license from Dolby Laboratories. “Dolby,” “Pro Logic” and the Double-D symbol<br />
are trademarks of Dolby Laboratories.<br />
DTS, DTS Surround, DTS-ES and DTS Neo:6 are registered trademarks of Digital Theater Systems, <strong>Inc</strong>.<br />
VMAx is a registered trademark of Harman International Industries, <strong>Inc</strong>orporated, and is an<br />
implementation of Cooper Bauck Transaural Stereo under patent license.<br />
SETUP CODES 23
®<br />
250 Crossways Park Drive, Woodbury, New York 11797<br />
www.harmankardon.com<br />
© 2004 Harman International Industries, <strong>Inc</strong>orporated<br />
Part No. CQX1A987Z