250/300/380 sx,mxc,exc repair manual engine - Tanga Moteurs
250/300/380 sx,mxc,exc repair manual engine - Tanga Moteurs
250/300/380 sx,mxc,exc repair manual engine - Tanga Moteurs

You also want an ePaper? Increase the reach of your titles
YUMPU automatically turns print PDFs into web optimized ePapers that Google loves.
Repair <strong>manual</strong> KTM <strong>250</strong> / <strong>300</strong> / <strong>380</strong> Art No 3206004 -E<br />
6<br />
1<br />
LOCTITE 243<br />
1<br />
7<br />
4<br />
6<br />
7<br />
13<br />
LOCTITE 243<br />
2<br />
14<br />
3 10<br />
12<br />
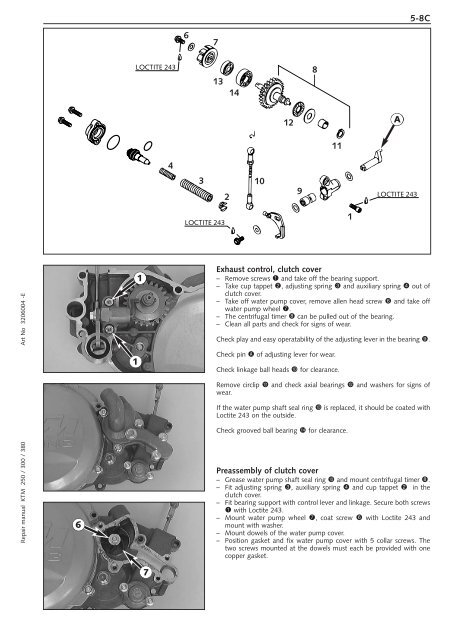
Exhaust control, clutch cover<br />
– Remove screws 1 and take off the bearing support.<br />
– Take cup tappet 2, adjusting spring 3 and auxiliary spring 4 out of<br />
clutch cover.<br />
– Take off water pump cover, remove allen head screw 6 and take off<br />
water pump wheel 7.<br />
– The centrifugal timer 8 can be pulled out of the bearing.<br />
– Clean all parts and check for signs of wear.<br />
Check play and easy operatability of the adjusting lever in the bearing 9.<br />
Check pin A of adjusting lever for wear.<br />
Check linkage ball heads bk for clearance.<br />
Remove circlip bl and check axial bearings bm and washers for signs of<br />
wear.<br />
If the water pump shaft seal ring bn is replaced, it should be coated with<br />
Loctite 243 on the outside.<br />
Check grooved ball bearing bo for clearance.<br />
9<br />
8<br />
LOCTITE 243<br />
5-8C<br />
Preassembly of clutch cover<br />
– Grease water pump shaft seal ring bn and mount centrifugal timer 8.<br />
– Fit adjusting spring 3, auxiliary spring 4 and cup tappet 2 in the<br />
clutch cover.<br />
– Fit bearing support with control lever and linkage. Secure both screws<br />
1 with Loctite 243.<br />
– Mount water pump wheel 7, coat screw 6 with Loctite 243 and<br />
mount with washer.<br />
– Mount dowels of the water pump cover.<br />
– Position gasket and fix water pump cover with 5 collar screws. The<br />
two screws mounted at the dowels must each be provided with one<br />
copper gasket.<br />
11<br />
1<br />
A