250/300/380 sx,mxc,exc repair manual engine - Tanga Moteurs
250/300/380 sx,mxc,exc repair manual engine - Tanga Moteurs
250/300/380 sx,mxc,exc repair manual engine - Tanga Moteurs

You also want an ePaper? Increase the reach of your titles
YUMPU automatically turns print PDFs into web optimized ePapers that Google loves.
Repair <strong>manual</strong> KTM <strong>250</strong> / <strong>300</strong> / <strong>380</strong> Art No 3206004 -E<br />
control<br />
flap<br />
5<br />
7<br />
2<br />
6<br />
8<br />
3<br />
1<br />
4<br />
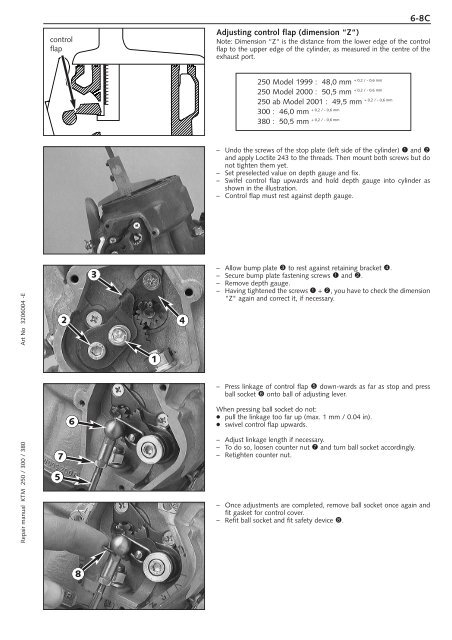
Adjusting control flap (dimension “Z“)<br />
Note: Dimension “Z“ is the distance from the lower edge of the control<br />
flap to the upper edge of the cylinder, as measured in the centre of the<br />
exhaust port.<br />
<strong>250</strong> Model 1999 : 48,0 mm<br />
<strong>250</strong> Model 2000 : 50,5 mm<br />
<strong>250</strong> ab Model 2001 : 49,5 mm<br />
+ 0,2 / - 0,6 mm<br />
<strong>300</strong> : 46,0 mm<br />
+ 0,2 / - 0,6 mm<br />
<strong>380</strong> : 50,5 mm<br />
+ 0,2 / - 0,6 mm<br />
+ 0,2 / - 0,6 mm<br />
– Undo the screws of the stop plate (left side of the cylinder) 1 and 2<br />
and apply Loctite 243 to the threads. Then mount both screws but do<br />
not tighten them yet.<br />
– Set preselected value on depth gauge and fix.<br />
– Swifel control flap upwards and hold depth gauge into cylinder as<br />
shown in the illustration.<br />
– Control flap must rest against depth gauge.<br />
– Allow bump plate 3 to rest against retaining bracket 4.<br />
– Secure bump plate fastening screws 1 and 2.<br />
– Remove depth gauge.<br />
– Having tightened the screws 1 + 2, you have to check the dimension<br />
"Z" again and correct it, if necessary.<br />
– Press linkage of control flap 5 down-wards as far as stop and press<br />
ball socket 6 onto ball of adjusting lever.<br />
When pressing ball socket do not:<br />
● pull the linkage too far up (max. 1 mm / 0.04 in).<br />
● swivel control flap upwards.<br />
+ 0,2 / - 0,6 mm<br />
– Adjust linkage length if necessary.<br />
– To do so, loosen counter nut 7 and turn ball socket accordingly.<br />
– Retighten counter nut.<br />
6-8C<br />
– Once adjustments are completed, remove ball socket once again and<br />
fit gasket for control cover.<br />
– Refit ball socket and fit safety device 8.