You also want an ePaper? Increase the reach of your titles
YUMPU automatically turns print PDFs into web optimized ePapers that Google loves.
<strong>aquatherm</strong> <strong>ISO</strong> socket<br />
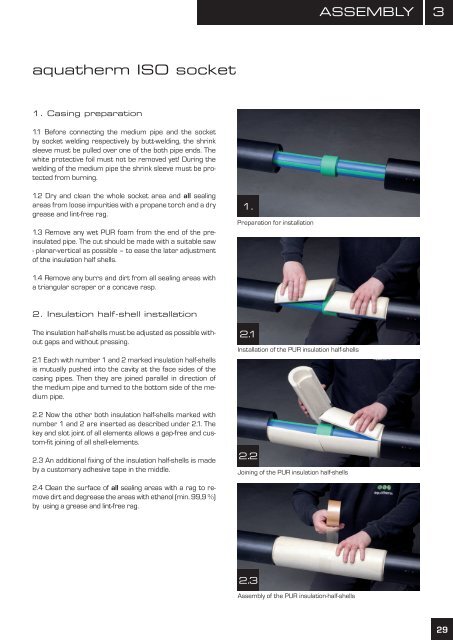
1. Casing preparation<br />
1.1 Before connecting the medium pipe and the socket<br />
by socket welding respectively by butt-welding, the shrink<br />
sleeve must be pulled over one of the both pipe ends. The<br />
white protective foil must not be removed yet! During the<br />
welding of the medium pipe the shrink sleeve must be protected<br />
from burning.<br />
1.2 Dry and clean the whole socket area and all sealing<br />
areas from loose impurities with a propane torch and a dry<br />
grease and lint-free rag.<br />
1.3 Remove any wet PUR foam from the end of the preinsulated<br />
pipe. The cut should be made with a suitable saw<br />
- planar-vertical as possible – to ease the later adjustment<br />
of the insulation half shells.<br />
1.4 Remove any burrs and dirt from all sealing areas with<br />
a triangular scraper or a concave rasp.<br />
2. Insulation half-shell installation<br />
The insulation half-shells must be adjusted as possible without<br />
gaps and without pressing.<br />
2.1 Each with number 1 and 2 marked insulation half-shells<br />
is mutually pushed into the cavity at the face sides of the<br />
casing pipes. Then they are joined parallel in direction of<br />
the medium pipe and turned to the bottom side of the medium<br />
pipe.<br />
2.2 Now the other both insulation half-shells marked with<br />
number 1 and 2 are inserted as described under 2.1. The<br />
key and slot joint of all elements allows a gap-free and custom-fit<br />
joining of all shell-elements.<br />
2.3 An additional fixing of the insulation half-shells is made<br />
by a customary adhesive tape in the middle.<br />
2.4 Clean the surface of all sealing areas with a rag to remove<br />
dirt and degrease the areas with ethanol (min. 99,9 %)<br />
by using a grease and lint-free rag.<br />
1.<br />
Preparation for installation<br />
2.1<br />
Installation of the PUR insulation half-shells<br />
2.2<br />
Joining of the PUR insulation half-shells<br />
2.3<br />
Assembly of the PUR insulation-half-shells<br />
aSSEMBLy<br />
3<br />
29


