Manual de reparaciones - HT Laser Oy
Manual de reparaciones - HT Laser Oy
Manual de reparaciones - HT Laser Oy

Create successful ePaper yourself
Turn your PDF publications into a flip-book with our unique Google optimized e-Paper software.
Eje principal y cojinete<br />
<strong>Manual</strong> <strong>de</strong> <strong>reparaciones</strong><br />
5.1.3. Instalación <strong>de</strong>l cojinete <strong>de</strong>lantero<br />
Antes <strong>de</strong> iniciar el procedimiento, asegúrese <strong>de</strong> que el alojamiento <strong>de</strong>l cojinete<br />
y el alojamiento <strong>de</strong>l cojinete <strong>de</strong> soporte estén completamente limpios.<br />
Instalación <strong>de</strong>l cojinete <strong>de</strong>lantero:<br />
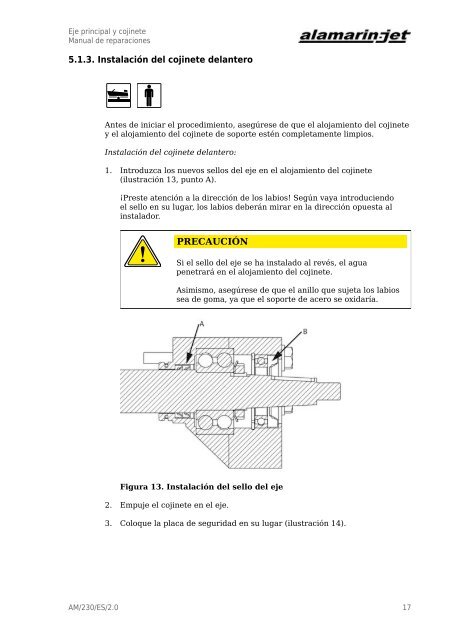
1. Introduzca los nuevos sellos <strong>de</strong>l eje en el alojamiento <strong>de</strong>l cojinete<br />
(ilustración 13, punto A).<br />
¡Preste atención a la dirección <strong>de</strong> los labios! Según vaya introduciendo<br />
el sello en su lugar, los labios <strong>de</strong>berán mirar en la dirección opuesta al<br />
instalador.<br />
PRECAUCIÓN<br />
Si el sello <strong>de</strong>l eje se ha instalado al revés, el agua<br />
penetrará en el alojamiento <strong>de</strong>l cojinete.<br />
Asimismo, asegúrese <strong>de</strong> que el anillo que sujeta los labios<br />
sea <strong>de</strong> goma, ya que el soporte <strong>de</strong> acero se oxidaría.<br />
Figura 13. Instalación <strong>de</strong>l sello <strong>de</strong>l eje<br />
2. Empuje el cojinete en el eje.<br />
3. Coloque la placa <strong>de</strong> seguridad en su lugar (ilustración 14).<br />
AM/230/ES/2.0 17