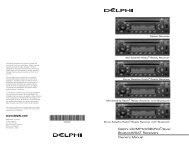
Delphi AM/FM Stereo and CD Receivers - Pana-Pacific
Delphi AM/FM Stereo and CD Receivers - Pana-Pacific
Delphi AM/FM Stereo and CD Receivers - Pana-Pacific

Create successful ePaper yourself
Turn your PDF publications into a flip-book with our unique Google optimized e-Paper software.
37<br />
2. Para aumentar la frecuencia del radio, presione el botón para<br />
ir a la siguiente estación más alta.<br />
3. Para reducir la frecuencia del radio, presione el botón para<br />
ir a la siguiente estación más baja.<br />
BÚSQUEDA: Presion<strong>and</strong>o los botones o por más de medio segundo<br />
activa la modalidad de búsqueda (SEEK) y aparece SEEK en el display. La<br />
modalidad de búsqueda (SEEK) termina cu<strong>and</strong>o se alcanza una estación<br />
que se puede sintonizar y se escuchará esa estación.<br />
Si SEEK no encuentra una estación que se pueda sintonizar después de<br />
buscar en la b<strong>and</strong>a dos veces, se termina la búsqueda y aparece NOT<br />
FOUND por 5 segundos en el display. Después de 5 segundos aparece el<br />
display predeterminado de fábrica y el radio continuará reproduciendo la<br />
estación que se estaba escuch<strong>and</strong>o antes de activar la búsqueda.<br />
Para cancelar la búsqueda presione otra vez o .<br />
PROGR<strong>AM</strong>ACIÓN AUTOMÁTICA: AUTO STORE almacena automáticamente las<br />
6 estaciones más fuertes en los botones 1-6. Mantenga presionado el botón<br />
AUTO STORE hasta que aparezcan AUTO y el ícono AS en el display. AUTO<br />
STORE tendrá efecto solamente en la b<strong>and</strong>a que está escuch<strong>and</strong>o. Por ejemplo:<br />
Si presiona AUTO STORE mientras escucha <strong>FM</strong>1, las estaciones programadas<br />
de <strong>AM</strong>, <strong>FM</strong>2, <strong>FM</strong>3 y WX no cambian. Mantener presionado AUTO STORE<br />
durante más de 2 segundos cancela la programación automática, y las<br />
estaciones programadas originales se restablecen.<br />
EXPLORACIÓN: Presione SCAN/PSCAN para explorar todas las estaciones en la<br />
b<strong>and</strong>a que esté us<strong>and</strong>o. Cu<strong>and</strong>o se encuentra una estación con una frecuencia<br />
alta, se escucha el radio por 5 segundos y continúa explor<strong>and</strong>o hasta que se<br />
presiona otra vez el botón SCAN/PSCAN. El display indica SCAN (exploración)<br />
y la frecuencia que está siendo explorada.<br />
EXPLORACIÓN DE LA PROGR<strong>AM</strong>ACIÓN: Presione SCAN/PSCAN por más<br />
de 2 segundos para explorar las estaciones programadas en la b<strong>and</strong>a que<br />
está escuch<strong>and</strong>o. (<strong>FM</strong> explora <strong>FM</strong>1, <strong>FM</strong>2 y <strong>FM</strong>3) Cu<strong>and</strong>o se encuentra una<br />
frecuencia suficientemente alta, el radio toca esa estación por 5 segundos y<br />
luego continúa la exploración. El display indica PSCN (exploración de estaciones<br />
programadas), la frecuencia, el número de estación programada y la b<strong>and</strong>a<br />
que se está escuch<strong>and</strong>o. La exploración de estaciones programadas continúa<br />
hasta que presione SCAN/PSCAN otra vez.<br />
Programación de estaciones<br />
Los seis botones numerados le permiten programar 6 de sus estaciones<br />
favoritas por b<strong>and</strong>a y regresar a ellas fácilmente con el toque de un botón.<br />
Para programar las estaciones:<br />
1. Encienda el radio.<br />
2. Elija la b<strong>and</strong>a.<br />
3. Sintonice la estación deseada.<br />
4. Mantenga presionado uno de los 6 botones numerados durante más<br />
de 2 segundos para programar la estación elegida. Cu<strong>and</strong>o la estación<br />
ha sido programada con el número de su elección, escuchará un<br />
“beep” y verá el número en el display.<br />
5. Repita los pasos del 1 al 4 para cada botón.<br />
Presionar un botón numerado en el futuro sintoniza el radio en la estación<br />
que programó en la b<strong>and</strong>a que esté escuch<strong>and</strong>o.<br />
Turning the Alarm Off<br />
Press <strong>and</strong> hold the ALARM CLOCK button until you hear a beep <strong>and</strong> the<br />
on the display disappears.<br />
Activating Snooze<br />
To use SNOOZE, press any button when the alarm is sounding. The alarm will<br />
sound again in 9 minutes.<br />
General Radio Receiver Functions<br />
Your receiver is equipped with:<br />
– An <strong>AM</strong> b<strong>and</strong> with 6 <strong>AM</strong> presets<br />
– Three <strong>FM</strong> b<strong>and</strong>s with a total of 18 <strong>FM</strong> presets<br />
– One weather b<strong>and</strong> with 6 WX presets<br />
Turning the Power On<br />
With the ignition on, the receiver can be turned on <strong>and</strong> off by pressing the<br />
button. Pressing the SETUP knob also turns on the receiver.<br />
Adjusting the Volume<br />
To increase volume, rotate the SETUP knob clockwise. To decrease volume,<br />
rotate the knob counterclockwise.<br />
One-Hour Timer<br />
With the ignition off, pressing the button or the SETUP knob will turn on the<br />
receiver <strong>and</strong> activate the receiver’s one-hour timer. The receiver will turn off after<br />
one hour. Pressing the button or the SETUP knob again reactivates the onehour<br />
timer.<br />
Display<br />
Your receiver’s default display is the time of day. It can also display additional<br />
information that changes depending upon the mode you are in. By pressing the<br />
DSPL/TIME button when the receiver is on, you can toggle between the available<br />
displays.<br />
Radio Mode Displays<br />
When you are using the radio, press the DSPL/TIME button to toggle between<br />
two displays:<br />
Display 1: Clock<br />
Display 2: Frequency<br />
<strong>CD</strong> Mode Displays<br />
When you are using the <strong>CD</strong> player, press the DSPL/TIME button to toggle<br />
between two displays:<br />
Display 1: Clock<br />
Display 2: Track number <strong>and</strong> elapsed time<br />
icon<br />
6