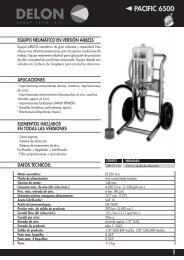
bombas doble membrana manual de instrucciones lista de ... - Sagola
bombas doble membrana manual de instrucciones lista de ... - Sagola
bombas doble membrana manual de instrucciones lista de ... - Sagola
- No tags were found...

Create successful ePaper yourself
Turn your PDF publications into a flip-book with our unique Google optimized e-Paper software.
3. Verify that the product return tubing (probe) (Nº9diagram 1) is secured and inserted into the right tank.Open the bleeding passage tap (Nº 15 diagram 1).4. By turning the related controls counter clockwise,check that the air inlet regulators (Nº5 and 6 in diagram 1)are <strong>de</strong>pressurised.5. Connect the equipment (Nº 12 in diagram 1) to thegeneral air network.6. Open the air passage tap (Nº 14 in diagram 1).7. Adjust the control of the pressure regulator (Nº 5 indiagram 1), turning it clockwise until the pump startsmoving. From that time on there will be a flow of productthrough the product return tubing (probe) (Nº 9 diagram1). Let it flow for 30 seconds to completely purge the airout of the pump.8. Close the bleed tap (Nº 15 diagram 1).9. Adjust the control of the product pressure regulator (Nº8 in diagram 1), turning it clockwise until the <strong>de</strong>siredpressure is reached.10. Aim the gun towards the container and pull the triggeruntil product starts coming out of the nozzle without air.Excessive product pressure causes premature wear ofthe valves and the pump’s and the gun’s closing mechanisms,as well as an unnecessary expenditure of productduring application. In the event that there is a low fluidflow level it is advisable to increase the nozzle productpassage rate of the gun before increasing the workingpressure with the equipment’s pressure regulator.12. Adjust, by turning clockwise, the air regulator controlof the gun (Nº 6 diagram 1) until the <strong>de</strong>sired air pressureis reached to achieve an optimal application of product.13. Adjust the product regulator of the gun and theproduct pressure regulator of the equipment (Nº 8diagram 1) to control the product flow ejected by the gun.14. Adjust the regulator of the spread of the gun in or<strong>de</strong>rto obtain the <strong>de</strong>sired spread width.15. Perform a non-compromised application test.12. SHUT DOWNShort durationWhen stopping for a short period of time that does notpose possible problems with catalysing or har<strong>de</strong>ning ofthe product insi<strong>de</strong> the unit and accessories, keep theproduct suction probe submerged in the product (if theunit has a gravity tank there is no need to empty it) andapply the Depressurisation procedure (Section 10).Ending the job1. Adjust the air pressure inlet regulator of the equipmentgun (Nº 5 in diagram 1) by turning it counter clockwiseuntil a pressure of 0 bar is reached.2. Pull the spray gun trigger, holding it until no moreproduct comes out of the gun.The unit is now ready to be cleaned.13. CLEANINGThe washing machine, the hoses and the rest of the unitmust be cleaned with the appropriate solvent, in or<strong>de</strong>r toremove any remaining product after each use. The usefulservice life of the unit largely <strong>de</strong>pends on the effectivenessof this cleaning process.The unit must be cleaned:- Before using it for the first time, in or<strong>de</strong>r to eliminate thetraces of maintenance oil that the equipment comes withfrom the factory.- After completing the job.- When proceeding to apply a different product (of adifferent colour or characteristics) to what we arecurrently using.Before proceeding to clean the unit you must havefollowed each and every one of the steps <strong>de</strong>scribed in thesection Shut Down when work is finished (Section12.2).This implies that the unit and its accessories must be<strong>de</strong>pressurised and without any product insi<strong>de</strong>.Always use an appropriate solvent when cleaning theunit. For water-based products always use water, forother products always use whatever is recommen<strong>de</strong>d bythe manufacturer of the product to be applied.It is consi<strong>de</strong>red that the unit and its accessories arecompletely clean when the product sprayed from thegun, or that flows out of the product outlet, is cleansolvent and is free of the applied product, for which itmust be renewed as many times as necessary.Once the unit and its accessories are clean, and as aprior step before finally shutting it down, the Depressurisationprocedure <strong>de</strong>scribed previously <strong>de</strong>scribedin Section 10 of the Manual must be applied.- Clean the absorption filters of the probe or the producttank and that of the gun.- Remove any remains of product from the gun, hosesand the rest of the unit with a cloth soaked in solvent.- Keep the product gasket areas free of accretions andforeign particles.- The product spout is a precision component. Any <strong>de</strong>formity,especially in the product outlet orifices, may causemalfunctions in its operation and incorrect or faulty qualityspraying.If necessary, dip the spot in solvent in or<strong>de</strong>r to soften theremains of product or dirt. Once softened, blow out thespout with compressed air until any remains of productand solvent are removed.- For automatic cleaning of the gun, tools and the accessoriesused in the mixing and preparation the product tobe applied, we recommend the use of washing machinesin SAGOLA’s product range.13.1 AFTER TRANSFER:1. Adjust the air pressure inlet regulator of the equipment(Nº 5 in diagram 1) by turning it clockwise until a pressureof 2 - 2.5 bar is reached.2. Remove the absorption probe (diagram DM01/300 Nº02 and 06 in diagram DM01/400) of the transferredproduct container.3. Wait until product starts coming out of the hose.4. Open the air passage tap to the pump (Nº 14 indiagram 1).5. Adjust the air pressure inlet regulator of the pump (Nº 5in diagram 1) by turning it counter clockwise.6. Enter the suction probe into a groun<strong>de</strong>d metal containerwith the appropriate solvent.-24-