MÃQUINA DUPLICADORA ECCO-AUTOMATIC ECCO ... - Jma.es
MÃQUINA DUPLICADORA ECCO-AUTOMATIC ECCO ... - Jma.es
MÃQUINA DUPLICADORA ECCO-AUTOMATIC ECCO ... - Jma.es
- No tags were found...

You also want an ePaper? Increase the reach of your titles
YUMPU automatically turns print PDFs into web optimized ePapers that Google loves.
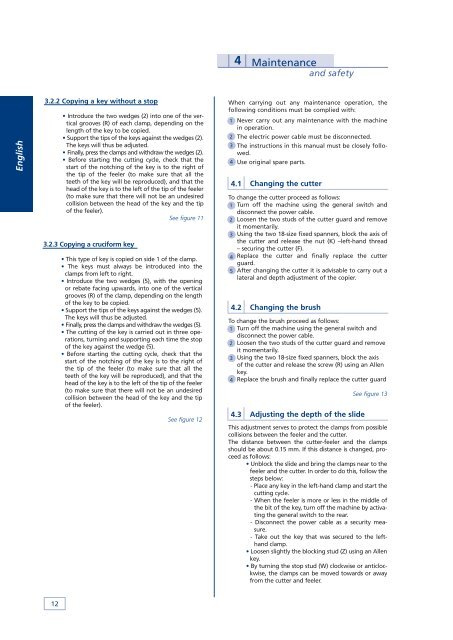
4Maintenanceand safetyEnglish3.2.2 Copying a key without a stop• Introduce the two wedg<strong>es</strong> (2) into one of the verticalgroov<strong>es</strong> (R) of each clamp, depending on thelength of the key to be copied.• Support the tips of the keys against the wedg<strong>es</strong> (2).The keys will thus be adjusted.• Finally, pr<strong>es</strong>s the clamps and withdraw the wedg<strong>es</strong> (2).• Before starting the cutting cycle, check that th<strong>es</strong>tart of the notching of the key is to the right ofthe tip of the feeler (to make sure that all theteeth of the key will be reproduced), and that thehead of the key is to the left of the tip of the feeler(to make sure that there will not be an und<strong>es</strong>iredcollision between the head of the key and the tipof the feeler).See figure 113.2.3 Copying a cruciform key• This type of key is copied on side 1 of the clamp.• The keys must always be introduced into theclamps from left to right.• Introduce the two wedg<strong>es</strong> (5), with the openingor rebate facing upwards, into one of the verticalgroov<strong>es</strong> (R) of the clamp, depending on the lengthof the key to be copied.• Support the tips of the keys against the wedg<strong>es</strong> (5).The keys will thus be adjusted.• Finally, pr<strong>es</strong>s the clamps and withdraw the wedg<strong>es</strong> (5).• The cutting of the key is carried out in three operations,turning and supporting each time the stopof the key against the wedge (5).• Before starting the cutting cycle, check that th<strong>es</strong>tart of the notching of the key is to the right ofthe tip of the feeler (to make sure that all theteeth of the key will be reproduced), and that thehead of the key is to the left of the tip of the feeler(to make sure that there will not be an und<strong>es</strong>iredcollision between the head of the key and the tipof the feeler).See figure 12When carrying out any maintenance operation, thefollowing conditions must be complied with:1 Never carry out any maintenance with the machinein operation.2 The electric power cable must be disconnected.3 The instructions in this manual must be closely followed.4 Use original spare parts.4.1Changing the cutterTo change the cutter proceed as follows:1 Turn off the machine using the general switch anddisconnect the power cable.2 Loosen the two studs of the cutter guard and removeit momentarily.3 Using the two 18-size fixed spanners, block the axis ofthe cutter and release the nut (K) –left-hand thread– securing the cutter (F).4 Replace the cutter and finally replace the cutterguard.5 After changing the cutter it is advisable to carry out alateral and depth adjustment of the copier.4.2Changing the brushTo change the brush proceed as follows:1 Turn off the machine using the general switch anddisconnect the power cable.2 Loosen the two studs of the cutter guard and removeit momentarily.3 Using the two 18-size fixed spanners, block the axisof the cutter and release the screw (R) using an Allenkey.4 Replace the brush and finally replace the cutter guard4.3Adjusting the depth of the slideSee figure 13This adjustment serv<strong>es</strong> to protect the clamps from possiblecollisions between the feeler and the cutter.The distance between the cutter-feeler and the clampsshould be about 0.15 mm. If this distance is changed, proceedas follows:• Unblock the slide and bring the clamps near to thefeeler and the cutter. In order to do this, follow th<strong>es</strong>teps below:- Place any key in the left-hand clamp and start thecutting cycle.- When the feeler is more or l<strong>es</strong>s in the middle ofthe bit of the key, turn off the machine by activatingthe general switch to the rear.- Disconnect the power cable as a security measure.- Take out the key that was secured to the lefthandclamp.• Loosen slightly the blocking stud (Z) using an Allenkey.• By turning the stop stud (W) clockwise or anticlockwise,the clamps can be moved towards or awayfrom the cutter and feeler.12