GAMMA STAR - Olimpia Splendid
GAMMA STAR - Olimpia Splendid
GAMMA STAR - Olimpia Splendid

You also want an ePaper? Increase the reach of your titles
YUMPU automatically turns print PDFs into web optimized ePapers that Google loves.
46<br />
2<br />
I<br />
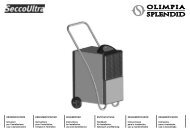
- Invertire le posizioni del gruppo<br />
alette deflettore (fig. 27 rif. A) con<br />
quella del coperchio laterale (fig.<br />
27 rif. B) e rimontare i due<br />
componenti, avvitando completamente<br />
tutte le viti di fissaggio.<br />
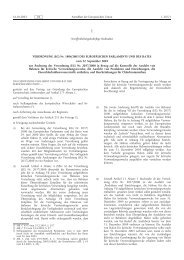
- Rimuovere la chiusura in<br />
polistirolo espanso (fig. 28 rif. A)<br />
che si trova nel lato destro<br />
inferiore , sotto la ventola di<br />
ricircolo dell’aria interna.<br />
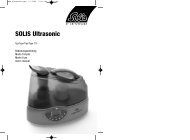
- Portare la chiusura in polistirolo<br />
espanso sul lato opposto della<br />
ventola di ricircolo dell’aria interna<br />
ed infilarla nella parte superiore, a<br />
chiusura dell’apertura (fig. 29).<br />
- Rimontare la scheda dei led di<br />
controllo (fig. 30); è consentito<br />
solo un verso di montaggio per<br />
evitare possibilità di errore.<br />
27<br />
B A<br />
GB F D<br />
- Invert the positions of the wing<br />
deflector group (fig. 27 ref. A) with<br />
that of the side cover (fig. 27 ref.<br />
B) and re-assemble the two<br />
components, screwing down all<br />
fixing screws completely.<br />
- Remove the expanded polystyrene<br />
cover (fig. 28 ref. A) located on<br />
the bottom right hand side, below<br />
the internal air re-circulation fan.<br />
- Move the expanded polystyrene<br />
cover to the opposite side of the<br />
internal air re-circulation fan and<br />
insert it into the upper part, closing<br />
the opening (fig. 29).<br />
- Re-assemble the led control card<br />
(fig. 30); only one assembly<br />
position is permitted in order to<br />
avoid any possible errors.<br />
- Inverser les positions du groupe<br />
des volets déflecteurs (fig. 27 réf.<br />
A) avec celle du couvercle latéral<br />
(fig. 27 réf. B) et remonter les deux<br />
composants, en vissant<br />
complètement toutes les vis de<br />
fixation.<br />
- Enlever la fermeture en<br />
polystyrène expansé (fig. 28 réf.<br />
A) qui se trouve sur le côté droit<br />
inférieur, sous le ventilateur de<br />
recirculation d'air interne.<br />
- Porter la fermeture en polystyrène<br />
expansé sur le côté opposé du<br />
ventilateur de recirculation d'air<br />
interne et l'introduire dans la partie<br />
supérieure, pour fermer l'ouverture<br />
(fig. 29).<br />
- Remonter la carte des voyants<br />
de contrôle (fig. 30) ; seul un sens<br />
de montage est possible afin<br />
d'éviter les erreurs.<br />
28<br />
- Die Position der Lammelleneinheit<br />
(Abb. 27 Ref. A) mit der der<br />
seitlichen Abdeckung (Abb. 27<br />
Ref. B) tauschen und die beiden<br />
Teile wieder montieren und alle<br />
Befestigungsschrauben wieder<br />
festdrehen.<br />
- Den Verschluss aus Schaumstoff<br />
(Abb. 28 Ref. A) rechts unter dem<br />
Lüfterrad für die innere Belüftung<br />
abnehmen.<br />
- Den Schaumstoffverschluss in<br />
das obere Teil der dem Lüfterrad<br />
zur inneren Belüftung<br />
entgegengesetzten Seite stecken,<br />
um die Öffnung zu schließen (Abb.<br />
29)<br />
- Die Karte der Kontrollleuchten<br />
(Abb. 30) wieder montieren; die<br />
Karte kann nur in eine Richtung<br />
montiert werden um<br />
Montagefehler zu vermeiden.<br />
A