Microlino Quickguide
This is a Quickguide for the Microlino, everything you need to know.
This is a Quickguide for the Microlino, everything you need to know.

You also want an ePaper? Increase the reach of your titles
YUMPU automatically turns print PDFs into web optimized ePapers that Google loves.
EN<br />
06 MULTIMEDIA<br />
07 CHARGING<br />
DISPLAY<br />
The display shows all driving-relevant data as well as warning symbols.<br />
The touch bar can be used to switch between a modern and<br />
retro display.<br />
TOUCHBAR<br />
The touchbar is used to operate all functions and adjust the settings.<br />
Tap on the symbols to activate/deactivate them. With the<br />
ventilation symbol, the fan strength can be adjusted to three different<br />
levels by tapping several times. Swiping to the left reveals<br />
further functions.<br />
SPEAKER<br />
The <strong>Microlino</strong> has a portable Bluetooth speaker. When the<br />
speaker is connected to the USB cable, it switches on automatically<br />
as soon as the vehicle is started. Search for <strong>Microlino</strong><br />
2.0 in the Bluetooth settings of your smartphone and connect it<br />
to the speaker.<br />
RECOMMENDED APPLICATIONS<br />
swipe<br />
The <strong>Microlino</strong> has a type 2 plug and can be charged with the<br />
appropriate cable at a wallbox, public AC charging station or a<br />
household socket. The on-board charger has an output of 2.6 kW<br />
(standard range = 1.35 kW).<br />
Charging at a DC fast charging station is not possible.<br />
WALLBOX / PUBLIC CHARGING STATION:<br />
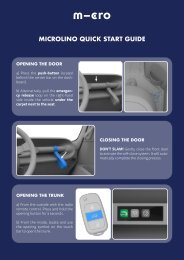
1. Open the charging flap on the vehicle and pull off the grommet<br />
from the charging connection.<br />
2. Unlock the vehicle<br />
3. Connect the type 2 cable on the wallbox side<br />
4. If necessary, activate the wallbox with the corresponding<br />
card/CHIP or APP.<br />
5. As soon as the wallbox is ready to charge, connect the Type 2<br />
charging cable to the vehicle.<br />
6. Check the charging process visually. The charging bar<br />
shows the charging process in the instrument cluster with a<br />
pulsating movement of the charging bar from left to right.<br />
7. Lock the vehicle.<br />
DOMESTIC POWER SOCKET (ICCB):<br />
1. Open the charging flap on the vehicle and remove the grommet<br />
from the charging connection.<br />
2. Connecting the charger to the household socket<br />
3. Check the current setting (max. 8A is permissible).<br />
4. Check the charger’s readiness for charging (if the LED lights<br />
up red, the unit is in an error state --> see quick fixes).<br />
5. Plug in the connector on the vehicle<br />
6. Check the charging process visually. The charging bar<br />
shows the charging process in the instrument cluster with a<br />
pulsating movement of the charging bar from left to right.<br />
7. Lock the vehicle<br />
ATTENTION!<br />
Spotify<br />
TuneIn Radio App<br />
Never connect the ICCB cable to an extension cable!<br />
Due to the increased resistance, this can lead to a cable fire.<br />
8<br />
9