TM-U950 (.PDF) - FTP - Epson
TM-U950 (.PDF) - FTP - Epson
TM-U950 (.PDF) - FTP - Epson
You also want an ePaper? Increase the reach of your titles
YUMPU automatically turns print PDFs into web optimized ePapers that Google loves.
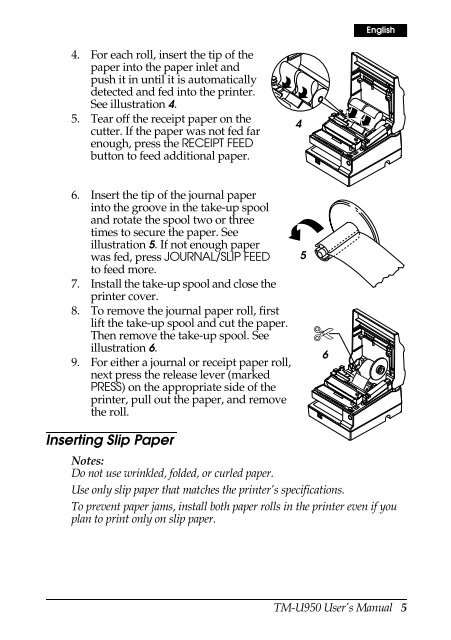
4. For each roll, insert the tip of the<br />
paper into the paper inlet and<br />
push it in until it is automatically<br />
detected and fed into the printer.<br />
See illustration 4.<br />
5. Tear off the receipt paper on the<br />
cutter. If the paper was not fed far<br />
enough, press the RECEIPT FEED<br />
button to feed additional paper.<br />
6. Insert the tip of the journal paper<br />
into the groove in the take-up spool<br />
and rotate the spool two or three<br />
times to secure the paper. See<br />
illustration 5. If not enough paper<br />
was fed, press JOURNAL/SLIP FEED<br />
to feed more.<br />
7. Install the take-up spool and close the<br />
printer cover.<br />
8. To remove the journal paper roll, first<br />
lift the take-up spool and cut the paper.<br />
Then remove the take-up spool. See<br />
illustration 6.<br />
9. For either a journal or receipt paper roll,<br />
next press the release lever (marked<br />
PRESS) on the appropriate side of the<br />
printer, pull out the paper, and remove<br />
the roll.<br />
English<br />
Inserting Slip Paper<br />
Notes:<br />
Do not use wrinkled, folded, or curled paper.<br />
Use only slip paper that matches the printer’s specifications.<br />
To prevent paper jams, install both paper rolls in the printer even if you<br />
plan to print only on slip paper.<br />
4<br />
5<br />
✄<br />
6<br />
<strong>TM</strong>-<strong>U950</strong> User’s Manual 5


