compact automatic washers lavadoras automáticas ... - Whirlpool
compact automatic washers lavadoras automáticas ... - Whirlpool
compact automatic washers lavadoras automáticas ... - Whirlpool

You also want an ePaper? Increase the reach of your titles
YUMPU automatically turns print PDFs into web optimized ePapers that Google loves.
10<br />
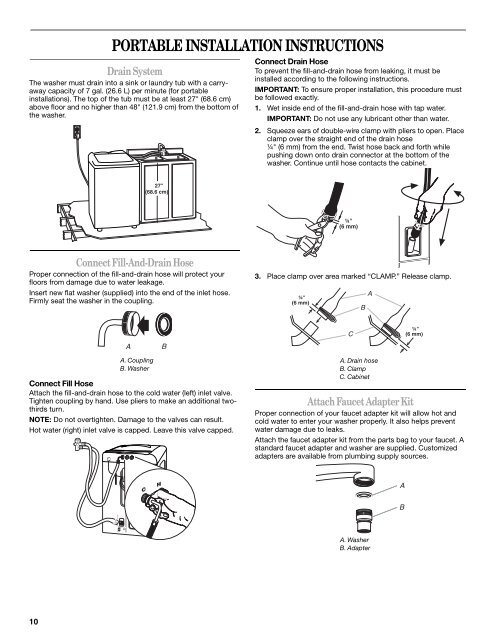
PORTABLE INSTALLATION INSTRUCTIONS<br />
Drain System<br />
The washer must drain into a sink or laundry tub with a carryaway<br />
capacity of 7 gal. (26.6 L) per minute (for portable<br />
installations). The top of the tub must be at least 27" (68.6 cm)<br />
above floor and no higher than 48" (121.9 cm) from the bottom of<br />
the washer.<br />
Connect Fill-And-Drain Hose<br />
Proper connection of the fill-and-drain hose will protect your<br />
floors from damage due to water leakage.<br />
Insert new flat washer (supplied) into the end of the inlet hose.<br />
Firmly seat the washer in the coupling.<br />
A. Coupling<br />
B. Washer<br />
27"<br />
(68.6 cm)<br />
A B<br />
Connect Fill Hose<br />
Attach the fill-and-drain hose to the cold water (left) inlet valve.<br />
Tighten coupling by hand. Use pliers to make an additional twothirds<br />
turn.<br />
NOTE: Do not overtighten. Damage to the valves can result.<br />
Hot water (right) inlet valve is capped. Leave this valve capped.<br />
Connect Drain Hose<br />
To prevent the fill-and-drain hose from leaking, it must be<br />
installed according to the following instructions.<br />
IMPORTANT: To ensure proper installation, this procedure must<br />
be followed exactly.<br />
1. Wet inside end of the fill-and-drain hose with tap water.<br />
IMPORTANT: Do not use any lubricant other than water.<br />
2. Squeeze ears of double-wire clamp with pliers to open. Place<br />
clamp over the straight end of the drain hose<br />
¼" (6 mm) from the end. Twist hose back and forth while<br />
pushing down onto drain connector at the bottom of the<br />
washer. Continue until hose contacts the cabinet.<br />
3. Place clamp over area marked “CLAMP.” Release clamp.<br />
¼"<br />
(6 mm)<br />
¼"<br />
(6 mm)<br />
C<br />
A. Drain hose<br />
B. Clamp<br />
C. Cabinet<br />
Attach Faucet Adapter Kit<br />
Proper connection of your faucet adapter kit will allow hot and<br />
cold water to enter your washer properly. It also helps prevent<br />
water damage due to leaks.<br />
Attach the faucet adapter kit from the parts bag to your faucet. A<br />
standard faucet adapter and washer are supplied. Customized<br />
adapters are available from plumbing supply sources.<br />
B<br />
A<br />
A. Washer<br />
B. Adapter<br />
A<br />
B<br />
¼"<br />
(6 mm)