compact automatic washers lavadoras automáticas ... - Whirlpool
compact automatic washers lavadoras automáticas ... - Whirlpool
compact automatic washers lavadoras automáticas ... - Whirlpool

Create successful ePaper yourself
Turn your PDF publications into a flip-book with our unique Google optimized e-Paper software.
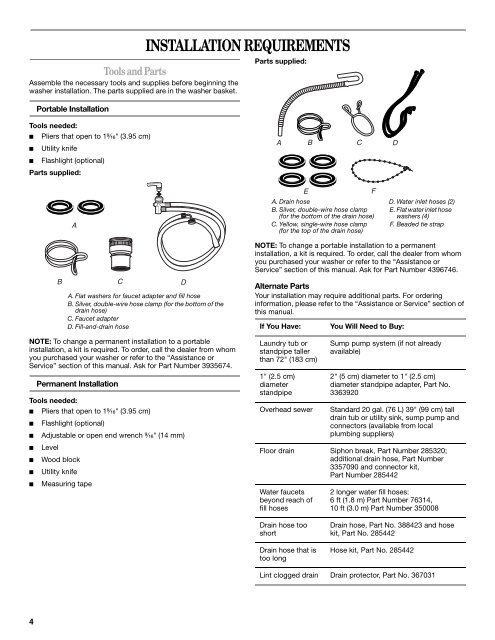
Tools and Parts<br />
Assemble the necessary tools and supplies before beginning the<br />
washer installation. The parts supplied are in the washer basket.<br />
4<br />
Portable Installation<br />
Tools needed:<br />
■ Pliers that open to 1⁹⁄₁₆" (3.95 cm)<br />
■ Utility knife<br />
■ Flashlight (optional)<br />
Parts supplied:<br />
NOTE: To change a permanent installation to a portable<br />
installation, a kit is required. To order, call the dealer from whom<br />
you purchased your washer or refer to the “Assistance or<br />
Service” section of this manual. Ask for Part Number 3935674.<br />
Permanent Installation<br />
Tools needed:<br />
■ Pliers that open to 1⁹⁄₁₆" (3.95 cm)<br />
■ Flashlight (optional)<br />
■ Adjustable or open end wrench ⁹⁄₁₆" (14 mm)<br />
■ Level<br />
A<br />
■ Wood block<br />
■ Utility knife<br />
B C D<br />
■ Measuring tape<br />
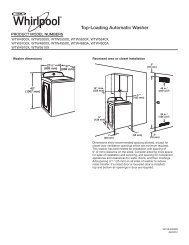
INSTALLATION REQUIREMENTS<br />
A. Flat <strong>washers</strong> for faucet adapter and fill hose<br />
B. Silver, double-wire hose clamp (for the bottom of the<br />
drain hose)<br />
C. Faucet adapter<br />
D. Fill-and-drain hose<br />
Parts supplied:<br />
A B C D<br />
A. Drain hose<br />
B. Silver, double-wire hose clamp<br />
(for the bottom of the drain hose)<br />
C. Yellow, single-wire hose clamp<br />
(for the top of the drain hose)<br />
D. Water inlet hoses (2)<br />
E. Flat water inlet hose<br />
<strong>washers</strong> (4)<br />
F. Beaded tie strap<br />
NOTE: To change a portable installation to a permanent<br />
installation, a kit is required. To order, call the dealer from whom<br />
you purchased your washer or refer to the “Assistance or<br />
Service” section of this manual. Ask for Part Number 4396746.<br />
Alternate Parts<br />
Your installation may require additional parts. For ordering<br />
information, please refer to the “Assistance or Service” section of<br />
this manual.<br />
If You Have: You Will Need to Buy:<br />
Laundry tub or<br />
standpipe taller<br />
than 72" (183 cm)<br />
1" (2.5 cm)<br />
diameter<br />
standpipe<br />
Sump pump system (if not already<br />
available)<br />
2" (5 cm) diameter to 1" (2.5 cm)<br />
diameter standpipe adapter, Part No.<br />
3363920<br />
Overhead sewer Standard 20 gal. (76 L) 39" (99 cm) tall<br />
drain tub or utility sink, sump pump and<br />
connectors (available from local<br />
plumbing suppliers)<br />
Floor drain Siphon break, Part Number 285320;<br />
additional drain hose, Part Number<br />
3357090 and connector kit,<br />
Part Number 285442<br />
Water faucets<br />
beyond reach of<br />
fill hoses<br />
Drain hose too<br />
short<br />
Drain hose that is<br />
too long<br />
E F<br />
2 longer water fill hoses:<br />
6 ft (1.8 m) Part Number 76314,<br />
10 ft (3.0 m) Part Number 350008<br />
Drain hose, Part No. 388423 and hose<br />
kit, Part No. 285442<br />
Hose kit, Part No. 285442<br />
Lint clogged drain Drain protector, Part No. 367031