washer/dryer use and care guide laveuse/sécheuse - Whirlpool
washer/dryer use and care guide laveuse/sécheuse - Whirlpool
washer/dryer use and care guide laveuse/sécheuse - Whirlpool

Create successful ePaper yourself
Turn your PDF publications into a flip-book with our unique Google optimized e-Paper software.
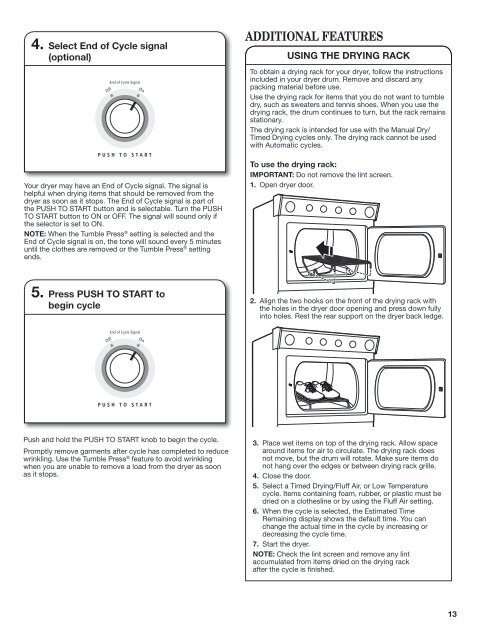
4. Select End of Cycle signal<br />
(optional)<br />
Your <strong>dryer</strong> may have an End of Cycle signal. The signal is<br />
helpful when drying items that should be removed from the<br />
<strong>dryer</strong> as soon as it stops. The End of Cycle signal is part of<br />
the PUSH TO START button <strong>and</strong> is selectable. Turn the PUSH<br />
TO START button to ON or OFF. The signal will sound only if<br />
the selector is set to ON.<br />
NOTE: When the Tumble Press ® setting is selected <strong>and</strong> the<br />
End of Cycle signal is on, the tone will sound every 5 minutes<br />
until the clothes are removed or the Tumble Press ® setting<br />
ends.<br />
5. Press PUSH TO START to<br />
begin cycle<br />
Push <strong>and</strong> hold the PUSH TO START knob to begin the cycle.<br />
Promptly remove garments after cycle has completed to reduce<br />
wrinkling. Use the Tumble Press ® feature to avoid wrinkling<br />
when you are unable to remove a load from the <strong>dryer</strong> as soon<br />
as it stops.<br />
ADDITIONAL FEATURES<br />
USING THE DRYING RACK<br />
To obtain a drying rack for your <strong>dryer</strong>, follow the instructions<br />
included in your <strong>dryer</strong> drum. Remove <strong>and</strong> discard any<br />
packing material before <strong>use</strong>.<br />
Use the drying rack for items that you do not want to tumble<br />
dry, such as sweaters <strong>and</strong> tennis shoes. When you <strong>use</strong> the<br />
drying rack, the drum continues to turn, but the rack remains<br />
stationary.<br />
The drying rack is intended for <strong>use</strong> with the Manual Dry/<br />
Timed Drying cycles only. The drying rack cannot be <strong>use</strong>d<br />
with Automatic cycles.<br />
To <strong>use</strong> the drying rack:<br />
IMPORTANT: Do not remove the lint screen.<br />
1. Open <strong>dryer</strong> door.<br />
2. Align the two hooks on the front of the drying rack with<br />
the holes in the <strong>dryer</strong> door opening <strong>and</strong> press down fully<br />
into holes. Rest the rear support on the <strong>dryer</strong> back ledge.<br />
3. Place wet items on top of the drying rack. Allow space<br />
around items for air to circulate. The drying rack does<br />
not move, but the drum will rotate. Make sure items do<br />
not hang over the edges or between drying rack grille.<br />
4. Close the door.<br />
5. Select a Timed Drying/Fluff Air, or Low Temperature<br />
cycle. Items containing foam, rubber, or plastic must be<br />
dried on a clothesline or by using the Fluff Air setting.<br />
6. When the cycle is selected, the Estimated Time<br />
Remaining display shows the default time. You can<br />
change the actual time in the cycle by increasing or<br />
decreasing the cycle time.<br />
7. Start the <strong>dryer</strong>.<br />
NOTE: Check the lint screen <strong>and</strong> remove any lint<br />
accumulated from items dried on the drying rack<br />
after the cycle is finished.<br />
13