washer/dryer use and care guide laveuse/sécheuse - Whirlpool
washer/dryer use and care guide laveuse/sécheuse - Whirlpool
washer/dryer use and care guide laveuse/sécheuse - Whirlpool

You also want an ePaper? Increase the reach of your titles
YUMPU automatically turns print PDFs into web optimized ePapers that Google loves.
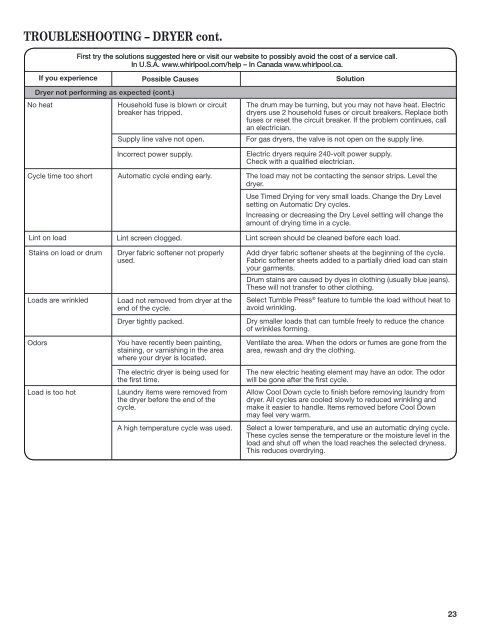
TROUBLESHOOTING – DRYER cont.<br />
First try the solutions suggested here or visit our website to possibly avoid the cost of a service call.<br />
In U.S.A. www.whirlpool.com/help – In Canada www.whirlpool.ca.<br />
If you experience Possible Ca<strong>use</strong>s Solution<br />
Dryer not performing as expected (cont.)<br />
No heat Ho<strong>use</strong>hold f<strong>use</strong> is blown or circuit<br />
breaker has tripped.<br />
Cycle time too short Automatic cycle ending early. The load may not be contacting the sensor strips. Level the<br />
<strong>dryer</strong>.<br />
Use Timed Drying for very small loads. Change the Dry Level<br />
setting on Automatic Dry cycles.<br />
Increasing or decreasing the Dry Level setting will change the<br />
amount of drying time in a cycle.<br />
Lint on load Lint screen clogged. Lint screen should be cleaned before each load.<br />
Stains on load or drum Dryer fabric softener not properly<br />
<strong>use</strong>d.<br />
Loads are wrinkled Load not removed from <strong>dryer</strong> at the<br />
end of the cycle.<br />
Add <strong>dryer</strong> fabric softener sheets at the beginning of the cycle.<br />
Fabric softener sheets added to a partially dried load can stain<br />
your garments.<br />
Drum stains are ca<strong>use</strong>d by dyes in clothing (usually blue jeans).<br />
These will not transfer to other clothing.<br />
Select Tumble Press ® feature to tumble the load without heat to<br />
avoid wrinkling.<br />
Dryer tightly packed. Dry smaller loads that can tumble freely to reduce the chance<br />
of wrinkles forming.<br />
Odors You have recently been painting,<br />
staining, or varnishing in the area<br />
where your <strong>dryer</strong> is located.<br />
The electric <strong>dryer</strong> is being <strong>use</strong>d for<br />
the first time.<br />
Load is too hot Laundry items were removed from<br />
the <strong>dryer</strong> before the end of the<br />
cycle.<br />
The drum may be turning, but you may not have heat. Electric<br />
<strong>dryer</strong>s <strong>use</strong> 2 ho<strong>use</strong>hold f<strong>use</strong>s or circuit breakers. Replace both<br />
f<strong>use</strong>s or reset the circuit breaker. If the problem continues, call<br />
an electrician.<br />
Supply line valve not open. For gas <strong>dryer</strong>s, the valve is not open on the supply line.<br />
Incorrect power supply. Electric <strong>dryer</strong>s require 240-volt power supply.<br />
Check with a qualified electrician.<br />
Ventilate the area. When the odors or fumes are gone from the<br />
area, rewash <strong>and</strong> dry the clothing.<br />
The new electric heating element may have an odor. The odor<br />
will be gone after the first cycle.<br />
Allow Cool Down cycle to finish before removing laundry from<br />
<strong>dryer</strong>. All cycles are cooled slowly to reduced wrinkling <strong>and</strong><br />
make it easier to h<strong>and</strong>le. Items removed before Cool Down<br />
may feel very warm.<br />
A high temperature cycle was <strong>use</strong>d. Select a lower temperature, <strong>and</strong> <strong>use</strong> an automatic drying cycle.<br />
These cycles sense the temperature or the moisture level in the<br />
load <strong>and</strong> shut off when the load reaches the selected dryness.<br />
This reduces overdrying.<br />
23