FIAT DUCATO_HDI-JTD_TT_x244 - Giordano Benicchi
FIAT DUCATO_HDI-JTD_TT_x244 - Giordano Benicchi
FIAT DUCATO_HDI-JTD_TT_x244 - Giordano Benicchi

Create successful ePaper yourself
Turn your PDF publications into a flip-book with our unique Google optimized e-Paper software.
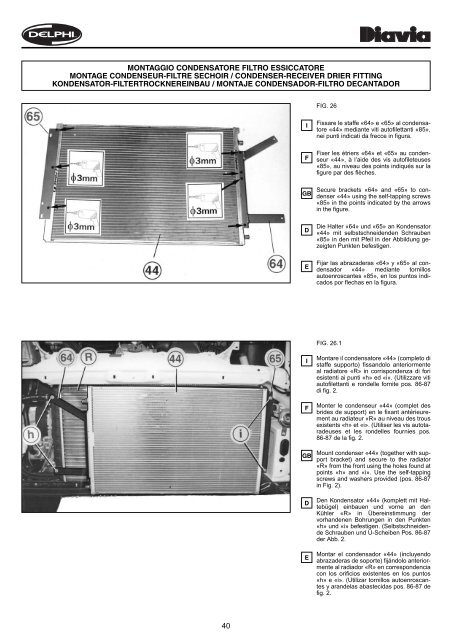
MONTAGGIO CONDENSATORE FILTRO ESSICCATORE<br />
MONTAGE CONDENSEUR-FILTRE SECHOIR / CONDENSER-RECEIVER DRIER FI<strong>TT</strong>ING<br />
KONDENSATOR-FILTERTROCKNEREINBAU / MONTAJE CONDENSADOR-FILTRO DECANTADOR<br />
FIG. 26<br />
I<br />
F<br />
GB<br />
D<br />
E<br />
Fissare le staffe «64» e «65» al condensatore<br />
«44» mediante viti autofilettanti «85»,<br />
nei punti indicati da frecce in figura.<br />
Fixer les étriers «64» et «65» au condenseur<br />
«44», à l’aide des vis autofileteuses<br />
«85», au niveau des points indiqués sur la<br />
figure par des flèches.<br />
Secure brackets «64» and «65» to condenser<br />
«44» using the self-tapping screws<br />
«85» in the points indicated by the arrows<br />
in the figure.<br />
Die Halter «64» und «65» an Kondensator<br />
«44» mit selbstschneidenden Schrauben<br />
«85» in den mit Pfeil in der Abbildung gezeigten<br />
Punkten befestigen.<br />
Fijar las abrazaderas «64» y «65» al condensador<br />
«44» mediante tornillos<br />
autoenroscantes «85», en los puntos indicados<br />
por flechas en la figura.<br />
FIG. 26.1<br />
I<br />
F<br />
GB<br />
D<br />
E<br />
Montare il condensatore «44» (completo di<br />
staffe supporto) fissandolo anteriormente<br />
al radiatore «R» in corrispondenza di fori<br />
esistenti ai punti «h» ed «i». (Utilizzare viti<br />
autofilettanti e rondelle fornite pos. 86-87<br />
di fig. 2.<br />
Monter le condenseur «44» (complet des<br />
brides de support) en le fixant antérieurement<br />
au radiateur «R» au niveau des trous<br />
existents «h» et «i». (Utiliser les vis autotaradeuses<br />
et les rondelles fournies pos.<br />
86-87 de la fig. 2.<br />
Mount condenser «44» (together with support<br />
bracket) and secure to the radiator<br />
«R» from the front using the holes found at<br />
points «h» and «i». Use the self-tapping<br />
screws and washers provided (pos. 86-87<br />
in Fig. 2).<br />
Den Kondensator «44» (komplett mit Haltebügel)<br />
einbauen und vorne an den<br />
Kühler «R» in Übereinstimmung der<br />
vorhandenen Bohrungen in den Punkten<br />
«h» und «i» befestigen. (Selbstschneidende<br />
Schrauben und U-Scheiben Pos. 86-87<br />
der Abb. 2.<br />
Montar el condensador «44» (incluyendo<br />
abrazaderas de soporte) fijándolo anteriormente<br />
al radiador «R» en correspondencia<br />
con los orificios existentes en los puntos<br />
«h» e «i». (Utilizar tornillos autoenroscantes<br />
y arandelas abastecidas pos. 86-87 de<br />
fig. 2.<br />
40