
You also want an ePaper? Increase the reach of your titles
YUMPU automatically turns print PDFs into web optimized ePapers that Google loves.
ENGLISH<br />
5 Cleaning and changing air filter<br />
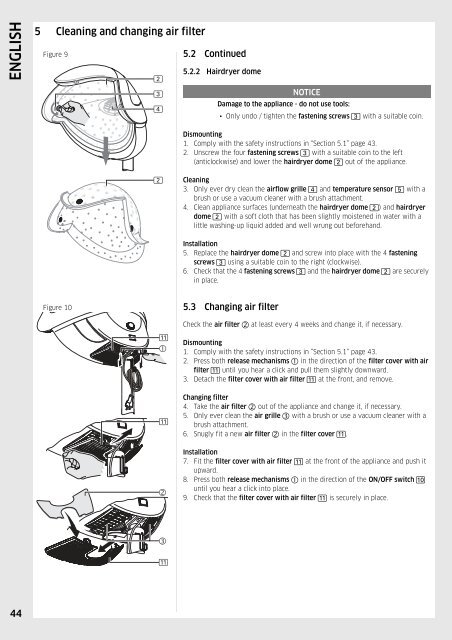
Figure 9 5.2 Continued<br />
5.2.2 Hairdryer dome<br />
NOTICE<br />
Damage to the appliance - do not use tools:<br />
• Only undo / tighten the fastening screws 3 with a suitable coin.<br />
Dismounting<br />
1. Comply with the safety instructions in “Section 5.1” page 43.<br />
2. Unscrew the four fastening screws 3 with a suitable coin to the left<br />
(anticlockwise) and lower the hairdryer dome 2 out of the appliance.<br />
Cleaning<br />
3. Only ever dry clean the airflow grille 4 and temperature sensor 5 with a<br />
brush or use a vacuum cleaner with a brush attachment.<br />
4. Clean appliance surfaces (underneath the hairdryer dome 2) and hairdryer<br />
dome 2 with a soft cloth that has been slightly moistened in water with a<br />
little washing-up liquid added and well wrung out beforehand.<br />
Installation<br />
5. Replace the hairdryer dome 2 and screw into place with the 4 fastening<br />
screws 3 using a suitable coin to the right (clockwise).<br />
6. Check that the 4 fastening screws 3 and the hairdryer dome 2 are securely<br />
in place.<br />
Figure 10 5.3 Changing air filter<br />
Check the air filter 2 at least every 4 weeks and change it, if necessary.<br />
Dismounting<br />
1. Comply with the safety instructions in “Section 5.1” page 43.<br />
2. Press both release mechanisms 1 in the direction of the filter cover with air<br />
filter b until you hear a click and pull them slightly downward.<br />
3. Detach the filter cover with air filter b at the front, and remove.<br />
Changing filter<br />
4. Take the air filter 2 out of the appliance and change it, if necessary.<br />
5. Only ever clean the air grille 3 with a brush or use a vacuum cleaner with a<br />
brush attachment.<br />
6. Snugly fit a new air filter 2 in the filter cover b.<br />
Installation<br />
7. Fit the filter cover with air filter b at the front of the appliance and push it<br />
upward.<br />
8. Press both release mechanisms 1 in the direction of the ON/OFF switch a<br />
until you hear a click into place.<br />
9. Check that the filter cover with air filter b is securely in place.<br />
44