DNA Extraction & Inhibition Control Real-Time PCR - Diagenode ...
DNA Extraction & Inhibition Control Real-Time PCR - Diagenode ...
DNA Extraction & Inhibition Control Real-Time PCR - Diagenode ...

Create successful ePaper yourself
Turn your PDF publications into a flip-book with our unique Google optimized e-Paper software.
DIA-EIC/<strong>DNA</strong>-050<br />
III. <strong>PCR</strong> Reaction Set-up (ABI 7000, Icycler Biorad)<br />
25 µl -------------------- master mix 2X<br />
(non inclus: Taqman® Universal <strong>PCR</strong> Master Mix, Applied Biosystems (Roche))<br />
5 µl ---------------------- amorces et sonde pour le contrôle ADN d’<strong>Extraction</strong> & d’<strong>Inhibition</strong><br />
5 (or 10) µl ------------- amorces et sonde pour le pathogène humain recherché<br />
5 (or 10) µl ------------- échantillon<br />
Eau si nécessaire.<br />
-----------------------------------<br />
50 µl ---------- Volume final<br />
Attention :<br />
Un nouveau mix doit être préparé pour toute nouvelle <strong>PCR</strong>. Un master mix (non inclus) et<br />
amorces/sondes incluses dans le kit doivent être placés dans la glace pendant la préparation de<br />
la <strong>PCR</strong>.<br />
IV. <strong>Real</strong> <strong>Time</strong> <strong>PCR</strong> Instrument Set Up<br />
‣ Système <strong>PCR</strong> Temps Réel ABI 7000<br />
1. « Open a New File ».<br />
2. Sélectionner « suivant » et cliquer « Next ».<br />
a. Assay: Absolute<br />
b. Container: 96-well plate<br />
c. Template: Blank<br />
3. Cliquer OK.<br />
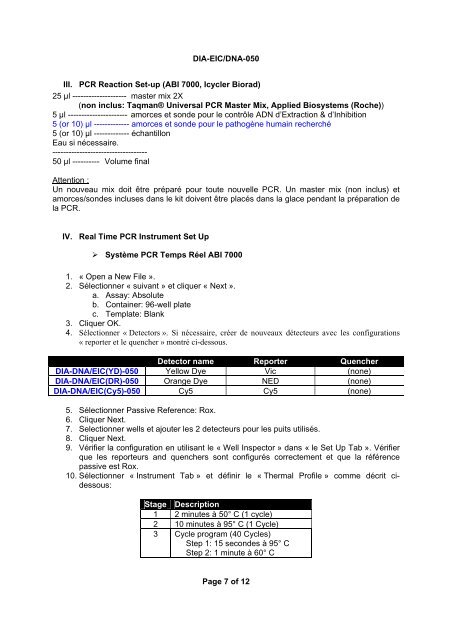
4. Sélectionner « Detectors ». Si nécessaire, créer de nouveaux détecteurs avec les configurations<br />
« reporter et le quencher » montré ci-dessous.<br />
Detector name Reporter Quencher<br />
DIA-<strong>DNA</strong>/EIC(YD)-050 Yellow Dye Vic (none)<br />
DIA-<strong>DNA</strong>/EIC(DR)-050 Orange Dye NED (none)<br />
DIA-<strong>DNA</strong>/EIC(Cy5)-050 Cy5 Cy5 (none)<br />
5. Sélectionner Passive Reference: Rox.<br />
6. Cliquer Next.<br />
7. Selectionner wells et ajouter les 2 detecteurs pour les puits utilisés.<br />
8. Cliquer Next.<br />
9. Vérifier la configuration en utilisant le « Well Inspector » dans « le Set Up Tab ». Vérifier<br />
que les reporteurs and quenchers sont configurés correctement et que la référence<br />
passive est Rox.<br />
10. Sélectionner « Instrument Tab » et définir le « Thermal Profile » comme décrit cidessous:<br />
Stage Description<br />
1 2 minutes à 50° C (1 cycle)<br />
2 10 minutes à 95° C (1 Cycle)<br />
3 Cycle program (40 Cycles)<br />
Step 1: 15 secondes à 95° C<br />
Step 2: 1 minute à 60° C<br />
Page 7 of 12