
Create successful ePaper yourself
Turn your PDF publications into a flip-book with our unique Google optimized e-Paper software.
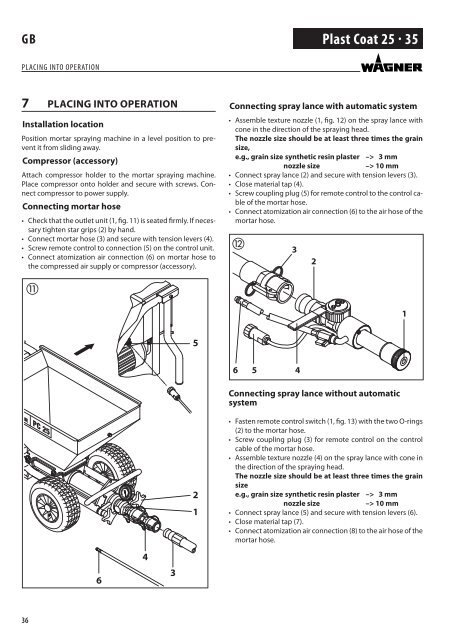
GB<strong>Plast</strong> <strong>Coat</strong> <strong>25</strong> · <strong>35</strong>Placing into operation7 Placing into operationInstallation locationPosition mortar spraying machine in a level position to preventit from sliding away.Compressor (accessory)Attach compressor holder to the mortar spraying machine.Place compressor onto holder and secure with screws. Connectcompressor to power supply.Connecting mortar hose• Check that the outlet unit (1, fig. 11) is seated firmly. If necessarytighten star grips (2) by hand.• Connect mortar hose (3) and secure with tension levers (4).• Screw remote control to connection (5) on the control unit.• Connect atomization air connection (6) on mortar hose tothe compressed air supply or compressor (accessory).Connecting spray lance with automatic system• Assemble texture nozzle (1, fig. 12) on the spray lance withcone in the direction of the spraying head.The nozzle size should be at least three times the grainsize,e.g., grain size synthetic resin plaster –> 3 mmnozzle size–> 10 mm• Connect spray lance (2) and secure with tension levers (3).• Close material tap (4).• Screw coupling plug (5) for remote control to the control cableof the mortar hose.• Connect atomization air connection (6) to the air hose of themortar hose.32156 5 4Connecting spray lance without automaticsystem21• Fasten remote control switch (1, fig. 13) with the two O-rings(2) to the mortar hose.• Screw coupling plug (3) for remote control on the controlcable of the mortar hose.• Assemble texture nozzle (4) on the spray lance with cone inthe direction of the spraying head.The nozzle size should be at least three times the grainsizee.g., grain size synthetic resin plaster –> 3 mmnozzle size–> 10 mm• Connect spray lance (5) and secure with tension levers (6).• Close material tap (7).• Connect atomization air connection (8) to the air hose of themortar hose.64336