Create successful ePaper yourself
Turn your PDF publications into a flip-book with our unique Google optimized e-Paper software.
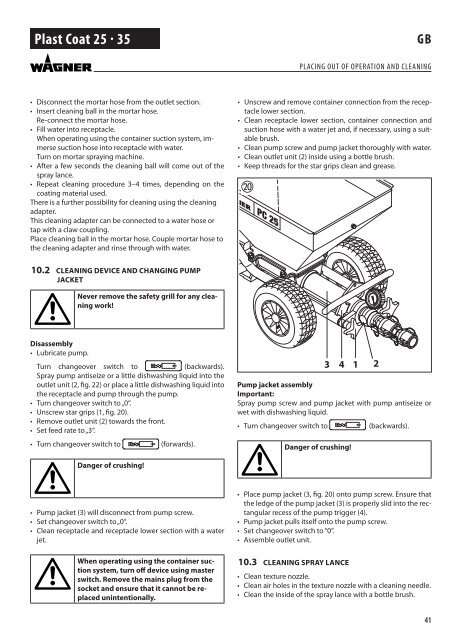
<strong>Plast</strong> <strong>Coat</strong> <strong>25</strong> · <strong>35</strong>GBPlacing out of operation and cleaning• Disconnect the mortar hose from the outlet section.• Insert cleaning ball in the mortar hose.Re-connect the mortar hose.• Fill water into receptacle.When operating using the container suction system, immersesuction hose into receptacle with water.Turn on mortar spraying machine.• After a few seconds the cleaning ball will come out of thespray lance.• Repeat cleaning procedure 3–4 times, depending on thecoating material used.There is a further possibility for cleaning using the cleaningadapter.This cleaning adapter can be connected to a water hose ortap with a claw coupling.Place cleaning ball in the mortar hose. Couple mortar hose tothe cleaning adapter and rinse through with water.• Unscrew and remove container connection from the receptaclelower section.• Clean receptacle lower section, container connection andsuction hose with a water jet and, if necessary, using a suitablebrush.• Clean pump screw and pump jacket thoroughly with water.• Clean outlet unit (2) inside using a bottle brush.• Keep threads for the star grips clean and grease.10.2 Cleaning device and changing pumpjacketNever remove the safety grill for any cleaningwork!Disassembly• Lubricate pump.Turn changeover switch to (backwards).Spray pump antiseize or a little dishwashing liquid into theoutlet unit (2, fig. 22) or place a little dishwashing liquid intothe receptacle and pump through the pump.• Turn changeover switch to „0“.• Unscrew star grips (1, fig. 20).• Remove outlet unit (2) towards the front.• Set feed rate to „3“.• Turn changeover switch to(forwards).Pump jacket assemblyImportant:Spray pump screw and pump jacket with pump antiseize orwet with dishwashing liquid.• Turn changeover switch to(backwards).Danger of crushing!3 4 1 2Danger of crushing!• Pump jacket (3) will disconnect from pump screw.• Set changeover switch to „0“.• Clean receptacle and receptacle lower section with a waterjet.When operating using the container suctionsystem, turn off device using masterswitch. Remove the mains plug from thesocket and ensure that it cannot be replacedunintentionally.• Place pump jacket (3, fig. 20) onto pump screw. Ensure thatthe ledge of the pump jacket (3) is properly slid into the rectangularrecess of the pump trigger (4).• Pump jacket pulls itself onto the pump screw.• Set changeover switch to “0”.• Assemble outlet unit.10.3 Cleaning spray lance• Clean texture nozzle.• Clean air holes in the texture nozzle with a cleaning needle.• Clean the inside of the spray lance with a bottle brush.41


