variostar 247 variostar 317, 317-2 operating instructions ... - dpiaca
variostar 247 variostar 317, 317-2 operating instructions ... - dpiaca
variostar 247 variostar 317, 317-2 operating instructions ... - dpiaca
- No tags were found...

You also want an ePaper? Increase the reach of your titles
YUMPU automatically turns print PDFs into web optimized ePapers that Google loves.
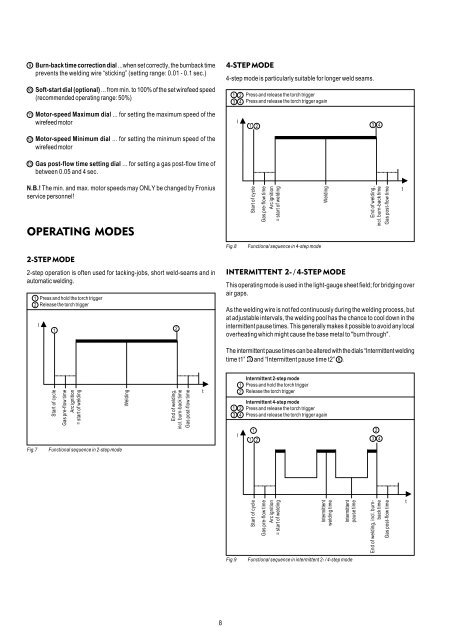
Burn-back time correction dial ...when set correctly, the burnback timeprevents the welding wire “sticking” (setting range: 0.01 - 0.1 sec.)Soft-start dial (optional) ... from min. to 100% of the set wirefeed speed(recommended <strong>operating</strong> range: 50%)Motor-speed Maximum dial ... for setting the maximum speed of thewirefeed motor4-STEP MODE4-step mode is particularly suitable for longer weld seams.IPress and release the torch triggerPress and release the torch trigger againMotor-speed Minimum dial ... for setting the minimum speed of thewirefeed motorGas post-flow time setting dial ... for setting a gas post-flow time ofbetween 0.05 and 4 sec.N.B.! The min. and max. motor speeds may ONLY be changed by Froniusservice personnel!OPERATING MODESStart of cycleGas pre-flow timeArc ignition= start of weldingWeldingEnd of welding,incl. burn-back timeGas post-flow timetFig.8Functional sequence in 4-step mode2-STEP MODE2-step operation is often used for tacking-jobs, short weld-seams and inautomatic welding.Press and hold the torch triggerRelease the torch triggerIINTERMITTENT 2- / 4-STEP MODEThis <strong>operating</strong> mode is used in the light-gauge sheet field; for bridging overair gaps.As the welding wire is not fed continuously during the welding process, butat adjustable intervals, the welding pool has the chance to cool down in theintermittent pause times. This generally makes it possible to avoid any localoverheating which might cause the base metal to "burn through".The intermittent pause times can be altered with the dials “Intermittent weldingtime t1” and “Intermittent pause time t2” .Start of cycleGas pre-flow timeArc ignition= start of weldingWeldingEnd of welding,incl. burn-back timeGas post-flow timetIntermittent 2-step modePress and hold the torch triggerRelease the torch triggerIntermittent 4-step modePress and release the torch triggerPress and release the torch trigger againIFig.7Functional sequence in 2-step modeStart of cycleGas pre-flow timeArc ignition= start of weldingIntermittentwelding timeIntermittentpause timeEnd of welding, incl. burnbacktimeGas post-flow timetFig.9Functional sequence in intermittent 2- / 4-step mode8