

Delonghi Nespresso Delonghi Latissima Touch EN550.S - notice
Delonghi Nespresso Delonghi Latissima Touch EN550.S - notice
Delonghi Nespresso Delonghi Latissima Touch EN550.S - notice

Create successful ePaper yourself
Turn your PDF publications into a flip-book with our unique Google optimized e-Paper software.
EN Special care for your rapid DE Special care for your rapid ES Special care for your rapid CZ Special care for your rapid<br />
4°<br />
cappuccino SyStem (r.c.S.)<br />
cappuccino SyStem (r.c.S.)<br />
cappuccino SyStem (r.c.S.)<br />
cappuccino SyStem (r.c.S.)<br />
important: refer<br />
important: refer<br />
important: refer<br />
important: refer<br />
to User manual for<br />
to User manual for<br />
to User manual for<br />
to User manual for<br />
complete instructions.<br />
complete instructions.<br />
complete instructions.<br />
complete instructions.<br />
1- For a perfect milk froth, use skimmed 1- For a perfect milk froth, use skimmed 1- For a perfect milk froth, use skimmed 1- For a perfect milk froth, use skimmed<br />
or semi-skimmed milk at refrigerator<br />
or semi-skimmed milk at refrigerator<br />
or semi-skimmed milk at refrigerator<br />
or semi-skimmed milk at refrigerator<br />
temperature (about 4° C).<br />
temperature (about 4° C).<br />
temperature (about 4° C).<br />
temperature (about 4° C).<br />
1<br />
2- Rinse after each milk based preparation. 2- Rinse after each milk based preparation. 2- Rinse after each milk based preparation. 2- Rinse after each milk based preparation.<br />
Place a recipient under milk outlet, press<br />
Place a recipient under milk outlet, press<br />
Place a recipient under milk outlet, press<br />
Place a recipient under milk outlet, press<br />
and hold the «CLEAN» button until<br />
and hold the «CLEAN» button until<br />
and hold the «CLEAN» button until<br />
and hold the «CLEAN» button until<br />
machine stops pumping automatically<br />
machine stops pumping automatically<br />
machine stops pumping automatically<br />
machine stops pumping automatically<br />
(approx. 15 sec.).<br />
(approx. 15 sec.).<br />
(approx. 15 sec.).<br />
(approx. 15 sec.).<br />
Machine starts rinsing, stops automatically<br />
Machine starts rinsing, stops automatically<br />
Machine starts rinsing, stops automatically<br />
Machine starts rinsing, stops automatically<br />
( ~15sec.).<br />
( ~15sec.).<br />
( ~15sec.).<br />
( ~15sec.).<br />
3- Place the milk container in the fridge 3- Place the milk container in the fridge 3- Place the milk container in the fridge 3- Place the milk container in the fridge<br />
immediately.<br />
immediately.<br />
immediately.<br />
immediately.<br />
4- Every two days, disassemble the<br />
4- Every two days, disassemble the<br />
4- Every two days, disassemble the<br />
4- Every two days, disassemble the<br />
Rapid Cappuccino System and clean<br />
Rapid Cappuccino System and clean<br />
Rapid Cappuccino System and clean<br />
Rapid Cappuccino System and clean<br />
all components in the upper level of a<br />
all components in the upper level of a<br />
all components in the upper level of a<br />
all components in the upper level of a<br />
2<br />
dishwasher.<br />
dishwasher.<br />
dishwasher.<br />
dishwasher.<br />
FR Special care for your rapid IT Special care for your rapid PT Special care for your rapid HU Special care for your rapid<br />
cappuccino SyStem (r.c.S.)<br />
cappuccino SyStem (r.c.S.)<br />
cappuccino SyStem (r.c.S.)<br />
cappuccino SyStem (r.c.S.)<br />
4°<br />
important: refer<br />
important: refer<br />
important: refer<br />
important: refer<br />
to User manual for<br />
to User manual for<br />
to User manual for<br />
to User manual for<br />
complete instructions.<br />
complete instructions.<br />
complete instructions.<br />
complete instructions.<br />
1- For a perfect milk froth, use skimmed 1- For a perfect milk froth, use skimmed 1- For a perfect milk froth, use skimmed 1- For a perfect milk froth, use skimmed<br />
or semi-skimmed milk at refrigerator<br />
or semi-skimmed milk at refrigerator<br />
or semi-skimmed milk at refrigerator<br />
or semi-skimmed milk at refrigerator<br />
temperature (about 4° C).<br />
temperature (about 4° C).<br />
temperature (about 4° C).<br />
temperature (about 4° C).<br />
2- Rinse after each milk based preparation. 2- Rinse after each milk based preparation. 2- Rinse after each milk based preparation. 2- Rinse after each milk based preparation.<br />
3<br />
Place a recipient under milk outlet, press<br />
Place a recipient under milk outlet, press<br />
Place a recipient under milk outlet, press<br />
Place a recipient under milk outlet, press<br />
and hold the «CLEAN» button until<br />
and hold the «CLEAN» button until<br />
and hold the «CLEAN» button until<br />
and hold the «CLEAN» button until<br />
machine stops pumping automatically<br />
machine stops pumping automatically<br />
machine stops pumping automatically<br />
machine stops pumping automatically<br />
(approx. 15 sec.).<br />
(approx. 15 sec.).<br />
(approx. 15 sec.).<br />
(approx. 15 sec.).<br />
Machine starts rinsing, stops automatically<br />
Machine starts rinsing, stops automatically<br />
Machine starts rinsing, stops automatically<br />
Machine starts rinsing, stops automatically<br />
( ~15sec.).<br />
( ~15sec.).<br />
( ~15sec.).<br />
( ~15sec.).<br />
3- Place the milk container in the fridge 3- Place the milk container in the fridge 3- Place the milk container in the fridge 3- Place the milk container in the fridge<br />
immediately.<br />
immediately.<br />
immediately.<br />
immediately.<br />
4- Every two days, disassemble the<br />
4- Every two days, disassemble the<br />
4- Every two days, disassemble the<br />
4- Every two days, disassemble the<br />
Rapid Cappuccino System and clean<br />
Rapid Cappuccino System and clean<br />
Rapid Cappuccino System and clean<br />
Rapid Cappuccino System and clean<br />
all components in the upper level of a<br />
all components in the upper level of a<br />
all components in the upper level of a<br />
all components in the upper level of a<br />
dishwasher.<br />
dishwasher.<br />
dishwasher.<br />
dishwasher.<br />
4<br />
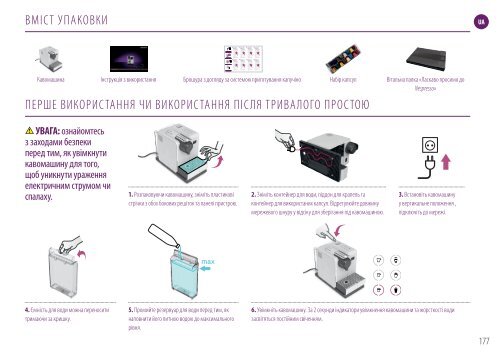
ВМІ СТ У ПАКОВКИ<br />
UA<br />
Кавомашина<br />
Інструкція з використання<br />
Брошура з догляду за системою приготування капучіно<br />
Набір капсул<br />
ПЕРШЕ ВИКОРИСТАННЯ Ч И ВИКОРИСТАННЯ ПІ СЛЯ ТРИВАЛОГО ПРОСТОЮ<br />
Вітальна папка «Ласкаво просимо до<br />
<strong>Nespresso</strong>»<br />
УВАГА: ознайомтесь<br />
з заходами безпеки<br />
перед тим, як увімкнути<br />
кавомашину для того,<br />
щоб уникнути ураження<br />
електричним струмом чи<br />
спалаху.<br />
1. Розпаковуючи кавомашину, зніміть пластикові<br />
стрічки з обох бокових решіток та панелі пристрою.<br />
2. Зніміть контейнер для води, піддон для крапель та<br />
контейнер для використаних капсул. Відрегулюйте довжину<br />
мережевого шнуру у відсіку для зберігання під кавомашиною.<br />
3. Встановіть кавомашину<br />
у вертикальне положення ,<br />
підключіть до мережі.<br />
4. Ємність для води можна переносити<br />
тримаючи за кришку.<br />
5. Промийте резервуар для води перед тим, як<br />
наповнити його питною водою до максимального<br />
рівня.<br />
6. Увімкніть кавомашину. За 2 секунди індикатори увімкнення кавомашини та жорсткості води<br />
засвітяться постійним свіченням.<br />
177<br />
7484_UM_LATTISSIMA_RESTYLE_Z2A.indb 177 03.10.14 14:49


