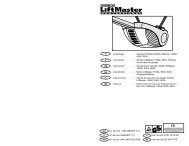
BIXLR22 - GOL IP1852
BIXLR22 - GOL IP1852
BIXLR22 - GOL IP1852

You also want an ePaper? Increase the reach of your titles
YUMPU automatically turns print PDFs into web optimized ePapers that Google loves.
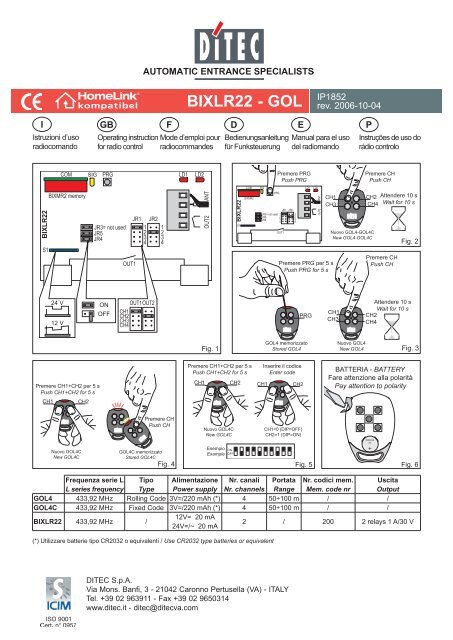
<strong>BIXLR22</strong> - <strong>GOL</strong><br />
<strong>IP1852</strong><br />
rev. 2006-10-04<br />
I<br />
Istruzioni d’uso<br />
radiocomando<br />
GB<br />
Operating instruction Mode d’emploi pour<br />
for radio control radiocommandes<br />
F<br />
D<br />
Bedienungsanleitung<br />
für Funksteuerung<br />
E<br />
Manual para el uso<br />
del radiomando<br />
P<br />
Instruções de uso do<br />
rádio controlo<br />
COM<br />
SIG<br />
PRG<br />
LD1<br />
LD2<br />
Premere PRG<br />
Push PRG<br />
Premere CH<br />
Push CH<br />
COM<br />
SIG<br />
LD1<br />
LD2<br />
<strong>BIXLR22</strong><br />
S1<br />
BIXMR2 memory<br />
JR3= not used<br />
JR5<br />
JR4<br />
OUT1<br />
JR1<br />
1<br />
2<br />
3<br />
4<br />
JR2<br />
1<br />
2<br />
3<br />
4<br />
ANT<br />
OUT2<br />
<strong>BIXLR22</strong><br />
S1<br />
BIXMR2<br />
PRG<br />
JR1<br />
JR3= not used 1<br />
JR5<br />
2<br />
JR4<br />
3<br />
4<br />
OUT1<br />
JR2<br />
1<br />
2<br />
3<br />
4<br />
ANT<br />
OUT2<br />
CH1<br />
CH3<br />
Premere PRG per 5 s<br />
Push PRG for 5 s<br />
CH2<br />
CH4<br />
Nuovo <strong>GOL</strong>4-<strong>GOL</strong>4C<br />
New <strong>GOL</strong>4-<strong>GOL</strong>4C<br />
Attendere 10 s<br />
Wait for 10 s<br />
Premere CH<br />
Push CH<br />
Fig. 2<br />
24 V<br />
12 V<br />
ON<br />
OFF<br />
CH1<br />
CH2<br />
CH3<br />
CH4<br />
OUT1OUT2<br />
PRG<br />
CH1<br />
CH3<br />
Attendere 10 s<br />
Wait for 10 s<br />
CH2<br />
CH4<br />
Fig. 1<br />
<strong>GOL</strong>4 memorizzato<br />
Stored <strong>GOL</strong>4<br />
Nuovo <strong>GOL</strong>4<br />
New <strong>GOL</strong>4<br />
Fig. 3<br />
Premere CH1+CH2 per 5 s<br />
Push CH1+CH2 for 5 s<br />
CH1 CH2<br />
Premere CH1+CH2 per 5 s<br />
Push CH1+CH2 for 5 s<br />
CH1<br />
Inserire il codice<br />
Enter code<br />
CH2 CH1 CH2<br />
BATTERIA - BATTERY<br />
Fare attenzione alla polarità<br />
Pay attention to polarity<br />
Nuovo <strong>GOL</strong>4C<br />
New <strong>GOL</strong>4C<br />
Premere CH<br />
Push CH<br />
<strong>GOL</strong>4C memorizzato<br />
Stored <strong>GOL</strong>4C<br />
Nuovo <strong>GOL</strong>4C<br />
New <strong>GOL</strong>4C<br />
Esempio ON<br />
Example OFF<br />
CH1=0 (DIP=OFF)<br />
CH2=1 (DIP=ON)<br />
Fig. 4 Fig. 5 Fig. 6<br />
CR2032<br />
3V<br />
+<br />
Frequenza serie L<br />
L series frequency<br />
Tipo<br />
Type<br />
Alimentazione<br />
Power supply<br />
Nr. canali<br />
Nr. channels<br />
Portata<br />
Range<br />
Nr. codici mem.<br />
Mem. code nr<br />
Uscita<br />
Output<br />
<strong>GOL</strong>4 433,92 MHz Rolling Code 3V=/220 mAh (*) 4 50÷100 m / /<br />
<strong>GOL</strong>4C 433,92 MHz Fixed Code 3V=/220 mAh (*) 4 50÷100 m / /<br />
<strong>BIXLR22</strong> 433,92 MHz /<br />
12V= 20 mA<br />
24V=/~ 20 mA<br />
2 / 200 2 relays 1 A/30 V<br />
(*) Utilizzare batterie tipo CR2032 o equivalenti / Use CR2032 type batteries or equivalent<br />
DITEC S.p.A.<br />
Via Mons. Banfi, 3 - 21042 Caronno Pertusella (VA) - ITALY<br />
Tel. +39 02 963911 - Fax +39 02 9650314<br />
www.ditec.it - ditec@ditecva.com
I<br />
DICHIARAZIONE CE DI CONFORMITÀ<br />
DITEC S.p.A. - via Mons. Banfi, 3 - 20142 Caronno P.lla (VA) - ITALY<br />
Dichiara che i radiocomandi <strong>GOL</strong>4, <strong>GOL</strong>4V, <strong>GOL</strong>4C, <strong>GOL</strong>4CV, <strong>BIXLR22</strong> sono<br />
conformi alla direttiva 1999/5/CE R&TTE.<br />
Caronno Pertusella,<br />
Fermo Bressanini<br />
21/06/2006 (Presidente)<br />
1. TRASMETTITORE<br />
I radiocomandi serie <strong>GOL</strong> servono per attivare da remoto porte e cancelli motorizzati.<br />
I trasmettitori <strong>GOL</strong> sono compatibili con tutti i ricevitori BIX e con tutti i quadri elettronici<br />
con ricevitore a bordo.<br />
2. RICEVITORE (fig. 1)<br />
I ricevitori <strong>BIXLR22</strong> possono essere inseriti direttamente nei quadri elettronici o<br />
nella base porta scheda CONT1.<br />
N.B.: alcuni tipi di quadri elettronici sono forniti con il ricevitore 4 canali già incorporato.<br />
La memoria BIXMR2 del ricevitore può contenere max 200 trasmettitori.<br />
Verificare che la memoria BIXMR2 sia inserita sul connettore COM del ricevitore.<br />
Attenzione: l’inserimento e l’estrazione della memoria BIXMR2 deve essere<br />
effettuata in assenza di alimentazione.<br />
I ricevitori sono dotati di antenna (filo rigido lunghezza 173 mm). In alternativa è<br />
possibile collegare l’antenna accordata BIXAL.<br />
Per collegare l’antenna al ricevitore usare un cavo coassiale tipo RG58 (max. 10 m).<br />
L’antenna deve essere posizionata il più in alto possibile, lontano da strutture metalliche.<br />
E’ possibile usare i lampeggianti provvisti di antenna a filo.<br />
3. SELEZIONE CANALI-USCITE (fig.1)<br />
2 dei 4 canali dei trasmettitori possono essere abbinati alle 2 uscite del ricevitore<br />
<strong>BIXLR22</strong> mediante i seguenti jumper:<br />
JR1 = uscita OUT1, attivazione led LD1;<br />
JR2 = uscita OUT2, attivazione led LD2.<br />
4. MEMORIZZAZIONE <strong>GOL</strong>4-<strong>GOL</strong>4C (fig. 2)<br />
- Premere il pulsante PRG presente sul ricevitore o sul quadro elettronico, il led<br />
segnalazione SIG si accende.<br />
- Effettuare una trasmissione premendo uno qualsiasi dei pulsanti CH del trasmettitore<br />
(entro la porta del ricevitore).<br />
Il trasmettitore viene così memorizzato. Durante questa fase il led segnalazione<br />
SIG lampeggia. Quando il led torna acceso è possibile abilitare un nuovo<br />
trasmettitore.<br />
Abilitare tutti i nuovi trasmettitori effettuando una trasmissione come indicato.<br />
N.B.: se JR4=ON vengono memorizzati tutti i canali. Se JR4=OFF viene memorizzato<br />
solo il tasto canale premuto.<br />
- L’uscita dalla procedura avviene in modo automatico dopo 10 s dall’ultima trasmissione<br />
oppure premendo nuovamente il tasto PRG (il led SIG si spegne).<br />
5. MEMORIZZAZIONE A DISTANZA <strong>GOL</strong>4 (fig. 3)<br />
Con JR5=ON si abilita la programmazione remota. Per memorizzare nuovi trasmettitori<br />
senza agire sul ricevitore, premere PRG di un trasmettitore <strong>GOL</strong>4 già<br />
memorizzato per 5 s fino all’accensione del led (entro la portata del ricevitore) e<br />
premere uno qualsiasi dei tasti CH del nuovo trasmettitore.<br />
N.B.: fare attenzione che i trasmettitori dei vicini non vengano memorizzati<br />
involontariamente.<br />
6. CLONAZIONE <strong>GOL</strong>4C (fig. 4)<br />
- Premere contemporaneamente CH1 e CH2 di un nuovo trasmettitore per 5 s.<br />
Il led rosso si accende.<br />
- Avvicinare il trasmettitore <strong>GOL</strong>4C già memorizzato come iondicato in fig. 4 ed<br />
eseguire una trasmissione premendo uno qualsiasi dei pulsanti CH.<br />
- Dopo tre lampeggi di conferma si esce automaticamente dalla procedura.<br />
N.B.: è possibile effettuare la clonazione anche dei trasmettitori BIXLS2.<br />
7. CLONAZIONE <strong>GOL</strong>4C MEDIANTE INSERIMENTO CODICE (fig. 5)<br />
- Premere contemporaneamente CH1 e CH2 di un nuovo trasmettitore per 5 s.<br />
Il led rosso si accende.<br />
- Inserire un codice di 10 cifre premendo CH1=0 (OFF) o CH2=1 (ON). Tra una<br />
pressione e l’altra si dispone di 5 s.<br />
- L’uscita dalla procedura avviene in modo automatico dopo l’inserimento della<br />
decima cifra. (Il trasmettitore effettua 3 lampeggi)<br />
N.B.: questa procedura rende il trasmettitore <strong>GOL</strong>4C equivalente ad un trasmettitore<br />
BIXLS2.<br />
8. CANCELLAZIONE TRASMETTITORI DALLA MEMORIA DEL RICEVITORE<br />
- Tenere premuto il pulsante PRG presente sul ricevitore o sul quadro elettronico<br />
per 3 s, finché il led SIG comincia a lampeggiare.<br />
- Per cancellare tutti i trasmettitori dalla memoria premere nuovamente il pulsante PRG<br />
per 3 s.<br />
- Per cancellare un singolo trasmettitore, premere uno qualsiasi dei pulsanti CH<br />
del trasmettitore da cancellare.<br />
- La cancellazione viene confermata dal lampeggio veloce del led SIG.<br />
9. SOSTITUZIONE BATTERIA (fig. 6)<br />
Usare la massima cautela nel sostituire la batteria. Fare attenzione alle polarità.<br />
Non maneggiare la batteria con l’ausilio di pinze o altro, per evitare rischi di<br />
scarica o esplosione.<br />
Per garantire prestazioni ottimali, si consiglia di sostituire la batteria una volta<br />
l’anno o quando si riscontra un consistente calo di portata.<br />
EC DECLARATION OF CONFORMITY<br />
DITEC S.p.A. - via Mons. Banfi, 3 - 20142 Caronno P.lla (VA) - ITALY<br />
Declares that <strong>GOL</strong>4, <strong>GOL</strong>4V, <strong>GOL</strong>4C, <strong>GOL</strong>4CV, <strong>BIXLR22</strong> remote controls meet<br />
the essential requisites fixed by the Directive 1999/5/EC R&TTE.<br />
Caronno Pertusella,<br />
Fermo Bressanini<br />
21/06/2006 (President)<br />
1. TRANSMITTER<br />
The remote controls of the <strong>GOL</strong> range are used to activate motorised doors and gates<br />
from a distance, <strong>GOL</strong> transmitters are compatible with all BIX receivers and with all<br />
control panels with an incorporated receiver.<br />
2. RECEIVER (fig. 1)<br />
The <strong>BIXLR22</strong> receivers can be inserted directly in the control panels or in the<br />
card holder base CONT1.<br />
Note: some types of control panels are supplied with the 4-channel receiver already incorporated.<br />
The BIXMR2 memory of the receiver can contain up to 200 transmitters.<br />
Check that the BIXMR2 memory is inserted on the COM connector of the receiver.<br />
Warning: the insertion and extraction of the BIXMR2 memory must be carried out<br />
in the absence of a power supply.<br />
The receivers are equipped with an antenna (rigid wire of 173mm). Alternatively,<br />
it is possible to connect the tuned BIXAL antenna.<br />
To connect the antenna to the receiver, use a coaxial cable, type RG58 (max. 10m).<br />
The antenna must be positioned as high as possible, far from any metal structures.<br />
You can use the flashing lights supplied with a wired antenna.<br />
3. SELECTION OF CHANNELS-OUTPUTS (fig.1)<br />
Two of the four transmitter channels must be matched with the two outputs of the<br />
<strong>BIXLR22</strong> receiver by means of the following jumpers:<br />
JR1 = output OUT1, activation of LED LD1;<br />
JR2 = output OUT2, activation of LED LD2.<br />
4. MEMORIZATION <strong>GOL</strong>4-<strong>GOL</strong>4C (fig. 2)<br />
- Press the PRG button on the receiver or on the control panel; the SIG indicator<br />
LED lights up.<br />
- Make a transmission by pressing any one of the CH buttons of the transmitter<br />
(within the range of the receiver).<br />
The transmitter is now memorised. During this phase, the SIG indicator LED<br />
flashes. When the LED is again lit up, it is possible to validate another transmitter.<br />
Validate all the new transmitters by making a transmission as indicated.<br />
Note: if JR4=ON, all the channels are memorised. If JR4=OFF, only the channel<br />
key that is pressed is memorised.<br />
- You automatically exit the procedure 10 seconds after the last transmission, or<br />
you can press the PRG button again (the SIG LED goes off).<br />
5. <strong>GOL</strong>4 LONG DISTANCE MEMORIZATION (fig. 3)<br />
With JR5=ON, the remote programming is enabled. To memorise new transmitters<br />
without using the receiver, press the PRG of a <strong>GOL</strong>4 transmitter already memorised<br />
for 5 seconds, until the LED comes on (within the range of the receiver) and press<br />
any one of the CH keys of the new transmitter.<br />
Note: be careful not to accidentally memorise the transmitters of your neighbours.<br />
6. CLONING <strong>GOL</strong>4C (fig. 4)<br />
- Press CH1 and CH2 of a new transmitter simultaneously for 5 seconds; the<br />
red LED comes on.<br />
- Bring the <strong>GOL</strong>4C transmitter (already memorised) near (see fig. 4), and make<br />
a transmission by pressing any one of the CH buttons.<br />
- After three confirmation flashes, you automatically exit the procedure.<br />
Note: it is also possible to carry out the cloning of the BIXLS2 transmitters.<br />
7. CLONING <strong>GOL</strong>4C USING CODE (fig. 5)<br />
- Press CH1 and CH2 of a new transmitter at the same time and for 5 seconds;<br />
the red LED comes on.<br />
- Insert a 10-figure code, pressing CH1=0 (OFF) or CH2=1 (ON). You have 5<br />
seconds of time between one pressing and the next.<br />
- You exit the procedure automatically after inserting the tenth figure. (The transmitter<br />
flashes 3 times)<br />
Note: this procedure makes the <strong>GOL</strong>4C transmitter equivalent to a BIXLS2 transmitter.<br />
8. CANCELLATION OF TRANSMITTERS FROM MEMORY OF RECEIVER<br />
- Keep pressed the PRG button on the receiver or on the control panel for 3<br />
seconds, until the SIG LED begins to flash.<br />
- To cancel all the transmitters from the memory of the receiver keep the PRG<br />
button pressed again for 3 seconds.<br />
- To cancel a single transmitter, press any one of the CH buttons of the transmitter<br />
to be cancelled.<br />
- The cancellation is confirmed by the quick flashing of the SIG LED.<br />
9. BATTERY REPLACEMENT (fig. 6)<br />
Be extremely careful when replacing the battery. Pay attention to the polarities.<br />
Do not handle the battery with pliers or other tools, to avoid the risk of discharge<br />
or explosion.<br />
To ensure an optimum performance, you are advised to replace the battery once<br />
a year, or when you notice a substantial loss of range.<br />
GB<br />
<strong>BIXLR22</strong> <strong>GOL</strong> - <strong>IP1852</strong><br />
2