Garagentoröffner Modell LiftMaster 1000A, 800A, 600A Instructions
Garagentoröffner Modell LiftMaster 1000A, 800A, 600A Instructions
Garagentoröffner Modell LiftMaster 1000A, 800A, 600A Instructions

Create successful ePaper yourself
Turn your PDF publications into a flip-book with our unique Google optimized e-Paper software.
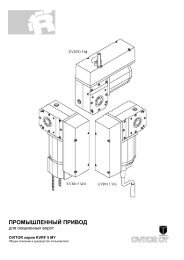
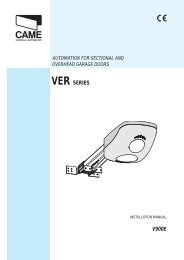
180 s120 s60 sRED1WHT2LOCKLOCKLIGHTLOCKLIGHTO –180 s 60 s120 s1 2321 Install Door ControlLocate door control where the garage door isvisible, away from door and door hardware andout of the reach of children. Mount at least 1,5 m(5 feet) above the floor.Serious personal injury from a moving garagedoor may result from misuse of opener. Do notallow children to operate the door control orremote control transmitter.Fasten the caution label permanently to the wallnear the door control as a reminder of safeoperating procedures.There are 2 screw terminals (1) on the back of thedoor control (2). Strip about 6mm (1/4") of insulationfrom bell wire (4). Separate wires enough to connectthe white/red wire to RED terminal screw 1 and thewhite wire to WHT terminal screw 2.Fasten the door control to an inside garage wall withsheet metal screws (3) provided. Drill 4mm (5/32")holes and use anchors if installing into drywall. Aconvenient place is beside the service door and out ofreach of children.Run the bell wire up the wall and across the ceiling tothe garage door opener. Use insulated staples tosecure wire. The receiver quick connect terminals arelocated behind the light lens of the opener. Connectthe bell wire to the terminals as follows: white/red tored and white to white (5).Operation of the Door ControlPress to open or close the door. Press again to stopthe door while moving.4O –2WHT2RED11121(Model <strong>600A</strong>)53(Models <strong>800A</strong>, <strong>1000A</strong>)LIGHT1 236mm3322 Program your Opener & RemoteActivate the opener only when door is in full view,free of obstruction and properly adjusted. No oneshould enter or leave garage while door is inmotion. Do not allow children to operate pushbutton(s) or remote(s). Do not allow children toplay near the door.Your garage door opener receiver and remote controltransmitter are set to a matching code. If youpurchase additional remote controls, the garage dooropener must be programmed to accept the newremote code.Program the Receiver to Match Additional RemoteControl Codes:Using the orange “LEARN” Button:1. Press and release the orange “learn” button on theopener. The learn indicator light will glow steadilyfor 30 seconds (1).2. Within 30 seconds, press and hold the button onthe hand-held remote that you wish to operate yourgarage door (2).3. Release the button when the opener light blinks. Ithas learned the code. If the light bulb is notinstalled, two clicks will be heard (3).Using the Multi-Function Door Control:1. Press and hold the button on the hand-held remotethat you wish to operate your garage door (4).2. While holding the remote button, press and hold theLIGHT button on the Multi-Function DoorControl (5).3. Continue holding both buttons while you press thepush bar on the Multi-Function Door Control (allthree buttons are held) (6).4. Release buttons when the opener light blinks. It haslearned the code. If the light bulb is not installed,two clicks will be heard (7).Now the opener will operate when the remote controlpush button is pressed. If you release the remotecontrol push button before the opener light flashes,the opener has not learned the code.To Erase all Remote Control Codes:To deactivate any unwanted remote, first erase allcodes: Press and hold the orange “learn” button onopener until the learn indicator light goes out(approximately 6 seconds). All previous codes arenow erased. Reprogram each remote or keyless entryyou wish to use.3-Channel Remote:If provided with your garage door opener, the largebutton is factory programmed to operate it. Additionalbuttons on any rolling code 3-channel remote ormini-remote can be programmed to operate this orother rolling code garage door openers.4<strong>LiftMaster</strong>1 3256<strong>LiftMaster</strong>723 Open/Close/Stop Operation(only if you have a Multifunction door control)Your remote control can be programmed to operateone door using all 3 buttons: the left button will onlyopen the door, the middle button will only close thedoor, and the third button will stop the door’smovement. You may set up this feature as follows:1. With the door closed, press and hold the leftremote push button.2. Press and hold the Lock button on the doorcontrol.3. Press and hold the door control push bar.OpenCloseStopWhen the opener lights flash, release all buttons. Testby pressing the left (Open) button on the remote. Thedoor should open. Press it again while the door isopen and nothing should happen. Press the middle(Close) button and the door should close. Press thethird (Stop) button while the door is moving and itshould stop immediately.114A2910B-GB7-GB8-GB114A2910B-GB
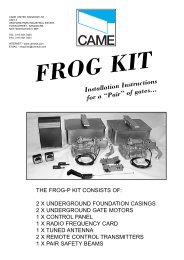
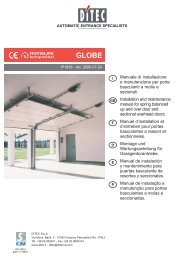
LOCKLIGHTLOCKLIGHTLOCKLIGHTO –180 s 60 s120 s1 23180 sO –120 s60 s180 sO –120 s60 s1 231 2324 Program your Keyless EntryActivate the opener only when door is in full view,free of obstruction and properly adjusted. No oneshould enter or leave garage while door is inmotion. Do not allow children to operate pushbutton(s) or remote(s). Do not allow children toplay near the door.NOTE: Your new Keyless Entry must be programmedto operate your garage door opener.Program the Receiver to Match Additional RemoteControl CodeUsing the orange “LEARN” Button:1. Press and release the orange “learn” button (1) onopener. The learn indicator light will glow steadilyfor 30 seconds.2. Within 30 seconds, enter a four digit personalidentification number (PIN) of your choice on thekeypad (2), then press and hold the ENTERbutton.3. Release the button when the opener light blinks(3). It has learned the code. If the light bulb is notinstalled, two clicks will be heard.Using the Multi-Function Door Control:NOTE: This method requires two people if theKeyless Entry is already mounted outside the garage.4. Enter a four digit personal identification number(PIN) of your choice on the keypad, then pressand hold ENTER.5. While holding the ENTER button, press and holdthe LIGHT button on the Multi-Function DoorControl.6. Continue holding the ENTER and LIGHT buttonswhile you press the push bar on the Multi-FunctionDoor Control (all three buttons are held).7. Release buttons when the opener light blinks. Ithas learned the code. If the light bulb is notinstalled, two clicks will be heard.25 Using the Wall-Mounted Door ControlTHE MULTI-FUNCTION DOOR CONTROLPress the push bar (1) to open or close the door.Press again to stop the door.Light featurePress the light button to turn the opener light on or off.It will not control the opener lights when the door is inmotion. If you turn it on and then activate the opener,the light will remain on for 2 1/2 minutes. Press againto turn it off sooner. The 2 1/2 minute interval can bechanged to 1-1/2, 3-1/2 or 4-1/2 minutes as follows:Press and hold the Lock button until the lightblinks(about 10 seconds). A single blink indicates thatthe timer is reset to 1-1/2 minutes. Repeat theprocedure and the light will blink twice, resetting thetimer to 2-1/2 minutes. Repeat again for 3-1/2 minuteinterval, etc., up to a maximum of four blinks and4-1/2 minutes.Lock featureDesigned to prevent operation of the door from handheldremote controls. However, the door will open andclose from the Door Control, the Outside Keylock andthe Keyless Entry Accessories.To activate, press and hold the Lock button (3) for 2seconds. The push bar light will flash as long as theLock feature is on.1 2 34 567LOCKLIGHTTo turn off, press and hold the Lock button again for2 seconds. The push bar light will stop flashing. TheLock feature will also turn off whenever the “LEARN”button on the opener panel is activated.12ADJUSTMENT SECTION26 Setting the LimitsTravel limits regulate the points at which the doorwill stop when moving up or down. Follow thesteps below to set the limits.To program the travel limits:1. Press and hold the black button (1) until the yellowindicator light (3) starts flashing slowly and thenrelease.2. Push and hold the black button (1) until the doorreaches the desired open position. Adjust theposition of the door by using the black (1) andorange (2) buttons. Black moves the door UP,orange moves the door DOWN.3. Push the programmed remote control (4) or pushbar on the door control that was shipped with youropener. This sets the full UP (open) position. Thedoor will travel to the floor and reverse back to theUP (open) position. The opener has learned itstravel limits.Check to be sure the door is high enough for yourvehicle. Adjust if necessary.4. The indicator light (3) will stop flashing when thelimits have been learned.NOTE: If the door reverses before it reaches the floor27 Setting the ForceThe force, as measured on the closing edge of thedoor, should not exceed 400N (40kg). If theclosing force is measured to more than 400N, theProtector System must be installed See step 29.The force setting regulates the amount of powerrequired to open and close the door.1. Locate the orange button (2).2. Push the orange button (2) twice to enter unit intoForce Adjustment Mode. The LED (3) (indicatorlight) will flash quickly.3. Push the programmed remote control (4) or pushbar on the door control that was shipped with youropener. The door will travel to the DOWN (close)position. Push the remote control (4) again, thedoor will travel to the UP (open) position.The LED (3) (indicator light) will stop flashing whenthe force has been learned.The door must travel through a complete cycle, UPand DOWN, in order for the force to be set properly. If<strong>LiftMaster</strong>28 Test the Safety Reverse SystemThe safety reverse system test is important.Garage door must reverse on contact with a40mm obstacle laid flat on the floor. Failure toproperly adjust opener may result in seriouspersonal injury from a closing garage door.Repeat test once a month and adjust as needed.Procedure: Place a 40mm obstacle (1) laid flat on thefloor under the garage door. Operate the door in thedown direction. The door must reverse on theobstruction. If the door stops on the obstruction,remove obstruction and repeat Setting the Limits step26. Repeat test.When the door reverses on the 40mm obstacle,remove the obstruction and run the opener through acomplete travel cycle. Door must not reverse inclosed position. If it does, repeat Setting the Limits<strong>LiftMaster</strong>41 2 3proceed to #15 of the Having a Problem? section andfollow the instructions for setting the limits manually.The force MUST be learned in order to properlycomplete the setting of the limits.<strong>LiftMaster</strong>4the unit cannot open and close your door fully, inspectyour door to insure that it is balanced properly and isnot sticking or binding.1222(2x)3and Force steps 26 and 27 and repeat safety reversetest.Place 20kg at the center of the door and ensure thatthe door will not move up more than 500mm.133114A2910B-GB9-GB10-GB114A2910B-GB
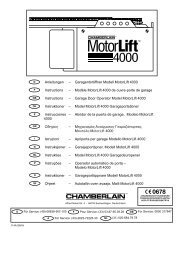
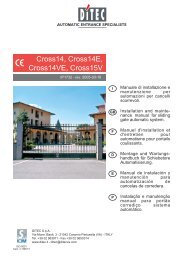
33REPLACEMENT PARTS171A47937D117-241C5392171A545108D56171A543158A49171A498216A20641C6741B5348171A384-841C5350-5 (60kg)41C5350-8 (80kg)41C5350-2 (100kg)171A32031D52528A9541B4375-3171A38441D701-2 (60kg)41D605(80kg, 100kg)CARE OF YOUR OPENERWhen properly installed, opener will provide highperformance with a minimum of maintenance. Theopener does not require additional lubrication.Limit and Force Settings: These settings must bechecked and properly set when opener is installed.Weather conditions may cause some minor changes inthe door operation, requiring some re-adjustments,particularly during the first year of operation.Refer to Setting the Limits and Force on page 10.Follow the instructions carefully and repeat the safetyreverse test after any adjustment.Remote Control: The remote control may be securedto a car sun visor with the clip provided. Additional171A31541B5351-526B66-2 (Schuko)26B62-3 (UK)26B63 (Swiss cord)26B72 (Australia & China)26B83 (Danish)41A5443-5 (60kg)41A5443-9 (80kg)41A5443-10 (100kg)41A5696-2b (60kg)41A5696-4b (80kg, 100kg)41D163remotes can be purchased at any time for use in allvehicles using garage. Refer to Accessories. Any newremotes must be programmed into the opener.Remote Control Battery: The lithium batteries shouldproduce power for up to 5 years. If transmission rangelessens, replace battery .To Change Battery: To replace batteries, use the visorclip or screwdriver blade to pry open the case. Insertbatteries positive side up. To replace cover, snap shutalong both sides. Do not dispose of the old battery withhousehold waste. Take batteries to a proper disposalcenter.MAINTENANCE OF YOUR OPENEROnce a Month:Once a Year:• Repeat safety reverse test. Make any necessary • Oil door rollers, bearings and hinges. The opener doesadjustments.not require additional lubrication. Do not grease the• Manually operate door. If it is unbalanced or binding, door tracks.call for professional garage door service.• GREASE THE RAIL AND THE TROLLEY.• Check to be sure door opens and closes fully. SetLimits and/or Force if necessary.13-GB114A2910B-GBHAVING A PROBLEM?1. Opener doesn't operate from either door controlor remote:• Does the opener have electric power? Plug lamp intooutlet. If it doesn't light, check the fuse box or thecircuit breaker. (Some outlets are controlled by a wallswitch.)• Have you disengaged all door locks? Reviewinstallation instruction warnings on page 1.• Is there a build-up of ice or snow under door? Thedoor may be frozen to ground. Remove anyobstruction.• The garage door spring may be broken. Have itreplaced.2. Opener operates from remote but not from doorcontrol:• Is door control button lit? If not, remove the bell wirefrom the opener terminals. Short the red and whiteterminals by touching both terminals at the same timewith a piece of wire. If the opener runs, check for afaulty wire connection at the door control, a shortunder the staples, or a broken wire.• Are wiring connections correct? Review page 7.3. Door operates from door control but not fromremote:• Replace battery if necessary.• If you have two or more remotes and only oneoperates, review Program Your Opener, Remote andKeyless Entry steps 22 and 24.• Is the door control button flashing? The opener is inlock mode. If you have a Multi-Function Door Control,push and hold the Lock button for 2 seconds. Thedoor control button will stop flashing.4. Remote has short range:• Is battery installed?• Change the location of the remote control on the car.• A metal garage door, foil-backed insulation or metalsiding will reduce the transmission range.5. Door reverses for no apparent reason andopener light doesn't blink:• Is something obstructing the door? Pull manualrelease handle. Operate door manually. If it isunbalanced or binding, call for professional garagedoor service.• Clear any ice or snow from garage floor area wheregarage door closes.• Repeat Setting Limits and Force, see adjustmentsteps 26 and 27.Repeat safety reverse test after adjustment iscomplete.6. Door reverses for no apparent reason andopener light blinks for 5 seconds after reversing:Check The Protector System (if you have installedthis accessory). If the light is blinking, correctalignment.7. Opener noise is disturbing in living quartersof home:If operational noise is a problem because of proximityof the opener to the living quarters, Vibration IsolatorKit 41A3263 can be installed. This kit was designed toreduce the "sounding board effect" and is easy toinstall.8. The garage door opens and closes by itself:Make sure remote push button is not stuck "on".9. Door stops but doesn't close completely:Repeat Setting the Limits, see adjustment step 26.Repeat safety reverse test after any adjustment of doorarm length, close force or down limit.14-GB10. Door opens but won't close:• Check The Protector System (if you have installedthis accessory). If the light is blinking, correctalignment.• If opener light does not blink and it is a newinstallation, repeat Setting the Limit and Force steps26 and 27.Repeat the safety reverse test after the adjustment iscomplete.11. Opener light does not turn on:Replace light bulb (230V/40W maximum). Replaceburned out bulbs with rough service light bulbs.12. Opener strains:Door may be unbalanced or springs are broken. Closedoor and use manual release rope and handle todisconnect trolley. Open and close door manually. Aproperly balanced door will stay in any point of travelwhile being supported entirely by its springs. If it doesnot, call for professional garage door service to correctthe problem.13. Opener motor hums briefly, then won't work:• Garage door springs are broken. SEE ABOVE.• If problem occurs on first operation of opener, door islocked. Disable door lock.Repeat safety reverse test after adjustment iscomplete.14. Opener won't activate due to power failure:• Pull manual release rope and handle down todisconnect trolley. Door can be opened and closedmanually. When the power is restored, pull themanual release handle down and toward opener. Thenext time the opener is activated, the trolley willreconnect.• The Outside Quick Release accessory (if fitted)disconnects the trolley from outside the garage incase of power failure.15. Setting the limits manually:1. Press and hold the black button until the yellowindicator light starts flashing slowly then release.2. Adjust the position of the door by using the blackand orange buttons. Black moves the door UP(open) and orange moves the door DOWN (close).Check to be sure the door opens high enough for yourvehicle.3. Push the remote control or door control. This setsthe UP (open) limit and begins closing the door.Immediately press either the orange or the blackbutton. The door will stop.Adjust the desired DOWN (close) limit positionusing the black and orange buttons. Check to besure the door is fully closed without applyingexcessive pressure on the rail (rail should not bowupwards and the chain/belt should not sag or droopbelow the rail). Push the remote control or doorcontrol. This sets the DOWN (close) limit andbegins opening the door.NOTE: If neither the black or the orange button ispressed, the door will reverse off the floor and theDOWN travel limit will be set automatically.4. Open and close the door with the remote control ordoor control 2 or 3 times.• If the door does not stop in the desired UP (open)position or reverses before the door stops at theDOWN (close) position, repeat Setting the Limitsand Force, see adjustment steps 26 and 27.• If the door stops in both the desired UP (open) andDOWN (close) positions, proceed to Test the SafetyReversal System.114A2910B-GB
OPERATION OF YOUR OPENERYour opener can be activated by any of the followingdevices:• The Lighted Door Control Button. Hold the buttondown until door starts to move.• The Outside Keylock or Keyless Entry System (if youhave installed either of these accessories).• The Remote Control Transmitter. Hold the push buttondown until the door starts to move.Opening the Door Manually: Door should be fullyclosed if possible. Weak or broken springs could allowan open door to fall rapidly. Property damage orserious personal injury could result.The door can be opened manually by pulling the releasehandle down. To reconnect the door, pull the releasehandle down and toward the opener.Do not use the manual release handle to pull the dooropener or closed. When the Opener is Activated byRemote Control or Lighted Door Control Button:1. If open, the door will close. If closed, the door will open.2. If closing, the door will stop.3. If opening, the door will stop (allowing space for entryand exit of pets and for fresh air).4. If the door has been stopped in a partially open orclosed position, it will reverse direction.5. If an obstruction is encountered while closing, the doorwill reverse.6. If an obstruction is encountered while opening, the doorwill reverse and stop.7. The optional Protector System uses an invisible beamwhich, when broken by an obstruction, causes a closingdoor to open and prevents an open door from closing. Itis STRONGLY RECOMMENDED for homeowners withyoung children.Allow a 15 minute cooling period after 5 continuousoperations of the opener. The opener light will turn on: 1.when opener is initially plugged in; 2. when the power isbriefly interrupted; 3. when the opener is activated.The light turns off automatically after 2-1/2 minutes. Bulbsize is 230V/40W maximum.GARAGE DOOR OPENER WARRANTYChamberlain GmbH warrants to the first retail purchaser of this productthat the product shall be free from any defect in materials and/orworkmanship for a period of 24 full months (2 years) from the date ofpurchase. The motor is warrantied to be free from defects in materialsand/or workmanship for a period of: ML<strong>1000A</strong>, 60 full months (5 years);ML<strong>800A</strong>, 48 full months (4 years); ML<strong>600A</strong>, 36 full months (3 years) fromthe date of purchase. Upon receipt of the product, the first retailpurchaser is under obligation to check the product for any visible defects.Conditions: The warranty is strictly limited to the reparation orreplacement of the parts of this product which are found to be defectiveand does not cover the costs or risks of transportation of the defectiveparts or product.This warranty does not cover non-defect damage caused byunreasonable use (including use not in complete accordance withChamberlain’s instructions for installation, operation and care; failure toprovide necessary maintenance and adjustment; or any adaptations of oralterations to the products), labor charges for dismantling or reinstallingof a repaired or replaced unit or replacement batteries.A product under warranty which is determined to be defective inmaterials and/or workmanship will be repaired or replaced (atChamberlain's option) at no cost to the owner for the repair and/orreplacement parts and/or product. Defective parts will be repaired orreplaced with new or factory rebuilt parts at Chamberlain's option.If, during the warranty period, the product appears as though it may bedefective, contact your original place of purchase.This warranty does not affect the purchaser’s statutory rights underapplicable national legislation in force nor the purchaser’s rights againstthe retailer arising from their sales/purchase contract. In the absence ofapplicable national or EU legislation, this warranty will be the purchaser’ssole and exclusive remedy, and neither Chamberlain nor its affiliates ordistributors shall be liable for any incidental or consequential damages forany express or implied warranty relating to this product.No representative or person is authorized to assume for Chamberlainany other liability in connection with the sale of this product.SPECIFICATIONSInput Voltage...................230-240 VAC, 50HzMax. Pull Force...............600N (LM<strong>600A</strong>), 800N (LM<strong>800A</strong>),1000N (LM<strong>1000A</strong>)Power..............................6Nm (LM<strong>600A</strong>), 8Nm (LM<strong>800A</strong>),10Nm (LM<strong>1000A</strong>)Watts...............................130W (LM<strong>600A</strong>), 165W(LM<strong>800A</strong>), 190W (LM<strong>1000A</strong>)Standby Power ...............5.0W (LM<strong>600A</strong> and LM<strong>800A</strong>),5.5W (LM<strong>1000A</strong>)MotorType................................DC gearmotor permanentlubricationDrive MechanismDrive ...............................Chain/belt with two-piece trolleyon steel rail.Length of Travel..............Adjustable to 2,3m (7-1/2 feet)Travel Rate .....................5"-7" (127-178mm) per secondLamp...............................On when door starts, off 2-1/2minutes after stop.Door Linkage ..................Adjustable door arm. Pull cordtrolley release.SafetyPersonal..........................Push button and automaticreversal in down direction. Pushbutton and automatic stop in updirection.Electronic........................Automatic force adjustmentElectrical .........................Transformer overload protectorand low voltage push buttonwiring.Limit Device ....................Optical RPM/Passpoint detector.Limit Adjustment .............Electronic, Semi and FullyAutomatic.Start Circuit.....................Low voltage push button circuit.DimensionsLength (Overall)..............3,2m (122-1/2")Headroom Required .......30mmHanging Weight ..............32 lb (14,5 kg)ReceiverMemory Registers ..........16 (LM<strong>600A</strong>), 32 (LM<strong>800A</strong>) &64 (LM<strong>1000A</strong>)Operating Frequency......433.92MHzSPECIAL NOTE: Chamberlain strongly recommends thatthe protector system be installed on all garage dooropeners.Declaration of ConformityThe undersigned, hereby declare that the equipment specified, andall accessories, conforms to the Directives and Standards stated.Model: . . . . . . . . . . . . . . . . . . . . . .LM<strong>600A</strong>, LM<strong>800A</strong>, LM<strong>1000A</strong>✓ 89/336/EEC✓ 73/23/EEC✓ 1999/5/ECEN55014-1 (2000), EN55014-2 (1997), EN61000-3-2 (2000),EN61000-3-3 (1995), EN 301 489-3 (V1.3.1), EN 300 220-3(V1.1.1), EN60335-1 (1994), and EN60335-2-95 (2000)Declaration of IncorporationA power door operator, in combination with a Garage Door must beinstalled and maintained according to all the Manufacturer’sinstructions, to meet the provisions of Machinery Directive,89/392/EEC.B. P. KelkhoffManager, Regulatory AffairsChamberlain GmbHD-66793 SaarwellingenMay, 2004114A2910B-GB©2004, Chamberlain GmbHAll rights reserved114A2910B-DK