Peltor FMT200 Rallyintercom
Peltor FMT200 Rallyintercom
Peltor FMT200 Rallyintercom
Create successful ePaper yourself
Turn your PDF publications into a flip-book with our unique Google optimized e-Paper software.
E<br />
<strong>Peltor</strong> <strong>FMT200</strong> Rally Intercom<br />
The <strong>Peltor</strong> <strong>FMT200</strong> Rally Intercom is the result of over 20 years’ experience in rally competition and<br />
close collaboration with several world-leading rally teams. The design and choice of materials are<br />
intended to minimise interference from other electronic equipment in the car, minimise the risk of<br />
incorrect use, and maximise audibility and communication capabilities in the extreme environment<br />
of a rally car. The <strong>Peltor</strong> <strong>FMT200</strong> can also be connected to a communication radio, GSM telephone<br />
or an audio output signal for video.<br />
The <strong>Peltor</strong> <strong>FMT200</strong> Rally Intercom is approved according to EN50081-1, EN50082-2 and ISO7673-1.<br />
Read these instructions carefully to derive the most benefit from your <strong>Peltor</strong> product.<br />
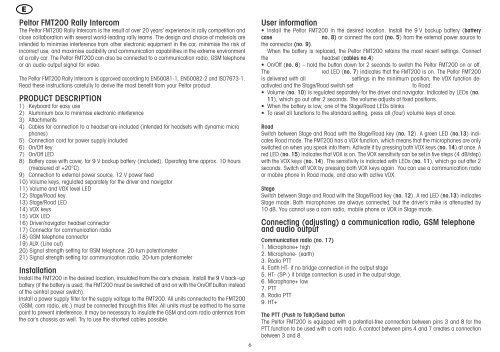
PRODUCT DESCRIPTION<br />
1) Keyboard for easy use<br />
2) Aluminium box to minimise electronic interference<br />
3) Attachments<br />
4) Cables for connection to a headset are included (intended for headsets with dynamic micro<br />
phones)<br />
5) Connection cord for power supply included<br />
6) On/Off key<br />
7) On/Off LED<br />
8) Battery case with cover, for 9 V backup battery (included). Operating time approx. 10 hours<br />
(measured at +20°C).<br />
9) Connection to external power source, 12 V power feed<br />
10) Volume keys, regulated separately for the driver and navigator<br />
11) Volume and VOX level LED<br />
12) Stage/Road key<br />
13) Stage/Road LED<br />
14) VOX keys<br />
15) VOX LED<br />
16) Driver/navigator headset connector<br />
17) Connector for communication radio<br />
18) GSM telephone connector<br />
19) AUX (Line out)<br />
20) Signal strength setting for GSM telephone. 20-turn potentiometer<br />
21) Signal strength setting for communication radio. 20-turn potentiometer<br />
Installation<br />
Install the <strong>FMT200</strong> in the desired location, insulated from the car’s chassis. Install the 9 V back–up<br />
battery (if the battery is used, the <strong>FMT200</strong> must be switched off and on with the On/Off button instead<br />
of the central power switch).<br />
Install a power supply filter for the supply voltage to the <strong>FMT200</strong>. All units connected to the <strong>FMT200</strong><br />
(GSM, com radio, etc.) must be connected through this filter. All units must be earthed to the same<br />
point to prevent interference. It may be necessary to insulate the GSM and com radio antennas from<br />
the car’s chassis as well. Try to use the shortest cables possible.<br />
<br />
User information<br />
• Install the <strong>Peltor</strong> <strong>FMT200</strong> in the desired location. Install the 9 V backup battery (battery<br />
case<br />
no. 8) or connect the cord (no. 5) from the external power source to<br />
the connector (no. 9).<br />
When the battery is replaced, the <strong>Peltor</strong> <strong>FMT200</strong> retains the most recent settings. Connect<br />
the<br />
headset (cables no.4)<br />
• On/Off (no. 6) – hold the button down for 2 seconds to switch the <strong>Peltor</strong> <strong>FMT200</strong> on or off.<br />
The<br />
red LED (no. 7) indicates that the <strong>FMT200</strong> is on. The <strong>Peltor</strong> <strong>FMT200</strong><br />
is delivered with all<br />
settings in the minimum position, the VOX function deactivated<br />
and the Stage/Road switch set<br />
to Road.<br />
• Volume (no. 10) is regulated separately for the driver and navigator. Indicated by LEDs (no.<br />
11), which go out after 2 seconds. The volume adjusts at fixed positions.<br />
• When the battery is low, one of the Stage/Road LEDs blinks.<br />
• To reset all functions to the standard setting, press all (four) volume keys at once.<br />
Road<br />
Switch between Stage and Road with the Stage/Road key (no. 12). A green LED (no.13) indicates<br />
Road mode. The <strong>FMT200</strong> has a VOX function, which means that the microphones are only<br />
switched on when you speak into them. Activate it by pressing both VOX keys (no. 14) at once. A<br />
red LED (no. 15) indicates that VOX is on. The VOX sensitivity can be set in five steps (4 dB/step)<br />
with the VOX keys (no. 14). The sensitivity is indicated with LEDs (no. 11), which go out after 2<br />
seconds. Switch off VOX by pressing both VOX keys again. You can use a communication radio<br />
or mobile phone in Road mode, and also with active VOX.<br />
Stage<br />
Switch between Stage and Road with the Stage/Road key (no. 12). A red LED (no.13) indicates<br />
Stage mode. Both microphones are always connected, but the driver’s mike is attenuated by<br />
10 dB. You cannot use a com radio, mobile phone or VOX in Stage mode.<br />
Connecting (adjusting) a communication radio, GSM telephone<br />
and audio output<br />
Communication radio (no. 17)<br />
1. Microphone+ high<br />
2. Microphone- (earth)<br />
3. Radio PTT<br />
4. Earth HT- if no bridge connection in the output stage<br />
5. HT- (SP-) if bridge connection is used in the output stage.<br />
6. Microphone+ low<br />
7. PTT<br />
8. Radio PTT<br />
9. HT+<br />
The PTT (Push to Talk)/Send button<br />
The <strong>Peltor</strong> <strong>FMT200</strong> is equipped with a potential-free connection between pins 3 and 8 for the<br />
PTT function to be used with a com radio. A contact between pins 4 and 7 creates a connection<br />
between 3 and 8.


