

Samsung LE19A656A1D - User Manual_84.58 MB, pdf, ENGLISH, DUTCH, FRENCH, GERMAN, ITALIAN, PORTUGUESE, SLOVENIAN, SPANISH
Samsung LE19A656A1D - User Manual_84.58 MB, pdf, ENGLISH, DUTCH, FRENCH, GERMAN, ITALIAN, PORTUGUESE, SLOVENIAN, SPANISH
Samsung LE19A656A1D - User Manual_84.58 MB, pdf, ENGLISH, DUTCH, FRENCH, GERMAN, ITALIAN, PORTUGUESE, SLOVENIAN, SPANISH

You also want an ePaper? Increase the reach of your titles
YUMPU automatically turns print PDFs into web optimized ePapers that Google loves.
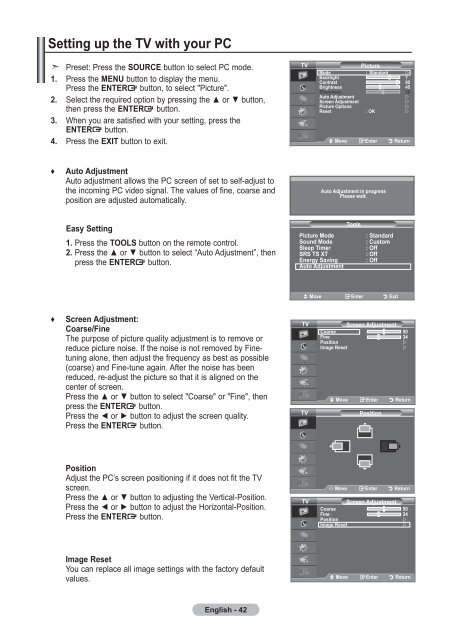
Setting up the TV with your PC<br />
Preset: Press the SOURCE button to select PC mode.<br />
1. Press the MENU button to display the menu.<br />
Press the ENTER button, to select "Picture".<br />
2. Select the required option by pressing the ▲ or ▼ button,<br />
then press the ENTER button.<br />
3. When you are satisfied with your setting, press the<br />
ENTER button.<br />
4. Press the EXIT button to exit.<br />
TV<br />
Picture<br />
Mode : Standard <br />
Backlight 7<br />
Contrast 95<br />
Brightness 45<br />
Sharpness<br />
0<br />
Auto Adjustment<br />
<br />
Screen Adjustment<br />
<br />
Picture Options<br />
<br />
Reset : OK <br />
Move Enter Return<br />
♦<br />
Auto Adjustment<br />
Auto adjustment allows the PC screen of set to self-adjust to<br />
the incoming PC video signal. The values of fine, coarse and<br />
position are adjusted automatically.<br />
Auto Adjustment in progress<br />
Please wait.<br />
Easy Setting<br />
1. Press the TOOLS button on the remote control.<br />
2. Press the ▲ or ▼ button to select “Auto Adjustment”, then<br />
press the ENTER button.<br />
Tools<br />
Picture Mode<br />
: Standard<br />
Sound Mode<br />
: Custom<br />
Sleep Timer<br />
: Off<br />
SRS TS XT<br />
: Off<br />
Energy Saving<br />
: Off<br />
Auto Adjustment<br />
Move Enter Exit<br />
♦<br />
Screen Adjustment:<br />
Coarse/Fine<br />
The purpose of picture quality adjustment is to remove or<br />
reduce picture noise. If the noise is not removed by Finetuning<br />
alone, then adjust the frequency as best as possible<br />
(coarse) and Fine-tune again. After the noise has been<br />
reduced, re-adjust the picture so that it is aligned on the<br />
center of screen.<br />
Press the ▲ or ▼ button to select "Coarse" or "Fine", then<br />
press the ENTER button.<br />
Press the ◄ or ► button to adjust the screen quality.<br />
Press the ENTER button.<br />
TV<br />
TV<br />
Screen Adjustment<br />
Coarse<br />
0<br />
Fine<br />
<br />
Position<br />
<br />
Image Reset<br />
<br />
Move Enter Return<br />
Position<br />
Position<br />
Adjust the PC’s screen positioning if it does not fit the TV<br />
screen.<br />
Press the ▲ or ▼ button to adjusting the Vertical-Position.<br />
Press the ◄ or ► button to adjust the Horizontal-Position.<br />
Press the ENTER button.<br />
TV<br />
Move Enter Return<br />
Screen Adjustment<br />
Coarse<br />
0<br />
Fine<br />
<br />
Position<br />
<br />
Image Reset<br />
<br />
Image Reset<br />
You can replace all image settings with the factory default<br />
values.<br />
Move Enter Return<br />
English - 42


