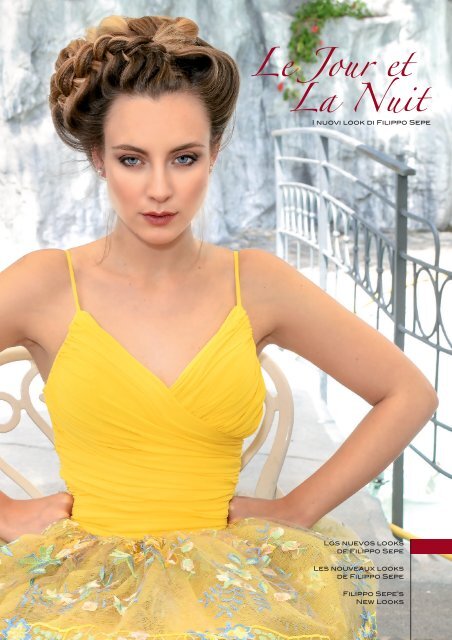
Le Jour et La Nuit by Filippo Sepe - 2019
Le Jour et La Nuit - I nuovi look di Filippo Sepe
Le Jour et La Nuit
- I nuovi look di Filippo Sepe

You also want an ePaper? Increase the reach of your titles
YUMPU automatically turns print PDFs into web optimized ePapers that Google loves.
<strong>Le</strong> <strong>Jour</strong> <strong>et</strong><br />
<strong>La</strong> <strong>Nuit</strong><br />
I nuovi look di <strong>Filippo</strong> <strong>Sepe</strong><br />
Los nuevos looks<br />
de <strong>Filippo</strong> <strong>Sepe</strong><br />
<strong>Le</strong>s nouveaux looks<br />
de <strong>Filippo</strong> <strong>Sepe</strong><br />
<strong>Filippo</strong> <strong>Sepe</strong>’s<br />
New Looks
e Jou<br />
<strong>La</strong> N<br />
“Una ragazza senza le trecce è come una montagna<br />
senza cascate, una città senza ponti.”<br />
Roman Payne<br />
È indubbio. I capelli intrecciati - da sempre - racchiudono l’essenza dell’anima<br />
femminile. Raccontano vite, sogni, desideri.<br />
A partire dall’antichità per arrivare ai giorni nostri, trecce, intrecci e nodi sono gli<br />
hairstyle che più di tutti hanno saputo attualizzarsi, attraversando i secoli, con fascino<br />
immutato. E <strong>Filippo</strong> <strong>Sepe</strong> ne è un maestro.<br />
<strong>Le</strong> sue tecniche, richieste dalle più prestigiose pedane nazionali e internazionali,<br />
rappresentano un bagaglio di conoscenze indispensabile per quegli acconciatori che<br />
amano essere aggiornati e che desiderano rendere le proprie clienti ogni giorno più<br />
“speciali”…<br />
In questo libro, le ultimissime idee di <strong>Filippo</strong> <strong>Sepe</strong> in tema di acconciatura:<br />
da realizzare subito in salone grazie alle spiegazioni step <strong>by</strong> step.<br />
Buon lavoro!<br />
2
“Una chica sin trenzas es como una montaña<br />
sin cascadas, una ciudad sin puentes.”<br />
Roman Payne<br />
Es indudable. Los cabellos trenzados - desde siempre - encierran la esencia del alma femenina.<br />
Cuentan vidas, sueños, deseos.<br />
Desde la antigüedad hasta nuestros días, trenzas, trenzados y nudos son los peinados que más que otros han sabido<br />
actualizarse, pasando a través de los siglos, con un encanto inmutable. Y <strong>Filippo</strong> <strong>Sepe</strong> es un maestro.<br />
Sus técnicas, requeridas en los escenarios nacionales e internacionales más prestigiosos, representan una riqueza de<br />
conocimientos esenciales para aquellos peluqueros que quieren estar al día y que desean que sus clientas sean cada<br />
día más “especiales”...<br />
En este libro, las últimas ideas de <strong>Filippo</strong> <strong>Sepe</strong> en términos de peinado: para ser creados inmediatamente en el salón<br />
gracias a las explicaciones paso a paso.<br />
¡Buen trabajo!<br />
r <strong>et</strong><br />
« Une fille sans tresse, c’est comme une montagne<br />
sans cascade, une ville sans ponts ».<br />
Roman Payne<br />
Rien de plus vrai. <strong>Le</strong>s cheveux tressés renferment, depuis toujours, l’essence de l’âme féminine.<br />
Elles racontent des vies, des rêves, des désirs.<br />
De l’antiquité jusqu’à nos jours, les tresses, les torsades <strong>et</strong> autres nœuds sont un style de coiffure qui, plus que<br />
n’importe quel autre, ont su se réactualiser, à travers les siècles, en conservant ce même charme intemporel. Et<br />
<strong>Filippo</strong> <strong>Sepe</strong> est un maître dans c<strong>et</strong> art.<br />
Ses techniques, redemandées par les plus grandes passerelles italiennes <strong>et</strong> du monde, constituent un bagage de<br />
connaissances indispensable pour les coiffeurs <strong>et</strong> coiffeuses qui aiment être au goût du jour <strong>et</strong> qui souhaitent<br />
rendre leurs clientes chaque jour un peu plus « spéciales »...<br />
Dans ce livre, les toutes dernières idées de <strong>Filippo</strong> <strong>Sepe</strong> en matière de coiffure : à copier aussitôt au salon grâce aux<br />
explications step-<strong>by</strong>-step.<br />
Bon travail !<br />
uit<br />
“A girl without braids is like a mountain<br />
without waterfalls, a city without bridges.”<br />
Roman Payne<br />
There is no doubt about it. Braided hair has always represented the quintessence of the female soul.<br />
Braids can express life, dreams, and desires. From antiquity until today, braids, weaving and knots have always<br />
been the hairstyles that, more than any other, have endured through the centuries thanks to their timeless charm.<br />
And <strong>Filippo</strong> <strong>Sepe</strong> is a master of braids.<br />
His techniques are requested <strong>by</strong> all the most prestigious Italian and international stages, representing an<br />
invaluable body of knowledge for those hairdressers who love being up to date and want to offer their clients a<br />
“special” look every day...<br />
In this book the reader will find <strong>Filippo</strong> <strong>Sepe</strong>’s latest ideas on hairdressing, all of which can be replicated in a<br />
salon thanks to clear step-<strong>by</strong>-step directions.<br />
Enjoy!<br />
3
e Jou<br />
Hair, Creative & Art Director: <strong>Filippo</strong> <strong>Sepe</strong><br />
<strong>La</strong> N<br />
Photo: Cesare Colognesi<br />
Make-up Artist: Rita Siviero<br />
Wardrobe: Gai Mattiolo - Roberto Ernesti - Sofia Monsurrò<br />
<strong>Le</strong>ather garments: NDN - Nando Di Nunzio<br />
Location: “LUNA DI MIELE” - Giugliano (NA)<br />
Coordination: Edizioni Esav - Torino<br />
Printed in Italy <strong>by</strong> Tipo Stampa - Moncalieri (TO)<br />
4
<strong>Le</strong> <strong>Jour</strong> <strong>et</strong> <strong>La</strong> <strong>Nuit</strong><br />
Look // 1<br />
<strong>Filippo</strong><br />
<strong>Sepe</strong>
Look // 1<br />
// 1<br />
Partendo dalla fronte sezioniamo quattro piccole<br />
ciocche non troppo ravvicinate tra loro.<br />
Partiendo desde la frente seccionamos cuatro<br />
pequeños mechones un poco distanciados entre<br />
ellos.<br />
En partant du front, former quatre p<strong>et</strong>ites<br />
mèches pas trop proches les unes des autres.<br />
Beginning at the forehead, section four small<br />
strands that are not too close tog<strong>et</strong>her.<br />
e Jou<br />
// 2∎3<br />
Con ognuna di queste realizziamo una treccia che<br />
fermiamo con una fasc<strong>et</strong>ta o un elastico.<br />
Con cada uno de ellos realizamos una trenza que<br />
fijamos con un elástico.<br />
Avec chacune, faire une tresse arrêtée par un collier<br />
ou un élastique.<br />
With each of these strands, make a braid and fix it<br />
with a band or an elastic at the end.<br />
6<br />
<strong>La</strong> N<br />
// 4<br />
Partendo dal lato sinistro sezioniamo una ciocca e la<br />
facciamo passare alternativamente sopra e sotto le trecce<br />
realizzate in precedenza. Fermiamo momentaneamente<br />
con una pinza.<br />
Partiendo por el lado izquierdo seccionamos un mechón<br />
y lo hacemos pasar alternativamente por encima y por<br />
debajo de las trenzas realizadas anteriormente. Fijamos<br />
momentáneamente con una pinza.<br />
En partant du côté gauche, sectionner une mèche <strong>et</strong> la<br />
faire passer par alternance sur/sous les tresses réalisées<br />
précédemment. Arrêter l’ensemble provisoirement avec<br />
une pince.<br />
Beginning on the left side, take a strand and weave it<br />
under and over the braids made in the previous step.<br />
Hold it in place for now with a clip.
5<br />
Passiamo adesso sul lato destro, sezioniamo una<br />
ciocca e la facciamo passare alternativamente sopra e<br />
sotto le trecce.<br />
Pasamos ahora al lado derecho, seccionamos un<br />
mechón y lo hacemos pasar alternativamente por<br />
encima y por debajo de las trenzas.<br />
En partant du côté droit, sectionner une mèche <strong>et</strong> la<br />
faire passer par alternance sur/sous les tresses.<br />
Now start on the right side <strong>by</strong> taking a strand and<br />
weaving it under and over the braids made in the<br />
previous step.<br />
r <strong>et</strong><br />
// 6<br />
Passiamo di nuovo sul lato sinistro della testa,<br />
sezioniamo una nuova ciocca e procediamo<br />
allo stesso modo.<br />
Pasamos de nuevo al lado izquierdo de la<br />
cabeza. Seccionamos un nuevo mechón y<br />
procedemos del mismo modo.<br />
Passer de nouveau sur le côté gauche de<br />
la tête, sectionner une nouvelle mèche <strong>et</strong><br />
procéder de la même façon.<br />
R<strong>et</strong>urn to the left side of the head, take a new<br />
strand and continue weaving in the same way.<br />
uit<br />
// 7<br />
Continuiamo allo stesso modo fino a m<strong>et</strong>à<br />
della testa.<br />
Continuamos del mismo modo hasta mitad<br />
de la cabeza.<br />
Continuer ainsi jusqu’à la moitié de la tête.<br />
Continue alternating sides and weaving in<br />
the same way until you reach the middle of<br />
the head in the back.<br />
// 8<br />
Raccogliamo tutti i capelli in una coda bassa e la<br />
fermiamo con una fasc<strong>et</strong>ta.<br />
Recogemos todo el cabello en una cola baja y la<br />
fijamos con un elástico.<br />
Attacher tous les cheveux dans une queue basse <strong>et</strong><br />
fixer avec un collier.<br />
Gather all the remaining lenghts of the hair into a<br />
low pony tail and fix it with a band.<br />
7
Look // 1
Look // 2<br />
<strong>Filippo</strong><br />
<strong>Sepe</strong><br />
<strong>Le</strong> <strong>Jour</strong> <strong>et</strong> <strong>La</strong> <strong>Nuit</strong>
Look // 2<br />
// 1<br />
Dividiamo i capelli in due sezioni.<br />
Realizziamo due code, una centrale di<br />
grandi dimensioni e una davanti più piccola.<br />
Chiudiamo entrambe con delle fasc<strong>et</strong>te.<br />
Dividimos el cabello en dos secciones.<br />
Realizamos dos colas, una central de<br />
grandes dimensiones y una delante más<br />
pequeña. Cerramos ambas con elásticos.<br />
e Jou<br />
// 2<br />
Dividiamo la coda centrale in due parti e cotoniamo<br />
la sezione posteriore.<br />
Dividimos la cola central en dos partes y cardamos la<br />
sección posterior.<br />
Séparer la queue centrale en deux <strong>et</strong> crêper la section<br />
arrière.<br />
Séparer les cheveux en deux sections. Faire<br />
deux queues, une centrale plus grande <strong>et</strong><br />
une devant plus p<strong>et</strong>ite. Fixer avec deux<br />
colliers.<br />
Divide the hair into two sections. Make two<br />
pony tails: a large one in the centre and a<br />
smaller one in front. Fix both of them with<br />
bands.<br />
<strong>La</strong> N<br />
// 3<br />
Divide the central pony tail into two parts and<br />
backcomb the rear section.<br />
Arrotoliamo la sezione cotonata con la<br />
punta rivolta verso il basso.<br />
Enrollamos la sección cardada con la<br />
punta orientada hacia abajo.<br />
Enrouler la section crêpée avec la pointe<br />
tournée vers le bas.<br />
Roll up the backcombed section with<br />
the end downward.<br />
10
4<br />
Inseriamo la ciocca non cotonata sopra e lavoriamo fino<br />
ad ottenere uno chignon pulito.<br />
Introducimos el mechón no cardado encima y<br />
trabajamos hasta obtener un chignon limpio.<br />
Insérer la mèche non crêpée au-dessus <strong>et</strong> travailler<br />
jusqu’à obtenir un chignon impeccable.<br />
r <strong>et</strong><br />
// 5<br />
Appuntiamo ferr<strong>et</strong>ti invisibili tutti intorno allo chignon.<br />
Fijamos con clips invisibles todos alrededor del chignon.<br />
Insérer des épingles invisibles tout autour du chignon.<br />
Use invisible hairpins all around the chignon.<br />
Insert the strand that is not backcombed over the roll<br />
and finish it until the chignon is smooth and finished.<br />
// 6<br />
<strong>La</strong>voriamo la seconda sezione (la coda più piccola)<br />
dividendola in più parti e con ognuna di queste<br />
realizziamo delle treccine.<br />
uit<br />
Trabajamos la segunda sección (la cola más pequeña)<br />
dividiéndola en más partes y con cada una de estas<br />
realizamos trencitas.<br />
Travailler la deuxième section (la queue plus p<strong>et</strong>ite) en la<br />
séparant en plusieurs mèches, <strong>et</strong> tresser chacune d’elles.<br />
Work the second section (the smaller pony tail), dividing<br />
it into several parts. Make small braids with each section.<br />
// 7<br />
<strong>La</strong>voriamo tutte le treccine formando un disegno.<br />
Trabajamos todas las trencitas formando un dibujo.<br />
Travailler toutes les fines tresses pour former un<br />
motif.<br />
Use the braids to weave and sculpt a design.<br />
11
Look // 2
Look // 3<br />
<strong>Filippo</strong><br />
<strong>Sepe</strong><br />
<strong>Le</strong> <strong>Jour</strong> <strong>et</strong> <strong>La</strong> <strong>Nuit</strong>
e Jou<br />
Look // 3<br />
// 1<br />
Realizziamo una coda centrale.<br />
Realizamos una cola central.<br />
Réaliser une queue centrale.<br />
Make a single central pony tail.<br />
<strong>La</strong> N<br />
// 2<br />
Ne separiamo una piccola sezione,<br />
attorcigliandola e girandola intorno alla coda<br />
stessa.<br />
Separamos un pequeña sección, enrollandola y<br />
girándola alrededor de la cola misma.<br />
En séparer une p<strong>et</strong>ite section <strong>et</strong> l’entortiller <strong>et</strong><br />
la tourner sur la queue.<br />
Take a small strand of the pony tail and twist it.<br />
Then wind it around the pony tail itself.<br />
14
3<br />
Continuiamo allo stesso modo fino alla fine della coda.<br />
Continuamos del mismo modo hasta el final de la cola.<br />
Continuer ainsi jusqu’à la fin de la queue.<br />
Continue in the same way until you reach the end of the<br />
pony tail.<br />
r <strong>et</strong><br />
uit<br />
// 4<br />
Giriamo la punta della coda verso la base<br />
della testa.<br />
Giramos la punta de la cola hacia la base de<br />
la cabeza.<br />
Tourner la pointe de la queue vers le bas de<br />
la tête.<br />
Turn the tip of the tail underneath toward<br />
the base of the head.<br />
// 5<br />
Fermiamo la punta della coda con moll<strong>et</strong>tine.<br />
Suj<strong>et</strong>amos la punta de la cola con clips.<br />
Fixer la pointe de la queue avec des épingles.<br />
Fix the tip of the tail with bob<strong>by</strong> pins.<br />
15
Look // 3
Look // 4<br />
<strong>Filippo</strong><br />
<strong>Sepe</strong><br />
<strong>Le</strong> <strong>Jour</strong> <strong>et</strong> <strong>La</strong> <strong>Nuit</strong>
Look // 4<br />
// 1<br />
<strong>La</strong>voriamo con una piastra mini frisé tutta<br />
la capigliatura.<br />
Trabajamos con una plancha mini frisé<br />
toda la cabellera.<br />
Travailler toute la chevelure au friseur.<br />
Use an iron to make mini-frisé on all the<br />
hair.<br />
e Jou<br />
// 2∎3<br />
Cotoniamo tutta la capigliatura per dare<br />
volume.<br />
Cardamos toda la cabellera para dar volumen.<br />
<strong>La</strong> N<br />
Crêper toute la chevelure pour donner du<br />
volume.<br />
Backcomb all the hair to add volume.<br />
18
4<br />
Raccogliamo i capelli come a voler fare una coda<br />
molto larga.<br />
Recogemos el cabello como si quisieramos hacer<br />
una cola muy ancha.<br />
Attacher les cheveux comme pour faire une queue<br />
très large.<br />
r <strong>et</strong><br />
// 5<br />
<strong>Le</strong>ghiamo la coda con una fasc<strong>et</strong>ta.<br />
Gather the hair tog<strong>et</strong>her as if to make a very wide<br />
pony tail.<br />
Atamos la cola con un elástico<br />
Fixer la queue avec un collier.<br />
Tie the pony tail with a band.<br />
uit<br />
Appoggiamo la coda sulla testa creando un volume<br />
// 6<br />
sulla fronte e fermiamo con moll<strong>et</strong>tine.<br />
Apoyamos la cola sobre la cabeza creando un<br />
volumen sobre la frente y suj<strong>et</strong>amos con clips.<br />
Poser la queue sur la tête en créant du volume sur le<br />
front <strong>et</strong> fixer avec des épingles.<br />
Bring the pony tail forward onto the head to create<br />
volume over the forehead and fix it in place with<br />
bob<strong>by</strong> pins.<br />
19
Look // 4
Look // 5<br />
<strong>Filippo</strong><br />
<strong>Sepe</strong><br />
<strong>Le</strong> <strong>Jour</strong> <strong>et</strong> <strong>La</strong> <strong>Nuit</strong>
Look // 5<br />
// 1<br />
Tracciamo una scriminatura centrale dalla fronte<br />
alla nuca, iniziando dal lato destro, e realizziamo dei<br />
nodi consecutivi fino alla fine della sezione.<br />
Trazamos una división central desde la frente a la<br />
nuca, empezando por el lado derecho, y realizamos<br />
nudos consecutivos hasta el final de la sección.<br />
Tracer une raie centrale du front à la nuque, en<br />
commençant par la droite <strong>et</strong> réaliser des nœuds<br />
consécutifs jusqu’à la fin de la section.<br />
e Jou<br />
Make a centre part from the forehead to the nape<br />
// 2<br />
Usando la stessa tecnica annodiamo<br />
tutta la sezione sinistra.<br />
Usando la misma técnica anudamos<br />
toda la sección izquierda.<br />
of the neck. Beginning on the right side. Make<br />
consecutive knots in a French braid until you reach<br />
the end of the section.<br />
<strong>La</strong> N<br />
// 3<br />
Avec la même technique, nouer toute<br />
la section gauche.<br />
Using the same technique, braid all<br />
the left-hand section.<br />
Proseguiamo con i nodi fino alla fine della capigliatura.<br />
Proseguimos con los nudos hasta el final de la cabellera.<br />
Continuer avec les nœuds jusqu’à la fin de la chevelure.<br />
Continue braiding until the entire length of the hair is<br />
braided.<br />
22
4<br />
Chiudiamo le due code con una fasc<strong>et</strong>ta<br />
e/o elastico.<br />
Cerramos las dos colas con una banda<br />
y/o elástico.<br />
Fixer les deux queues avec un collier <strong>et</strong>/<br />
ou un élastique.<br />
Tie the two ends tog<strong>et</strong>her with a band<br />
and/or elastic.<br />
r <strong>et</strong><br />
// 5<br />
Giriamo la punta delle code verso il<br />
basso e fermiamo con moll<strong>et</strong>tine.<br />
uit<br />
Giramos la punta de las colas hacia abajo<br />
y fijamos con clips.<br />
R<strong>et</strong>ourner la pointe des queues vers le<br />
bas <strong>et</strong> fixer avec des épingles.<br />
Turn the tips of the tails underneath and<br />
fix it with bob<strong>by</strong> pins.<br />
23
Look // 5
Look // 6<br />
<strong>Filippo</strong><br />
<strong>Sepe</strong><br />
<strong>Le</strong> <strong>Jour</strong> <strong>et</strong> <strong>La</strong> <strong>Nuit</strong>
Look // 6<br />
// 1<br />
Isoliamo un’unica sezione<br />
frontale.<br />
Aislamos una única sección<br />
frontal.<br />
Pull hair forward into a single<br />
e Jou<br />
// 2<br />
Realizziamo un’unica<br />
treccia a tre capi.<br />
Realizamos una única<br />
trenza de tres cabos.<br />
Former une seule <strong>et</strong><br />
unique tresse à trois<br />
brins.<br />
Make one three-strand<br />
braid.<br />
Isoler une seule <strong>et</strong> unique<br />
section frontale.<br />
section in the front.<br />
<strong>La</strong> N<br />
26
3<br />
Allarghiamo la treccia e la arrotoliamo<br />
su se stessa.<br />
Alargamos la trenza y la enrollamos<br />
sobre sí misma.<br />
Élargir la tresse <strong>et</strong> l’enrouler sur ellemême.<br />
Loosen the braid and coil it around<br />
itself.<br />
r <strong>et</strong><br />
// 4<br />
uit<br />
Giriamo la punta della coda sotto e<br />
fermiamo con moll<strong>et</strong>tine.<br />
Giramos la punta de la cola debajo<br />
y fijamos con clips.<br />
R<strong>et</strong>ourner la pointe de la queue<br />
en-dessous <strong>et</strong> fixer avec des<br />
épingles.<br />
Turn the tip of the tail underneath<br />
and fix it with bob<strong>by</strong> pins.<br />
27
Look // 6
Look // 7<br />
<strong>Filippo</strong><br />
<strong>Sepe</strong><br />
<strong>Le</strong> <strong>Jour</strong> <strong>et</strong> <strong>La</strong> <strong>Nuit</strong>
Look // 7<br />
// 1<br />
Realizziamo una coda centrale e la<br />
inseriamo dentro un cerchio di crine.<br />
Realizamos una cola central y la<br />
introducimos dentro de un circulo de<br />
crin.<br />
Réaliser une queue centrale <strong>et</strong> l’insérer<br />
dans une éponge en mousse.<br />
e Jou<br />
// 2<br />
Prendiamo delle piccole sezioni, le<br />
dividiamo in due e realizziamo dei<br />
torciglioni.<br />
Tomamos pequeñas secciones, las<br />
dividimos en dos y las enrollamos.<br />
Prendre de p<strong>et</strong>ites sections, les séparer en<br />
deux <strong>et</strong> les entortiller.<br />
Make a centred pony tail and insert it<br />
through a bun shaper.<br />
<strong>La</strong> N<br />
Take small strands, divide them in half,<br />
and twist them.<br />
// 3<br />
Inseriamo i torciglioni intorno al crine.<br />
Introducimos las dos partes enrolladas<br />
en la crin.<br />
Insérer les mèches entortillées autour de<br />
l’éponge.<br />
30<br />
Wrap the twisted strands around the<br />
bun shaper.
<strong>et</strong><br />
impact.<br />
// 4∎5<br />
Formiamo uno chignon<br />
semplice ma di grande<br />
eff<strong>et</strong>to.<br />
Formamos un chignon<br />
simple pero de gran<br />
efecto.<br />
Former un chignon<br />
simple mais d’eff<strong>et</strong>.<br />
This makes a very simple<br />
chignon with amazing<br />
uit<br />
31
Look // 7
Look // 8<br />
<strong>Filippo</strong><br />
<strong>Sepe</strong><br />
<strong>Le</strong> <strong>Jour</strong> <strong>et</strong> <strong>La</strong> <strong>Nuit</strong>
Look // 8<br />
// 1<br />
Partendo dalla fronte prendiamo una ciocca centrale,<br />
la passiamo attorno a un rotolo di crine e, dopo averla<br />
spinta in avanti per creare un volume sulla fronte, la<br />
fissiamo con delle moll<strong>et</strong>tine.<br />
Partiendo de la frente cogemos un mechón central,<br />
lo pasamos alrededor de un rollo de crin, después<br />
de haberlo empujado hacia adelante para crear un<br />
volumen sobre la frente, lo fijamos con clips.<br />
e Jou<br />
En partant du front, prendre une mèche centrale, la<br />
passer autour de l’éponge <strong>et</strong>, après l’avoir poussée<br />
vers l’avant pour donner du volume sur le front, la<br />
fixer avec des épingles.<br />
Beginning at the front, take a central strand of hair<br />
and wrap it around a roller. After having pushed it<br />
forward to create volume on the forehead, fix it in<br />
place with bob<strong>by</strong> pins.<br />
<strong>La</strong> N<br />
// 2∎3<br />
Prendiamo una seconda e una terza ciocca partendo<br />
dai lati e procediamo allo stesso modo.<br />
Cogemos un segundo y un tercer mechón partiendo<br />
desde los lados y procedemos del mismo modo.<br />
Prendre une deuxième <strong>et</strong> troisième mèche en<br />
partant des côtés <strong>et</strong> procéder de la même façon.<br />
34<br />
Take a second and third strand, beginning at the<br />
sides, and repeat the same as Step 1.
<strong>et</strong><br />
// 4<br />
Selezioniamo una quarta ciocca,<br />
facciamo un nodo al vertice e la<br />
fissiamo sulle ciocche precedenti<br />
con delle moll<strong>et</strong>tine.<br />
Seleccionamos un cuarto mechón,<br />
hacemos un nudo al vértice y<br />
lo fijamos sobe los mechones<br />
precedentes con clips.<br />
Sélectionner une quatrième<br />
mèche, faire un nœud au<br />
somm<strong>et</strong> <strong>et</strong> la fixer sur les mèches<br />
précédentes avec des épingles.<br />
Select a quarter of a strand and<br />
make a knot at the top. Fix it onto<br />
the previous strands with bob<strong>by</strong><br />
pins.<br />
// 5<br />
Rifiniamo l’acconciatura<br />
per rendere n<strong>et</strong>te e pulite<br />
le forme.<br />
Perfeccionamos el<br />
peinado para dejar<br />
limpias y n<strong>et</strong>as las formas.<br />
Parfaire la coiffure en<br />
n<strong>et</strong>toyant <strong>et</strong> épurant les<br />
formes.<br />
Finish the styling to clean<br />
up and define the lines.<br />
uit<br />
35
Look // 8
Look // 9<br />
<strong>Filippo</strong><br />
<strong>Sepe</strong><br />
<strong>Le</strong> <strong>Jour</strong> <strong>et</strong> <strong>La</strong> <strong>Nuit</strong>
Look // 9<br />
// 1∎2<br />
Realizziamo una<br />
scriminatura centrale e<br />
per ogni lato realizziamo<br />
due code. Su ciascuna di<br />
esse formiamo una treccia<br />
a tre capi prendendo a<br />
ogni passaggio una piccola<br />
ciocca dalla coda.<br />
Realizamos una división<br />
e Jou<br />
central y para cada lado<br />
realizamos dos colas.<br />
En cada una de ellas<br />
formamos una trenza de<br />
tres cabos tomando en<br />
cada pasaje un pequeño<br />
mechón de la cola.<br />
Former une raie centrale<br />
<strong>et</strong>, sur chaque côté, former<br />
deux queues. Sur chaque<br />
queue, former une tresse<br />
à trois brins en prenant, à<br />
chaque passage, une p<strong>et</strong>ite<br />
mèche de la queue.<br />
Make a centre part and<br />
make two pony tails, one<br />
on each side. On each of<br />
them, make a three-strand<br />
braid, adding a small<br />
strand from the pony tail<br />
<strong>La</strong><br />
with each step.<br />
N<br />
38
3<br />
Inseriamo la punta dell’intreccio all’interno<br />
della coda e appuntiamo con moll<strong>et</strong>tine.<br />
Introducimos la punta del trenzado en el<br />
interior de la cola y fijamos con pinzas.<br />
Insérer la pointe de la tresse dans la queue <strong>et</strong><br />
fixer avec des épingles.<br />
Insert the end of the braid into the pony tail<br />
r <strong>et</strong><br />
and fix it in place with bob<strong>by</strong> pins.<br />
// 4∎5<br />
Procediamo allo stesso modo dall’altra<br />
parte.<br />
uit<br />
Procedemos de la misma forma en la otra<br />
parte.<br />
Procéder ainsi sur l’autre côté.<br />
Continue the same way on the other side.<br />
39
Look // 9
Look // 10<br />
<strong>Filippo</strong><br />
<strong>Sepe</strong><br />
<strong>Le</strong> <strong>Jour</strong> <strong>et</strong> <strong>La</strong> <strong>Nuit</strong>
Look // 10<br />
// 1<br />
Tracciamo una scriminatura<br />
laterale, arrotoliamo la ciocca<br />
sulle due dita della mano e<br />
appuntiamo con moll<strong>et</strong>tine.<br />
Trazamos una división lateral,<br />
enrollamos el mechón sobre<br />
los dedos de la mano y<br />
fijamos con pinzas.<br />
e Jou<br />
// 2<br />
Procediamo allo stesso modo<br />
con una seconda ciocca.<br />
Preocedemos del mismo<br />
modo con un segundo<br />
mechón.<br />
Procéder ainsi avec la<br />
deuxième mèche.<br />
In the same way, make a<br />
second roll.<br />
Tracer une raie centrale,<br />
enrouler la mèche sur les<br />
deux doigts de la main <strong>et</strong><br />
fixer avec des épingles.<br />
Make a side part. Roll a<br />
strand over two fingers of<br />
your hand and fix it in place<br />
with bob<strong>by</strong> pins.<br />
<strong>La</strong> N<br />
42
<strong>et</strong><br />
// 3∎4∎5<br />
Usiamo la stessa tecnica fino alla fine della<br />
capigliatura.<br />
uit<br />
ciocche rimaste sospese e fermiamo la punta con<br />
// 6<br />
Facciamo una treccia larga a tre capi con le<br />
moll<strong>et</strong>tine.<br />
Haemos una trenza ancha de tres cabos con los<br />
mechones que quedan suspendidos y fijamos la<br />
punta con pinzas.<br />
Former une tresse large à trois brins avec les<br />
mèches restantes suspendues <strong>et</strong> fixer avec des<br />
épingles.<br />
Usamos la misma técnica hasta el fin de la<br />
cabellera.<br />
Continuer de la même façon jusqu’à la fin<br />
de la chevelure.<br />
Continue using the same technique for the<br />
length of the hair.<br />
Make a three-strand braid with the strands left<br />
hanging and fix the end in place with bob<strong>by</strong> pins.<br />
43
Look // 10
Look // 11<br />
<strong>Filippo</strong><br />
<strong>Sepe</strong><br />
<strong>Le</strong> <strong>Jour</strong> <strong>et</strong> <strong>La</strong> <strong>Nuit</strong>
Look // 11<br />
// 1<br />
Tracciamo una scriminatura centrale.<br />
Partendo dal lato destro sezioniamo una<br />
ciocca e la arrotoliamo parzialmente su se<br />
stessa a formare un cilindro. Fermiamo con<br />
moll<strong>et</strong>tine.<br />
Trazamos una división central. Partiendo<br />
del lado derecho seccionamos un mechón<br />
y lo enrollamos parcialmente sobre si<br />
mismo hasta formar un cilindro. Fijamos<br />
con pinzas.<br />
e Jou<br />
Réaliser une raie centrale. En partant<br />
du côté droit, sectionner une mèche <strong>et</strong><br />
l’enrouler partiellement sur elle-même<br />
pour former un cylindre. Fixer avec des<br />
épingles.<br />
Make a centre part. Beginning on the right<br />
side, section a strand and roll it up partially<br />
to form a sort of victory roll. Fix it in place<br />
with bob<strong>by</strong> pins.<br />
// 2∎3<br />
Procediamo allo stesso modo sul lato sinistro.<br />
Procedemos del mismo modo sobre el lado<br />
izuierdo.<br />
<strong>La</strong> N<br />
Procéder de la même façon sur le côté gauche.<br />
Continue the same way on the other side.<br />
46
4<br />
Partendo dal lato destro prendiamo un’altra sezione,<br />
la portiamo al centro della testa e la fermiamo con<br />
moll<strong>et</strong>tine.<br />
Partiendo desde el lado derecho tomamos otra<br />
sección, la llevamos al centro de la cabeza y la fijmos<br />
con pinzas.<br />
En partant du côté droit, prendre une autre section,<br />
l’amener au centre de la tête <strong>et</strong> la fixer avec des<br />
épingles.<br />
Starting on the right side, take another section and<br />
pull it towards the centre of the head, fixing it in<br />
place with bob<strong>by</strong> pins.<br />
r <strong>et</strong><br />
// 5<br />
Procediamo allo stesso modo prendendo delle<br />
ciocche da destra e da sinistra per poi fermarle al<br />
centro della testa.<br />
Procedemos de la misma manerea tomando<br />
mechones a derecha e izquierda para fijarlos<br />
después en parte central de la cabeza.<br />
Procéder de la même manière en prenant des<br />
mèches de la droite <strong>et</strong> de la gauche, puis les fixer au<br />
centre de la tête.<br />
Continue in the same way, taking strands from the<br />
right and left and fixing them in place in the centre<br />
of the head.<br />
uit<br />
// 6<br />
Procediamo allo stesso modo fino alla fine della<br />
nuca.<br />
Procedemos de la mima manera hasta el final de<br />
la nuca.<br />
Continuer ainsi jusqu’à la fin de la nuque.<br />
Continue in the same way until you reach the<br />
nape of the neck.<br />
47
Look // 11
Look // 12<br />
<strong>Filippo</strong><br />
<strong>Sepe</strong><br />
<strong>Le</strong> <strong>Jour</strong> <strong>et</strong> <strong>La</strong> <strong>Nuit</strong>
Look // 12<br />
// 1<br />
Partendo dal lato destro facciamo una treccia<br />
a tre capi con l’innesto di due ciocche una<br />
da sinistra e una da destra fino alla fine della<br />
coda.<br />
Partiendo desde el lado derecho hacemos una<br />
trenza de tres cabos con la intersección de<br />
dos mechones uno de la izquierda y uno de la<br />
derecha hasta el final de la cola.<br />
En partant du côté droit, faire une tresse à<br />
e Jou<br />
// 2<br />
Allo stesso modo facciamo una seconda<br />
treccia.<br />
Del mismo modo hacemos una segunda<br />
trenza.<br />
trois brins en introduisant deux mèches, une<br />
de la gauche <strong>et</strong> une de la droite, jusqu’à la fin<br />
de la queue.<br />
Starting on the right side, make a three-strand<br />
braid, adding two strands - one from the left<br />
and one from the right - until the very end.<br />
<strong>La</strong> N<br />
In the same way, make a second braid.<br />
De la même manière, faire une deuxième<br />
tresse.<br />
// 3<br />
Continuiamo con la stessa tecnica facendo<br />
una terza treccia.<br />
Continuamos con la misma técnica haciendo<br />
una tercera trenza.<br />
Continuer avec la même technique en faisant<br />
une troisième tresse.<br />
Continue using the same technique to make a<br />
third braid.<br />
50
4<br />
Allarghiamo un pezz<strong>et</strong>to alla volta tutta la<br />
treccia.<br />
Alargamos un trocito cada vez toda la trenza.<br />
Élargir un p<strong>et</strong>it bout à la fois, sur toute la<br />
tresse.<br />
Loosen the entire braid, one bit at a time.<br />
r <strong>et</strong><br />
// 5∎6<br />
Procediamo allo stesso modo su tutte le trecce<br />
rimanenti.<br />
Procedemos del mismo modo en todas la trenzas<br />
restantes.<br />
Procéder ainsi sur toutes les tresses restantes.<br />
uit<br />
Continue the same way on all the other braids.<br />
51
Look // 12
Look // 13<br />
<strong>Filippo</strong><br />
<strong>Sepe</strong><br />
<strong>Le</strong> <strong>Jour</strong> <strong>et</strong> <strong>La</strong> <strong>Nuit</strong>
Look // 13<br />
// 1<br />
Tracciamo una scriminatura laterale, partendo<br />
dal lato destro, sezioniamo una ciocca<br />
orizzontale e realizziamo una treccia a tre capi<br />
con l’innesto della quarta ciocca presa sia dal<br />
lato sinistro che dal lato destro.<br />
Trazamos una división lateral, partiendo<br />
del lado derecho, seccionamos un mechón<br />
horizontal y realizamos una trenza de tres<br />
cabos con la intersección del cuarto mechón<br />
tanto del lado derecho como izquierdo.<br />
e Jou<br />
// 2<br />
Intrecciamo la ciocca fino alla fine,<br />
lasciando la punta libera.<br />
Tracer une raie centrale, en partant du côté<br />
gauche, sectionner une mèche horizontale <strong>et</strong><br />
faire une tresse à trois brins en introduisant la<br />
quatrième mèche prise tant de la gauche que<br />
de la droite.<br />
Make a side part. Starting on the right side,<br />
make a horizontal section and a three-strand<br />
braid, adding a fourth strand from both the left<br />
and right sides.<br />
Trenzamos el mechón hasta el final,<br />
dejando la punta libre.<br />
Tresser la mèche jusqu’à la fin, en laissant<br />
la pointe libre.<br />
<strong>La</strong> N<br />
// 3<br />
Braid the hair until the very end, leaving<br />
the tip free.<br />
Prendiamo delle ciocche in diagonale, facciamo<br />
dei nodi alle punte e fermiamo con moll<strong>et</strong>tine<br />
sotto la treccia.<br />
Tomamos mechones en diagonal, hacemos<br />
nudos a las puntas y fijamos con clips bajo la<br />
trenza.<br />
Prendre des mèches en diagonale, faire des<br />
nœuds sur les pointes <strong>et</strong> fixer avec des épingles<br />
sous la tresse.<br />
54<br />
Take the diagonal strands and make a knot at<br />
the end. Fix it in place under the braid with<br />
bob<strong>by</strong> pins.
4∎5<br />
Rifiniamo l’acconciatura per<br />
rendere n<strong>et</strong>te e pulite le forme.<br />
Perfeccionamos el peinado para<br />
dejar limpias y n<strong>et</strong>as las formas.<br />
Parfaire la coiffure en n<strong>et</strong>toyant <strong>et</strong><br />
épurant les formes.<br />
Finish the styling <strong>by</strong> cleaning up<br />
and defining the lines.<br />
r <strong>et</strong><br />
uit<br />
55
Look // 13
Look // 14<br />
<strong>Filippo</strong><br />
<strong>Sepe</strong><br />
<strong>Le</strong> <strong>Jour</strong> <strong>et</strong> <strong>La</strong> <strong>Nuit</strong>
Look // 14<br />
// 1<br />
Realizziamo una coda centrale,<br />
prendiamo una piccola ciocca<br />
dalla coda, la dividiamo in due e<br />
facciamo un primo nodo.<br />
Realizamos una cola central.<br />
Cogemos un pequeño mechón<br />
de la cola, lo dividimos en dos y<br />
hacemos un primer nudo.<br />
e Jou<br />
Former une queue centrale,<br />
prendre une p<strong>et</strong>ite mèche de<br />
la queue, la séparer en deux <strong>et</strong><br />
faire un premier nœud.<br />
Make a pony tail at the centre<br />
of the top of the head. Take a<br />
small strand of the pony tail and<br />
divide it into two. Make a first<br />
knot.<br />
// 2<br />
Continuiamo a prendere piccole<br />
ciocche che annodiamo sulla<br />
coda.<br />
<strong>La</strong> N<br />
Continuamos cogiendo<br />
pequeños mechones que<br />
anudamos a la cola.<br />
Continuer à prendre de p<strong>et</strong>ites<br />
mèches pour les nouer sur la<br />
queue.<br />
Continue taking small strands<br />
and knotting them around the<br />
pony tail.<br />
58
<strong>et</strong><br />
// 3∎4∎5<br />
Continuiamo allo stesso modo fino alla fine<br />
della capigliatura.<br />
Continuamos del mismo modo hasta el final<br />
de la cabellera.<br />
Continuer de la même façon jusqu’à la fin de<br />
la chevelure.<br />
// 6<br />
M<strong>et</strong>tiamo la punta sotto e fermiamo con<br />
moll<strong>et</strong>tine.<br />
Continue in the same way until you reach the<br />
uit<br />
end of the pony tail.<br />
Ponemos la punta debajo y la fijamos con clips.<br />
R<strong>et</strong>ourner la pointe en-dessous <strong>et</strong> fixer avec des<br />
épingles.<br />
Turn the tip of the pony tail underneath and fix it<br />
in place with bob<strong>by</strong> pins.<br />
59
Look // 14
Look // 15<br />
<strong>Filippo</strong><br />
<strong>Sepe</strong><br />
<strong>Le</strong> <strong>Jour</strong> <strong>et</strong> <strong>La</strong> <strong>Nuit</strong>
Look // 15<br />
// 1<br />
Cotonare leggermente tutta la<br />
capigliatura.<br />
Cardamos ligeramente toda la<br />
cabellera.<br />
Crêper légèrement toute la<br />
e Jou<br />
chevelure.<br />
Lightly backcomb all the hair.<br />
// 2<br />
Prendere delle ciocche in<br />
orizzontale e fare dei nodi.<br />
<strong>La</strong> N<br />
Tomamos mechones horizontales<br />
y hacemos nudos.<br />
Prendre des mèches à<br />
l’horizontale <strong>et</strong> faire des nœuds.<br />
Take some horizontal strands and<br />
make large knots.<br />
62
3<br />
Prendere le ciocche sospese e fare una treccia a tre capi<br />
fino alla punta.<br />
Tomamos los mechones restantes y hacemos una trenza<br />
de tres cabos hasta la punta.<br />
Prendre les mèches suspendues <strong>et</strong> faire une tresse à trois<br />
brins jusqu݈ la pointe.<br />
r <strong>et</strong><br />
Seguimos del mismo modo con la otra parte de la<br />
Take the strands left hanging and make a three-strand<br />
braid until the end.<br />
// 4<br />
Proseguire allo stesso modo anche con l’altra parte della<br />
capigliatura, arrotolare le punte sotto la nuca e fermare<br />
con moll<strong>et</strong>tine.<br />
cabellera, enrollamos las puntas bajo la nuca y fijamos<br />
con pinzas.<br />
Continuer ainsi aussi avec l’autre partie de la chevelure,<br />
enrouler les pointes sur la nuque <strong>et</strong> fixer avec des<br />
épingles.<br />
// 5<br />
Rifinire l’acconciatura con lacca per rendere<br />
n<strong>et</strong>te e pulite le forme.<br />
Continue in the same way with the other ends, then roll<br />
uit<br />
the tips under the nape of the neck and fix them in place<br />
with bob<strong>by</strong> pins.<br />
Perfeccionamos el peinado con laca para dejar<br />
n<strong>et</strong>as y limpias las formas.<br />
Coiffer <strong>et</strong> fixer avec de laque pour n<strong>et</strong>toyer <strong>et</strong><br />
épurer les formes.<br />
Finish the style with hairspray to keep it neat<br />
and define the shapes.<br />
63
Look // 15