- Page 3 and 4:
EnglishInstructions for VELUX ACTIV
- Page 5 and 6:
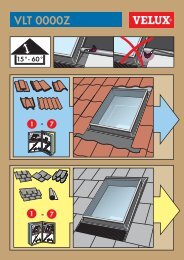
Contents of the package1 2 3 41 : C
- Page 7 and 8:
• The product is compatible with
- Page 9 and 10:
Selection keys- for activating the
- Page 11 and 12:
There are four program modes:Day:Th
- Page 13 and 14:
3Set time the first time the contro
- Page 15 and 16:
Preparing sunscreening products via
- Page 17 and 18:
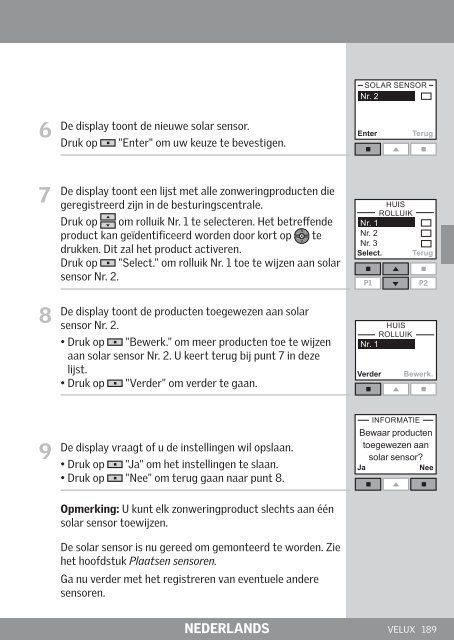
Registering sunscreening products i
- Page 19 and 20:
12The display asks whether to save
- Page 21 and 22:
Fitting controllerThe controller is
- Page 23 and 24:
Navigating through the menusThe exa
- Page 25:
SET CLOCK9:006Press to set minutes.
- Page 28 and 29:
New sunscreening productsYou can as
- Page 30 and 31:
Timetable123Timetable has been fact
- Page 32 and 33:
Ambient daylightYou can set the sun
- Page 34 and 35:
Disabling programYou can interrupt
- Page 36 and 37:
Registering new sensorsIt is advisa
- Page 38 and 39:
Display symbolsInterruption of a pr
- Page 40 and 41:
40 VELUX ENGLISH
- Page 42 and 43:
InhaltsübersichtVerpackungsinhalt
- Page 44 and 45:
Wichtige InformationenBitte bewahre
- Page 46 and 47:
SteuerungsfunktionenDas Display zei
- Page 48 and 49:
Programmarten des VELUX ACTIVESenso
- Page 51 and 52:
3Stellen Sie bei der Erstinbetriebn
- Page 53 and 54:
1Vorbereitung der Sonnenschutzprodu
- Page 55 and 56:
Registrierung der Sonnenschutzprodu
- Page 57 and 58:
12Auf dem Display erscheint die Fra
- Page 59 and 60:
Montage der SteuerungDie Steuerung
- Page 61 and 62:
MenünavigationIm folgenden Beispie
- Page 63 and 64:
Uhr einstellen9:006Drücken Sie um
- Page 65 and 66:
ProgrammeinstellungenDas Programm k
- Page 67 and 68:
6Sie werden gefragt, ob Sie dem Lic
- Page 69 and 70:
6Um das Programm für einen bestimm
- Page 71 and 72:
GlasscheibenfaktorFür Dachfenster
- Page 73 and 74:
Zurücksetzung der SteuerungDie Ste
- Page 75 and 76:
LichtsensorNr. 26Das Display zeigt
- Page 77 and 78:
DisplaytexteBlockade: Ein unbekannt
- Page 79 and 80:
KonformitätserklärungLaut der Ric
- Page 81:
Contenu de l'emballage1 2 3 41 : Ce
- Page 84 and 85:
Fonctions de la centrale muraleL'é
- Page 86 and 87:
Configuration du kit VELUX ACTIVE c
- Page 88 and 89:
Initialisation1Préparer la central
- Page 90 and 91:
Initialisation45Préparer les capte
- Page 92 and 93:
InitialisationPhase 2 : Préparatio
- Page 94 and 95:
InitialisationPhase 4 : Affecter de
- Page 96 and 97:
Installation des capteursGGLGGUSMLL
- Page 98 and 99:
Présentation des menus de la centr
- Page 100 and 101:
Heure et dateL'heure et la date peu
- Page 102 and 103:
102 VELUX FRANÇAIS
- Page 104 and 105:
Nouveaux équipements de protection
- Page 106 and 107:
Plage horaire12La plage horaire a
- Page 108 and 109:
Lumière naturelleVous pouvez défi
- Page 110 and 111:
Désactivation du programme1Vous po
- Page 112 and 113:
Enregistrer de nouveaux capteursSi
- Page 114 and 115:
Symboles de l'écranInterrompre le
- Page 116 and 117:
116 VELUX FRANÇAIS
- Page 118 and 119:
IndholdPakkens indhold 119Vigtig in
- Page 120 and 121:
Vigtig informationVejledningen bør
- Page 122 and 123:
Styrecentralens funktionerDisplayet
- Page 124 and 125:
Programtilstande i VELUX Active kli
- Page 126 and 127:
StartprocedureGøre styrecentral kl
- Page 128 and 129:
StartprocedureGøre sensorer klar o
- Page 130 and 131:
StartprocedureTrin 2: Gør betjenin
- Page 132 and 133:
StartprocedureTrin 4: Knyt indvendi
- Page 134 and 135:
Montere sensorerGGLGGUSMLSolsensore
- Page 136 and 137:
MenuoversigtNedenfor vises en overs
- Page 138 and 139: Tid og datoTid og dato kan ændres.
- Page 140 and 141: 140 VELUX DANSK
- Page 142 and 143: Nye solafskærmningsprodukterMan ka
- Page 144 and 145: Tidsplan123Tidsplan er ved levering
- Page 146 and 147: OrienteringslysMan kan indstille so
- Page 148 and 149: Deaktivere programmetMan kan afbryd
- Page 150 and 151: Registrere nye sensorerDet anbefale
- Page 152 and 153: DisplaysymbolerAfbrydelse af et pro
- Page 154 and 155: 154 VELUX DANSK
- Page 156 and 157: InhoudInhoud van de verpakking 157B
- Page 158 and 159: Belangrijke informatieBewaar deze i
- Page 160 and 161: Functies besturingscentraleDe displ
- Page 162 and 163: Programma modusen in VELUX ACTIVEKl
- Page 164 and 165: De initiële set-upVoorbereiden bes
- Page 166 and 167: De initiële set-up45Voorbereiden e
- Page 168 and 169: De initiële set-upStap 2: Bereid b
- Page 170 and 171: De initiële set-upStap 4: A wijs V
- Page 172 and 173: Plaatsen sensorenGGLGGUSMLDe solar
- Page 174 and 175: Menu uitlegHandleiding voor de menu
- Page 176 and 177: Tijd en datumDatum en tijd kunnen g
- Page 178 and 179: 178 VELUX NEDERLANDS
- Page 180 and 181: Nieuwe zonweringproductenU kunt nie
- Page 182 and 183: Tijdschema12Het tijdschema is in de
- Page 184 and 185: Daglicht ambianceU kunt de zonwerin
- Page 186 and 187: Uitschakelen programmaU kunt het pr
- Page 190 and 191: DisplaysymbolenOnderbreking van het
- Page 192 and 193: 192 VELUX NEDERLANDS
- Page 194 and 195: IndiceContenuto dell'imballo 195Inf
- Page 196 and 197: Informazioni importantiConservare q
- Page 198 and 199: Funzioni del dispositivo di control
- Page 200 and 201: Modalità programma del Controllo C
- Page 202 and 203: Impostazioni iniziali1Predisposizio
- Page 204 and 205: Impostazioni iniziali45Predisposizi
- Page 206 and 207: Impostazioni inizialiFase 2: come p
- Page 208 and 209: Impostazioni inizialiFase 4: assegn
- Page 210 and 211: Fissaggio dei sensoriGGLGGUSMLIl se
- Page 212 and 213: Lista delle funzioni/menuGuida alle
- Page 214 and 215: Ora e dataL'ora e la data possono e
- Page 216 and 217: 216 VELUX ITALIANO
- Page 218 and 219: Nuovi prodotti di schermatura solar
- Page 220 and 221: Programmazione123Una programmazione
- Page 222 and 223: Luce soffusaE' possibile impostare
- Page 224 and 225: Disattivazione programma1E' possibi
- Page 226 and 227: Memorizzazione dei nuovi sensoriE'
- Page 228 and 229: Simbologia del displayInterruzione
- Page 230 and 231: 230 VELUX ITALIANO
- Page 232: AR:AT:AU:BA:BE:BG:BY:CA:CH:CL:CN:CZ