Bruksanvisning för kombimaskin såg/hyvel Bruksanvisning for ... - Jula
Bruksanvisning för kombimaskin såg/hyvel Bruksanvisning for ... - Jula
Bruksanvisning för kombimaskin såg/hyvel Bruksanvisning for ... - Jula

You also want an ePaper? Increase the reach of your titles
YUMPU automatically turns print PDFs into web optimized ePapers that Google loves.
ENGLISH<br />
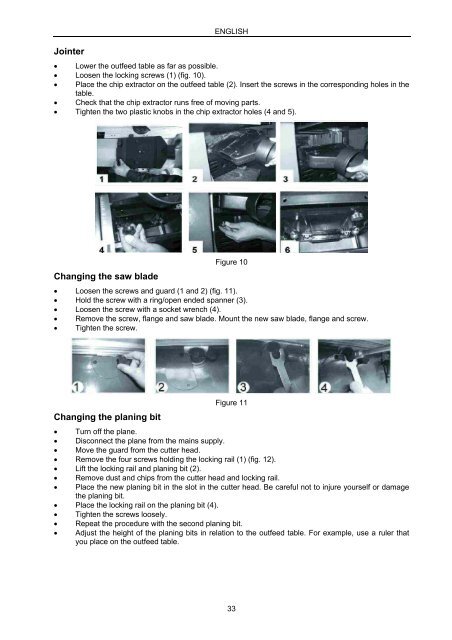
Jointer<br />
Lower the outfeed table as far as possible.<br />
Loosen the locking screws (1) (fig. 10).<br />
Place the chip extractor on the outfeed table (2). Insert the screws in the corresponding holes in the<br />
table.<br />
Check that the chip extractor runs free of moving parts.<br />
Tighten the two plastic knobs in the chip extractor holes (4 and 5).<br />
Changing the saw blade<br />
Figure 10<br />
Loosen the screws and guard (1 and 2) (fig. 11).<br />
Hold the screw with a ring/open ended spanner (3).<br />
Loosen the screw with a socket wrench (4).<br />
Remove the screw, flange and saw blade. Mount the new saw blade, flange and screw.<br />
Tighten the screw.<br />
Changing the planing bit<br />
Figure 11<br />
Turn off the plane.<br />
Disconnect the plane from the mains supply.<br />
Move the guard from the cutter head.<br />
Remove the four screws holding the locking rail (1) (fig. 12).<br />
Lift the locking rail and planing bit (2).<br />
Remove dust and chips from the cutter head and locking rail.<br />
Place the new planing bit in the slot in the cutter head. Be careful not to injure yourself or damage<br />
the planing bit.<br />
Place the locking rail on the planing bit (4).<br />
Tighten the screws loosely.<br />
Repeat the procedure with the second planing bit.<br />
Adjust the height of the planing bits in relation to the outfeed table. For example, use a ruler that<br />
you place on the outfeed table.<br />
33