Garmin: Nuvi 3500 Series Owner's Manual
Garmin: Nuvi 3500 Series Owner's Manual
Garmin: Nuvi 3500 Series Owner's Manual

Create successful ePaper yourself
Turn your PDF publications into a flip-book with our unique Google optimized e-Paper software.
nüvi ® <strong>3500</strong> series<br />
owner's manual<br />
April 2012 190-01387-00_0C Printed in Taiwan
© 2012 <strong>Garmin</strong> Ltd. or its subsidiaries<br />
All rights reserved. Under the copyright laws, this manual may not be copied, in whole or in part, without the written<br />
consent of <strong>Garmin</strong>. <strong>Garmin</strong> reserves the right to change or improve its products and to make changes in the content of<br />
this manual without obligation to notify any person or organization of such changes or improvements. Go to www.garmin<br />
.com for current updates and supplemental information concerning the use of this product.<br />
Information in this document is subject to change without notice. <strong>Garmin</strong> reserves the right to change or improve its<br />
products and to make changes in the content without obligation to notify any person or organization of such changes<br />
or improvements. Go to the <strong>Garmin</strong> Web site (www.garmin.com) for current updates and supplemental information<br />
concerning the use and operation of this and other <strong>Garmin</strong> products.<br />
<strong>Garmin</strong> ® , the <strong>Garmin</strong> logo, nüvi ® , and MapSource ® are trademarks of <strong>Garmin</strong> Ltd. or its subsidiaries, registered in the<br />
USA and other countries. BaseCamp, HomePort, cityXplorer , ecoRoute , myTrends , nüMaps Guarantee ,<br />
nüMaps Lifetime , my<strong>Garmin</strong> , and trafficTrends are trademarks of <strong>Garmin</strong> Ltd. or its subsidiaries. These trademarks<br />
may not be used without the express permission of <strong>Garmin</strong>.<br />
The Bluetooth ® word mark and logos are owned by the Bluetooth SIG, Inc., and any use of such name by <strong>Garmin</strong> is<br />
under license. Windows ® and Windows NT ® are registered trademarks of Microsoft Corporation in the United States and/<br />
or other countries. Mac ® is a trademark of Apple Computer, Inc. microSD is a trademark of SD-3C, LLC. Audible.com ®<br />
and AudibleReady ® are registred trademarks of Audible, Inc. © 1997–2011 Audible. HD Radio Technology manufactured<br />
under license from iBiquity Digital Corporation. U.S. and Foreign Patents. HD Radio and the HD logo are proprietary<br />
trademarks of iBiquity Digital Corp.<br />
.
Table of Contents<br />
Getting Started 1<br />
Connecting the Device to Vehicle Power ........... 1<br />
About myDashboard .......................................... 2<br />
About Sleep Mode ............................................. 4<br />
Adjusting the Screen Brightness ....................... 4<br />
Adjusting the Master Volume ............................. 4<br />
About Automatic Volume ................................... 4<br />
Status Bar Icons ................................................ 5<br />
Satellite Signals ................................................. 5<br />
Using the On-screen Buttons ............................ 6<br />
Using the On-screen Keyboard ......................... 7<br />
About Shortcuts ................................................. 7<br />
Finding Locations 8<br />
About Locations ................................................. 8<br />
About Search Tools ......................................... 11<br />
Saving a Home Location ................................. 14<br />
Finding Recently Found Places ....................... 14<br />
Finding Parking ................................................ 14<br />
Setting a Simulated Location ........................... 14<br />
Saving Locations ............................................. 15<br />
Voice Command 17<br />
About Voice Command .................................... 17<br />
Navigation 20<br />
Starting a Route ............................................... 20<br />
Following an Automobile Route ....................... 20<br />
About Exit Services ......................................... 23<br />
Avoiding Road Features .................................. 24<br />
About Custom Avoidances .............................. 24<br />
Enabling Advanced Detours ............................ 25<br />
Navigating Off Road ........................................ 26<br />
Map Pages 26<br />
Customizing the Map ....................................... 26<br />
Viewing Turns .................................................. 28<br />
Viewing Current Location Information ............. 30<br />
Pedestrian Routes ........................................... 30<br />
Hands-Free Phone Calls 32<br />
About Hands-Free Calling ............................... 32<br />
nüvi <strong>3500</strong> <strong>Series</strong> Owner’s <strong>Manual</strong> iii
Pairing Your Phone .......................................... 32<br />
Placing a Call ................................................... 33<br />
Receiving a Call .............................................. 34<br />
Using the Call History ...................................... 34<br />
Using In-Call Options ...................................... 34<br />
Saving a Home Phone Number ....................... 35<br />
Using the Apps 35<br />
Using Help ....................................................... 35<br />
About Smartphone Link ................................... 35<br />
About <strong>Garmin</strong> Live Services ............................ 37<br />
About ecoRoute .............................................. 38<br />
Viewing my<strong>Garmin</strong> Messages ......................... 41<br />
Viewing the Weather Forecast ........................ 41<br />
About Audiobooks ............................................ 42<br />
Planning a Trip ................................................. 44<br />
Viewing Pictures .............................................. 45<br />
Viewing Previous Routes and Destinations ..... 46<br />
Using the World Clock .................................... 46<br />
Using the Media Player ................................... 47<br />
Playing a Video ................................................ 48<br />
Setting an Alarm .............................................. 48<br />
Finding Parking ................................................ 49<br />
Finding Your Last Parking Spot ....................... 49<br />
Using the Calculator ........................................ 49<br />
Converting Units ............................................. 49<br />
Using the Language Guide .............................. 50<br />
About Tracker 51<br />
Setting Up Tracker ........................................... 51<br />
About Followers ............................................... 52<br />
Hiding Your Location ........................................ 53<br />
Sending a Location Message .......................... 53<br />
Enabling Your Social Network Accounts for<br />
Tracker ............................................................ 54<br />
Traffic 55<br />
Enabling Traffic ................................................ 55<br />
Receiving Traffic Data Using a Traffic<br />
Receiver .......................................................... 56<br />
Traffic Receiver ............................................... 56<br />
Receiving Traffic Data Using Smartphone<br />
Link .................................................................. 57<br />
iv nüvi <strong>3500</strong> <strong>Series</strong> Owner’s <strong>Manual</strong>
About the Traffic Icon ....................................... 57<br />
Traffic on Your Route ....................................... 58<br />
Traffic in Your Area .......................................... 59<br />
Understanding Traffic Data .............................. 59<br />
About Traffic Cameras ..................................... 59<br />
Traffic Subscriptions ........................................ 60<br />
Data Management 61<br />
File Types ........................................................ 61<br />
About Memory Cards ....................................... 62<br />
Transferring Files from Your Computer ........... 62<br />
Deleting Files .................................................. 63<br />
Customizing the Device 63<br />
Map and Vehicle Settings ................................ 63<br />
Navigation Settings .......................................... 64<br />
Display Settings ............................................... 65<br />
Bluetooth Settings ........................................... 65<br />
Traffic Settings ................................................. 66<br />
Units and Time Settings................................... 67<br />
Language and Keyboard Settings ................... 67<br />
Proximity Alerts Settings .................................. 67<br />
Device and Privacy Settings ............................ 68<br />
Restoring Settings ........................................... 68<br />
Appendix 68<br />
Power Cables .................................................. 68<br />
Caring for Your Device ..................................... 69<br />
Changing the Fuse in the Vehicle Power<br />
Cable ............................................................... 70<br />
Mounting on Your Dashboard .......................... 71<br />
Removing the Device, Cradle, and Mount ....... 71<br />
Updating Maps ................................................ 72<br />
Purchasing Additional Maps ............................ 72<br />
Safety Cameras ............................................... 72<br />
Custom Points of Interest ................................ 73<br />
Purchasing Accessories .................................. 73<br />
Troubleshooting .............................................. 74<br />
Index 76<br />
nüvi <strong>3500</strong> <strong>Series</strong> Owner’s <strong>Manual</strong> v
Getting Started<br />
WARNING<br />
See the Important Safety and Product<br />
Information guide in the product box for product<br />
warnings and other important information.<br />
1 Mount the device (page 1).<br />
2 Register the device (page 3).<br />
3 Check for updates.<br />
• Software updates (page 3).<br />
• Free map update (page 3).<br />
Connecting the Device to Vehicle<br />
Power<br />
WARNING<br />
This product contains a lithium-ion battery.<br />
To prevent the possibility of personal injury or<br />
product damage caused by battery exposure<br />
to extreme heat, remove the device from the<br />
vehicle when exiting or store it out of direct<br />
sunlight.<br />
Before you use your device on battery power,<br />
you should charge it.<br />
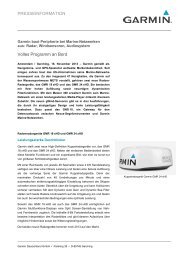
1 Plug the vehicle power cable ➊ into the<br />
USB port on the mount ➋.<br />
2 Snap the mount onto the suction cup ➌.<br />
3 Press the suction cup to the windshield, and<br />
flip the lever ➍ back toward the windshield.<br />
4 Fit the bottom of your device into the mount.<br />
5 Tilt your device back until it snaps into place.<br />
nüvi <strong>3500</strong> <strong>Series</strong> Owner’s <strong>Manual</strong> 1
➊<br />
➋<br />
➌<br />
➍<br />
6 Plug the other end of the vehicle power<br />
cable into a power outlet in your vehicle.<br />
7 If necessary, connect the external antenna<br />
to the traffic receiver and secure it to the<br />
windshield using the suction cups.<br />
About myDashboard<br />
Use myDashboard to register your device, check<br />
for software and map updates, access product<br />
manuals and support, and more.<br />
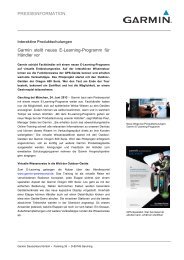
Setting Up myDashboard<br />
1 Connect the USB cable to the USB port on<br />
the device.<br />
2 nüvi <strong>3500</strong> <strong>Series</strong> Owner’s <strong>Manual</strong><br />
➋<br />
➊<br />
2 Connect the USB cable ➊ to the USB port<br />
➋ on your computer.<br />
3 Go to www.garmin.com/dashboard.<br />
4 Follow the on-screen instructions.
Registering the Device<br />
1 From myDashboard, click Register Now.<br />
2 Follow on-screen instructions.<br />
Updating the Software<br />
1 Open myDashboard (page 2).<br />
2 Under Software Updates, click Update Now.<br />
3 Follow the on-screen instructions.<br />
nüMaps Guarantee To receive one free map update (if available),<br />
register your device at http://my.garmin.com<br />
within 90 days of acquiring satellites while<br />
driving with your device. You are not eligible for<br />
the free map update if you register by phone or<br />
wait longer than 90 days after the first time you<br />
acquire satellites while driving with your device.<br />
For more information, go to www.garmin.com<br />
/numaps.<br />
Updating Maps<br />
1 Open myDashboard (page 2).<br />
2 Register the device (page 3).<br />
3 Select an option:<br />
• Under Map Updates, click Update Now.<br />
• If a free map update is no longer<br />
available, click Buy Now.<br />
4 Follow the on-screen instructions.<br />
Turning Off the Device<br />
You can power off the device completely.<br />
1 Hold the Power key ➊ .<br />
➊<br />
NOTE: If you hold the Power key for less<br />
than 4 seconds, the device enters sleep<br />
mode.<br />
nüvi <strong>3500</strong> <strong>Series</strong> Owner’s <strong>Manual</strong> 3
2 Select Off.<br />
Resetting the Device<br />
You can reset your device if it stops functioning<br />
Hold the Power key for 10 seconds.<br />
About Sleep Mode<br />
Use sleep mode to conserve battery power<br />
when your device is not in use. Sleep mode<br />
uses very little power, and a battery charge lasts<br />
for weeks when your device is in sleep mode.<br />
Entering Sleep Mode<br />
Press the Power key.<br />
Exiting Sleep Mode<br />
While the device is in sleep mode, press the<br />
Power key and double-tap .<br />
Adjusting the Screen Brightness<br />
1 Select Settings > Display > Brightness.<br />
2 Use the slider bar to adjust the brightness.<br />
Adjusting the Master Volume<br />
1 Select Volume.<br />
2 Select an option:<br />
• Use the slider bar to adjust the volume.<br />
• Select to mute the device.<br />
• Select > Audio Mixer and use the<br />
slider bars to adjust the volume for<br />
navigation prompts, phone, and media.<br />
About Automatic Volume<br />
On devices with hands-free calling, automatic<br />
volume allows the device to adjust the volume<br />
level based on the background noise in the<br />
vehicle. See page 32<br />
Automatic volume control lowers the volume of<br />
the device when background noise is low and<br />
raises the volume level when background noise<br />
increases.<br />
4 nüvi <strong>3500</strong> <strong>Series</strong> Owner’s <strong>Manual</strong>
Enabling Automatic Volume<br />
Your device can increase or decrease the<br />
volume automatically based on the level of<br />
background noise.<br />
1 Select Volume > > Automatic Volume.<br />
2 Select Enabled > Save.<br />
Status Bar Icons<br />
The status bar is located at the top of the main<br />
menu. The status bar icons display information<br />
about features on the device. You can select<br />
some icons to change settings or view additional<br />
information.<br />
GPS signal status.<br />
Bluetooth ® technology status (appears<br />
when connected to a compatible device).<br />
Transportation mode indicator.<br />
Current time.<br />
Battery status.<br />
Smartphone Link status (appears when<br />
connected to Smartphone Link). See<br />
page 36.<br />
Satellite Signals<br />
After the device is turned on, it begins acquiring<br />
satellite signals. The device may need a clear<br />
view of the sky to acquire satellite signals. When<br />
at least one of the bars is green, your<br />
device has acquired satellite signals.<br />
nüvi <strong>3500</strong> <strong>Series</strong> Owner’s <strong>Manual</strong> 5
Viewing GPS Satellite Signals<br />
For more information about GPS, go to<br />
www.garmin.com/aboutGPS.<br />
Hold .<br />
Transportation Modes<br />
Automobile mode<br />
Pedestrian mode<br />
Routing and navigation are calculated differently<br />
based on your transportation mode.<br />
For example, in Automobile mode, the estimated<br />
time of arrival is calculated using the speed<br />
limit of the roads on the route. Pedestrian mode<br />
calculates time of arrival based on walking<br />
speed.<br />
NOTE: Pedestrian routes do not include<br />
highways. If you have cityXplorer maps loaded<br />
on your device, pedestrian routes may include<br />
public transit (page 31).<br />
Choosing a Transportation Mode<br />
Select .<br />
Battery Information<br />
After the device is connected to power, it begins<br />
to charge.<br />
The icon in the status bar indicates the<br />
status of the internal battery. To increase the<br />
accuracy of the battery gauge, you should fully<br />
discharge the battery and then fully charge it. Do<br />
not unplug the device until it is fully charged.<br />
Using the On-screen Buttons<br />
• Select to return to the main menu.<br />
• Hold to quickly return to the main menu.<br />
• Select or to see more choices.<br />
• Hold or to scroll faster.<br />
6 nüvi <strong>3500</strong> <strong>Series</strong> Owner’s <strong>Manual</strong>
• Select to see a menu of options for the<br />
current screen.<br />
Using the On-screen Keyboard<br />
See Language and Keyboard Settings to<br />
change the keyboard layout (page 67). Select<br />
a character on the keyboard to enter a letter or<br />
number.<br />
• Select to add a space.<br />
• Hold to delete a character.<br />
• Select to erase the entire entry.<br />
• Select to select the keyboard language<br />
mode.<br />
• Select to enter special characters,<br />
such as punctuation marks.<br />
• Select to change character<br />
capitalization.<br />
About Shortcuts<br />
You can add shortcuts to the Where To? menu.<br />
A shortcut can point to a location, a category, or<br />
a search tool.<br />
Adding a Shortcut Icon<br />
The Where To? menu can contain up to 36<br />
shortcut icons.<br />
1 Select Where To? > Add Shortcut.<br />
2 Select an item.<br />
Removing a Shortcut<br />
1 Select Where To > > Remove<br />
Shortcut(s).<br />
2 Select the shortcut to remove.<br />
3 Select the shortcut again to confirm.<br />
nüvi <strong>3500</strong> <strong>Series</strong> Owner’s <strong>Manual</strong> 7
Finding Locations<br />
The device offers many methods for finding<br />
locations.<br />
• By category (page 8)<br />
• Near another location (page 10)<br />
• By spelling the name (page 11)<br />
• By address (page 11)<br />
• Using recently found locations (page 14)<br />
• Using coordinates (page 12)<br />
• Using the map (page 13)<br />
• Using saved locations (page 15)<br />
About Locations<br />
The detailed maps loaded in your device contain<br />
locations, such as restaurants, hotels, and auto<br />
services. You can use categories to browse for<br />
nearby businesses and attractions.<br />
Finding a Location by Category<br />
1 Select Where To?.<br />
2 Select a category, or select Categories.<br />
3 If necessary, select a subcategory.<br />
4 Select a location.<br />
Searching Within a Category<br />
To narrow your search results, you can search<br />
within some categories.<br />
1 Select Where To?.<br />
2 Select a category, or select Categories.<br />
3 If necessary, select a subcategory.<br />
4 If necessary, enter all or part of the name in<br />
the search bar (page 9).<br />
8 nüvi <strong>3500</strong> <strong>Series</strong> Owner’s <strong>Manual</strong>
Finding a Location Using the Search Bar<br />
You can use the search bar to search for<br />
locations by entering a category, brand name,<br />
address, or city name.<br />
1 Select Where To?.<br />
2 Select the search bar ➊.<br />
➊<br />
3 Enter a search term.<br />
Suggested search terms appear below the<br />
search bar as you type.<br />
4 Select an option:<br />
• To search for a type of business, enter<br />
a category name, such as “movie<br />
theaters.”<br />
• To search for a business by name, enter<br />
all or part of the name.<br />
• To search for an address near you, enter<br />
the street number and street name.<br />
• To search for an address in another city,<br />
enter the street number, street name,<br />
city, and state.<br />
• To search for a city, enter the city and<br />
state.<br />
• To search for coordinates, enter latitude<br />
and longitude coordinates.<br />
5 Select an option:<br />
• To search using a suggested search<br />
term, select the term.<br />
• To search using the text you entered,<br />
select .<br />
6 If necessary, select a location.<br />
nüvi <strong>3500</strong> <strong>Series</strong> Owner’s <strong>Manual</strong> 9
Changing the Search Area<br />
By default, your device finds locations closest<br />
to your current location. You can find a location<br />
near another city or location.<br />
1 Select Where To? > Searching Near.<br />
2 Select an option.<br />
3 If necessary, select a location.<br />
Reporting a Closed or Missing Location<br />
If your search results include an outdated or<br />
incorrect location, you can report the error to<br />
<strong>Garmin</strong> and remove the location from future<br />
searches.<br />
1 Search for a location (page 8).<br />
2 From the search results, select a location.<br />
3 Select .<br />
4 Select > Edit.<br />
5 Select Report as Closed or Report as<br />
Missing.<br />
This information is sent to <strong>Garmin</strong> when you<br />
connect to Smartphone Link (see page 36) or<br />
when you connect your device to myDashboard<br />
using your computer (see page 2).<br />
Editing Location Information<br />
You can change the address or phone number<br />
for a location that appears in the search results.<br />
1 Search for a location.<br />
2 From the search results, select a location.<br />
3 Select .<br />
4 Select > Edit.<br />
5 Select Address or Phone Number, and<br />
enter the new information.<br />
Rating a Point of Interest<br />
You can assign a star rating to a point of<br />
interest.<br />
1 Search for a location (page 8).<br />
2 From the search results, select a location.<br />
10 nüvi <strong>3500</strong> <strong>Series</strong> Owner’s <strong>Manual</strong>
3 Select .<br />
4 Select the stars to rate the point of interest.<br />
The star rating updates on your device.<br />
About Search Tools<br />
You can search for locations by using the onscreen<br />
keyboard or by entering the location’s<br />
address or coordinates.<br />
Finding Fuel Stations and Prices<br />
Before you can use this feature, you must<br />
subscribe to the Fuel Price service, and your<br />
device must be connected to a supported phone<br />
running Smartphone Link (page 36). This feature<br />
is not available in all areas.<br />
You can find nearby fuel stations and compare<br />
fuel prices.<br />
1 Select Where To? > Categories > Fuel<br />
Prices.<br />
2 If necessary, select > Fuel Type, select a<br />
fuel type, and select Save.<br />
3 Select a fuel station.<br />
Finding an Address<br />
NOTE: The order of the steps may change<br />
depending on the map data loaded on your<br />
device.<br />
1 Select Where To? > Address.<br />
2 Enter the address number, and select Done.<br />
3 Enter the street name, and select Next.<br />
4 If necessary, select Searching In to change<br />
the city, state, or province.<br />
5 If necessary, select the city, the state, or the<br />
province.<br />
6 If necessary, select the address.<br />
nüvi <strong>3500</strong> <strong>Series</strong> Owner’s <strong>Manual</strong> 11
Finding a City<br />
1 Select Where To? > Categories > Cities.<br />
2 Select Enter Search.<br />
3 Enter a city name, and select .<br />
4 Select a city.<br />
Finding an Intersection<br />
Before you can find an intersection, you must<br />
add a shortcut to the intersection search tool<br />
(page 7).<br />
1 Select Where To? > Categories ><br />
Intersections.<br />
2 Select a state or province.<br />
NOTE: If necessary, select State or Country<br />
to change the country, state, or province.<br />
3 Enter the first street name, and select Next.<br />
4 If necessary, select the street.<br />
5 Enter the second street name, and select<br />
Next.<br />
6 If necessary, select the street.<br />
7 If necessary, select the intersection.<br />
Finding a Location Using Coordinates<br />
Before you can find a location using coordinates,<br />
you must add a shortcut to the coordinates<br />
search tool (page 7).<br />
You can find a location using latitude and<br />
longitude coordinates. This can be helpful when<br />
geocaching.<br />
1 Select Where To? > Categories ><br />
Coordinates.<br />
2 If necessary, select > Format, select the<br />
correct coordinate format for the type of map<br />
you are using, and select Save.<br />
3 Select the latitude coordinate.<br />
4 Enter the new coordinate, and select Done.<br />
5 Select the longitude coordinate.<br />
6 Enter the new coordinate, and select Done.<br />
12 nüvi <strong>3500</strong> <strong>Series</strong> Owner’s <strong>Manual</strong>
7 Select View on Map.<br />
Finding a Location by Browsing the Map<br />
Before you can find places included in the map<br />
data, such as restaurants, hospitals, and fuel<br />
stations, you must enable the map layer for<br />
places along the road (page 26).<br />
1 Select View Map.<br />
2 Drag and zoom the map to display the area<br />
to search.<br />
3 If necessary, select , and select a<br />
category icon to view only a specific<br />
category of places.<br />
Location markers ( or a blue dot) appear<br />
on the map.<br />
4 Select an option:<br />
• Select a location marker.<br />
• Select a point, such as a street,<br />
intersection, or address location.<br />
5 If necessary, select the location description<br />
to view additional information.<br />
Searching within a Category<br />
After you have performed a search for a point<br />
of interest, certain categories may display a<br />
Quick Search list that displays the last four<br />
destinations you selected.<br />
1 Select Where To?.<br />
2 Select a category, or select Categories.<br />
3 If applicable, select a destination from the<br />
Quick Search list.<br />
nüvi <strong>3500</strong> <strong>Series</strong> Owner’s <strong>Manual</strong> 13<br />
➊<br />
4 If necessary, select the appropriate<br />
destination.
Saving a Home Location<br />
You can set your home location for the location<br />
you return to most often.<br />
1 Select Where To? > > Set Home<br />
Location.<br />
2 Select Enter My Address, Use My Current<br />
Location, or Recently Found.<br />
The location is saved as “Home” in the Saved<br />
menu (page 15).<br />
Going Home<br />
Select Where To? > Go Home.<br />
Editing Your Home Location Information<br />
1 Select Where To? > Saved > Home.<br />
2 Select > > Edit.<br />
3 Enter your changes.<br />
4 Select Done.<br />
Finding Recently Found Places<br />
Your device stores the last 50 locations you<br />
have found.<br />
1 Select Where To? > Recent.<br />
2 Select a location.<br />
Clearing the List of Recently Found<br />
Places<br />
Select Where To? > Recent > > Clear<br />
> Yes.<br />
Finding Parking<br />
1 Select Where To? > Categories > Parking.<br />
2 Select a parking location.<br />
Setting a Simulated Location<br />
If you are indoors or not receiving satellite<br />
signals, you can use the GPS to set a simulated<br />
location.<br />
1 Select Settings > Navigation.<br />
14 nüvi <strong>3500</strong> <strong>Series</strong> Owner’s <strong>Manual</strong>
2 Select GPS Simulator.<br />
3 From the main menu, select View Map.<br />
4 Select an area on the map.<br />
The address of the location appears at the<br />
bottom of the screen.<br />
5 Select the location description.<br />
6 Select Set Location.<br />
Saving Locations<br />
You can save locations so you can quickly find<br />
them and create routes to them.<br />
Saving a Location<br />
1 Search for a location (page 8).<br />
2 From the search results, select a location.<br />
3 Select .<br />
4 Select > Save.<br />
5 If necessary, enter a name, and select Done.<br />
Saving Your Current Location<br />
1 From the map, select the vehicle icon.<br />
2 Select Save.<br />
3 Enter a name, and select Done.<br />
4 Select OK.<br />
Starting a Route to a Saved Location<br />
1 Select Where To? > Saved.<br />
2 If necessary, select a category, or select All<br />
Saved Places.<br />
3 Select a location.<br />
4 Select Go!<br />
Editing a Saved Location<br />
1 Select Where To? > Saved.<br />
2 If necessary, select a category.<br />
3 Select a location.<br />
4 Select .<br />
5 Select > Edit.<br />
nüvi <strong>3500</strong> <strong>Series</strong> Owner’s <strong>Manual</strong> 15
6 Select an option:<br />
• Select Name.<br />
• Select Phone Number.<br />
• To assign categories to the Favorite,<br />
select Categories.<br />
• To save a photo with the Favorite, select<br />
Assign Photo (page 45).<br />
• To change the symbol used to mark the<br />
Favorite on a map, select Change Map<br />
Symbol.<br />
7 Edit the information.<br />
8 Select Done.<br />
Assigning Categories to a Saved<br />
Location<br />
You can add custom categories to organize your<br />
saved locations.<br />
NOTE: Categories appear in the saved locations<br />
menu after you have saved more than 12<br />
locations.<br />
1 Select Where To? > Saved.<br />
2 Select a location.<br />
3 Select .<br />
4 Select > Edit > Categories.<br />
5 Enter one or more category names,<br />
separated by commas.<br />
6 If necessary, select a suggested category.<br />
7 Select Done.<br />
Sharing a Saved Location<br />
If you save the location of a business that is not<br />
in the map data, you can share the location with<br />
<strong>Garmin</strong> so that it can be added to future map<br />
updates and shared with the <strong>Garmin</strong> community.<br />
1 Select Where To? > Saved.<br />
2 If necessary, select a category.<br />
3 Select a location.<br />
4 Select .<br />
5 Select Share Place.<br />
16 nüvi <strong>3500</strong> <strong>Series</strong> Owner’s <strong>Manual</strong>
6 Enter one or more categories that apply to<br />
the location, and select Done.<br />
7 Select Share.<br />
This information is sent to <strong>Garmin</strong> when you<br />
connect to Smartphone Link or when you<br />
connect your device to my<strong>Garmin</strong> using your<br />
computer (page 36).<br />
Deleting a Saved Location<br />
NOTE: Deleted locations cannot be recovered.<br />
1 Select Where To? > Saved.<br />
2 Select > Delete Saved Places.<br />
3 Select the box next to the saved locations to<br />
delete, and select Delete.<br />
Voice Command<br />
About Voice Command<br />
NOTE: Voice Command is not available for<br />
all languages and regions, and may not be<br />
available on all models.<br />
Voice Command allows you to use your device<br />
by saying words and commands. The Voice<br />
Command menu provides voice prompts and a<br />
list of available commands.<br />
Setting Your Wakeup Phrase<br />
The wakeup phrase is a word or phrase you can<br />
say to activate Voice Command. The default<br />
wakeup phrase is Voice Command.<br />
TIP: You can reduce the chance of accidental<br />
Voice Command activation by using a strong<br />
wakeup phrase.<br />
1 Select Apps > Voice Command ><br />
Customize Phrase.<br />
nüvi <strong>3500</strong> <strong>Series</strong> Owner’s <strong>Manual</strong> 17
2 Enter a new wakeup phrase.<br />
The device indicates the strength of the<br />
wakeup phrase as you enter the phrase.<br />
3 Select Done.<br />
Activating Voice Command<br />
Say your wakeup phrase.<br />
The Voice Command menu appears.<br />
Voice Command Tips<br />
• Speak in a normal voice directed at the<br />
device.<br />
• Reduce background noise, such as voices<br />
or the radio, to increase the accuracy of the<br />
voice recognition.<br />
• Speak commands as they appear on the<br />
screen.<br />
• Respond to voice prompts from the device<br />
as needed.<br />
• Increase the length of your wakeup phrase<br />
to reduce the chance of accidental Voice<br />
Command activation.<br />
• Listen for two tones to confirm when the<br />
device enters and exits Voice Command<br />
mode.<br />
Starting a Route Using Voice Command<br />
You can say the names of popular, well-known<br />
locations.<br />
1 Say your wakeup phrase (page 17).<br />
2 Say Find Place.<br />
3 Listen for the voice prompt, and speak the<br />
name of the location.<br />
18 nüvi <strong>3500</strong> <strong>Series</strong> Owner’s <strong>Manual</strong>
A list of locations appears.<br />
4 Say the line number.<br />
5 Say Navigate.<br />
Finding an Address<br />
1 Say Voice Command.<br />
2 Say Find Address.<br />
3 Speak the entire address.<br />
Muting Instructions<br />
You can disable the voice prompts for Voice<br />
Command without muting the device.<br />
1 Select Apps > Voice Command > .<br />
2 Select Mute Instructions > Enabled.<br />
Disabling Voice Command<br />
You can disable Voice Command, which<br />
prevents you from accidentally activating Voice<br />
Command while speaking.<br />
1 Select Apps > Voice Command > .<br />
2 Select Voice Command > Disabled.<br />
nüvi <strong>3500</strong> <strong>Series</strong> Owner’s <strong>Manual</strong> 19
Navigation<br />
Starting a Route<br />
1 Search for a location (page 9).<br />
2 Select a location.<br />
3 Select Go!.<br />
4 If necessary, select an option.<br />
• Select Drive.<br />
• Select Walk.<br />
• Select Public Transit to calculate a route<br />
that combines public transit and walking.<br />
NOTE: You must have cityXplorer maps<br />
loaded to navigate using public transit<br />
(page 31).<br />
5 If necessary, select a route.<br />
Previewing Multiple Routes<br />
1 Search for a location (page 9).<br />
2 From the search results, select a location.<br />
3 Select Routes.<br />
4 Use the on-screen buttons to select a route.<br />
5 Select Go!.<br />
Following an Automobile Route<br />
The route is marked with a magenta line. A<br />
checkered flag marks your destination.<br />
As you travel, the device guides you to the<br />
destination with voice prompts, arrows on the<br />
map, and directions at the top of the map. If<br />
you depart from the original route, the device<br />
recalculates the route and provides new<br />
directions.<br />
20 nüvi <strong>3500</strong> <strong>Series</strong> Owner’s <strong>Manual</strong>
Using the Navigation Map<br />
1 From the main menu, select View Map.<br />
2 If the zoom controls are hidden, select the<br />
map to display the zoom controls.<br />
3 Select the map to switch to browsing mode.<br />
Map buttons appear.<br />
4 Select an option:<br />
• To zoom in or out, select or .<br />
• To rotate the map view, select .<br />
• To switch between North Up and 3-D<br />
views, select .<br />
• To add or remove map layers, select<br />
.<br />
• To view specific location categories,<br />
select and select a category icon.<br />
• To center the map on your current<br />
location, select .<br />
• To view shortcuts for map and navigation<br />
features, select .<br />
Using Multi-touch Controls<br />
You can use multi-touch controls to change<br />
the map view while using the navigation map<br />
(page 21).<br />
• Drag the map to view different parts of<br />
the map.<br />
• Double-tap the map to zoom in one level.<br />
• Pinch two fingers together on the screen<br />
to zoom out.<br />
• Spread two fingers on the screen to<br />
zoom in.<br />
• Drag two fingers left or right to rotate the<br />
map.<br />
nüvi <strong>3500</strong> <strong>Series</strong> Owner’s <strong>Manual</strong> 21
• Drag two fingers upward on the screen to<br />
switch to North Up view.<br />
• Drag two fingers downward on the map<br />
to switch to 3-D view.<br />
Adding a Point to a Route<br />
Before you can add a stop to a route, you must<br />
be navigating a route in Automobile mode.<br />
1 While navigating a route, select to return<br />
to the main menu.<br />
2 Select Where To?.<br />
3 Search for the location (page 8)<br />
4 Select Go!.<br />
5 Select Add to Active Route.<br />
Taking a Detour<br />
While navigating a route, you can use detours<br />
to avoid obstacles ahead of you, such as<br />
construction zones.<br />
NOTE: If the route you are currently navigating<br />
is the only reasonable option, your device might<br />
not calculate a detour.<br />
From the map, select > Detour.<br />
Stopping the Route<br />
From the map, select .<br />
Updating Speed Limits<br />
noTiCe<br />
The speed limit icon feature is for information<br />
only and does not replace the driver’s<br />
responsibility to abide by all posted speed limit<br />
signs and to use safe driving judgment at all<br />
times. <strong>Garmin</strong> will not be responsible for any<br />
traffic fines or citations that you may receive for<br />
failing to follow all applicable traffic laws and<br />
signs.<br />
An icon displaying the current speed limit may<br />
appear as you travel on major roadways.<br />
22 nüvi <strong>3500</strong> <strong>Series</strong> Owner’s <strong>Manual</strong>
1 From the map, select > Set Speed<br />
Limit.<br />
2 Select and to set the<br />
speed limit.<br />
Using Suggested Routes<br />
Before you can use this feature, you must save<br />
at least one location and enable the travel<br />
history feature (page 68).<br />
Using the myTrends feature, your device<br />
predicts your destination based on your travel<br />
history, the day of the week, and the time of day.<br />
After you have driven to a saved location several<br />
times, the location may appear in the navigation<br />
bar on the map, along with the estimated time of<br />
travel, and traffic information.<br />
Select the navigation bar to view a<br />
suggested route to the location.<br />
About Exit Services<br />
While you navigate a route, you can find gas,<br />
food, lodging, and rest rooms near upcoming<br />
exits.<br />
Services are listed under tabs by category.<br />
nüvi <strong>3500</strong> <strong>Series</strong> Owner’s <strong>Manual</strong> 23<br />
Gas<br />
Food<br />
Lodging<br />
Restrooms<br />
Finding Exit Services<br />
1 From the map, select > Exit Services.<br />
2 Use the arrows to select an upcoming exit.<br />
3 Select an exit service tab.<br />
4 Select a point of interest.
Navigating to an Exit<br />
1 From the map, select > Exit Services ><br />
<br />
2 Select Go!.<br />
Avoiding Road Features<br />
1 Select Settings > Navigation ><br />
Avoidances.<br />
2 Select the road features to avoid on your<br />
routes, and select Save.<br />
Avoiding Transit Types<br />
NOTE: Transit types are available when<br />
cityXplorer maps are loaded (page 31).<br />
1 Select Settings > Navigation > Public<br />
Transit.<br />
2 Select the transit type to avoid on your<br />
routes.<br />
3 Select Save.<br />
About Custom Avoidances<br />
Custom avoidances allow you to avoid specific<br />
areas and sections of road. You can enable and<br />
disable custom avoidances as needed.<br />
Avoiding an Area<br />
1 Select Settings > Navigation > Custom<br />
Avoidances.<br />
2 If necessary, select Add Avoidance.<br />
3 Select Add Avoid Area.<br />
4 Select the upper-left corner of the area to<br />
avoid, and select Next.<br />
5 Select the lower-right corner of the area to<br />
avoid, and select Next.<br />
The selected area is shaded on the map.<br />
6 Select Done.<br />
Avoiding a Road<br />
1 Select Settings > Navigation > Custom<br />
Avoidances.<br />
24 nüvi <strong>3500</strong> <strong>Series</strong> Owner’s <strong>Manual</strong>
2 Select Add Avoid Road.<br />
3 Select the starting point of the section of<br />
road to avoid, and select Next.<br />
4 Select the ending point of the road section,<br />
and select Next.<br />
5 Select Done.<br />
Disabling a Custom Avoidance<br />
You can disable a custom avoidance without<br />
deleting it.<br />
1 Select Settings > Navigation > Custom<br />
Avoidances<br />
2 Select an avoidance.<br />
3 Select > Disable.<br />
Deleting Custom Avoidances<br />
1 Select Settings > Navigation > Custom<br />
Avoidances.<br />
2 Select an option:<br />
• To delete all custom avoidances, select<br />
.<br />
• To delete one custom avoidance, select<br />
the avoidance, and select > Delete.<br />
Enabling Advanced Detours<br />
Select Settings > Navigation > Advanced<br />
Detours.<br />
Taking a Detour Around Specified Areas<br />
You can take a detour for a specified distance<br />
along your route or detour around specific roads.<br />
This is useful if you encounter construction<br />
zones, closed roads, or poor road conditions.<br />
1 Select a destination, and select Go!<br />
(page 8).<br />
2 From the map, select > Detour<br />
3 Select Next 5mi on Route, Next 2mi on<br />
Route, Next 5mi on Route, or Detour by<br />
Road(s) on Route.<br />
nüvi <strong>3500</strong> <strong>Series</strong> Owner’s <strong>Manual</strong> 25
4 If necessary, select a road to detour around.<br />
Navigating Off Road<br />
If you are not following roadways as you<br />
navigate, you can use Off Road mode.<br />
1 Select Settings > Navigation.<br />
2 Select Calculation Mode > Off Road ><br />
Save.<br />
The route will be calculated as a straight line<br />
to the location.<br />
Map Pages<br />
Customizing the Map<br />
Customizing the Map Layers<br />
You can customize which data appear on the<br />
map, such as icons for points of interest and<br />
road conditions.<br />
1 From the map, select .<br />
2 Select Map Layers.<br />
3 Select which layers you want to include on<br />
the map, and select Save.<br />
Viewing the Trip Log<br />
Your device keeps a trip log, which is a record of<br />
the path you have traveled.<br />
1 Select Settings > Map and Vehicle > Map<br />
Layers.<br />
2 Select the Trip Log check box.<br />
Changing the Map Data Field<br />
1 From the map, select the data field in the<br />
lower left-hand corner.<br />
2 Select a type of data to display.<br />
3 Select Save.<br />
26 nüvi <strong>3500</strong> <strong>Series</strong> Owner’s <strong>Manual</strong>
Changing the Map Perspective<br />
1 Select Settings > Map and Vehicle ><br />
Driving Map View.<br />
2 Select an option:<br />
• Select Track Up to display the map in<br />
two dimensions (2-D), with your direction<br />
of travel at the top.<br />
• Select North Up to display the map in<br />
2-D with North at the top.<br />
• Select 3-D to display the map in three<br />
dimensions.<br />
Customizing Map Buttons<br />
You can include up to three icons on the right<br />
side of the main map.<br />
1 Select Settings > Map and Vehicle > Map<br />
Buttons.<br />
2 Select an icon, and select OK.<br />
3 Select .<br />
4 Select a different icon.<br />
Removing Buttons from the Map<br />
You can remove all buttons from the right side<br />
of the map.<br />
1 Select Settings > Map and Vehicle > Map<br />
Buttons.<br />
2 Select an icon, and touch OK.<br />
3 Select Save.<br />
Changing the Map Dashboard<br />
The dashboard displays trip information at the<br />
bottom of the map. You can select different<br />
dashboards to change the style and layout of the<br />
information.<br />
1 Select Settings > Map and Vehicle ><br />
Dashboards.<br />
2 Use the arrows to select a dashboard.<br />
3 Select Save.<br />
nüvi <strong>3500</strong> <strong>Series</strong> Owner’s <strong>Manual</strong> 27
Viewing Turns<br />
Viewing a List of Turns<br />
When you are navigating a route, you can view<br />
all of the turns and maneuvers for your entire<br />
route and the distance between turns.<br />
1 Select the text bar on the top of the map.<br />
2 Select a turn.<br />
The details for the turn appear. If available,<br />
an image of the junction appears for junction<br />
on major roadways.<br />
Viewing the entire Route on the Map<br />
1 While navigating an automobile route, select<br />
the navigation bar at the top of the map.<br />
2 Select > Map.<br />
Viewing the Next Turn<br />
While navigating an automobile route, a preview<br />
of the next turn, lane change, or other maneuver<br />
appears in the upper-left corner of the map.<br />
The preview includes the distance to the turn or<br />
maneuver and the lane in which you should be<br />
traveling, if available.<br />
From the map, select to view the next<br />
turn on the map.<br />
Viewing Junctions<br />
While navigating an automobile route, you can<br />
view the junctions on major roadways. When<br />
28 nüvi <strong>3500</strong> <strong>Series</strong> Owner’s <strong>Manual</strong>
you approach a junction in a route, the image of<br />
that junction appears briefly, if available.<br />
From the map, select to view the<br />
junction, if available.<br />
Viewing Traffic Alerts<br />
While you navigate an automobile route, a traffic<br />
alert may appear.<br />
Select the alert to view more information.<br />
Viewing Trip Information<br />
The trip information page displays your present<br />
speed and provides statistics about your trip.<br />
TIP: If you make frequent stops, leave the<br />
device turned on so it can accurately measure<br />
elapsed time during the trip.<br />
From the map, select > Trip Computer.<br />
Resetting Trip information<br />
1 From the map, select > Trip Computer.<br />
2 Select > Reset Field(s).<br />
3 Select an option:<br />
• When not navigating a route, select<br />
Select All to reset every data field,<br />
except the speedometer, on the page.<br />
• Select Reset Trip Data to reset the<br />
information on the trip computer.<br />
nüvi <strong>3500</strong> <strong>Series</strong> Owner’s <strong>Manual</strong> 29
• Select Reset Max Speed to reset the<br />
maximum speed.<br />
• Select Reset Trip B to reset the<br />
odometer.<br />
Viewing Current Location<br />
Information<br />
You can use the Where Am I? page to view<br />
information about your current location. This<br />
feature is helpful if you need to tell emergency<br />
personnel your location.<br />
From the map, select > Where Am I?.<br />
Finding Nearby Services<br />
You can use the Where Am I? page to find<br />
nearby services, such as hospitals or police<br />
stations.<br />
1 From the map, select > Where Am I?.<br />
2 Select a category.<br />
Getting Directions to Your Current<br />
Location<br />
If you need to tell another person how to get to<br />
your current location, your device can give you a<br />
list of directions.<br />
Select Apps > Where Am I? > ><br />
Directions to Me.<br />
Pedestrian Routes<br />
Following a Pedestrian Route<br />
In Pedestrian mode, your route is displayed on a<br />
two-dimensional map.<br />
If you have cityXplorer maps installed,<br />
the device calculates a route that uses a<br />
combination of public transit options, such as<br />
riding a bus or subway, and walking.<br />
NOTE: cityXplorer maps are not included with<br />
the device. Go to http://my.garmin.com to<br />
purchase cityXplorer maps.<br />
30 nüvi <strong>3500</strong> <strong>Series</strong> Owner’s <strong>Manual</strong>
NOTE: You can change the types of public<br />
transit and limit the distance spent walking<br />
during a pedestrian route (page 64).<br />
Using the Pedestrian Navigation Map<br />
See page 21 for more map functions.<br />
➊<br />
➋<br />
• Select ➊ to switch between sections of the<br />
route.<br />
• Select ➋ to view the route itinerary.<br />
About Map Icons<br />
• When you are navigating in Pedestrian<br />
mode, indicates your approximate<br />
position and your direction of travel on the<br />
map.<br />
• The circle around indicates the accuracy<br />
of your position on the map. A smaller<br />
circle means the displayed position is more<br />
accurate.<br />
• The yellow icons indicate the transportation<br />
method used in each section of the route.<br />
For example, when you see , board a bus<br />
at that point in the route.<br />
• The black dots on the map show public<br />
transit stops along your route.<br />
Enabling Transit Types<br />
NOTE: Transit types are available when<br />
cityXplorer maps are loaded (page 30).<br />
1 Select Settings > Navigation > Public<br />
Transit.<br />
nüvi <strong>3500</strong> <strong>Series</strong> Owner’s <strong>Manual</strong> 31
2 Select the transit type to include in your<br />
routes, and select Save.<br />
Hands-Free Phone Calls<br />
About Hands-Free Calling<br />
Using Bluetooth ® wireless technology, your<br />
device can connect to your mobile phone to<br />
become a hands-free device. To determine<br />
whether your mobile phone with Bluetooth<br />
technology is compatible with your device, go to<br />
www.garmin.com/bluetooth.<br />
Your phone may not support all of the handsfree<br />
phone features your device provides.<br />
Enabling Bluetooth Wireless Technology<br />
1 Select Settings > Bluetooth.<br />
2 Select Bluetooth.<br />
Pairing Your Phone<br />
Before you can use hands-free calling, you must<br />
pair your device with a compatible mobile phone.<br />
Pairing your phone with your device allows your<br />
phone and device to recognize each other and<br />
connect quickly.<br />
1 Place your phone and your device within 33<br />
ft. (10 m) of each other.<br />
2 On your device, enable Bluetooth wireless<br />
technology (page 32).<br />
3 Select an option:<br />
• Select Add Phone.<br />
• If you have already paired a different<br />
phone, select Settings > Bluetooth ><br />
Phone > .<br />
4 On your phone, enable Bluetooth wireless<br />
technology.<br />
5 On your device, select OK.<br />
A list of nearby Bluetooth devices appears.<br />
32 nüvi <strong>3500</strong> <strong>Series</strong> Owner’s <strong>Manual</strong>
6 Select your phone from the list, and select<br />
OK.<br />
7 If necessary, on your phone, confirm that the<br />
device is allowed to connect.<br />
8 If necessary, enter the device Bluetooth PIN<br />
(1234) into your phone.<br />
Disconnecting Your Phone<br />
1 Select Settings > Bluetooth.<br />
2 Select Phone > None > Save.<br />
Your phone is disconnected from your device but<br />
remains paired with your device.<br />
Tips After Pairing the Devices<br />
• After the initial pairing, the two devices can<br />
connect automatically each time you turn<br />
them on.<br />
• When your phone is connected to your<br />
device, you are ready to make phone calls.<br />
• When you turn on the device, it tries to<br />
connect to the last phone to which it was<br />
connected.<br />
• You might need to set your mobile phone to<br />
connect to the device automatically when the<br />
device is turned on.<br />
Placing a Call<br />
Dialing a Number<br />
1 Select Phone > Dial.<br />
2 Enter the number.<br />
3 Select Dial.<br />
Calling a Contact in Your Phone Book<br />
Your phone book is loaded from your phone to<br />
the device each time your phone and the device<br />
connect. It may take a few minutes for the phone<br />
book to be available. Some phones do not<br />
support this feature.<br />
1 Select Phone > Phone Book.<br />
nüvi <strong>3500</strong> <strong>Series</strong> Owner’s <strong>Manual</strong> 33
2 Select a contact.<br />
3 Select Call.<br />
Calling a Location<br />
1 Select Phone > Browse Categories.<br />
2 Select a point of interest (page 8).<br />
3 Select Call.<br />
Receiving a Call<br />
When you receive a call, select Answer or<br />
Ignore.<br />
Using the Call History<br />
Your call history is loaded from your phone to<br />
the device each time your phone and the device<br />
connect. It may take a few minutes for the call<br />
history to be available. Some phones do not<br />
support this feature.<br />
1 Select Phone > Call History.<br />
2 Select a category.<br />
A list of calls appears, with the most recent<br />
calls at the top.<br />
3 Select a call.<br />
Using In-Call Options<br />
1 While on a call, select .<br />
2 Select an option:<br />
• To transfer audio to your phone, select<br />
Handset.<br />
TIP: You can use this feature if you want<br />
to turn off your device and remain on the<br />
call, or if you need privacy.<br />
• To display a keypad, select Keypad.<br />
TIP: You can use this feature to use<br />
automated systems, such as voice mail.<br />
• To mute the microphone, select Mute.<br />
• To hang up, select End Call.<br />
34 nüvi <strong>3500</strong> <strong>Series</strong> Owner’s <strong>Manual</strong>
Saving a Home Phone Number<br />
TIP: After you save a home number, you can<br />
edit the home number by editing “Home” in your<br />
list of saved locations (page 15).<br />
Select Phone > > Set Home Number,<br />
enter your phone number, and select Done.<br />
Calling Home<br />
Before you can call home using the Call Home<br />
button, you must enter a phone number for your<br />
home location.<br />
Select Saved > Home > > Call.<br />
Using the Apps<br />
Using Help<br />
Select Apps > Help to view information<br />
about using the device.<br />
Searching Help Topics<br />
Select Apps > Help > .<br />
About Smartphone Link<br />
Smartphone Link is a phone application that<br />
allows your device to download live data using<br />
your phone data connection. Your device<br />
transfers data from Smartphone Link using<br />
Bluetooth wireless technology.<br />
Connecting to Smartphone Link provides access<br />
to <strong>Garmin</strong> Live Services. <strong>Garmin</strong> Live Services<br />
provides free and subscription-based plans to<br />
view live data on your device, such as traffic<br />
data, weather, and fuel prices.<br />
nüvi <strong>3500</strong> <strong>Series</strong> Owner’s <strong>Manual</strong> 35
Saved locations and recently found locations are<br />
synchronized with your phone each time your<br />
device connects to Smartphone Link.<br />
Downloading Smartphone Link<br />
Smartphone Link supports phones running<br />
Android operating system version 2.1 or newer.<br />
Download Smartphone Link from the application<br />
market on your supported phone. See your<br />
phone owner's manual for information on<br />
downloading and installing applications.<br />
Connecting to Smartphone Link<br />
Before you can connect to Smartphone Link,<br />
you must download and install the Smartphone<br />
Link application on your phone.<br />
1 Start Smartphone Link on your phone.<br />
2 From your device, select Settings ><br />
Bluetooth, and select the Bluetooth check<br />
box.<br />
3 From your phone, select Bluetooth<br />
Settings.<br />
4 From your phone, enable Bluetooth wireless<br />
technology, and scan for nearby Bluetooth<br />
devices.<br />
See your phone owner's manual for more<br />
information.<br />
5 From your phone, select your device from<br />
the list of nearby devices.<br />
6 Follow the on-screen instructions on your<br />
phone and on your device to confirm the<br />
pairing request.<br />
appears in the status bar on your device<br />
when Smartphone Link is connected.<br />
36 nüvi <strong>3500</strong> <strong>Series</strong> Owner’s <strong>Manual</strong>
Sending a Location from Your Phone to<br />
Your Device<br />
Smartphone Link is registered as a navigation<br />
application on your phone.<br />
1 From your phone, select the button to start<br />
navigating to a location (see the owner's<br />
manual for your phone).<br />
2 Select Smartphone Link from the application<br />
menu.<br />
The next time you connect your device to your<br />
phone, the location is transferred to the recently<br />
found items on your device.<br />
Disabling Calls While Connected to<br />
Smartphone Link<br />
While the device is connected to the phone and<br />
receiving <strong>Garmin</strong> Live Services, you can disable<br />
hands-free calling.<br />
1 Select Apps > Smartphone Link.<br />
2 Select your phone.<br />
3 Clear the Hands-Free Calling check box.<br />
About <strong>Garmin</strong> Live Services<br />
NOTE: Smartphone Link supports phones<br />
running Android operating system version 2.1<br />
or newer.<br />
Before you can use <strong>Garmin</strong> Live Services, your<br />
device must be connected to a supported phone<br />
running Smartphone Link (page 36).<br />
Connecting to Smartphone Link provides access<br />
to <strong>Garmin</strong> Live Services. <strong>Garmin</strong> Live Services<br />
provide free and subscription-based plans to<br />
view live data on your device, such as traffic<br />
data, weather and fuel prices.<br />
Some <strong>Garmin</strong> Live Services, like Weather, are<br />
available as separate apps on your device.<br />
Other <strong>Garmin</strong> Live Services, like Live Traffic,<br />
enhance the existing navigation features on your<br />
device. Features that require access to <strong>Garmin</strong><br />
Live Services display the Smartphone Link<br />
nüvi <strong>3500</strong> <strong>Series</strong> Owner’s <strong>Manual</strong> 37
symbol and appear only when the device is<br />
connected to Smartphone Link.<br />
Subscribing to <strong>Garmin</strong> Live Services<br />
You must subscribe to <strong>Garmin</strong> Live Services<br />
using the Smartphone Link app on your phone.<br />
1 Start the Smartphone Link app on your<br />
phone (page 36).<br />
2 Select <strong>Garmin</strong> Live Services.<br />
A list of services and subscription prices<br />
appears.<br />
3 Select a service.<br />
4 Select the price.<br />
5 Select Subscribe.<br />
6 Follow the on-screen instructions.<br />
About ecoRoute<br />
In some areas, before you can use ecoRoute<br />
features, you must purchase an unlock code or<br />
an ecoRoute HD accessory. Go to www.garmin<br />
.com/ecoroute for more information.<br />
The ecoRoute feature calculates the fuel<br />
economy and the fuel price of navigating to a<br />
destination, and offers tools for improving fuel<br />
efficiency.<br />
The data provided by the ecoRoute feature is an<br />
estimate only. The data is not actually read from<br />
the vehicle, unless you are using the ecoRoute<br />
HD accessory.<br />
To receive more-accurate fuel reports for your<br />
specific vehicle and driving habits, calibrate the<br />
fuel economy (page 39).<br />
ecoRoute HD Accessory<br />
When connected to the ecoRoute HD accessory,<br />
your device can receive real-time vehicle<br />
information, such as error messages, RPM, and<br />
battery voltage. Your device includes data read<br />
from the vehicle by the ecoRoute HD accessory<br />
when calculating ecoRoute data.<br />
38 nüvi <strong>3500</strong> <strong>Series</strong> Owner’s <strong>Manual</strong>
Go to www.garmin.com/ecoroute for<br />
compatibility and purchasing information.<br />
Setting Up the Vehicle Profile<br />
The first time you use the ecoRoute features,<br />
you must enter vehicle information.<br />
1 Select Apps > ecoRoute .<br />
2 Enter fuel and mileage information.<br />
Changing the Fuel Price<br />
1 Select Apps > ecoRoute > At the Pump.<br />
2 Enter the current price of fuel, and select<br />
Next.<br />
3 Select Yes.<br />
Calibrating the Fuel Economy<br />
You can calibrate the fuel economy to receive<br />
more-accurate fuel reports for your specific<br />
vehicle and driving habits. You should calibrate<br />
when you fill up your fuel tank.<br />
1 Select Apps > ecoRoute > At the Pump.<br />
2 Enter the current fuel price.<br />
3 Enter the amount of fuel the vehicle has<br />
used since the last time the fuel tank was<br />
filled.<br />
4 Enter the distance you have travelled since<br />
the last time the fuel tank was filled.<br />
5 Select Next.<br />
The device calculates the average vehicle<br />
fuel economy.<br />
6 Select Save.<br />
About the ecoChallenge<br />
ecoChallenge helps you maximize the vehicle<br />
fuel economy by scoring your driving habits. The<br />
higher your ecoChallenge scores, the more fuel<br />
you have saved. The ecoChallenge collects data<br />
and calculates a score whenever your device is<br />
moving and in Automobile transportation mode.<br />
nüvi <strong>3500</strong> <strong>Series</strong> Owner’s <strong>Manual</strong> 39
Viewing ecoChallenge Scores<br />
• View your current score in the<br />
ecoChallenge icon on the map.<br />
• Select to view detailed scores.<br />
About the ecoChallenge Score<br />
Current: Displays the score for your current<br />
driving activity.<br />
Overall: Displays an average of the speed,<br />
acceleration, and braking score.<br />
Speed: Displays your score for driving your<br />
vehicle at the optimal speed for conserving<br />
fuel (45–60 mph for most vehicles).<br />
Acceleration: Displays your score for smooth<br />
and gradual acceleration. You lose points for<br />
rapid acceleration.<br />
Braking: Displays your score for smooth and<br />
gradual braking. You lose points for hard<br />
braking.<br />
Removing the ecoChallenge Score From the<br />
Map<br />
Select > > Settings > Hide > Save.<br />
Resetting the ecoChallenge Scores<br />
Select > > Reset.<br />
Viewing Fuel Economy Information<br />
You can view your fuel consumption, your total<br />
fuel cost, and your average fuel economy.<br />
1 Select Apps > ecoRoute > Fuel Economy.<br />
2 Select a section of the graph to zoom in.<br />
Mileage Reports<br />
Mileage reports provide the distance, the time,<br />
the average fuel economy, and the fuel cost of<br />
navigating to a destination.<br />
A mileage report is created for every route that<br />
you drive. If you stop a route on the device, a<br />
mileage report is created for the distance you<br />
traveled.<br />
40 nüvi <strong>3500</strong> <strong>Series</strong> Owner’s <strong>Manual</strong>
Viewing a Mileage Report<br />
You can view saved mileage reports on the<br />
device.<br />
TIP: You can access mileage reports in the<br />
Reports folder on the device drive/volume<br />
(page 62).<br />
1 Select Apps > ecoRoute > Mileage<br />
Report.<br />
2 Select a report.<br />
Resetting ecoRoute Information<br />
1 Select Apps > ecoRoute > Vehicle<br />
Profile.<br />
2 Select > Reset.<br />
Viewing my<strong>Garmin</strong> Messages<br />
Before you can use this feature, your device<br />
must be connected to a supported phone<br />
running Smartphone Link (page 36). This feature<br />
is not available in all areas.<br />
You can view messages from my<strong>Garmin</strong>, such<br />
as notifications for software and map updates.<br />
1 Select Apps > my<strong>Garmin</strong>.<br />
If you have unread messages, the number of<br />
unread messages appears on the my<strong>Garmin</strong><br />
icon.<br />
2 Select a message subject.<br />
The full message appears.<br />
Viewing the Weather Forecast<br />
Before you can use this feature, your device<br />
must be connected to a supported phone<br />
running Smartphone Link (page 36). This feature<br />
is not available in all areas.<br />
1 Select Apps > Weather.<br />
The forecast for your current location<br />
appears.<br />
2 Select a day.<br />
The detailed forecast for that day appears.<br />
nüvi <strong>3500</strong> <strong>Series</strong> Owner’s <strong>Manual</strong> 41
Viewing Weather Near a Different City<br />
1 Select Apps > Weather > Current<br />
Location.<br />
2 Select an option:<br />
• To view weather for a favorite city, select<br />
a city in the list.<br />
• To add a favorite city, select Add City,<br />
and enter a city name.<br />
Viewing the Weather Radar<br />
You can view an animated, color-coded radar<br />
map of current weather conditions, as well as<br />
a weather icon on the map. The weather icon<br />
changes to show weather in the vicinity, such as<br />
rain, snow, and thunderstorms.<br />
1 Select Apps > Weather.<br />
2 If necessary, select a city.<br />
3 Select > Weather Radar.<br />
Viewing Weather Alerts<br />
While you are traveling with your device,<br />
weather alerts may appear on the map. You<br />
can also view a map of weather alerts near your<br />
current location or near a selected city.<br />
1 Select Apps > Weather.<br />
2 If necessary, select a city.<br />
3 Select > Weather Alerts.<br />
Checking Road Conditions<br />
1 Select Apps > Weather.<br />
2 If necessary, select a city.<br />
3 Select > Road Conditions.<br />
About Audiobooks<br />
The device can play audiobooks from Audible<br />
.com. This feature requires a subscription to<br />
Audible.com. Go to www.audible.com/garmin to<br />
activate a free 30-day trial subscription.<br />
42 nüvi <strong>3500</strong> <strong>Series</strong> Owner’s <strong>Manual</strong>
Loading Audiobooks onto Your Device<br />
Before you can load audiobooks onto your<br />
device, you must subscribe to Audible.com.<br />
Go to www.audible.com/garmin for more<br />
information.<br />
1 Connect your device to your computer<br />
(page 2).<br />
2 On your computer, log in to your Audible.com<br />
account.<br />
3 Follow the instructions from Audible.com.<br />
Playing an Audiobook<br />
1 Select Apps > Audible.<br />
2 Select Browse.<br />
3 Select Titles, Authors, Narrators, or<br />
Bookmarks.<br />
4 Select a book.<br />
5 Select an option to control playback:<br />
• To add a bookmark, select .<br />
• To pause playback, select .<br />
To resume playback, select .<br />
• To move quickly forward or backward in<br />
the book, use the slider bar at the top of<br />
the page.<br />
• To go to the next chapter, select .<br />
• To go to the previous chapter, select<br />
.<br />
• To fast forward, hold .<br />
• To rewind, hold .<br />
Adding a Bookmark<br />
When you play an audiobook, the player<br />
automatically resumes the audiobook from<br />
the point where you last stopped. You can<br />
add a bookmark to mark a certain spot in the<br />
audiobook.<br />
While playing an audiobook, select > Add<br />
Bookmark.<br />
nüvi <strong>3500</strong> <strong>Series</strong> Owner’s <strong>Manual</strong> 43
Resuming Playback from a Bookmark<br />
1 While playing an audiobook, select .<br />
2 Select a bookmark.<br />
Renaming a Bookmark<br />
By default, the device names a bookmark<br />
using the time stamp of the bookmark. You can<br />
rename a bookmark.<br />
1 While playing an audiobook, select ><br />
> Rename Bookmarks.<br />
2 Select a bookmark.<br />
3 Enter a name, and select Done.<br />
Deleting a Bookmark<br />
1 While playing an audiobook, select ><br />
> Delete Bookmarks.<br />
2 Select a bookmark.<br />
Planning a Trip<br />
You can use the trip planner to create and save<br />
a trip with multiple destinations.<br />
1 Select Apps > Trip Planner.<br />
2 Select .<br />
3 Select Select Start Location.<br />
4 Search for a location (page 8).<br />
5 Select Select.<br />
6 To add additional locations, select .<br />
7 Select Next.<br />
8 Enter a name, and select Done.<br />
Editing a Trip Itinerary<br />
1 Select Apps > Trip Planner.<br />
2 Select a saved trip.<br />
3 Select an option:<br />
• To change the arrival or departure time,<br />
select a location in the trip.<br />
44 nüvi <strong>3500</strong> <strong>Series</strong> Owner’s <strong>Manual</strong>
• To record how long you will stay at a<br />
location, select a location in the trip, and<br />
select Duration.<br />
• To change the transportation mode or<br />
route preference for a trip leg, select a<br />
leg, and select Transportation Mode.<br />
• To view the trip on the map, select Map.<br />
Navigating to a Saved Trip<br />
1 Select Apps > Trip Planner.<br />
2 Select a saved trip.<br />
3 Select Go!.<br />
4 If prompted, select a route (page 20).<br />
Editing a Saved Trip<br />
1 Select Apps > Trip Planner.<br />
2 Select a saved trip.<br />
3 Select .<br />
4 Select an option:<br />
• Select Rename Trip.<br />
• Select Edit Destinations to add and<br />
delete locations, or to change the order<br />
of locations.<br />
• Select Delete Trip.<br />
• Select Optimize Order to arrange the<br />
stops on your trip in the most-efficient<br />
order.<br />
Viewing Pictures<br />
You can view pictures that you have stored in<br />
the device or on a memory card. See page 61<br />
for more information about loading pictures on<br />
the device.<br />
1 Select Apps > Picture Viewer.<br />
2 Use the arrows to scroll through the images.<br />
3 Select a picture.<br />
nüvi <strong>3500</strong> <strong>Series</strong> Owner’s <strong>Manual</strong> 45
Viewing a Slideshow<br />
1 Select Apps > Picture Viewer.<br />
2 Select .<br />
3 While a slideshow is playing, select the<br />
screen to stop the slideshow.<br />
Setting a Picture as Wallpaper<br />
1 Select Apps > Picture Viewer.<br />
2 Select a picture.<br />
3 Select > Set as Wallpaper.<br />
4 Use the on-screen buttons to adjust the<br />
wallpaper.<br />
5 Select Save.<br />
Deleting Pictures<br />
1 Select Apps > Picture Viewer.<br />
2 Select a picture.<br />
3 Select > Delete > Yes.<br />
Viewing Previous Routes and<br />
Destinations<br />
Before you can use this feature, you must<br />
enable the travel history feature (page 66).<br />
You can view your previous routes and places<br />
you have stopped on the map.<br />
Select Apps > Where I’ve Been.<br />
Using the World Clock<br />
1 Select Apps > World Clock.<br />
2 If necessary, select a city, enter a city name,<br />
and select Done.<br />
Viewing the World Map<br />
Select Apps > World Clock > .<br />
Nighttime hours appear in the shaded area<br />
of the map.<br />
46 nüvi <strong>3500</strong> <strong>Series</strong> Owner’s <strong>Manual</strong>
Using the Media Player<br />
On some models, the media player can play<br />
MP3 music files. You can load music files<br />
into the Music folder on your device or onto a<br />
memory card.<br />
See page 62 to add files to your device.<br />
1 Select Apps > Media Player.<br />
2 Select an option:<br />
• To play a song, select .<br />
• To adjust the volume, select .<br />
• To toggle between songs, select<br />
and .<br />
• To shuffle songs, select .<br />
• To view the current playlist, select the<br />
title of the playing song.<br />
• To repeat the playlist, select .<br />
• To repeat a song, select .<br />
Browsing Music Files<br />
You can browse to find other songs you have<br />
loaded on the device.<br />
1 Select Apps > Media Player.<br />
2 Select Browse.<br />
3 Select an option.<br />
Creating a Playlist<br />
You can create playlists, which allows you to<br />
quickly queue a list of songs for playback.<br />
1 Select Apps > Media Player.<br />
2 Select Browse > Playlists > New Playlist.<br />
3 Enter a name, and select Done.<br />
4 Select All Songs, Albums, Artists, or<br />
Genres.<br />
5 If necessary, select an album, artist, or<br />
genre.<br />
6 Select the check box next to each item to<br />
add to the playlist, and select Save.<br />
nüvi <strong>3500</strong> <strong>Series</strong> Owner’s <strong>Manual</strong> 47
editing a Playlist<br />
You can edit the songs or the order of songs in a<br />
playlist, or you can delete a playlist.<br />
1 Select Apps > Media Player > Browse ><br />
Playlists.<br />
2 Select a playlist.<br />
3 Select Edit Playlist.<br />
4 Select Add Song, Remove Song, Reorder<br />
Songs, Rename Playlist, or Delete<br />
Playlist.<br />
5 Follow the on-screen prompts.<br />
Playing a Video<br />
On some devices, you can play video.<br />
Before you can play a video, you must load a<br />
compatible video file onto your device (page 62).<br />
1 Select Apps > Video Player.<br />
2 Select a video.<br />
3 Select the screen to view the playback<br />
controls.<br />
Supported Video Formats<br />
The video player supports these video file<br />
formats.<br />
• AVI file containing h.264 video and AAC<br />
audio.<br />
• MP4 file containing h.264 video and AAC<br />
audio.<br />
• ASF file containing WMV video and WMA<br />
audio.<br />
Setting an Alarm<br />
1 Select Apps > Alarm Clock.<br />
2 Set a time.<br />
3 Select the Alarm On check box.<br />
48 nüvi <strong>3500</strong> <strong>Series</strong> Owner’s <strong>Manual</strong>
Finding Parking<br />
Before you can use this feature, you must<br />
subscribe to the Dynamic Parking service, and<br />
your device must be connected to a supported<br />
phone running Smartphone Link (page 36). This<br />
feature is not available in all areas.<br />
You can find detailed parking information, in<br />
cluding parking availability in nearby garages,<br />
and pricing information.<br />
1 Select Apps > Parking.<br />
2 Select a parking location.<br />
Finding Your Last Parking Spot<br />
When you remove your device from the vehicle<br />
mount while the device is on, your current<br />
location is saved as a parking spot.<br />
Select Apps > Last Spot.<br />
Saving a Parking Spot<br />
1 Select Apps > Last Spot.<br />
2 Select > Save.<br />
3 If necessary, enter a name.<br />
Using the Calculator<br />
Select Apps > Calculator.<br />
Converting Units<br />
1 Select Apps > Unit Converter.<br />
2 If necessary, select the button next to<br />
Convert, select a measurement category,<br />
and select Save.<br />
3 If necessary, select a unit button, select a<br />
unit of measurement, and select Save.<br />
4 Select the field below the unit you want to<br />
convert.<br />
5 Enter the number, and select Done.<br />
nüvi <strong>3500</strong> <strong>Series</strong> Owner’s <strong>Manual</strong> 49
Setting Currency Conversion Rates<br />
Before you can use this feature, your device<br />
must be connected to a supported phone<br />
running Smartphone Link (page 36). This feature<br />
is not available in all areas.<br />
You can update the currency conversion rates<br />
for the unit convertor.<br />
1 Select Apps > Unit Converter.<br />
2 Select the button next to Convert.<br />
3 Select Currency, and select Save.<br />
4 If necessary, select a currency button, select<br />
a different currency, and select Save.<br />
5 Select the button at the bottom of the screen<br />
that displays the currency conversion rates.<br />
6 Select the box next to a currency.<br />
7 Enter a value, and select Done.<br />
8 Select OK.<br />
Using the Language Guide<br />
Use the Language Guide to look up and<br />
translate words or phrases.<br />
Select Apps > Language Guide.<br />
Selecting Languages in the Language<br />
Guide<br />
You can select the languages you want to<br />
translate when translating words and phrases.<br />
1 Select Apps > Language Guide > Words<br />
and Phrases.<br />
2 Select > Language.<br />
3 Select From, select the language to<br />
translate from, and select Save.<br />
4 Select To, select the language to translate<br />
to, and select Save.<br />
Translating Words and Phrases<br />
1 Select Apps > Language Guide > Words<br />
and Phrases.<br />
50 nüvi <strong>3500</strong> <strong>Series</strong> Owner’s <strong>Manual</strong>
2 Select a category and subcategories.<br />
3 If necessary, select , enter a keyword,<br />
and select Done.<br />
4 Select a word or a phrase.<br />
5 Select to listen to the translation.<br />
Using a Bilingual Dictionary<br />
1 Select Apps > Language Guide > Bilingual<br />
Dictionaries.<br />
2 Select a dictionary.<br />
3 If necessary, select , enter a word, and<br />
select Done.<br />
4 Select a word.<br />
5 Select to listen to the translation.<br />
About Tracker<br />
noTiCeS<br />
Use caution when sharing your location<br />
information with others.<br />
Before you can use this feature, your device<br />
must be connected to a supported smartphone<br />
running Smartphone Link (page 36). This feature<br />
is not available in all areas.<br />
Tracker allows you to report your location, follow<br />
others, and allow others to follow your location.<br />
Tracker is available on select <strong>Garmin</strong> GPS<br />
devices and as an application for select mobile<br />
phones.<br />
Setting Up Tracker<br />
1 Select Apps > Tracker > Get Started.<br />
2 Follow the on-screen instructions.<br />
nüvi <strong>3500</strong> <strong>Series</strong> Owner’s <strong>Manual</strong> 51
Changing Your Nickname<br />
The first time you power on your device, you are<br />
prompted to enter the nickname that identifies<br />
you when you use Tracker.<br />
1 Select Apps > Tracker > > Profile.<br />
2 Beside Nickname, select Edit.<br />
3 Enter a nickname, and select Done.<br />
Viewing Your Tracker ID<br />
Your Tracker ID identifies your device uniquely<br />
to other Tracker users. Other users can use your<br />
Tracker ID to invite you as a follower.<br />
Select Apps > Tracker > > Profile.<br />
About Followers<br />
You can invite another person to follow your<br />
location for a specified period of time. When that<br />
time expires, the follower can no longer view<br />
your location.<br />
You can invite a follower using an email address<br />
or a Tracker ID. If you invite a follower using<br />
an email address, that person must follow you<br />
using the <strong>Garmin</strong> website. If you invite a follower<br />
using a Tracker ID, that person can follow you<br />
using Tracker.<br />
Following Others<br />
Before you can follow someone using your<br />
device, that person must invite you to follow him<br />
or her using your Tracker ID.<br />
1 Select Apps > Tracker > View.<br />
2 Select a person.<br />
The location of the selected person appears on<br />
the map.<br />
Viewing Followers<br />
You can view a list of users who are currently<br />
following you.<br />
Select Apps > Tracker > View.<br />
52 nüvi <strong>3500</strong> <strong>Series</strong> Owner’s <strong>Manual</strong>
inviting a Follower<br />
You can invite another person to follow your<br />
location for a specified period of time.<br />
1 Select Apps > Tracker > Follow Me.<br />
2 Select an option:<br />
• Select the check box next to each<br />
recipient.<br />
• Select Enter Email or Tracker ID, and<br />
enter the recipient email address or<br />
Tracker ID (page 52).<br />
NOTE: The Tracker ID is case-sensitive.<br />
3 Select Next.<br />
4 Select an option:<br />
• Select a message.<br />
• Select Enter Message, and enter a<br />
customized message.<br />
5 Drag Hours and Minutes to select a<br />
duration, and select Next.<br />
6 Select Send.<br />
Canceling a Follower<br />
When you cancel a follower, that person can no<br />
longer view your location.<br />
1 Select Apps > Tracker > View.<br />
2 Select .<br />
3 Select one or more followers.<br />
4 Select Cancel Tracking.<br />
Hiding Your Location<br />
You can hide your location from people who are<br />
following you.<br />
Select Apps > Tracker > Hide Me.<br />
Sending a Location Message<br />
You can send a customized location message to<br />
another user.<br />
1 Select Apps > Tracker > Here I Am.<br />
nüvi <strong>3500</strong> <strong>Series</strong> Owner’s <strong>Manual</strong> 53
2 Select an option:<br />
• Select the check box next to each<br />
recipient.<br />
• Select Enter Email or Tracker ID, and<br />
enter the recipient email address or<br />
Tracker ID.<br />
The Tracker ID is case-sensitive.<br />
3 Select Next.<br />
4 Select an option:<br />
• Select a message.<br />
• Select Enter Message, and enter a<br />
customized message.<br />
5 Select Send.<br />
Enabling Your Social Network<br />
Accounts for Tracker<br />
Before you can post your location on social<br />
networks using Tracker, you must enable your<br />
social network accounts in Smartphone Link.<br />
1 From your phone, launch Smartphone Link.<br />
2 Select the menu button on your phone.<br />
3 Select Settings.<br />
4 Select the Social Network check box.<br />
5 Select Social Network Accounts.<br />
6 Select the check box next to the social<br />
networks that should be enabled in Tracker.<br />
7 If necessary, follow the on-screen prompts to<br />
authenticate the selected accounts.<br />
Posting Your Location to Social<br />
Networks<br />
You can post your location on social networks<br />
for a specified period of time. During that time,<br />
anyone who can view your posts on the social<br />
network will be able to view your location.<br />
1 Select Apps > Tracker > Follow Me.<br />
2 Select one or more social networks.<br />
3 Select Next.<br />
54 nüvi <strong>3500</strong> <strong>Series</strong> Owner’s <strong>Manual</strong>
4 Select an option:<br />
• Select a message.<br />
• Select Enter Message, and enter a<br />
customized message.<br />
5 Drag Hours and Minutes to select a<br />
duration, and select Next.<br />
6 Select Send.<br />
Traffic<br />
noTiCe<br />
<strong>Garmin</strong> is not responsible for the accuracy or<br />
timeliness of the traffic information.<br />
NOTE: In some areas, traffic information may<br />
be received from FM radio stations using HD<br />
Radio technology.<br />
Traffic information may not be available in all<br />
areas or countries.<br />
Your device can receive traffic information<br />
using a compatible <strong>Garmin</strong> traffic receiver or a<br />
traffic subscription from <strong>Garmin</strong> Live Services<br />
(page 36). A traffic receiver is included in some<br />
packages. It is built into the vehicle power cable.<br />
The traffic receiver and device must be powered<br />
and in data range of a station transmitting traffic<br />
data to receive traffic information. You do not<br />
need to activate the subscription included with<br />
your traffic receiver.<br />
For information about traffic receivers and<br />
coverage areas, go to www.garmin.com/traffic.<br />
Enabling Traffic<br />
1 Select Settings > Traffic.<br />
2 Select Traffic.<br />
nüvi <strong>3500</strong> <strong>Series</strong> Owner’s <strong>Manual</strong> 55
Receiving Traffic Data Using a<br />
Traffic Receiver<br />
noTiCeS<br />
Heated (metallized) windshields could degrade<br />
the performance of the traffic receiver.<br />
When the receiver is within a traffic coverage<br />
area, your device will begin displaying traffic<br />
information.<br />
The traffic receiver and the device may need to<br />
be in data range of an FM station transmitting<br />
traffic information.<br />
1 Connect the traffic receiver to an external<br />
power source.<br />
2 Connect the traffic receiver to the device.<br />
Traffic Receiver<br />
➊ ➋<br />
➌ ➍ ➎<br />
56 nüvi <strong>3500</strong> <strong>Series</strong> Owner’s <strong>Manual</strong><br />
➊<br />
➋<br />
➌<br />
➍<br />
➎<br />
Mini-USB connector<br />
External antenna connector<br />
Internal antenna<br />
Power LED<br />
Vehicle power adapter
Receiving Traffic Data Using<br />
Smartphone Link<br />
You can purchase a traffic subscription to<br />
receive traffic data using Smartphone Link.<br />
When your device is connected to Smartphone<br />
Link and within a traffic coverage area, your<br />
device will begin displaying traffic information.<br />
Traffic data is not available in all areas.<br />
1 From your phone, purchase a traffic<br />
subscription from <strong>Garmin</strong> Live Services<br />
(page 38).<br />
2 Connect your device to Smartphone LInk<br />
(page 36).<br />
About the Traffic Icon<br />
When you are receiving traffic information, a<br />
traffic icon appears on the map. The traffic icon<br />
changes color to indicate the severity of traffic<br />
conditions.<br />
Color Severity Meaning<br />
Green Low Traffic is flowing freely.<br />
Yellow Medium Traffic is moving but there is<br />
a delay. There is moderate<br />
traffic congestion.<br />
Red High Traffic is not moving or<br />
moving slowly. There is a<br />
severe delay.<br />
Gray No signal Traffic information is not<br />
available.<br />
nüvi <strong>3500</strong> <strong>Series</strong> Owner’s <strong>Manual</strong> 57
Traffic on Your Route<br />
When calculating your route, the device<br />
examines the current traffic and automatically<br />
optimizes the route for the shortest time. If a<br />
severe traffic delay occurs on your route while<br />
you are navigating, your device automatically<br />
recalculates the route.<br />
The traffic icon changes color to indicate the<br />
severity of traffic conditions on your route or on<br />
the road you are currently traveling.<br />
Your device may route you through a traffic<br />
delay if a better alternative route does not exist.<br />
The delay time is added into your estimated time<br />
of arrival automatically.<br />
Viewing Traffic on Your Route<br />
1 While navigating a route, select .<br />
2 Select Traffic on Route.<br />
A list of traffic events appears, organized by<br />
their location on the route.<br />
3 Select an event.<br />
<strong>Manual</strong>ly Avoiding Traffic on Your Route<br />
1 From the map, select .<br />
2 Select Traffic On Route.<br />
3 If necessary, use the arrows to view other<br />
traffic delays on your route.<br />
4 Select > Avoid.<br />
Taking an Alternate Route<br />
1 While navigating an automobile route, select<br />
.<br />
2 Select Alternate Route.<br />
3 Select a route.<br />
Viewing Traffic on the Map<br />
The traffic map shows color-coded traffic flow<br />
and delays on nearby roads.<br />
1 From the map, select .<br />
2 Select Traffic Conditions.<br />
58 nüvi <strong>3500</strong> <strong>Series</strong> Owner’s <strong>Manual</strong>
Traffic in Your Area<br />
Searching for Traffic Delays<br />
1 From the map, select .<br />
2 Select Traffic Conditions > .<br />
3 Select an item in the list.<br />
4 If there is more than one delay, use the<br />
arrows to view additional delays.<br />
Viewing a Traffic Incident on the Map<br />
1 From the map, select .<br />
2 Select Traffic Conditions.<br />
3 Select a traffic icon.<br />
Understanding Traffic Data<br />
The traffic legend explains the icons and colors<br />
used on the traffic map.<br />
1 From the map, select .<br />
2 Select Traffic Legend.<br />
About Traffic Cameras<br />
Before you can use this feature, you must<br />
subscribe to the photoLive service, and your<br />
device must be connected to a supported phone<br />
running Smartphone Link (page 36). This feature<br />
is not available in all areas.<br />
Traffic cameras provide live images of traffic<br />
conditions on major roadways and intersections.<br />
You can save cameras that you want to view<br />
regularly.<br />
Saving a Traffic Camera<br />
1 Select Apps > MyCameras.<br />
2 Select Add Camera.<br />
3 Select a road.<br />
4 Select an intersection.<br />
5 Select Save.<br />
nüvi <strong>3500</strong> <strong>Series</strong> Owner’s <strong>Manual</strong> 59
Viewing a Traffic Camera<br />
Before you can view a traffic camera, you must<br />
save a traffic camera.<br />
1 Select Apps > myCameras.<br />
2 Select a camera.<br />
Traffic Subscriptions<br />
Subscription Activation<br />
You do not need to activate the subscription<br />
included with your FM traffic receiver. The<br />
subscription activates automatically after your<br />
device acquires satellite signals while receiving<br />
traffic signals from the pay service provider.<br />
Lifetime Subscriptions<br />
Some models include subscriptions to lifetime<br />
features.<br />
LT This model includes a lifetime traffic<br />
subscription and a traffic receiver.<br />
LMT This model includes a nüMaps Lifetime subscription, lifetime traffic subscription<br />
(page 72), and a traffic receiver.<br />
Adding a Subscription<br />
You can purchase traffic subscriptions for other<br />
regions or countries.<br />
NOTE: You can also purchase a traffic<br />
subscription using <strong>Garmin</strong> Live Services<br />
(page 38). Traffic subscriptions purchased<br />
through <strong>Garmin</strong> Live Services require a<br />
connection to Smartphone Link, but do not<br />
require a traffic receiver (page 36).<br />
1 From the main menu, select Settings ><br />
Traffic.<br />
60 nüvi <strong>3500</strong> <strong>Series</strong> Owner’s <strong>Manual</strong>
2 Select an option:<br />
• For non-North American units, select<br />
Subscriptions > .<br />
• For North American units, select .<br />
3 Write down the FM traffic receiver unit ID.<br />
4 Go to www.garmin.com/fmtraffic to purchase<br />
a subscription and get a 25-character code.<br />
The traffic subscription code cannot be<br />
reused. You must obtain a new code each<br />
time you renew your service. If you own<br />
multiple FM traffic receivers, you must obtain<br />
a new code for each receiver.<br />
5 Select Next on the device.<br />
6 Enter the code.<br />
7 Select Done.<br />
Data Management<br />
You can store files, such as JPEG image files,<br />
on your device. The device has a memory card<br />
slot for additional data storage.<br />
NOTE: The device is not compatible with<br />
Windows ® 95, 98, Me, Windows NT ® , and Mac ®<br />
OS 10.3 and earlier.<br />
File Types<br />
The device supports the following file types:<br />
• JPEG and JPG image files (page 45)<br />
• Maps and GPX waypoint files from <strong>Garmin</strong><br />
mapping software, including MapSource ® ,<br />
BaseCamp , and HomePort (page 72)<br />
• GPI custom POI files from <strong>Garmin</strong> POI<br />
Loader (page 73)<br />
nüvi <strong>3500</strong> <strong>Series</strong> Owner’s <strong>Manual</strong> 61
About Memory Cards<br />
You can purchase memory cards from an<br />
electronics supplier, or purchase pre-loaded<br />
<strong>Garmin</strong> mapping software (www.garmin.com<br />
/trip_planning). In addition to map and data<br />
storage, the memory card can be used to store<br />
files such as maps, images, geocaches, routes,<br />
waypoints, and custom POIs.<br />
Installing a Memory Card<br />
The device supports microSD and microSDHC<br />
memory cards.<br />
1 Insert a memory card into the slot on the<br />
device.<br />
2 Press it in until it clicks.<br />
Transferring Files from Your<br />
Computer<br />
1 Connect the device to your computer<br />
(page 2).<br />
Your device and memory card appear<br />
as removable drives in My Computer in<br />
Windows and as mounted volumes on Mac<br />
computers.<br />
NOTE: Some computers with multiple<br />
network drives cannot display nüvi drives.<br />
See your operating system Help file to learn<br />
how to map the drives.<br />
2 On your computer, open the file browser.<br />
3 Select the file.<br />
4 Select Edit > Copy.<br />
5 Open the <strong>Garmin</strong> or memory card drive or<br />
volume.<br />
6 Select Edit > Paste.<br />
The file appears in the list of files in the<br />
device memory or on the memory card.<br />
Disconnecting the USB Cable<br />
1 Complete an action:<br />
62 nüvi <strong>3500</strong> <strong>Series</strong> Owner’s <strong>Manual</strong>
• For Windows computers, click the eject<br />
icon in your system tray.<br />
• For Mac computers, drag the volume<br />
icon to the Trash .<br />
2 Disconnect the cable from your computer.<br />
Deleting Files<br />
noTiCe<br />
If you do not know the purpose of a file, do not<br />
delete it. Your device memory contains important<br />
system files that should not be deleted.<br />
1 Open the <strong>Garmin</strong> drive or volume.<br />
2 If necessary, open a folder or volume.<br />
3 Select a file.<br />
4 Press the Delete key on your keyboard.<br />
Customizing the Device<br />
1 Select Settings.<br />
2 Select a setting category.<br />
3 Select the setting to change it.<br />
Map and Vehicle Settings<br />
Select Settings > Map & Vehicle.<br />
Vehicle: Changes the icon to represent your<br />
position on the map. Go to www<br />
.garmingarage.com for more icons.<br />
Driving Map View: Sets the perspective on the<br />
map.<br />
Pedestrian Map View: Sets the perspective on<br />
the map.<br />
Map Detail: Sets the level of detail on the map.<br />
More detail may cause the map to draw<br />
slower.<br />
Map Theme: Changes the color of the map<br />
data.<br />
nüvi <strong>3500</strong> <strong>Series</strong> Owner’s <strong>Manual</strong> 63
Map Buttons: Sets which icons are included on<br />
the map. Up to three icons can be included<br />
on the map.<br />
Map Layers: Sets the data that appears on the<br />
map (page 26).<br />
Dashboards: Sets the map dashboard layout.<br />
myMaps: Sets which installed maps the device<br />
uses.<br />
Enabling Maps<br />
TIP: To purchase additional map products, go to<br />
www.garmin.com/us/maps.<br />
1 Select Settings > Map and Vehicle ><br />
myMaps.<br />
2 Select a map.<br />
Navigation Settings<br />
Select Settings > Navigation.<br />
Calculation Mode: Sets route preference.<br />
Avoidances: Sets road features to avoid on a<br />
route.<br />
Custom Avoidances: Allows you to avoid<br />
specific roads or areas.<br />
Advanced Detours: Sets the length of a detour.<br />
Limit Walking: Controls the maximum walking<br />
distance included in a pedestrian route.<br />
Public Transit: Enables or disables transit<br />
types.<br />
Safe Mode: Disables all functions that require<br />
significant operator attention and could<br />
become a distraction while driving.<br />
GPS Simulator: Stops the device from receiving<br />
a GPS signal, and saves battery power.<br />
Route Preferences<br />
Select Settings > Navigation > Calculation<br />
Mode.<br />
The route calculation is based on road speeds<br />
and vehicle acceleration data for a given route.<br />
64 nüvi <strong>3500</strong> <strong>Series</strong> Owner’s <strong>Manual</strong>
Faster Time: Calculates routes that are faster to<br />
drive but can be longer in distance.<br />
Shorter Distance: Calculates routes that are<br />
shorter in distance but can take more time<br />
to drive.<br />
Less Fuel: Calculates routes that could use less<br />
fuel than other routes.<br />
Off Road: Calculates a direct line from your<br />
location to your destination.<br />
Display Settings<br />
Select Settings > Display.<br />
Color Mode: Sets a light background (Day), a<br />
dark background (Night), or automatically<br />
switches between the two based on the<br />
sunrise time and the sunset time for your<br />
current location (Auto).<br />
Brightness: Changes the brightness of the<br />
screen. Decreasing the brightness can save<br />
battery power.<br />
Display Timeout: Sets the amount of idle time<br />
before your device enters sleep mode.<br />
Screenshot: Allows you to take a picture of the<br />
device screen. Screenshots are saved in the<br />
Screenshot folder of the device storage.<br />
Bluetooth Settings<br />
Select Settings > Bluetooth.<br />
Bluetooth: Enables the Bluetooth component.<br />
Add Phone or Phone: Manages connections<br />
between your device and mobile phones with<br />
Bluetooth wireless technology.<br />
Friendly Name: Allows you to enter a friendly<br />
name that identifies your devices with<br />
Bluetooth technology.<br />
Managing the Bluetooth Device List<br />
You can add, disconnect, or delete phones that<br />
your device detects while Bluetooth is enabled.<br />
1 Select Settings > Bluetooth > Phone.<br />
nüvi <strong>3500</strong> <strong>Series</strong> Owner’s <strong>Manual</strong> 65
2 Select an option:<br />
• Select a phone for your device to<br />
connect with.<br />
• Select to add a phone to the menu.<br />
• Select to delete a phone from the<br />
device memory.<br />
• Select None to drop your current<br />
connection<br />
Disabling Bluetooth<br />
1 Select Settings > Bluetooth.<br />
2 Select Bluetooth.<br />
Traffic Settings<br />
Select Settings > Traffic.<br />
Traffic: Enables traffic<br />
Subscriptions: Lists current traffic<br />
subscriptions.<br />
trafficTrends : See page 66.<br />
Enabling Traffic<br />
The traffic receiver is included in some device<br />
packages.<br />
Select Settings > Traffic > Traffic.<br />
About Traffic Subscriptions<br />
You can purchase additional subscriptions or a<br />
renewal if your subscription expires. Go to<br />
www.garmin.com/traffic.<br />
Viewing Traffic Subscriptions<br />
Select Settings > Traffic > Subscriptions.<br />
trafficTrends<br />
When the trafficTrends feature is enabled, your<br />
device records historic traffic data and uses that<br />
data to calculate more-efficient routes.<br />
When you drive with the trafficTrends feature<br />
enabled, your device records traffic data that is<br />
used to improve the trafficTrends historic traffic<br />
information. This information is sent to <strong>Garmin</strong><br />
66 nüvi <strong>3500</strong> <strong>Series</strong> Owner’s <strong>Manual</strong>
when you connect your device to my<strong>Garmin</strong><br />
using your computer.<br />
NOTE: Different routes may be calculated based<br />
on traffic trends for the day of the week or the<br />
time of day.<br />
Disabling trafficTrends<br />
To prevent your device from recording or sharing<br />
traffic data, you must disable trafficTrends.<br />
Select Settings > Traffic > trafficTrends.<br />
Units and Time Settings<br />
Select Settings > Units & Time.<br />
Current Time: Sets the device time.<br />
Time Format: Allows you to select a 12-hour,<br />
24-hour, or UTC display time.<br />
Units: Sets the unit of measure used for<br />
distances.<br />
Language and Keyboard Settings<br />
Select Settings > Language & Keyboard.<br />
Voice Language: Sets the language for voice<br />
prompts.<br />
Text Language: Sets all on-screen text to the<br />
selected language.<br />
NOTE: Changing the text language does not<br />
change the language of user-entered data or<br />
map data, such as street names.<br />
Keyboard Language: Sets the language for<br />
your keyboard.<br />
Keyboard Layout: Sets the keyboard layout.<br />
Proximity Alerts Settings<br />
Select Settings > Proximity Alerts.<br />
• Audio: Sets the style of alert that plays when<br />
you approach proximity points.<br />
• Alerts: Sets the type of proximity points for<br />
which alerts are played.<br />
nüvi <strong>3500</strong> <strong>Series</strong> Owner’s <strong>Manual</strong> 67
Device and Privacy Settings<br />
Select Settings > Device.<br />
• About: Displays the software version<br />
number, the unit ID number, and information<br />
on several other software features.<br />
• EULAs: Displays the end-user license<br />
agreements that apply to your choice.<br />
NOTE: You need this information when you<br />
update the system software or purchase<br />
additional map data (page 72).<br />
• Position Reporting: Allows the device to<br />
collect your speed, direction, and location<br />
information and share it with strategic<br />
partners and service providers.<br />
• Travel History: Allows the device to record<br />
information for the myTrends (page 23),<br />
Where I’ve Been (page 46) and Trip Log<br />
(page 26) features.<br />
• Clear Travel History<br />
Restoring Settings<br />
You can restore a category of settings or all<br />
settings to the factory default values.<br />
1 Select Settings.<br />
2 If necessary, select a settings category.<br />
3 Select > Restore<br />
Appendix<br />
Power Cables<br />
Your device can be powered three ways.<br />
• Vehicle power cable<br />
• USB cable<br />
• AC adapter (optional accessory)<br />
68 nüvi <strong>3500</strong> <strong>Series</strong> Owner’s <strong>Manual</strong>
Caring for Your Device<br />
noTiCe<br />
Avoid dropping your device and operating it in<br />
high-shock and high-vibration environments.<br />
Do not expose the device to water.<br />
Contact with water can cause this device to<br />
malfunction.<br />
Do not store the device where prolonged<br />
exposure to extreme temperatures can occur,<br />
because it can cause permanent damage.<br />
Never use a hard or sharp object to operate the<br />
touchscreen, or damage may result.<br />
Cleaning the Outer Casing<br />
noTiCe<br />
Avoid chemical cleaners and solvents that can<br />
damage plastic components.<br />
1 Clean the outer casing of the device (not the<br />
touchscreen) using a cloth dampened with a<br />
mild detergent solution.<br />
2 Wipe the device dry.<br />
Cleaning the Touchscreen<br />
1 Use a soft, clean, lint-free cloth.<br />
2 If necessary, use water, isopropyl alcohol, or<br />
eyeglass lens cleaner.<br />
3 Apply the liquid to the cloth.<br />
4 Gently wipe the screen with the cloth.<br />
Avoiding Theft<br />
• Remove the device and mount from sight<br />
when not in use.<br />
• Remove the residue left on the windshield by<br />
the suction cup.<br />
• Do not keep your unit in the glove<br />
compartment.<br />
nüvi <strong>3500</strong> <strong>Series</strong> Owner’s <strong>Manual</strong> 69
• Register your device at http://my.garmin<br />
.com.<br />
Extending the Battery Life<br />
• Keep your device away from extreme<br />
temperatures.<br />
• Put the device in sleep mode (page 4).<br />
• Decrease the screen brightness (page 4).<br />
• Do not leave your device in direct sunlight.<br />
• Decrease the volume (page 4).<br />
• Disable Bluetooth (page 66).<br />
• Shorten the display timeout time (page 65).<br />
Changing the Fuse in the Vehicle<br />
Power Cable<br />
noTiCe<br />
When replacing the fuse, do not lose any of the<br />
small pieces and make sure they are put back in<br />
the proper position. The vehicle power cable<br />
does not work unless it is assembled correctly.<br />
If your device does not charge in your vehicle,<br />
you may need to replace the fuse located at the<br />
tip of the vehicle adapter.<br />
1 Unscrew the end piece ➊.<br />
TIP: You may need to use a coin to remove<br />
the end piece.<br />
2 Remove the end piece, the silver tip ➋, and<br />
the fuse ➌.<br />
3 Install an 2 A fast-blow fuse.<br />
70 nüvi <strong>3500</strong> <strong>Series</strong> Owner’s <strong>Manual</strong><br />
➍<br />
➌<br />
➋<br />
➊
4 Place the silver tip in the end piece.<br />
5 Screw the end piece back into the vehicle<br />
power cable ➍.<br />
Mounting on Your Dashboard<br />
noTiCe<br />
The permanent mounting adhesive is extremely<br />
difficult to remove after it is installed.<br />
Use the mounting disk to mount your device to<br />
the dashboard and comply with certain state<br />
regulations. See www.garmin.com for more<br />
information.<br />
1 Clean and dry the dashboard where you are<br />
placing the disk.<br />
2 Remove the backing from the adhesive on<br />
the bottom of the disk.<br />
3 Place the disk on the dashboard.<br />
4 Remove the clear plastic cover from the top<br />
of the disk.<br />
5 Place the suction cup mount on top of the<br />
disk.<br />
6 Flip the lever down (toward the disk).<br />
Removing the Device, Cradle, and<br />
Mount<br />
Removing the Device from the Cradle<br />
1 Press the tab on the bottom of the cradle.<br />
2 Tilt the device forward.<br />
Removing the Cradle from the Mount<br />
1 Turn the cradle to the right or left.<br />
2 Apply pressure until the socket on the cradle<br />
releases the ball on the mount.<br />
Removing the Suction Cup Mount from<br />
the Windshield<br />
1 Flip the lever on the suction cup mount<br />
toward you.<br />
2 Pull the tab on the suction cup toward you.<br />
nüvi <strong>3500</strong> <strong>Series</strong> Owner’s <strong>Manual</strong> 71
Updating Maps<br />
You can update the maps on your device. For<br />
more information, go to www.garmin.com<br />
/mapupdates, and select Map Update User<br />
Guide.<br />
About nüMaps Lifetime<br />
Some models include subscriptions nüMaps<br />
Lifetime, which provides quarterly map updates<br />
for the life of your device. For terms and<br />
conditions, go to www.garmin.com/us/maps<br />
/numaps_lifetime.<br />
LM This model includes a nüMaps<br />
Lifetime subscription.<br />
LMT This model includes a lifetime traffic<br />
subscription, nüMaps Lifetime<br />
subscription, and a traffic receiver.<br />
Purchasing Additional Maps<br />
1 Go to your device product page on the<br />
<strong>Garmin</strong> web site (www.garmin.com).<br />
2 Click the Maps tab.<br />
3 Follow the on-screen instructions.<br />
Safety Cameras<br />
CAUTION<br />
<strong>Garmin</strong> is not responsible for the accuracy of,<br />
or the consequences of using, a custom POI or<br />
safety camera database.<br />
Safety camera information is available in some<br />
locations. Check http://my.garmin.com for<br />
availability. For these locations, the nüvi includes<br />
the locations of hundreds of safety cameras.<br />
Your nüvi alerts you when you are approaching<br />
a safety camera and can warn you if you are<br />
driving too fast. The data is updated at least<br />
weekly, so you always have access to the most<br />
up-to-date information.<br />
72 nüvi <strong>3500</strong> <strong>Series</strong> Owner’s <strong>Manual</strong>
You can purchase a new region or extend an<br />
existing subscription at any time. Each region<br />
that you purchase has an expiration date.<br />
Custom Points of Interest<br />
Custom POIs are customized points on the<br />
map. They can contain alerts that let you know<br />
if you are near a designated point or if you are<br />
traveling faster than a specified speed.<br />
Installing a POI Loader<br />
You can create or download custom POI lists<br />
and install them on your device using POI<br />
Loader software.<br />
1 Go to www.garmin.com/extras.<br />
2 Click Services > POI Loader.<br />
3 Install the POI Loader onto your computer.<br />
Using the POI Loader Help Files<br />
For more information on the POI Loader, refer to<br />
the Help file.<br />
With the POI Loader open, click Help.<br />
Finding Extras<br />
1 Select Where To? > Custom POIs.<br />
2 Select a category.<br />
Purchasing Accessories<br />
Go to http://buy.garmin.com.<br />
nüvi <strong>3500</strong> <strong>Series</strong> Owner’s <strong>Manual</strong> 73
Troubleshooting<br />
Problem Solution<br />
My device is not acquiring<br />
satellite signals<br />
The suction cup will not<br />
stay on my windshield.<br />
The device does not<br />
charge in my vehicle.<br />
My battery does not stay<br />
charged for very long.<br />
My battery gauge does not<br />
seem accurate.<br />
How do I know my device<br />
is in USB mass storage<br />
mode?<br />
• Verify the GPS simulator is turned off (page 64).<br />
• Take your device out of parking garages and away from tall buildings and trees.<br />
• Remain stationary for several minutes.<br />
1 Clean the suction cup and windshield with rubbing alcohol.<br />
2 Dry with a clean, dry cloth.<br />
3 Mount the suction cup (page 1).<br />
• Check the fuse in the vehicle power cable (page 70).<br />
• Verify the vehicle is turned on and is supplying power to the power outlet.<br />
• Your device can only charge between 32°F and 113°F (between 0°C and 45°C).<br />
If the device is placed in direct sunlight or in a hot environment, it cannot charge.<br />
To maximize the time between changes, turn down the backlight (page 65).<br />
Allow the unit to fully discharge, and fully charge it (without interrupting the charge<br />
cycle).<br />
When your device is in USB mass storage mode, a picture of a device connected<br />
to a computer is shown on the device screen. Also, you should see two new<br />
removable disk drives listed in My Computer.<br />
74 nüvi <strong>3500</strong> <strong>Series</strong> Owner’s <strong>Manual</strong>
The device is connected<br />
to the computer, but it will<br />
not go into mass storage<br />
mode.<br />
I cannot see any new<br />
removable drives in my list<br />
of drives.<br />
My phone will not connect<br />
to the device.<br />
1 Disconnect the USB cable from your computer.<br />
2 Turn off the device.<br />
3 Plug the USB cable into a USB port on your computer and into your device.<br />
The device automatically turns on and goes into USB mass storage mode.<br />
4 Verify your device is connected to a USB port and not a USB hub.<br />
If you have several network drives mapped on your computer, Windows can have<br />
trouble assigning drive letters to your device drives. Refer to your operating system<br />
Help file to learn how to map or assign drive letters.<br />
• From the main menu, select Tools > Settings > Bluetooth. The Bluetooth field<br />
must be set to Enabled.<br />
• Turn on your phone and bring it within 33 feet (10m) of the device.<br />
• Go to www.garmin.com/bluetooth for more help.<br />
nüvi <strong>3500</strong> <strong>Series</strong> Owner’s <strong>Manual</strong> 75
Symbols<br />
Index<br />
2-D, 3-D map view 27<br />
A<br />
accessories 73<br />
adding a point 22<br />
addresses 11<br />
alerts<br />
safety camera 72<br />
audiobook 42<br />
bookmark 43<br />
loading 43<br />
playing 43<br />
automatic volume 4<br />
enabling 5<br />
avoiding<br />
public transit types 24, 31<br />
roads 24<br />
theft 69<br />
traffic 58<br />
B<br />
battery 74<br />
Bluetooth technology 32–82<br />
friendly name 65<br />
pairing with phone 32<br />
settings 65<br />
brightness 65<br />
C<br />
calculator 49<br />
calls<br />
answering 34<br />
hanging up 34<br />
home 35<br />
muting 34<br />
caring for your device 69<br />
category<br />
searching within 8<br />
charging your device 1, 74<br />
cityXplorer maps 20, 30<br />
cleaning your device 69<br />
computer, connecting 2<br />
converting<br />
currency 50<br />
units 49<br />
coordinates 12<br />
current location, directions to 30<br />
current location, saving 15<br />
customizing the device 63–70<br />
custom POIs 73<br />
76 nüvi <strong>3500</strong> <strong>Series</strong> Owner’s <strong>Manual</strong><br />
D<br />
dashboard disk 71<br />
deleting<br />
character 7<br />
files 63<br />
pictures 46<br />
recent finds list 14<br />
saved locations 17<br />
trips 45<br />
detailed maps 61, 64<br />
detours 22<br />
advanced 25<br />
diacritical characters 7<br />
display settings 24, 31<br />
display timeout 65<br />
driving directions 28
E<br />
ecoRoute 38–41<br />
calibrate fuel economy 39<br />
ecoChallenge score 40<br />
fuel economy information 40<br />
mileage report 40<br />
vehicle profile 38<br />
editing<br />
change categories 16<br />
change map symbol 16<br />
destinations 45<br />
home location 14<br />
saved locations 16<br />
saved trip 45<br />
extras 73<br />
F<br />
feedback on POI's 10<br />
files<br />
deleting 63<br />
supported types 61<br />
finding locations<br />
by address 11<br />
by coordinates 12<br />
recent selections 14<br />
saved locations 15<br />
fuel prices 11<br />
fuel stations 11<br />
fuse, changing 70<br />
G<br />
<strong>Garmin</strong> Live Services 37<br />
subscribing 38<br />
geocaching 12<br />
go home 14<br />
GPS<br />
settings 64<br />
simulator 14<br />
H<br />
Help 35<br />
home<br />
phone number 35<br />
setting a location 14<br />
nüvi <strong>3500</strong> <strong>Series</strong> Owner’s <strong>Manual</strong> 77<br />
I<br />
intersection, finding 12<br />
J<br />
JPEG image files 61<br />
junction view 28<br />
K<br />
keyboard 7<br />
language mode 7, 67<br />
L<br />
latitude and longitude 12<br />
locations 8, 10<br />
report a closed location 10<br />
report a missing location 10<br />
M<br />
maps<br />
adding 72<br />
data layout 26<br />
detail level 63<br />
errors 10<br />
purchasing 72
theme 63<br />
view 27<br />
MapSource 72<br />
mass storage mode 61<br />
measurements, converting 49<br />
memory card 62<br />
mileage report 40<br />
mounting the device<br />
on dashboard 71<br />
on windshield 74<br />
removing from mount 71<br />
mute<br />
phone call 34<br />
myDashboard 2<br />
my<strong>Garmin</strong> messages 41<br />
N<br />
navigation 20<br />
off road 26<br />
pedestrian 30<br />
nearby services 30<br />
next turn 28<br />
nüMaps Lifetime 72<br />
O<br />
off-road navigation 26, 65<br />
on-screen buttons 6<br />
P<br />
pairing a mobile phone 32<br />
parking 14, 49<br />
last spot 49<br />
saving 49<br />
pedestrian mode<br />
settings 24, 31<br />
picture viewer 45<br />
PIN<br />
Bluetooth 33<br />
points of interest<br />
finding 8<br />
POI loader 61<br />
predictive routing 23<br />
protecting your device<br />
69<br />
public transit<br />
avoidances 24, 31<br />
city maps 30<br />
78 nüvi <strong>3500</strong> <strong>Series</strong> Owner’s <strong>Manual</strong><br />
R<br />
recalculating routes 22<br />
recently found locations 14<br />
registering the device 3<br />
removing the mount 71<br />
renaming trips 45<br />
resetting<br />
home location 14<br />
the max speed 30<br />
trip data 29<br />
routes<br />
off road 26, 65<br />
stopping 22<br />
S<br />
safe mode 64<br />
satellite signals 5<br />
Saved Locations 15–16<br />
saving<br />
your current location 15<br />
school zone database 73<br />
screen<br />
brightness 65<br />
screenshots 65
search bar 9<br />
sending a location 37<br />
settings 63–82<br />
shortcuts<br />
adding 7<br />
removing 7<br />
Smartphone Link 35<br />
connecting 36<br />
software<br />
version 68<br />
speech recognition 17<br />
speed limit<br />
icon 22<br />
storing the device 69<br />
system settings 64<br />
T<br />
text language 67<br />
time settings 67<br />
tools 35–40<br />
Tracker 51<br />
following others 52<br />
hiding your location 53<br />
ID 52<br />
inviting followers 53<br />
nickname 52<br />
sending location message 53<br />
sharing your location 54<br />
viewing followers 52<br />
Track Up 27<br />
traffic 55–82<br />
activating a subscription 60,<br />
66<br />
adding traffic subscriptions 66<br />
icons 56<br />
incidents 57<br />
receiver 56<br />
Smartphone Link 57<br />
trafficTrends 66<br />
traffic alerts 29<br />
transportation mode 6<br />
trip computer 29<br />
resetting information 23<br />
trip log 26, 68<br />
trip planner 44<br />
troubleshooting 74<br />
turn-by-turn directions 28<br />
turn list 28<br />
U<br />
unit converter 49<br />
unit ID 68<br />
updating<br />
maps 3<br />
software 3<br />
USB 74<br />
V<br />
video player 48<br />
voice command<br />
activating 18<br />
icons and tones 18<br />
navigating with 18<br />
tips for using 18<br />
wakeup phrase 17<br />
voice language 67<br />
voice mail 34<br />
volume<br />
adjusting 4<br />
audio mixer 4<br />
automatic 4
W<br />
weather 41<br />
radar 42<br />
Where Am I? 30<br />
Where I've Been<br />
enabling 68<br />
Where To?<br />
customization 7<br />
where to menu 7<br />
customization<br />
shortcut icon, adding 7<br />
shortcut icon, removing 7<br />
world clock 46<br />
80 nüvi <strong>3500</strong> <strong>Series</strong> Owner’s <strong>Manual</strong>
913-397-8200<br />
1-800-800-1020<br />
00 32 2 672 52 54<br />
0180 5 / 42 76 46 - 880<br />
00800 4412 454<br />
00 35 1214 447 460<br />
+44 2380 662 915<br />
<strong>Garmin</strong> International, Inc<br />
1200 East 151st Street,<br />
Olathe, Kansas 66062, USA<br />
<strong>Garmin</strong> (Europe) Ltd<br />
Liberty House, Hounsdown Business Park<br />
Southampton, Hampshire, SO40 9LR UK<br />
<strong>Garmin</strong> Corporation<br />
No. 68, Zhangshu 2nd Road, Xizhi Dist.<br />
New Taipei City, 221, Taiwan (R.O.C.)<br />
wwwgarmincom/support<br />
0808 2380000<br />
+44 (0) 870.8501241<br />
00 45 4810 5050<br />
00 39 02 3669 9699<br />
1-866-429-9296<br />
00 358 9 6937 9758<br />
0800-0233937<br />
© 2012 <strong>Garmin</strong> Ltd. or its subsidiaries<br />
00 34 902 007 097<br />
43 (0) 3133 3181 0<br />
00 331 55 69 33 99<br />
815 69 555<br />
00 46 7744 52020