EN Installation and operation instructions for RADEMACHER X-line ...
EN Installation and operation instructions for RADEMACHER X-line ...
EN Installation and operation instructions for RADEMACHER X-line ...

Erfolgreiche ePaper selbst erstellen
Machen Sie aus Ihren PDF Publikationen ein blätterbares Flipbook mit unserer einzigartigen Google optimierten e-Paper Software.
54<br />
Safety in<strong>for</strong>mation regarding the electrical connection<br />
Danger due to electric shock when working on all electrical systems.<br />
◆ The electrical connection <strong>for</strong> the tubular motor <strong>and</strong> all work on the electrical systems<br />
may only be undertaken by an authorised qualified electrician <strong>and</strong> in accordance with<br />
the connection diagrams in these <strong>instructions</strong>.<br />
◆ Disconnect all poles from the mains <strong>and</strong> secure them against unintentional recon-<br />
nection.<br />
◆ Check that the system is dead.<br />
◆ Always undertake mounting <strong>and</strong> connection work with the equipment disconnected<br />
from the mains power.<br />
Risk of short-circuit resulting from damaged cable.<br />
◆ Lay all cables in the roller shutter box so that they cannot be damaged by moving<br />
machinery.<br />
◆ The mains connection <strong>for</strong> the drive may only be connected with the same conduction<br />
type. Consult customer services if necessary.<br />
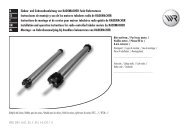
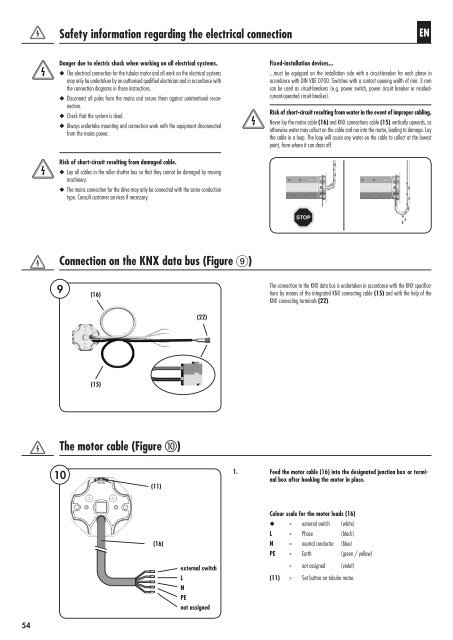
Connection on the KNX data bus (Figure 9)<br />
9<br />
10<br />
(16)<br />
(15)<br />
The motor cable (Figure j)<br />
(11)<br />
(16)<br />
(22)<br />
external switch<br />
L<br />
N<br />
PE<br />
not assigned<br />
1.<br />
STOP<br />
<strong>EN</strong><br />
Fixed-installation devices...<br />
...must be equipped on the installation side with a circuit-breaker <strong>for</strong> each phase in<br />
accordance with DIN VDE 0700. Switches with a contact opening width of min. 3 mm<br />
can be used as circuit-breakers (e.g. power switch, power circuit breaker or residualcurrent-operated<br />
circuit-breaker).<br />
Risk of short-circuit resulting from water in the event of improper cabling.<br />
Never lay the motor cable (16) <strong>and</strong> KNX connections cable (15) vertically upwards, as<br />
otherwise water may collect on the cable <strong>and</strong> run into the motor, leading to damage. Lay<br />
the cable in a loop. The loop will cause any water on the cable to collect at the lowest<br />
point, from where it can drain off.<br />
The connection to the KNX data bus is undertaken in accordance with the KNX specifications<br />
by means of the integrated KNX connecting cable (15) <strong>and</strong> with the help of the<br />
KNX connecting terminals (22).<br />
Feed the motor cable (16) into the designated junction box or terminal<br />
box after hooking the motor in place.<br />
Colour scale <strong>for</strong> the motor leads (16)<br />
◆ = external switch (white)<br />
L = Phase (black)<br />
N = neutral conductor (blue)<br />
PE = Earth (green / yellow)<br />
= not assigned (violet)<br />
(11) = Set button on tubular motor