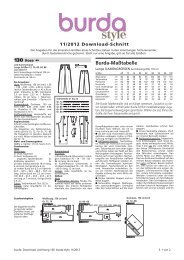
KLEID & TOP ROBE & HAUT DRESS & TOP VESTIDO ... - Burdastyle
KLEID & TOP ROBE & HAUT DRESS & TOP VESTIDO ... - Burdastyle
KLEID & TOP ROBE & HAUT DRESS & TOP VESTIDO ... - Burdastyle

Sie wollen auch ein ePaper? Erhöhen Sie die Reichweite Ihrer Titel.
YUMPU macht aus Druck-PDFs automatisch weboptimierte ePaper, die Google liebt.
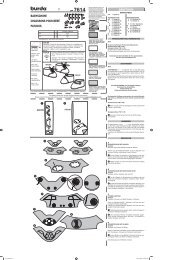
C<br />
<strong>TOP</strong><br />
Halsausschnitt / Banddurchzug<br />
DEUTSCH ENGLISH FRANÇAIS<br />
Zugabe am Halsausschnitt versäubern, nach innen umheften,<br />
bügeln. Kante 1,2 cm breit absteppen, dabei die Zugabe feststeppen.<br />
Band (Teil 9)<br />
Schrägstreifen für das Band wie bei Text und Zeichnung 1 bügeln.<br />
Schrägstreifen der Länge nach zur Hälfte bügeln, linke Seite innen.<br />
Kanten aufeinanderstecken und schmal aufeinandersteppen.<br />
Band mit einer Sicherheitsnadel am Halsausschnitt einziehen (11a).<br />
Bandenden knoten.<br />
Bänder (Teil 10) wie bei Text und Zeichnung 11 steppen.<br />
Je ein Bandende an den seitl. Ecken laut Zeichnung innen eingeschlagen<br />
feststeppen.<br />
Die anderen Bandenden knoten.<br />
Links Knopfloch<br />
Aus dem restl. Stoff ein Rechteck, ca. 4 cm x 5,5 cm schneiden. Kanten<br />
1 cm breit umbügeln.<br />
Stoffstück wie markiert innen auf die linke Hälfte des Tops heften<br />
und schmal feststeppen. KNOPFLOCH einarbeiten.<br />
Top laut Abb. anziehen, dabei das rechte Band durch das Knopfloch<br />
nach außen führen. Bänder vorne zur Schleife binden.<br />
C<br />
<strong>TOP</strong><br />
Kanten umsteppen<br />
Finish edges<br />
Plier et piquer les bords sur l‘envers<br />
Zugabe zuerst an den oberen schrägen Kanten umbügeln, ein- First press allowances on each upper angled edge to wrong side, Plier d‘abord le surplus des bords obliques supérieurs sur<br />
schlagen, fesheften und schmal feststeppen. Dann die Zugabe der turn raw edges under, and baste. Edgestitch these allowances in l‘envers, remplier, repasser, les bâtir et piquer au ras des bords. Puis<br />
unteren schrägen Kanten genauso feststeppen.<br />
place. Then finish lower angled edges in same manner.<br />
fixer de même le surplus des bords obliques inférieurs.<br />
Neck edge / casing for band<br />
Finish edge of allowance on neck edge. Press this allowance to<br />
wrong side, baste, and press. Topstitch ½" (1.2 cm) from neck edge,<br />
thereby catching the allowance and forming the casing.<br />
Tie band (piece 9)<br />
Press bias strip for tie band as described and illustrated for step 1.<br />
Press bias strip in half lengthwise, wrong side facing in. Pin fold<br />
edges together and edgestitch together.<br />
Pull tie band into neck edge casing, using a safety pin as bodkin<br />
(11a). Knot ends of tie band.<br />
Stitch tie bands (piece 10) as described and illustrated for step 11.<br />
Stitch one end of each tie band to inside of side corner, as illustrated,<br />
turning end of band under.<br />
Knot remaining ends of tie bands.<br />
Left buttonhole<br />
From the remaining fabric, cut a rectangle, approx. 1⅝" x 2¼" (4 cm x<br />
5.5 cm). Press all edges of this piece to wrong side, ⅜" (1 cm) wide.<br />
Baste fabric piece to inner side of left half of top, as marked, and<br />
edgestitch in place. Work BUTTONHOLE.<br />
Put on top as illustrated and run the right tie band to the outside,<br />
through the buttonhole. Tie bands in bow in front.<br />
C<br />
<strong>TOP</strong><br />
Encolure / coulisse<br />
Surfiler le surplus le long de l‘encolure, le plier sur l‘envers, repasser.<br />
Surpiquer l‘encolure à 1,2 cm du bord, fixer aussi le surplus.<br />
Ruban (pièce 9)<br />
Plier et repasser le biais pour le ruban selon paragraphe et croquis 1.<br />
Plier le biais en deux dans la longueur, repasser, l‘envers à l‘intérieur.<br />
Epingler les bords ensemble et piquer le biais au ras des bords.<br />
Enfiler le ruban avec une épingle à nourrice dans la coulisse de<br />
l‘encolure (fig. 11a). Nouer les extrémités du ruban.<br />
Piquer les liens (pièce 10) comme au paragraphe et au croquis 11.<br />
Remplier une extrémité de chaque lien et la piquer selon le croquis<br />
à l‘intérieur sur un coin latéral du top.<br />
Nouer l‘autre extrémité du lien.<br />
Boutonnière à gauche<br />
Dans la chute de tissu, découper un rectangle d‘env. 4 cm x 5,5 cm.<br />
Plier les bords de 1 cm sur l‘envers, repasser.<br />
Bâtir ce rectangle de tissu selon le tracé à l‘intérieur sur la moitié<br />
gauche du top, le piquer au ras des bords. Exécuter la BOUTONNIERE.<br />
Enfiler le top selon la photo, enfiler le lien droit dans la boutonnière<br />
pour le ramener sur l‘endroit du top. Nouer les liens sur le devant.<br />
9468 / 2