Produktkatalog Catalogue of Products - Daume Regelarmaturen ...
Produktkatalog Catalogue of Products - Daume Regelarmaturen ...
Produktkatalog Catalogue of Products - Daume Regelarmaturen ...

Erfolgreiche ePaper selbst erstellen
Machen Sie aus Ihren PDF Publikationen ein blätterbares Flipbook mit unserer einzigartigen Google optimierten e-Paper Software.
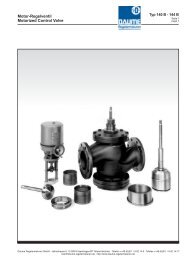
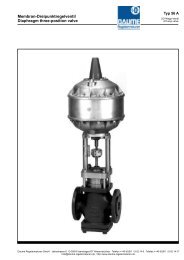
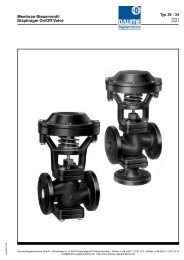
Einbauhinweise<br />
Neue Rohrleitungen sind zu reinigen. Das Medium muß in Pfeilrichtung<br />
strömen. Das Ventil kann senkrecht stehend oder<br />
waagerecht eingebaut werden. Hierbei müssen die Adapterplatte<br />
(18.1) und der Flansch (157) über einander liegen.<br />
Eventuell Antrieb um 90° drehen.<br />
Dazu Kupplung (16) und Nutmutter (14) lösen, den Antrieb<br />
anheben und so weit drehen, bis die Spannhülse (15) in die<br />
nächste um 90° versetzte Bohrung einrastet. Die Nutmutter (14)<br />
wieder fest anziehen und die Kupplung (16) anschrauben.<br />
Wartung<br />
Alle Übertragungsteile im Antriebsgehäuse sind von einer Dauer<br />
fettfüllung umgeben und ebenso wie das Zahnriemenvorgelege<br />
wartungsfrei.<br />
Auswechseln der Lippendichtungsringe (12)<br />
Dazu das Ventil in die Mittelstellung fahren, Innensechskantschrauben<br />
aus der Kupplung (16) herausschrauben und diese<br />
abnehmen. Den Abstand zwischen den beiden Spindelenden<br />
genau messen, (wichtig für die Wiedereinstellung des Hubes) und<br />
die Spindel (19) nach unten drücken. Danach die Überwurfmutter<br />
(13) abschrauben. Die Stopfbuchsinnenteile werden dann von der<br />
Feder nach oben gedrückt und können auf ihren Zustand<br />
untersucht und ggf. ersetzt werden. Dazu nach Entfernen der alten<br />
Packung den Stopfbuchsinnenraum sorgfältig säubern und die<br />
neue Packung vorsichtig über die Spindel einführen.<br />
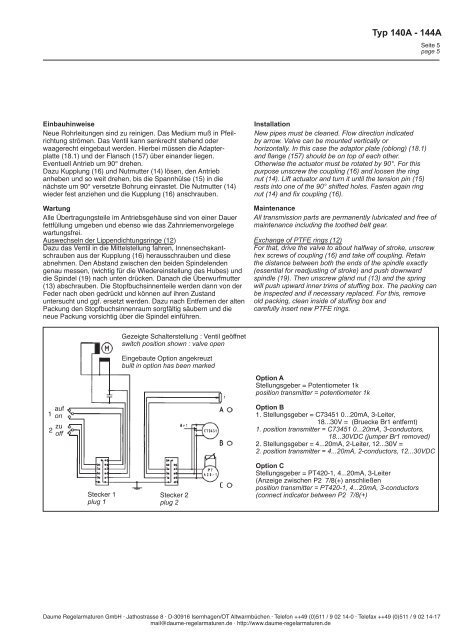
1 auf<br />
on<br />
zu<br />
2<br />
<strong>of</strong>f<br />
Stecker 1<br />
plug 1<br />
Gezeigte Schalterstellung : Ventil geöffnet<br />
switch position shown : valve open<br />
Eingebaute Option angekreuzt<br />
built in option has been marked<br />
Stecker 2<br />
plug 2<br />
Typ 140A - 144A<br />
Installation<br />
New pipes must be cleaned. Flow direction indicated<br />
by arrow. Valve can be mounted vertically or<br />
horizontally. In this case the adaptor plate (oblong) (18.1)<br />
and flange (157) should be on top <strong>of</strong> each other.<br />
Otherwise the actuator must be rotated by 90°. For this<br />
purpose unscrew the coupling (16) and loosen the ring<br />
nut (14). Lift actuator and turn it until the tension pin (15)<br />
rests into one <strong>of</strong> the 90° shifted holes. Fasten again ring<br />
nut (14) and fix coupling (16).<br />
Seite 5<br />
page 5<br />
Maintenance<br />
All transmission parts are permanently lubricated and free <strong>of</strong><br />
maintenance including the toothed belt gear.<br />
Exchange <strong>of</strong> PTFE rings (12)<br />
For that, drive the valve to about halfway <strong>of</strong> stroke, unscrew<br />
hex screws <strong>of</strong> coupling (16) and take <strong>of</strong>f coupling. Retain<br />
the distance between both the ends <strong>of</strong> the spindle exactly<br />
(essential for readjusting <strong>of</strong> stroke) and push downward<br />
spindle (19). Then unscrew gland nut (13) and the spring<br />
will push upward inner trims <strong>of</strong> stuffing box. The packing can<br />
be inspected and if necessary replaced. For this, remove<br />
old packing, clean inside <strong>of</strong> stuffing box and<br />
carefully insert new PTFE rings.<br />
Option A<br />
Stellungsgeber = Potentiometer 1k<br />
position transmitter = potentiometer 1k<br />
Option B<br />
1. Stellungsgeber = C73451 0...20mA, 3-Leiter,<br />
18...30V = (Bruecke Br1 entfernt)<br />
1. position transmitter = C73451 0...20mA, 3-conductors,<br />
18...30VDC (jumper Br1 removed)<br />
2. Stellungsgeber = 4...20mA, 2-Leiter, 12...30V =<br />
2. position transmitter = 4...20mA, 2-conductors, 12...30VDC<br />
Option C<br />
Stellungsgeber = PT420-1, 4...20mA, 3-Leiter<br />
(Anzeige zwischen P2 7/8(+) anschließen<br />
position transmitter = PT420-1, 4...20mA, 3-conductors<br />
(connect indicator between P2 7/8(+)<br />
<strong>Daume</strong> <strong>Regelarmaturen</strong> GmbH · Jathostrasse 8 · D-30916 Isernhagen/OT Altwarmbüchen · Telefon ++49 (0)511 / 9 02 14-0 · Telefax ++49 (0)511 / 9 02 14-17<br />
mail@daume-regelarmaturen.de · http://www.daume-regelarmaturen.de