SERVICE MANUAL SERIES 320 XR - Precisa
SERVICE MANUAL SERIES 320 XR - Precisa
SERVICE MANUAL SERIES 320 XR - Precisa
- Keine Tags gefunden...

Sie wollen auch ein ePaper? Erhöhen Sie die Reichweite Ihrer Titel.
YUMPU macht aus Druck-PDFs automatisch weboptimierte ePaper, die Google liebt.
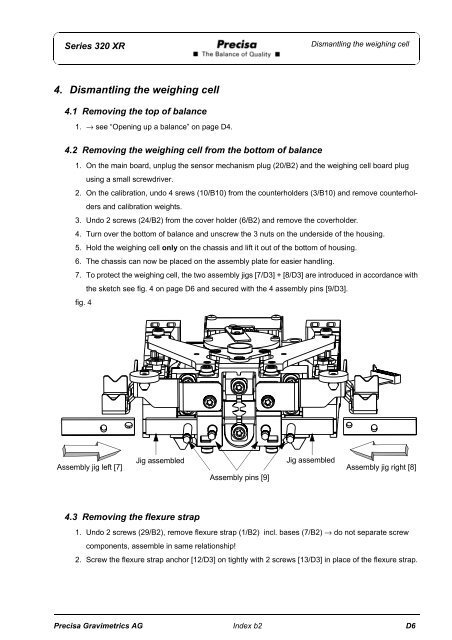
Series <strong>320</strong> <strong>XR</strong>Dismantling the weighing cell4. Dismantling the weighing cell4.1 Removing the top of balance1. → see “Opening up a balance” on page D4.4.2 Removing the weighing cell from the bottom of balance1. On the main board, unplug the sensor mechanism plug (20/B2) and the weighing cell board plugusing a small screwdriver.2. On the calibration, undo 4 srews (10/B10) from the counterholders (3/B10) and remove counterholdersand calibration weights.3. Undo 2 screws (24/B2) from the cover holder (6/B2) and remove the coverholder.4. Turn over the bottom of balance and unscrew the 3 nuts on the underside of the housing.5. Hold the weighing cell only on the chassis and lift it out of the bottom of housing.6. The chassis can now be placed on the assembly plate for easier handling.7. To protect the weighing cell, the two assembly jigs [7/D3] + [8/D3] are introduced in accordance withthe sketch see fig. 4 on page D6 and secured with the 4 assembly pins [9/D3].fig. 4Jig assembledJig assembledAssembly jig left [7] Assembly jig right [8]Assembly pins [9]4.3 Removing the flexure strap1. Undo 2 screws (29/B2), remove flexure strap (1/B2) incl. bases (7/B2) → do not separate screwcomponents, assemble in same relationship!2. Screw the flexure strap anchor [12/D3] on tightly with 2 screws [13/D3] in place of the flexure strap.<strong>Precisa</strong> Gravimetrics AG Index b2 D6