SERVICE MANUAL SERIES 320 XR - Precisa
SERVICE MANUAL SERIES 320 XR - Precisa
SERVICE MANUAL SERIES 320 XR - Precisa
- Keine Tags gefunden...
Sie wollen auch ein ePaper? Erhöhen Sie die Reichweite Ihrer Titel.
YUMPU macht aus Druck-PDFs automatisch weboptimierte ePaper, die Google liebt.
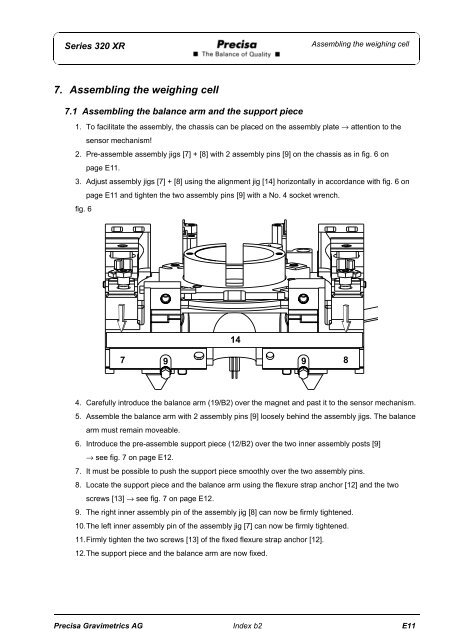
Series <strong>320</strong> <strong>XR</strong>Assembling the weighing cell7. Assembling the weighing cell7.1 Assembling the balance arm and the support piece1. To facilitate the assembly, the chassis can be placed on the assembly plate → attention to thesensor mechanism!2. Pre-assemble assembly jigs [7] + [8] with 2 assembly pins [9] on the chassis as in fig. 6 onpage E11.3. Adjust assembly jigs [7] + [8] using the alignment jig [14] horizontally in accordance with fig. 6 onpage E11 and tighten the two assembly pins [9] with a No. 4 socket wrench.fig. 61479984. Carefully introduce the balance arm (19/B2) over the magnet and past it to the sensor mechanism.5. Assemble the balance arm with 2 assembly pins [9] loosely behind the assembly jigs. The balancearm must remain moveable.6. Introduce the pre-assemble support piece (12/B2) over the two inner assembly posts [9]→ see fig. 7 on page E12.7. It must be possible to push the support piece smoothly over the two assembly pins.8. Locate the support piece and the balance arm using the flexure strap anchor [12] and the twoscrews [13] → see fig. 7 on page E12.9. The right inner assembly pin of the assembly jig [8] can now be firmly tightened.10.The left inner assembly pin of the assembly jig [7] can now be firmly tightened.11.Firmly tighten the two screws [13] of the fixed flexure strap anchor [12].12.The support piece and the balance arm are now fixed.<strong>Precisa</strong> Gravimetrics AG Index b2 E11


