MapInfo Spatial Server Web Map Service - Product Documentation ...
MapInfo Spatial Server Web Map Service - Product Documentation ...
MapInfo Spatial Server Web Map Service - Product Documentation ...
Create successful ePaper yourself
Turn your PDF publications into a flip-book with our unique Google optimized e-Paper software.
Accessing the <strong>Web</strong> <strong>Map</strong> <strong>Service</strong> From Within <strong><strong>Map</strong>Info</strong> Professional<br />
Accessing the <strong>Web</strong> <strong>Map</strong> <strong>Service</strong> From Within<br />
<strong><strong>Map</strong>Info</strong> Professional<br />
You can access the <strong><strong>Map</strong>Info</strong> <strong>Spatial</strong> <strong>Server</strong> <strong>Web</strong> <strong>Map</strong> <strong>Service</strong> from within <strong><strong>Map</strong>Info</strong> Professional. For<br />
more information, refer to the topic entitled Enhancing <strong>Map</strong> Data Using a <strong>Web</strong> <strong>Map</strong> <strong>Service</strong> in the <strong><strong>Map</strong>Info</strong><br />
Professional online help.<br />
Adding a WMS <strong>Server</strong> in <strong><strong>Map</strong>Info</strong> Professional<br />
16<br />
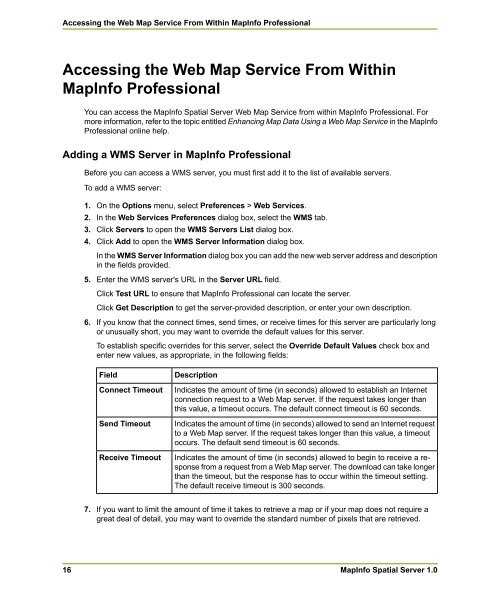
Before you can access a WMS server, you must first add it to the list of available servers.<br />
To add a WMS server:<br />
1. On the Options menu, select Preferences > <strong>Web</strong> <strong>Service</strong>s.<br />
2. In the <strong>Web</strong> <strong>Service</strong>s Preferences dialog box, select the WMS tab.<br />
3. Click <strong>Server</strong>s to open the WMS <strong>Server</strong>s List dialog box.<br />
4. Click Add to open the WMS <strong>Server</strong> Information dialog box.<br />
In the WMS <strong>Server</strong> Information dialog box you can add the new web server address and description<br />
in the fields provided.<br />
5. Enter the WMS server's URL in the <strong>Server</strong> URL field.<br />
Click Test URL to ensure that <strong><strong>Map</strong>Info</strong> Professional can locate the server.<br />
Click Get Description to get the server-provided description, or enter your own description.<br />
6. If you know that the connect times, send times, or receive times for this server are particularly long<br />
or unusually short, you may want to override the default values for this server.<br />
To establish specific overrides for this server, select the Override Default Values check box and<br />
enter new values, as appropriate, in the following fields:<br />
Field<br />
Connect Timeout<br />
Send Timeout<br />
Receive Timeout<br />
Description<br />
Indicates the amount of time (in seconds) allowed to establish an Internet<br />
connection request to a <strong>Web</strong> <strong>Map</strong> server. If the request takes longer than<br />
this value, a timeout occurs. The default connect timeout is 60 seconds.<br />
Indicates the amount of time (in seconds) allowed to send an Internet request<br />
to a <strong>Web</strong> <strong>Map</strong> server. If the request takes longer than this value, a timeout<br />
occurs. The default send timeout is 60 seconds.<br />
Indicates the amount of time (in seconds) allowed to begin to receive a response<br />
from a request from a <strong>Web</strong> <strong>Map</strong> server. The download can take longer<br />
than the timeout, but the response has to occur within the timeout setting.<br />
The default receive timeout is 300 seconds.<br />
7. If you want to limit the amount of time it takes to retrieve a map or if your map does not require a<br />
great deal of detail, you may want to override the standard number of pixels that are retrieved.<br />
<strong><strong>Map</strong>Info</strong> <strong>Spatial</strong> <strong>Server</strong> 1.0


