DOMINO Panel Formwork - Peri
DOMINO Panel Formwork - Peri
DOMINO Panel Formwork - Peri

Create successful ePaper yourself
Turn your PDF publications into a flip-book with our unique Google optimized e-Paper software.
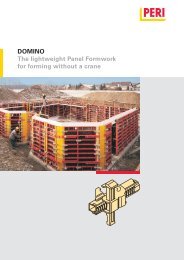
<strong>DOMINO</strong> <strong>Panel</strong> <strong>Formwork</strong><br />
A12 Stopend <strong>Formwork</strong><br />
Stopend panel reinforcement<br />
with and without water<br />
bar<br />
H = 2.50 m and 1.25 m<br />
Consisting of:<br />
– 2 x Outside Pieces AT 3 (56) for approx.<br />
2.5 cm concrete cover or 2 x AT 5 for<br />
approx. 5 cm concrete covering<br />
– 1 x Centre Piece MTF (57)<br />
(Fig. A12.02)<br />
The rubber lip (56.1) allows a continuous<br />
reinforcement thickness of 16 mm.<br />
Assembly without water bar<br />
1. Position primary formwork.<br />
2. Attach Outside Piece AT (56) by<br />
means of Alignment Coupler DRS (20).<br />
3. Install first layer of reinforcement.<br />
4. Place Centre Piece MT (57) in position.<br />
5. Install second layer of reinforcement.<br />
6. Position closing formwork.<br />
7. Install second Outside Piece AT (56)<br />
in Centre Piece MT.<br />
8. Fix with Alignment Coupler DRS (20).<br />
(Fig. A12.03)<br />
22<br />
56.1<br />
Fig. A12.02<br />
20<br />
Fig. A12.03<br />
57 MTF<br />
56 AT<br />
56 57<br />
56.1<br />
16 mm<br />
56 57<br />
MTF<br />
AT<br />
16 mm<br />
DM 75<br />
Concrete cover c:<br />
d - b<br />
c = - Ø<br />
2<br />
c<br />
c<br />
b<br />
c<br />
c<br />
b<br />
DM 75<br />
Reinforcement<br />
d<br />
d<br />
Assembly Instructions for Standard Configuration