Bedienungsanleitung Graupner JR mx-12 (englische Version) - ROKE
Bedienungsanleitung Graupner JR mx-12 (englische Version) - ROKE
Bedienungsanleitung Graupner JR mx-12 (englische Version) - ROKE

Create successful ePaper yourself
Turn your PDF publications into a flip-book with our unique Google optimized e-Paper software.
Function mode AIRPLANE<br />
Fail Safe<br />
Accessing the Programmable Mixing Function<br />
1. Place the transmitter switch in the ON position.<br />
2. Press the Down and Select keys simultaneously<br />
to enter the Function mode.<br />
3. Press either the Up or Down key until MIX 1<br />
appears in the LCD.<br />
Selecting the Master and Slave Mixing Channels<br />
4. Press the (+) or (-) keys to select the master chan-<br />
nel.<br />
5. Press the Select key to move the cursor to the<br />
slave channel position.<br />
6. Press the (+) or (-) keys to select the slave channel.<br />
7. Press the Select key once. The display will conti-<br />
nue to show the current mixing channels at the<br />
top of the LCD, but now an arrow will indicate the<br />
current stick position (master) to be adjusted.<br />
Setting the Mixing Values<br />
8. While holding the master stick in the direction you<br />
want to mix, press the (+) or (-) keys to increase or<br />
decrease the mixing value for the slave channel. The<br />
value in the LCD will change to display the current<br />
mix value selected. Next, hold the master stick to the<br />
other side to adjust the mix for the other direction.<br />
Setting the Mixing Switch Activation<br />
9. Press the Select key until the SW is highlighted.<br />
The LCD with “ALWAYS ON“ indicates the current<br />
switch that this mix is currently selected to always be<br />
active (ON).<br />
Mixing Operation and Switches<br />
Each mixing program can be turned on and off by a<br />
lever or switch. The levers and switches that can be<br />
selected for program mixing are tabulated at the right<br />
with their abbreviations appearing on the displayand<br />
their corresponding positions.<br />
24 Function mode AIRPLANE<br />
Setting the Mixing Channel Offset<br />
1. Press the Select key until offset is highlighted. The<br />
display will show the current mixing channels at the<br />
top of the LCD, with the word “OFFSET“ in the<br />
center of the LCD. The value to the right is the<br />
mixing Offset neutral point, currently 0.<br />
2. A new value for the offset can be selected using the<br />
(+) or (-) keys. This is the new neutral point for the<br />
slave channel (Point that the mix is activated). Press<br />
the Clear key to reset the value back to 0.<br />
3. Press the Down and Select keys simultaneously<br />
to exit the Programmable Mix function.<br />
With a little practice, programmable mixing will become<br />
easier to understand. Mixing is inly limited by your<br />
imagination.<br />
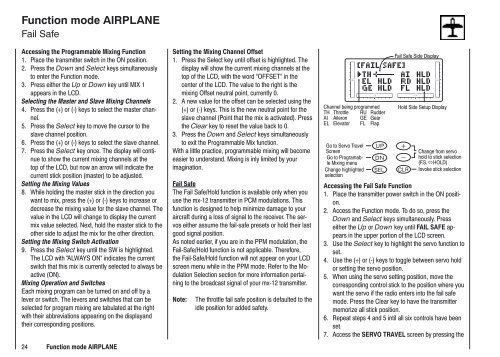
Fail Safe<br />
The Fail Safe/Hold function is available only when you<br />
use the <strong>mx</strong>-<strong>12</strong> transmitter in PCM modulations. This<br />
function is designed to help minimize damage to your<br />
aircraft during a loss of signal to the receiver. The servos<br />
either assume the fail-safe presets or hold their last<br />
good signal position.<br />
As noted earlier, if you are in the PPM modulation, the<br />
Fail-Safe/Hold function is not applicable. Therefore,<br />
the Fail-Safe/Hold function will not appear on your LCD<br />
screen menu while in the PPM mode. Refer to the Modulation<br />
Selection section for more information pertaining<br />
to the broadcast signal of your <strong>mx</strong>-<strong>12</strong> transmitter.<br />
Note: The throttle fail safe position is defaulted to the<br />
idle position for added safety.<br />
Channel being programmed<br />
TH Throttle RU Rudder<br />
AI Aileron GE Gear<br />
EL Elevator FL Flap<br />
Go to Servo Travel<br />
Screen<br />
Go to Programable<br />
Mixing menu<br />
Change highlighted<br />
selection<br />
Fail Safe Side Display<br />
Hold Side Setup Display<br />
Change from servo<br />
hold to stick selection<br />
(F.S.HOLD)<br />
Invoke stick selection<br />
Accessing the Fail Safe Function<br />
1. Place the transmitter power switch in the ON positi-<br />
on.<br />
2. Access the Function mode. To do so, press the<br />
Down and Select keys simultaneously. Press<br />
either the Up or Down key until FAIL SAFE ap-<br />
pears in the upper portion of the LCD screen.<br />
3. Use the Select key to highlight the servo function to<br />
set.<br />
4. Use the (+) or (-) keys to toggle between servo hold<br />
or setting the servo position.<br />
5. When using the servo setting position, move the<br />
corresponding control stick to the position where you<br />
want the servo if the radio enters into the fail safe<br />
mode. Press the Clear key to have the transmitter<br />
memorize all stick position.<br />
6. Repeat steps 4 and 5 intil all six controls have been<br />
set.<br />
7. Access the SERVO TRAVEL screen by pressing the