

TC-L42U5X
TC-L42U5X
TC-L42U5X

You also want an ePaper? Increase the reach of your titles
YUMPU automatically turns print PDFs into web optimized ePapers that Google loves.
After this item is processed then the DUT needs to be powered off then AC powered off.<br />
5) Full power<br />
This is for power consumption testing.<br />
To measure the maximum power consumption of TV set, we adjust the value of following items to<br />
maximum.<br />
- Video: Contrast maximum value, Brightness maximum value, Backlight maximum value.<br />
- Audio: Volume maximum value, Bass default value, Treble default value.<br />
Press enter key to turn on Full Power and OSD stay display until press enter key to recover from Full<br />
Power<br />
6) Source Calibration<br />
Source Calibration (gain/offset) must be adjusted color by firmware automatic adjustment in PC,<br />
Composite and Component input source.<br />
This item will have a result dialog “OK” or “NG”.<br />
7) Reset to Default<br />
Reset all settings of OSD menu to default value.<br />
- Reset settings: Channel table, Model table (H/V Position, Clock, Phase), Source dependent setting<br />
(Contrast, Brightness etc.), Common setting (Volume, Language etc.), Parental Control (Rating,<br />
Password etc), Closed Caption.<br />
8) RF Burn In<br />
Use “snow” pattern for burn in. Selected items are “On” and “Off”.<br />
While turn on burn in mode, firmware will automatically turn off “Auto power off” function.<br />
If there is no power supply suddenly, firmware will re-enter burn in mode automatically when power<br />
supply is back<br />
Pressed the “Power” key, firmware will automatically turn off burn in mode.<br />
Burn in mode: Source is “ANT/Cable" and channel is NTSC channel 3.<br />
9) USB F/W Upgrade<br />
Upgrade firmware through USB.<br />
10) UART Enable<br />
Enable to communicate with Auto-Alignment system.<br />
11) Bypass Gamma<br />
For factory test value of gamma.<br />
(6) Performance check<br />
6-1 TV function<br />
Connect RF to the center signal source, enter Channel menu → auto tuning, check if there are channels be<br />
skipped, check if the picture and speaker are normal.<br />
6-2 AV terminals<br />
Input Video signal, check if the picture and sound are normal.<br />
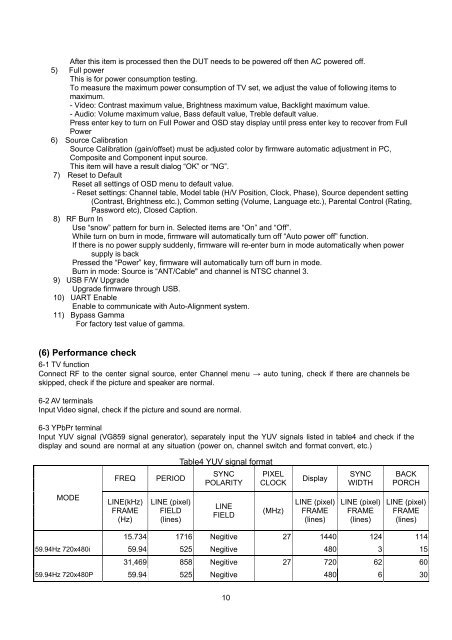
6-3 YPbPr terminal<br />
Input YUV signal (VG859 signal generator), separately input the YUV signals listed in table4 and check if the<br />
display and sound are normal at any situation (power on, channel switch and format convert, etc.)<br />
MODE<br />
FREQ PERIOD<br />
LINE(kHz)<br />
FRAME<br />
(Hz)<br />
LINE (pixel)<br />
FIELD<br />
(lines)<br />
Table4 YUV signal format<br />
SYNC<br />
POLARITY<br />
LINE<br />
FIELD<br />
10<br />
PIXEL<br />
CLOCK<br />
(MHz)<br />
Display<br />
LINE (pixel)<br />
FRAME<br />
(lines)<br />
SYNC<br />
WIDTH<br />
LINE (pixel)<br />
FRAME<br />
(lines)<br />
BACK<br />
PORCH<br />
LINE (pixel)<br />
FRAME<br />
(lines)<br />
15.734 1716 Negitive 27 1440 124 114<br />
59.94Hz 720x480i 59.94 525 Negitive 480 3 15<br />
31,469 858 Negitive 27 720 62 60<br />
59.94Hz 720x480P 59.94 525 Negitive 480 6 30


